Gilson Company, Inc.
Micro-Deval Apparatus: MD-2000, MD-2000C & MD-2000F
Page 6
6.0 INITIAL FUNCTION CHECK:
Prior to its first use, the MD-2000 should be put through a short
series of functional checks to confirm proper operation.
To check for proper operation in the
Timer Mode:
• DO NOT place jars in the machine yet.
• Following the controller instructions above, input a short
test time into the timer; 1 or 2 minutes is sufficient.
• Close the doors as detailed above; bottom door first
then the latching top door.
• Press the Green <START> button on the front panel to
activate the drive motor and check to see that the rear
roller in the top and bottom set are spinning smoothly.
• Allow the timer to count down and stop the machine.
To check for proper operation in the
Revolutions Mode:
• First, set the controller to revolutions mode as instructed
above.
• DO NOT place jars in the machine yet.
NOTE: For purposes of this first run with no jars,
use any small number. With no jars in place, the
encoder will not operate the counter.
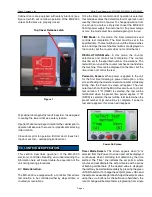
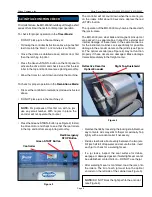
• Press the Green <START> button (see Figure 2) to start
the drive motor and check to see that the rear rollers
in the top and bottom are spinning smoothly.
The controller will not count down when there are no jars
on the rollers. After about 30 seconds, depress the red
<STOP> button.
The operation of the MD-2000 may now be checked with
the jars in-place.
The MD-2000 jars, steel balls and magnetic pickup tool
are packed in a separate box. Inspect for external and
internal damage of these items in the same manner as
for the instrument cabinet. Look specifically for possible
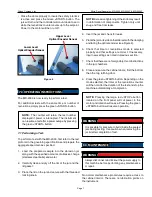
damage to the encoder decals on the jar lids (see Figure
3). The optical encoder (see Figure 4) may not function
properly if these decals are damaged. Make damage
claims immediately to the freight carrier.
• Remove the lids by loosening the locking knob. Remove
any contents. Lids may stick to the jar occasionally. Tap
lightly with a wooden mallet if necessary.
• Divide steel balls about evenly between the two jars.
Fill jars half full of tap water and secure the lids. Invert
each jar to check for a watertight seal.
• If a jar leaks, inspect the seal surface for debris,
warpage or damaged gasket. If watertight seal cannot
be established, contact Gilson – DO NOT use the jar.
• After watertight seal is confirmed, load the jars onto
the rollers. The lid of each jar must face the optical
encoder on the left side of the cabinet (see Figure 5).
NOTE: DO NOT block the light path to the encoder
(see Figure 4).
Figure 2
Controller
Green START Button
Red Emergency
STOP Button
Figure 3
Reflective Decal for
Optical Encoder
Right Top-Dustshield

