background image


SPECIAL TOOLS    2 


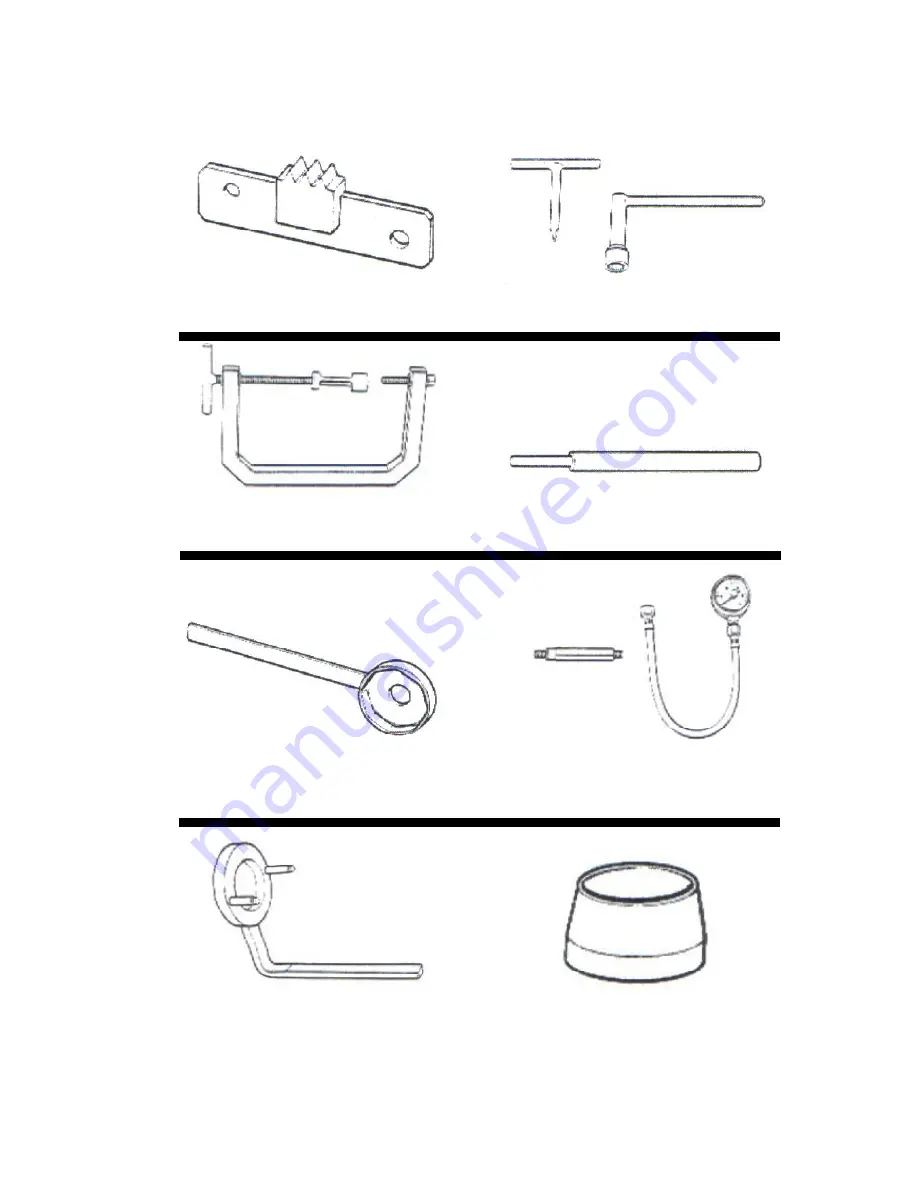
Mounted flywheel blocking tool 

19.1.20521 

Oil seal installation sleeve 

19.1.20525 

2.3 

Oil filter removal spanner 

19.1.20520 

Compression check tool 

19.1.20524 

Valve spring compression tool 

19.1.20519 

Valve guide extraction/installation punch 

19.1.20523 

Drive gear blocking tool 

19.1.20515 

Valve clearance adjustment tool 

19.1.20522 

Содержание Nordwest

Страница 1: ...WORKSHOP MANUAL NORDWEST Nordcape in Germany ...

Страница 2: ...ribed from original Piaggio Gilera manuals there is included a section on the various known faults with which the Nordwest RC600 is prone to suffer Whilst these faults were obviously not included in the original official manuals we believed they should be a part of any publication dealing with Nordwest RC600 maintenance At the very rear of the manual are 5 pages of additional information which hav...

Страница 3: ...utch Primary drive Oil pump Crankcase Gearbox Crankshaft components FRAMES Working procedures Front Wheel Front suspension Steering Rear Suspension Rear wheel Brakes ELECTRICAL SYSTEM Battery Charging circuit Ignition system Electric starter Switches Horn Lights Trouble shooting Circuit diagram ADDITIONAL INFORMATION Not included in original manual Section 1 2 3 4 5 6 7 8 9 10 11 12 13 14 15 16 17...

Страница 4: ...ON 1 SUB INDEX Known faults Safety procedures Maintenance procedures Model Identification Technical data Engine overhaul data Torque wrench settings Cables and wire passage Section Page 1 1 1 2 1 2 1 2 1 3 1 4 1 5 1 6 1 ...

Страница 5: ...rews and refit one at a time loosely They must go in without the panel having to be stretched If they will not go in enlarge the holes slightly then all should fit Nose crews first then tank screws then the big screws in the middle of the panel After 228 70862 a revised system of fixing the tank panels was used to stop the cracking To update an older bike Screws only in the rear fixings to the tan...

Страница 6: ...hat the teeth of the pawl didn t engage on the dogs of the selector drum and the edges of the teeth weren t square to it s plane Pawl part no 321536 Spring part no 321176 Gasket part no 947243 The pawl can be replaced once the left hand engine cover has been removed To do this you will need an alternator puller As you will need one of these to change the cam belt anyway it could be well worth whil...

Страница 7: ...ulley marks are in the correct place If OK fit the tensioner and torque the nut to 28 30 Nm You can use an OHP overhead projector pen or similar to make marks on the belt and cam wheels Then you can transfer the marks to the new belt when the old one is removed Double check by counting the teeth on the belt If the wheels move out of line you can simply re align to the marks on the new belt The ten...

Страница 8: ...l bikes based on the 4 valve OHC single use the same type of front sprocket and 520 chain Nordwest 14 front part no 328016 43 rear part no 946060 Rear sprocket is dished not flat 5 bolt fixing 108 links Brake fluid ALL hydraulic brakes on Gilera bikes use DOT 4 Nordwest speedo cable One from an XJ900 or an RD125LC or even an RC600 can be used but you might need to adjust the routing of the cable S...

Страница 9: ... in the end of the fork leg loosen this nut by tapping the spanner sharply Once the nut is removed the two halves of the fork leg can be separated but first remove the dust seal and the spring ring underneath then hold the bottom of the lower leg in a vice and knock the seals out by pulling the top leg up sharply Fit the new seals etc with the special tool which will ensure it all goes in straight...

Страница 10: ...d in front of the bike and grip the bottom of the fork legs Pull and push there should be no free play at the head stock If there is movement you need to tighten the races You may not be able to feel any free play but as a double check get someone else to pull and push whilst you put your finger half on the bottom yoke and half on the head stock You will be able to feel the smallest movement Adjus...

Страница 11: ... easily and straight If you have to change the races the difficult bits are getting the bottom inner race off the stem and getting the outer races out of the steering head There are tools designed to do the job and a local repair shop MAY lend hire them to you Otherwise you ll need a long punch which you can put through the head stock and tap the race out first one side then the other a little at ...

Страница 12: ... PROCEDURES Always use original Gilera spare parts and recommended lubricants The use on non original parts or parts not conforming to Gilera specifications may result in damage to the motorcycle Always use the special tools designed specifically for this motorcycle Always use new gaskets O rings split pins and safety plates when reassembling Always tighten nuts or bolts starting with those of gre...

Страница 13: ...frame and engine The engine serial number and engine size are stamped on the plate fig 1 found at the rear of the engine The carburettor identification number is found on the right side of the carburettor fig 2 The frame serial number is stamped on steering sleeve left side fig 3 Fig 1 Fig 2 Fig 3 1 2 2 ...

Страница 14: ...ve shock absorber Stroke Wheels Front die cast Tyre size Pressure rider only with passenger Rear die cast Tyre size Pressure rider only with passenger Brakes Front floating disc with hydraulic controlled double piston disc diameter disc thickness Rear floating disc with hydraulic controlled single piston disc diameter disc thickness Fuel tank capacity Fuel reserve 2180 mm 800 mm 1180 mm 1415 mm 87...

Страница 15: ...with recirculating pump and by pass thermostat Coolant capacity Air filter paper dry Intake valve diameter Exhaust valve diameter Valve clearance cold between cam and rocker arm intake Exhaust TRANSMISSION Clutch wet multi plate Primary drive Gearbox straight tooth gears and claw couplings Ratios 1st 2nd 3rd 4th 5th Final drive 98 x 74 mm 557 9 cm 10 5 1 10 12 bar 9 11 bar 36 5 kw 49 5hp a at 7250...

Страница 16: ... carburettor info is on the additions page at rear of manual ELECTRICAL SYSTEM Ignition electronic capacitive discharge Ignition timing fixed variable Alternator three phase Battery capacity electric starting Standard spark plug Electrode gap Fuses Starter motor Headlamp Driving lamp Tail stop lamp Turn signal lamp Warning indicator lamp E30PV2A 30 155 48 68 Ø 1 1 5C58 3 Ø 2 60 VOO 4 00 10 5 g 35 ...

Страница 17: ...ts radial clearance Axle rocker arm radial clearance Piston ring gap 1st and 2nd ring scraper ring Rings axial clearance 1st and 2nd ring scraper ring Oil pressure Water thermostat opens at Water fully thermostat opens at Cooling fan enable temperature Valve clearance intake between camshaft rocker arm exhaust between camshaft rocker arm 0 030 0 042 0 030 0 059 0 017 0 060 0 05 0 25 0 15 0 25 0 0 ...

Страница 18: ...switch Thermistore Oil pressure indicator Exhaust pipe clamp screw Frame Engine support front upper rear lower rear cylinder head Lower plate fixing screw Upper plate fixing screw Absorber shock fixing Fork fixing Suspension connecting rod support to frame Connecting rod suspension lever Suspension lever support absorber shock Suspension lever support fork Front disc brake fixing Front brake calli...

Страница 19: ...ng extraction punch 19 1 20506 2 1 Flywheel puller 19 1 20501 Con rod small end bushing installation punch 19 1 20505 Puller for steering bearing lower race 19 1 20109 Camshaft pulley blocking tool 19 1 20504 Sprocket locking wrench 19 1 20086 Camshaft oil ring installation punch 19 1 20503 ...

Страница 20: ...2 Pad for crankshaft and flywheel puller 19 1 20513 Piston support 19 1 20512 Main journal bushing extraction punch 19 1 20507 Main journal bearing extraction ring ignition side 19 1 20511 Main journal bearing installation punch clutch side 19 1 20508 Main journal bearing installation punch ignition side 19 1 20509 ...

Страница 21: ...llation sleeve 19 1 20525 2 3 Oil filter removal spanner 19 1 20520 Compression check tool 19 1 20524 Valve spring compression tool 19 1 20519 Valve guide extraction installation punch 19 1 20523 Drive gear blocking tool 19 1 20515 Valve clearance adjustment tool 19 1 20522 ...

Страница 22: ...ve seats 19 1 20529 Punch 19 1 20566 2 4 Complete roller cage extractor 19 1 20528 Chain slack tool 19 1 20565 Engine support base 19 1 20527 Battery charge density meter 19 1 20564 Engine support 19 1 20526 Pin sliding punch 19 1 20530 ...

Страница 23: ... Exhaust manifold spring removal tool 19 1 20551 Clutch collets tool 19 1 20540 Complete tool kit 19 1 20563 Paioli fork fitting oil seal tool upside down 19 1 20598 Paioli fork disassembling wrench upside down 19 1 20599 ...

Страница 24: ...ession Steering bearings Fairing removal Carburettor ducts removal and checking Carburettor Air filter Spark plug Vacuum system Belt tension Throttle gas control Clutch control Front brake control Rear brake control Drive chain Suspensions Section Page 3 1 3 1 3 1 3 2 3 3 3 3 3 4 3 5 3 5 3 6 3 6 3 6 3 7 3 7 3 7 3 8 3 8 3 8 3 9 ...

Страница 25: ... and adjustment Sprocket brake calliper and disc wheel spindle chain pinion mounting bolts Chain check adjustment lubrication if necessary replace the whole drive Brake pads and blocks check replace if req d Fork oil replacement Fork pivot joint tightening check Steering bearing play check and lubrication Battery charge electrical system efficiency Tyre pressure check X X X X X X X X X X X X X X X...

Страница 26: ...INTENTIONALLY BLANK ...

Страница 27: ...t the oil drain completely Clean and blow out the mesh filter and then remount it and pour 2 litres of oil into the filler cap Check oil level Start the engine then stop it after an idle period of approx 1 minute If necessary add some oil and check for leaks Every two oil changes it is necessary to replace the filter cartridge the correct oil level is reached with 2 2 litres of new oil remove filt...

Страница 28: ...3 1 2 ...

Страница 29: ...urn the flywheel so that the reference marks on the gears of the camshafts are lined up with those on the engine guard and the piston is at TMC fig 36 Check the clearance of all four valves by inserting feeler gauges between the camshafts and the rocker arm fig 37 Valve clearance Intake valve 0 05 mm Exhaust valve 0 10 mm To set clearance loosen the lock nut and turn the adjusting screw to get a s...

Страница 30: ...ot pressure tight Head gasket leak Worn piston or cylinder parts Incorrect adjustment of the decompressor High compression may be caused by Excessive carbon deposits in the combustion chamber or on the crown of ppiston STEERING SLEEVE BEARINGS Place the motorcycle on a support so as to raise the front wheel from the ground Check that the handlebar turns freely from one side to the other If the han...

Страница 31: ...ide the side covers in case in order to facilitate the outlet widen the side covers Front mudguard and under crankcase protection In order to remove the mudguard untighten the 8 screws D 4 for each side fixing the fork stand to the mudguard then remove the mudguard Loosen and remove the five screws E fixing the fork stand cover to the fork Small side cover rear mudguard and rear end protection Rem...

Страница 32: ...g the fixing screws B Check that each float C is not damaged Check that each needle valve housing D is not worn or damaged Remove and clean by means of compressed air all the jets Place all jets on the carburettor Fit the float chambers Fit the carburettor and the intake sleeves as well as the air filter box clamps Fit the fuel tank Fit the side covers and the saddle Check the choke the idle RPM a...

Страница 33: ...embly SPARK PLUG Disconnect the spark plug protection and remove it Check carefully the protection and if the insulating material is cracked or bro ken replace it Using a feeler gauge measure the electrodes gap and in case adjust by bending the external electrode Electrode gap 0 6 0 7 mm Suitable spark plug Champion RA4HC Assure that the sealing washer is not damaged Fit the spark plug by hand and...

Страница 34: ...t A to the appropriate torque 28 30 Kgm Warning Never rotate the timing pullies acting on the relevant fixing screws TRANSMISSION Throttle gas cable Assure that the throttle transmission grip rotate freely when steering on both sides Check the grip free play standard ply 4 mm Fig 63 In case restore the correct play by operating on the adjusting screw over the carburettor Clutch The clutch control ...

Страница 35: ...ransmission chain condition must be carried out before every starting and the chain adjusting every 2 000 km In case that the vehicle is used in dusty places the servicing operations have to be carried out more often Chain tension check This operation have to be carried out with unloaded vehicle and in order to check the rim gear excessive eccentricity in vertical position The chain lower side pus...

Страница 36: ...suspension Check the shock absorber and whole suspension unit functioning Ensure that the shock absorber is securely fitted without any damage or leakage In order to lift the rear wheel off the ground place a support under the vehicle In order to check the fork bolt bearings for an eventual wear move the wheel sideways with force In case replace the bearings Tighten all the nuts and bolts to the a...

Страница 37: ...SECTION 4 INTENTIONALLY BLANK 4 ...

Страница 38: ...ENGINE REMOVAL INSTALLATION 5 5 Working procedures Engine removal Engine installation Section Page 5 1 5 2 5 3 ...

Страница 39: ...t a time or place them in separate containers so as to mount them in the same position as prior to disassembly Pay attention to the position of the component prior to removal so as to mount it correctly upon reassembly The timing belt is never to come into contact with oil petrol or grease and is to be handled with clean hands only Avoid bending or twisting the belt Gudgeon pin snap rings gaskets ...

Страница 40: ...move the carburettor to cylinder head intake sleeves securing clamps Disconnect the rear brake pedal Remove the chain pinion protection Remove the chain pinion fig 2 Remove the flywheel cover fig 3 Disconnect the water temperature oil pressure and speed neutral position indicator switch wires Disconnect the engine breather hose Disconnect the clutch cable Remove the engine cooling liquid sleeves L...

Страница 41: ...ame exhaust pipe gasket Tighten the bolts to the appropriate torque Arrange all cables and wiring correctly Carry out the following checks and adjustment Engine oil level Throttle grip free travel Transmission chain Rear brake free travel Electrical system Cooling system Idle speed RPM 5 3 ...

Страница 42: ...GENERATOR TIMING BELT GEARBOX SELECTOR 6 6 Disassembly Inspection Reassembly Valve timing Torque wrench settings Section Page 6 1 6 2 6 2 6 2 6 3 ...

Страница 43: ...ractor 19 1 20501 figs 4 5 6 Pull off the two spring washers and the large guide washer from the crankshaft end Remove the timing belt figs 7 8 Loosen the block side cover mounting bolts and remove cover fig 9 Slide out the gearshift pedal shaft together with selector drum assembly fig 10 Remove selector drum cam central bolt fig 11 Remove crankshaft pinion using extractor 19 1 20514 figs 12 13 Re...

Страница 44: ...6 1 2 ...

Страница 45: ...6 1 3 ...

Страница 46: ...that in the rest position either extremity of the lever is at the same distance to the drum s adjacent drag grain Adjustment is made by turning the cam screw on the lever after having loosened the lock nut VALVE TIMING Put piston at TDC indicated by aligning the reference mark on the generator rotor with the fixed mark as shown in fig 18 Place the camshafts with their reference marks facing as sho...

Страница 47: ...stening bolt lubricate thread with oil Generator rotor fastening bolt lubricate thread with oil Chain sprocket fastening bolt use Loctite 270 Selector cam fastening bolt Tensioner pulley fastening nut 6 3 40 Nm 40 Nm 40 Nm 40 Nm 28 30 Nm ...

Страница 48: ...CYLINDER HEAD VALVETRAIN COMPONENTS 7 7 Diagram Disassembly Inspection Reassembly Torque wrench settings Section Page 7 1 7 2 7 2 7 3 7 3 ...

Страница 49: ...7 1 ...

Страница 50: ...ner bushing fig 6 Remove the cylinder head cover and remove the camshafts with their oil seals figs 7 8 Remove the valve lifter device found on the left hand side of head near the exhaust valve by extracting the retainer pin fig 9 The little shaft together with the lifter may now be dismantled by hand Extract the retainer bushing and intake rocker arm shaft use an 8mm bolt with a 1 25 pitch and re...

Страница 51: ...7 2 2 ...

Страница 52: ...7 2 3 ...

Страница 53: ...excessive wear In the event of valve seat wear resurface by grinding Check that the valve stem is straight Max straightness error allowed 0 01 mm fig 15 The face must be radial with respect to the stem fig 16 Valve seat must be in good shape with no sign of pitting cracking or corrosion Springs After visual inspection of the springs and valves measure the length of each spring with a gauge fig 17 ...

Страница 54: ...7 2 5 ...

Страница 55: ...eals for both valve guides and camshafts for the latter use special tool 19 1 20502 for the former use special tool 19 1 20503 Oil the lip seal before mounting Install the head gasket make sure the correct side is facing up All contact surfaces must be clean and in good condition fig 19 Between head and cylinder there are four rubber anti vibration devises that are Installed after positioning the ...

Страница 56: ...CYLINDER PISTON 8 8 Diagram Disassembly Inspection Reassembly Section Page 8 1 8 2 8 2 8 2 ...

Страница 57: ...8 1 ...

Страница 58: ...ring found around the oil feed line fig 6 INSPECTION After a thorough cleaning of all parts all components must go through a careful visual inspection Replace all parts that show sign of damage and or wear Careful attention goes to cylinder wall piston surfaces rings and gudgeon pin with no signs of scoring deep grooves shrinkage or any other damage Cylinder Measure bore diameter with a micrometer...

Страница 59: ...8 2 2 ...

Страница 60: ...or scaled Verify that it starts to open at 75 C and that it is fully opened at 85 C Check condition of the thermostat s O ring REASSEMBLY Assemble in reverse order of disassembly Pay close attention to the following points Piston rings are installed in a specific order and direction The first two rings are marked with the letters TOP 2 and TOP for the first and second ring re spectively the scrape...

Страница 61: ...8 2 4 ...

Страница 62: ...CLUTCH PRIMARY DRIVE OIL PUMP 9 7 1 5 Diagram Disassembly Inspection Reassembly Torque wrench setting Section Page 9 1 9 2 9 2 9 3 9 3 ...

Страница 63: ...9 1 ...

Страница 64: ... the washer of the mainshaft Slide out both drive and driven gears from the balance shaft fig 11 Remove the spacer washer near the right main bearing fig 9 INSPECTION After a thorough cleaning of all parts inspect all components carefully All those parts that show sign of wear and or damage must be replaced All gears must be in good condition with no sign of wear deep scratches or pitting Clutch T...

Страница 65: ...9 2 2 ...

Страница 66: ...9 2 3 ...

Страница 67: ...In this case the teeth inner surface present a triangular groove Operate in way that the groove is aligned with the balance shaft mark fig 14 Mount the clutch drum by inserting the oil pump pawl guide into its seat The clutch drive plates are installed with the arrow imprinted on the friction material facing out Install the spring washers with the convex side facing out Oil all washers gear mounti...

Страница 68: ...CRANKCASE GEARBOX CRANKSHAFT COMPONENTS 10 10 Diagram Disassembly Inspection Reassembly Torque wrench settings Section Page 10 1 10 2 10 3 10 3 10 3 ...

Страница 69: ...10 1 ...

Страница 70: ...at the end of the gearbox shafts When separating the cases fig 1 check to see if a spacer washer from one of the shafts has fallen out reinstall if necessary Slide out the gear selector fork shaft and remove the forks fig 2 Remove the selector drum balance shaft and the two gear train shafts figs 3 4 5 Remove crankshaft with connecting rod fig 6 Loosen the nuts of the connecting rod caps and remov...

Страница 71: ...10 2 2 ...

Страница 72: ...eplace the wrist pin use special tool 19 1 20506 for removal to install use special tool 19 1 20505 Be careful to align the pin lubrication hole with the one in the small end Connecting rod cap radial gap must be between 0 15 0 25 mm It is recommended to replace connecting rod bolts at every overhaul Note the fitting of the connecting rod cap mount the connecting rod in the same direction it was t...

Страница 73: ...er of disassembly Pay close attention to the following points Crankshaft balance shaft and gears are all mounted in the left crankcase Use Loctite 574 on the contact surface of the two cases The crankshaft thrust ring is installed in the right case with the antifriction surface side facing the shaft and so is the selector drum spacer washer Hold these components in with a little grease Crankshaft ...

Страница 74: ...FRAMES Working procedures Front wheel Front suspension Steering Rear suspension Rear wheel Brakes Section 11 12 13 14 15 ...

Страница 75: ... must be carried out in a precise order mark all components to be removed one at a time or place them in separate containers so as to mount them in the same position as prior to disassembly Pay attention to the position of the component prior to removal so as to mount it correctly upon reassembly Lubricate all moving components prior to assembly Spring washers must always be installed with the con...

Страница 76: ...FRONT WHEEL 12 12 Diagram Disassembly Reassembly Technical data Trouble shooting Section Page 12 1 12 2 12 2 12 3 12 4 ...

Страница 77: ...12 1 ...

Страница 78: ... centering value with a gauge fig 14 Allowable limit Radial variation 2 00 mm Axial variation 2 00 mm Bearing inspection Rotate with a finger each bearing inner race The bearings must turn smoothly and without noise assure that the outer race is correctly housed on wheel hub In case that the bearing races don t turn freely and without noise remove and replace the bearings Brake disc inspection Mea...

Страница 79: ... INSTALLATION Pay attention to don t damage the brake pads when fitting the calliper on brake disc Prior to fit the wheel spindle clean carefully Lightly tighten the nuts securing the spindle caps Tighten the wheel spindle to the appropriate torque After the wheel installation always check the proper brake functioning In order to set the wheel spindle move the brake act on fork up and down for sev...

Страница 80: ...n Bent rim Worn front wheel bearings Damaged tyre Incorrectly torqued wheel spindle Suspension too soft Insufficient fork oil Fork oil too thin Weakened fork springs Suspension too hard Too much fork oil Fork oil too dense Damaged leg or stanchion Noisy front suspension Fork stanchion sticky Insufficient oil in forks Loose front fork bolts Poor braking performance Missing or insufficient brake flu...

Страница 81: ...SUSPENSION STEERING 13 13 Handlebar Steering sleeve Trouble shooting Paioli fork Section Page 13 1 13 2 13 3 13 4 ...

Страница 82: ...ottle grip and on the throttle control box and slide the grip along the handlebar Fit the choke and throttle control on the handlebar Fit the handlebar on the lower supports Fit the upper supports on the handlebar Tighten first the front side bolts then tighten the rear side bolts to the suitable torque Fit the switch on the left side of handlebar by aligning the dowel with the handlebar hole then...

Страница 83: ...ate punch fit the new ring nut In case of road accident check for cracks around the motorcycle steering head By means of the special tool 19 1 20109 remove the lower bearing race from the steering sleeve Using an hydraulic press fit a new bearing Fill with AGIP MU EP 3 grease the bearings housing Install the steering sleeve into its housing then fit the upper bearing Tighten the steering nut Turn ...

Страница 84: ... bearings Defective tyre Wrong tyre pressure Slack and or deformed spokes Slack wheel spindle Incorrect wheel balancing Suspension too soft Insufficient quantity fork oil Fork oil too fluid Weakened fork springs Suspension too stiff Too much quantity fork oil Fork oil too dense Damaged legs or stanchions Noisy front suspension Blocked fork legs Poor quantity of fork oil Loose front fork bolt Poor ...

Страница 85: ...al tool 19 1 20598 press the different components in their housing paying attention that the special tool doesn t push the seal lip Fill the oil see page 1 3 1 Fully tighten the lock nut B then screw the plug A to the torque 2 Kgm Extend completely the fork then screw the plug A on the leg Right side leg mechanical After the parts A and B removal using the special tool 19 1 20599 loosen the plug G...

Страница 86: ...ther with the relevant bushing then install the lock ring Tighten the plug P into the plug Q the inner bushing must slide freely Tighten the plug R paying attention to align the spring pin hole with the hydraulic cartridge hole Z Insert a new spring ring sticking out about 3 4 mm Insert the complete hydraulic cartridge then by means of the appropriate tool screw the plug M Carry out the same opera...

Страница 87: ... REAR SUSPENSION WHEEL 14 14 Troubleshooting Wheel Rear damper Final drive Section Page 14 1 14 1 14 2 14 3 ...

Страница 88: ...bolt bearings Suspension noisy Slack joint links Defective absorber shock leg Worn suspension link bushings WHEEL REMOVAL AND CHECKS Removal By means of an appropriate support lift the motorcycle wheel Loosen the adjusting nuts to the fork end fig 46 Loosen and remove the wheel spindle nut using a rubber hammer Moving forward the spindle remove the chain from the rim then place the chain on fork l...

Страница 89: ...ank for the Nordwest model is without tanks and normally is without any servicing The spring pre load can be adjusted by means of two ring nuts situated on the upper side fig 47 The pre load is calculated for a rider having 70 kg weight 14 2 Technical data Shock absorber Boghe Gas Azota Air Press 15 atm ...

Страница 90: ...arefully the teeth on both the drive and driven sprockets and check the condition of the chain fig 4 Replace any component that shows signs of excessive wear deformation or other damage Chain check This operation must be executed with the motorcycle unloaded placed vertically and repeated for the different wheel positions in order to check driven sprocket runout The lower branch when shifted up ha...

Страница 91: ...for excessive play in the pins and rollers Replace chain if any damage is discovered Lubricate the chain with highly viscous oil AGIP ROTRA SAE 80W 90 upon installation and adjust for proper tension If it becomes necessary to go directly to chain lubrication thereby skipping the above mentioned operations a small amount of oil may be sprayed on the chain temporarily while spinning the wheel Cautio...

Страница 92: ... BRAKES 15 Working procedures Trouble shooting Master cylinder Calliper Disc Pad replacement Section Page 15 1 15 1 15 2 15 3 15 3 15 5 ...

Страница 93: ... fill main cylinder with DOT 4 brake fluid up to the maximum level Put the hydraulic brake system liquid under pressure with either the brake lever or pedal until there are not any bubbles visible in the reservoir small hole and there is sufficient resistance coming from the lever or pedal Use this procedure for all the disc brakes TROUBLESHOOTING Brake pedal is soft or spongy Air in the system Br...

Страница 94: ...id clean the master cylinder inside fluid tank spring and piston Check Check that the master cylinder piston and cylinder don t presents any linings fig 30 Piston outer diameter fig 31 Wear limit allowable 0 05 mm Prior to reassembly check that the seals are not damaged Warning Piston master cylinder body and spring are not available as separate parts Installation Prior to reassembly moisten the p...

Страница 95: ... sliding surfaces on the calliper inner section Pistons check Check that the pistons are not damaged fig 34 Outer diameter fig 35 section 1 technical data Allowable limit 0 05 mm Installation Once removed the pistons seals must always be replaced Prior to reassembly moisten the oil seals using some brake fluid Install the pistons pistons concave ends towards the pads Fit the protection rings payin...

Страница 96: ... 15 4 ...

Страница 97: ...together Warning Always use GILERA original parts Grease on brake linings reduce he brake s performance The procedures are the same for both brakes Remove the upper cover A fig 37 then dismantle the seeger ring B Remove the pin C dismantle the spring D and the pads figs 38 39 15 5 ...

Страница 98: ... BATTERY CHARGING CIRCUIT 16 16 Battery voltage Battery charging Charging circuit Troubleshooting Battery removal Battery installation Section Page 16 1 16 1 16 1 16 2 16 2 16 2 ...

Страница 99: ...the voltmeter indicator must be constant for at least an hour After charging wash the battery with water Periodically check the electrolyte level CHARGING SYSTEM Leakages checks Prior to the regulated voltage check control an eventual current leaks Turn the ignition switch to OFF position Disconnect the battery ground cable Connect the ammeter between the ground cable and the battery negative term...

Страница 100: ...ld not move The same operation must be carried out on the black wire and the positive prod on the white wires always one at a time With efficient diodes the pointer should not move If during the test the ohmmeter s pointer moves this means that the diode considered is short circuited To check if one of the diodes is discontinued repeat same operation being careful to reverse the prods of the ohmme...

Страница 101: ...fig 6 Check for continuity between the wires of the alternator stator rectifier fig 7 Check if there is no continuity on the contrary between the above mentioned stator coil wires and ground figs 8 9 In case of no continuity between the stator coil and rectifier wires or if vice versa in case of continuity between wires and ground the stator itself should be replaced 16 1 3 ...

Страница 102: ... Low voltage with engine on Insufficiently charged battery Malfunction in the charging circuit BATTERY REMOVAL Remove seat Remove the battery securing rubber band Disconnect the battery s negative and then positive terminals Remove the battery Battery inspection Check each element with a hydrometer Specific gravity 1 270 1 290 at 20 C If the specific gravity is under 1 230 the battery must be char...

Страница 103: ... the positive cable to the battery s positive terminal connect the negative cable to the battery s negative terminal Block the battery with securing rubber Apply some clean grease to the battery terminals Place the battery breather tube in it s original position Mount the seat 16 2 2 ...

Страница 104: ...VE DISCHARGE IGNITION SYSTEM 17 17 Capacity discharge ignition Description Inspection Spark plug Troubleshooting Inductive discharge ignition Description Inspection Spark plug Troubleshooting Section Page 17 1 17 2 17 2 17 3 17 4 17 5 17 5 17 5 ...

Страница 105: ...s and a pick up coil for the C D I Control unit activation signal C D I Control unit The C D I Box is an electronic device which arranges by means of the pick up signal to generate the pulse tension to the HT coil primary windings HT coil Consists of a primary and secondary windings Revolution reductor The revolution reductor is an electronic device reducing the engine revolutions in order to avoi...

Страница 106: ... Ignition coil test Connect the leads tester to the coil output wires Pink Green in order to determine the coil resistance and insulation fig 1 Resistance value 218 Ω 10 at 20 C Insulation test ensure that the ohmeter needle doesn t move while plaing one xlead to the groove Pick up coil test Place tester leads between the pick up output wires in order to determine the resistance and insulation Res...

Страница 107: ...ntrol unit test The normal tester results are not reliable therefore it is advisable to replace the CDI control unit Revolution reduction test The normal tester results are not reliable therefore it is advisable to replace the revolution reductor Spark plug cap resistance 1 kΩ fig 5 Replace if out of specification Spark plug Check spark plug condition in case it is overheated fouled or worn replac...

Страница 108: ...nerator Electronic control unit faulty Lack of spark to spark plug Ignition not turned on Loose broken or short circuited electrical wires between Discharge device coil and ignition control unit Ignition control unit and engine stop switch Ignition control unit and spark plug Pulses generator and ignition control unit Ignition control unit and ignition coil Ignition coil faulty Ignition control un...

Страница 109: ...the control unit Control unit All the timings spark advance revolution reductor operations are carried out by a microprocessor HT coil The HT coil consists of a primary and secondary windings Spark plug Spark plug Champion RA4HC Warning Take note that no possibility to regulate the spark advance being the fact that the electronic control unit has not any adjusting device In case of incorrect spark...

Страница 110: ...ne the coil resistance and insulation fig 1 Resistance value 150 Ω 10 at 20 C Insulation test connect one tester lead to the ground ensure that the ohmmeter does not move fig 3 HT Coil test Remove the petrol tank and seat Disconnect the electrical wires and spark plug cap Measure the resistance between ignition coil terminal and Standard resistance 4 0 Ω 10 at 20 C If there is no continuity replac...

Страница 111: ... The spark plug use having different heat ranges or incorrect thread may cause serious damages to the engine TROUBLESHOOTING The engine start to run but not regularly The following parts could be faulty Ignition Coil Control box Pick up HT cable Spark plug Loose wires Incorrect spark advance Lack of spark to spark plug Ignition not turned on Loose broken or short circuited electrical wires between...

Страница 112: ...ELECTRIC STARTER 18 Starter motor Casing insulation check Troubleshooting Section Page 18 1 18 1 18 1 18 ...

Страница 113: ...re shaft there must not be continuity fig 3 CASING INSULATION CHECK Check for continuity between the cable terminal and starter casing and between the cable terminal and brushes lead fig 4 Replace starter if there is no continuity in the windings or if it s shorted to the casing Install the starter taking care in positioning the spacer washers Install the cover and fasten the two nuts Install the ...

Страница 114: ...ELECTRIC STARTER 18 18 1 2 ...

Страница 115: ...Headlamp Tail lamp Turn signal indicators Neutral switch Temperature indicator Oil pressure sensor Reserve fuel indicator Thermoswitch Brake light switches Horn Troubleshooting Section Page 19 1 19 1 19 1 19 1 19 1 19 1 19 2 19 2 19 2 19 2 19 2 19 2 19 2 19 ...

Страница 116: ...e instrumentation in reverse order of disassembly HEADLAMP Remove the fairing mounting bolts Remove the headlamp fairing optic group and disconnect the bulb wires Remove the bulb cover and replace if necessary fig 2 Remove the bulb holder with the TOP marking facing up Connect the wires to the bulbs Install the headlamp and fairing and fasten with its mounting bolts Adjust the position of the head...

Страница 117: ...19 1 2 ...

Страница 118: ... the tank Move the float towards the threaded part of the sensor and connect the two wire terminals to a tester There must be continuity THERMOSWITCH The cooling fan motor is operated by a thermoswitch mounted on the radiator If the fan does not start link the two wires connected to the switch with a spare wire Turn ignition to ON The fan motor must turn If it does not check the battery voltage be...

Страница 119: ...olt and remove horn Disconnect the wires to the horn and connect a fully charged 12 V battery to the horn terminals the horn should sound TROUBLESHOOTING When ignition switch is ON the lights do not turn on Faulty or burned bulbs Defective switch Open or short circuits Burned fuse Loose broken or shorted wires Battery weak or not connected All lights are on but are weak Battery weak or not connect...

Страница 120: ...TROUBLESHOOTING 20 Engine doesn t start or starts with difficulty Poor performance Poor road handling Section Page 20 1 20 2 20 3 20 ...

Страница 121: ...TROUBLESHOOTING 20 20 1 ...

Страница 122: ...20 2 1 TROUBLESHOOTING 20 Continued on page 20 2 2 ...

Страница 123: ...20 2 2 TROUBLESHOOTING 20 Continued from page 20 2 1 ...

Страница 124: ...20 3 TROUBLESHOOTING 20 ...

Страница 125: ...iring colours list of components Nordwest RC600 91 Diagram Wiring colours list of components Nordwest 600 93 Diagram Wiring colours list of components Inductive discharge Diagram Section Page 21 1 21 1 21 2 21 2 21 3 21 3 21 ...

Страница 126: ...b 12V 60 55W Front parking light bulb 12V 3W Front and rear turn indicators Blinker bulb 12V 10W Multiple connectors Handlebar light control left Horn Instrument light 12V 1 2W Electronic revolution indicator Water thermometer High beam indicator light 12V 1 2W Blinker indicator light 12V 1 2W Neutral indicator light 12V 1 2W Oil pressure indicator light 12V 1 2W Thermistor Frame earth Oil pressur...

Страница 127: ...21 1 2 ...

Страница 128: ...b 12V 5W Turn indicators Light bulb 12V 10W Multiple connectors Handlebar light control left Horn Instrument light 12V 1 2W Electronic revolution indicator Water thermometer High beam indicator light 12V 1 2W Blinker indicator light 12V 1 2W Neutral indicator light 12V 1 2W Oil pressure indicator light 12V 1 2W Thermistor Frame earth Oil pressure LED Neutral LED Voltage regulator Pick up Electroni...

Страница 129: ...21 2 2 ...

Страница 130: ... lighting group Two level halogen bulb 12V 55 60W Light bulb 12V 5W Turn indicators Light bulb 12V 10W Multiple connectors Handlebar light control left Horn Instrument light 12V 1 2W Electronic revolution indicator Water thermometer High beam indicator light 12V 1 2W Blinker indicator light 12V 1 2W Neutral indicator light 12V 1 2W Oil pressure indicator light 12V 1 2W Thermistor Frame earth Oil p...

Страница 131: ...21 3 2 ...

Страница 132: ...head stock Engine no 227 plate on top of gearbox behind cylinder Dimensions Frame Early bikes have a short seat and no rear carrier Later bikes have a longer seat and a rear carrier Front fork Oil grade and quantity is only important in right leg Bikes before 228 71037 had forks that used a thicker Seal which is no longer available Use 8mm plus a spacer part no 952737 A 1 Length Width Height Wheel...

Страница 133: ...y 4 wires from ignition switch no separate rev limiter 7 wires from ignition box 2 groups of wires from alternator 3 fuses Because the Inductive system gets its power from the battery if the battery is getting flat below 6 V the control box will disable the ignition to protect the circuit The motor may turn but engine will not start no spark Pick up coil Part no 947125 Resistance test 150 ohms 10 ...

Страница 134: ... 2 0 mm Tyre 120 70 17R tubeless original Pressure 2 1 bar 30psi solo 2 2 bar 33psi passenger Rear wheel 4 5 X 17 Three spoke cast alloy Bearing Part no 348382 Rim radial var limit 2 0 mm axial var limit 2 0 mm Spindle bend limit 2 0 mm Tyre 160 60 17R tubeless original Pressure 2 3 bar 33psi solo 2 4 bar 35psi passenger Front brake disc Twin semi floating discs part no 946052 Diameter 270 mm Thic...

Страница 135: ...o 12 bar new 9 to 11 bar over 5 000 km BHP 49 5 bhp at 7 250 rpm claimed Torque 52 Nm at 6 250 rpm claimed Oil 10W40 semi synthetic Oil capacity 2 2 ltrs Oil filter Technocar R15 part no 321205 Most Renault 4 filters will fit Coolant Permanent undiluted Capacity 1 3 ltrs Air filter Oiled foam part no 324505 Foam filter oil or SAE 90 gear oil Valves Inlet diameter 36 mm X 2 Exhaust diameter 32 mm X...

Страница 136: ...de Atomiser VOO Slow running jet Slow running jet 2nd carb jet 2nd carb jet 2nd carb jet 2nd carb jet 2nd carb jet 2nd carb jet 2nd carb needle assy 2nd carb needle assy 2nd carb atomiser OO 2nd carb slide assy Float valve Size type 135 140 145 150 155 160 165 170 5C58 5C60 5C55 5 5 4 2 6 48 46 140 145 150 155 160 165 5X7A 5X74 2 6 2 5 Part no Notes 341856 341750 RC600 89 std 341857 346355 346314 ...

Отзывы: