System Hardware Installation
- 34 -
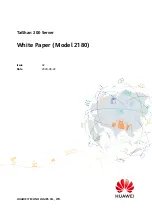
3-9 Removing and Installing the Power Supply
Follow these instructions to replace the power supply:
1. Flip up and then grasp the power supply handle.
2. Press the retaining clip on the right side of the power supply in the direction indicated.
3. Pull out the power supply using the handle.
4.
Insert the replacement power supply firmly into the chassis. Connect the AC power cord to the
replacement power supply.
1
3
2
4
CAUTION!
• In order to reduce the risk of injury from electric shock, disconnect AC power from the power
supply before removing the power supply from the system.
• Please see Section 2-2 "Rear View" for installation sequence.
Содержание G262-IR0
Страница 1: ...G262 IR0 HPC Server NVIDIA HGX A100 4 GPU 3rd Gen Intel Xeon Scalable GPU Server User Manual Rev 1 0 ...
Страница 13: ...Hardware Installation 15 1 3 System Block Diagram ...
Страница 25: ... 27 System Hardware Installation 4 1 2 3 4 5 6 ...
Страница 33: ... 35 System Hardware Installation 3 10 Cable Routing Front Switch Cable Front LED Cable GPU Power Cable ...
Страница 34: ...System Hardware Installation 36 HDD Back Plane Board Power Cable HDD Back Plane Board Signal Cable ...
Страница 35: ... 37 System Hardware Installation HDD Back Panel Board NVMe Signal Cable ...
Страница 36: ...System Hardware Installation 38 PCIe Signal Cable ...
Страница 37: ... 39 System Hardware Installation System Power Cable Power Supply Signal Cable ...
Страница 38: ...System Hardware Installation 40 On Board SATA Cable ...
Страница 62: ...BIOS Setup 64 5 3 1 Processor Configuration ...
Страница 75: ... 77 BIOS Setup 5 3 7 PCH Configuration Note 1 Only appears when HDD sets to RAID Mode ...