background image


Operating Your Computer 

2-10 

Using the Touchpad 

CAUTION: Do not use a sharp object such as a pen on the touchpad. Doing so may 
damage the touchpad surface. 


NOTE: For optimal performance of the touchpad, keep your fingers and the pads clean 
and dry. When tapping on the pad, tap lightly. Do not use excessive force. 


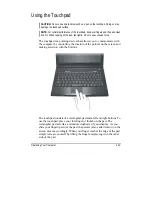
The touchpad is a pointing device that allows you to communicate with 
the computer by controlling the location of the pointer on the screen and 
making selection with the buttons. 


The touchpad consists of a rectangular pad and a left and right buttons. To 
use the touchpad, place your forefinger or thumb on the pad. The 
rectangular pad acts like a miniature duplicate of your display. As you 
slide your fingertip across the pad, the pointer (also called cursor) on the 
screen moves accordingly. When your finger reaches the edge of the pad, 
simply relocate yourself by lifting the finger and placing it on the other 
side of the pad. 

Содержание 8212X

Страница 1: ...User s Manual November 2007 ...

Страница 2: ...le parts inside Please refer all servicing to a qualified personnel TRADEMARKS The Bluetooth word mark and logos are owned by the Bluetooth SIG Inc All brand and product names are trademarks or registered trademarks of their respective companies NOTE The information in this manual is subject to change without notice ...

Страница 3: ...t the Computer 1 6 Right Side Components 1 6 Left Side Components 1 7 Rear Components 1 8 Bottom Components 1 9 Top open Components 1 10 Where to Go from Here 1 13 Chapter 2 Operating Your Computer 2 1 Starting and Stopping the Computer 2 2 Starting the Computer 2 2 Stopping the Computer 2 2 Using the Quick Buttons 2 4 Using the Keyboard 2 5 Typewriter Keys 2 5 Cursor Control Keys 2 6 Numeric Keyp...

Страница 4: ...Using the Bluetooth Wireless Feature 2 30 Using the 3G Feature Optional 2 37 Using the Fingerprint Sensor 2 41 Enrolling Fingerprints 2 42 Changing the Settings 2 44 Chapter 3 Managing Power 3 1 AC Adapter 3 2 Battery Pack 3 3 Charging the Battery Pack 3 3 Initializing the Battery Pack 3 4 Checking the Battery Level 3 4 Replacing the Battery Pack 3 5 Battery Low Signals and Actions 3 7 Power Manag...

Страница 5: ... Advanced Menu 5 6 Security Menu 5 7 Boot Menu 5 8 Exit Menu 5 9 Chapter 6 Installing Software Drivers and Using the P1 Utility 6 1 How to Use the Driver Disc 6 2 Installing Drivers 6 4 P1 Quick Launch Key Utility 6 6 Chapter 7 Caring for the Computer 7 1 Protecting the Computer 7 2 Using the Windows Security Center 7 2 Using the Password 7 3 Using the Cable Lock 7 4 Taking Care of the Computer 7 ...

Страница 6: ...s 8 8 Modem Problems 8 9 Power Management Problems 8 10 Software Problems 8 11 Sound Problems 8 11 Startup Problems 8 12 Other Problems 8 12 Resetting the Computer 8 14 Appendix A Specifications A 1 Appendix B Regulatory Information B 1 On the Use of the System B 2 Class B Regulations B 2 Safety Notices B 3 On the Use of the RF Device B 6 USA and Canada Safety Requirements and Notices B 6 European...

Страница 7: ...heral devices Chapter 5 Using BIOS Setup describes the BIOS Setup program that configures the computer s BIOS settings Chapter 6 Installing Software Drivers and Using the TPM P1 Utilities describes how to install the drivers and utilities supplied with the computer as well as how to use TPM Trusted Platform Module and P1 quick launch key utilities Chapter 7 Caring for the Computer gives you tips i...

Страница 8: ...n a bold typeset For example Press the Enter key to complete When keys are joined by a plus sign press the first key and while keeping the first key down press the remaining keys finally release all the keys When necessary keys are also shown in graphics A title command setup item or button that you can see on the screen is shown in boldface A value or an option that you can select for a setup ite...

Страница 9: ...er you need it the computer is ready and easy to go This chapter first tells you step by step how to get the computer up and running You will find instructions for these procedures Unpacking Connecting to AC power Opening the cover Turning on the computer Turning off the computer Then you will find a section briefly introducing the external components of the computer And the last section navigates...

Страница 10: ...your dealer immediately Keep the shipping carton and packing materials in case you need to ship or store the computer in the future Connecting to AC Power The computer operates either on the external AC power or internal battery power It is suggested that you use AC power when you start up the computer for the very first time CAUTION Use only the AC adapter included with your computer Using other ...

Страница 11: ... connected it also charges the battery pack The Battery Charge Indicator on the computer glows red to indicate that charging is in progress When the battery is fully charged the Battery Charge Indicator is off For information on using battery power see Chapter 3 CAUTION When you disconnect the AC adapter disconnect from the electrical outlet first and then from the computer A reverse procedure may...

Страница 12: ...t vigorously or slamming it shut could damage the computer Open the top cover by lifting up the cover You can tilt the cover forward or backward for optimal viewing clarity Turning On and Off the Computer Turning On 1 Make sure that the computer is connected to AC power or the battery is fully charged ...

Страница 13: ...r use the Shut Down command of your operating system NOTE There are other ways you can stop the computer so that you will be back to where you left off when you next turn on the computer See Stopping the Computer in Chapter 2 for information CAUTION If you have to turn the computer on again immediately after turning it off wait for at least five seconds Turning the computer off and on rapidly can ...

Страница 14: ...de Components Ref Component Description See Also Audio Output Connector Connects a set of headphones external speakers with amplifier or an audio recording device P 2 19 Microphone Connector Connects an external microphone P 2 19 USB Ports Each of the two ports connects a USB device such as a flash disk printer digital camera joystick and more P 4 3 PCMCIA Slot Accepts a PC card for additional fun...

Страница 15: ... Serves as the master switch that allows you to turn the wireless LAN radio Bluetooth radio and WWAN on off P 2 29 2 33 USB Port Connects a USB device such as a flash disk printer digital camera joystick and more P 4 3 Card Reader Accepts a MultiMediaCard MMC Secure Digital SD Memory Stick MS or Memory Stick PRO MS PRO card for removable storage media P 4 8 ...

Страница 16: ...Getting Started 1 8 Rear Components Ref Component Description See Also Kensington Lock Locks the computer to a stationery object for security P 7 4 Power Connector Connects the AC adapter P 1 2 ...

Страница 17: ...Battery pack supplies power to your computer when external power is not connected Also contains the optional 3G SIM card slot P 3 3 P 2 37 Wireless LAN WLAN Card Slot Inside is the mini PCI E slot for using a mini PCI E WLAN card P 2 29 Speaker Sends out sound and voice from the computer P 2 18 ...

Страница 18: ...ponent Description See Also LCD Screen Displays the output of the computer P 4 2 Quick Buttons P1 P1 Program 1 user customized quick launch key Default is Microsoft Internet Explorer P 6 6 Enables disables power saving when using battery power P 2 4 ...

Страница 19: ...e data input device of the computer P 2 5 Touchpad Serves as the pointing device of the computer P 2 10 Smart Card Reader Accepts a smart card for additional security feature P 4 4 Indicators Show the current status of the computer s devices WLAN indicator Lights blue when WLAN is on P 2 29 3G indicator Lights blue when optional 3G is on P 2 37 Bluetooth feature indicator Lights blue when Bluetoot...

Страница 20: ...y is being charged with 90 battery capacity remaining Lights red when the battery is being charged with less than 90 battery capacity remaining Battery charge indicator Blinks red when the battery s capacity is below 10 P 3 3 Microphone Receives sound and voice for the computer P 2 18 ...

Страница 21: ...hapter To install the operating system if your dealer has not already done so See the operating system manual To know more about the operating system Read the operating system manual To install the drivers if your dealer has not already done so See Chapter 6 To set a power on password See Security Menu in Chapter 5 To charge the battery pack for the first time See Charging the Battery Pack in Chap...

Страница 22: ... operating basics If you are already a computer user but are new to notebook computers you may choose to read only the parts containing information unique to your computer Described in this chapter are the operating basics of these components Starting and stopping the computer Quick buttons Keyboard Touchpad DVD drive Video features Audio features Communication features Fingerprint sensor CHAPTER ...

Страница 23: ...may use the Microsoft Windows Vista or XP operating system Stopping the Computer When you finish a working session you can stop the computer by turning off the power or leaving the computer in Sleep Standby or Hibernation mode To stop in this mode Do this To start up or resume again Off Click Start Shut Down This can prevent loss of unsaved data or damage to your software programs If the system is...

Страница 24: ...in Windows you can place the computer in Hibernation mode by Closing the display cover Pressing the power button Press the power button If you choose to stop in Sleep Standby or Hibernation mode you can return to where you left off the next time you start up the computer See Power Management in Chapter 3 for more information ...

Страница 25: ...tomized quick launch button P1 Default is Microsoft Internet Explorer See chapter 6 for more details ECO button to enter into power saving mode when using battery power The system will turn down the panel backlight and sacrifice processing speed to gain more battery life NOTE The ECO button works only when using battery power ...

Страница 26: ...ewriter Keys Typewriter keys are similar to the keys on a typewriter Several keys are added such as the Ctrl Alt Esc and lock keys for special purposes When the lock keys Caps Lock NumLk and ScrLk are pressed their corresponding indicators light up The Control Ctrl Alternate Alt key is normally used in combination with other keys for program specific functions The Escape Esc key is usually used fo...

Страница 27: ...he indicator on the screen that lets you know exactly where on your screen anything you type will appear It can take the form of a vertical or horizontal line a block or one of many other shapes Numeric Keypad A 15 key numeric keypad is embedded in the typewriter keys as shown next ...

Страница 28: ... F1 to F12 Function keys are multi purpose keys that perform functions defined by individual programs Fn Key The Fn key at the lower left corner of the keyboard is used with another key to perform the alternative function of a key The letter Fn and the alternative functions are identified by the color of blue on the keytop To perform a desired function first press and hold Fn then press the other ...

Страница 29: ... are connected Upon booting the system with CRT NOTE This function only applies to Plug Play display devices Decreases the LCD brightness Increases the LCD brightness Switches the touchpad off and on depending on your model Switches the system sound output off mute and on Switches LCD display on and off Serves as the sleep button that you can define with Windows Power Options See the Power Managem...

Страница 30: ... and type 0128 on the numeric keypad part of your keyboard To press the euro sign on an UK keyboard hold down the Alt Gr key and press 4 which has an euro sign on it Windows Keys The keyboard has two keys that perform Windows specific functions Windows Logo key and Application key The Windows Logo key opens the Start menu and performs software specific functions when used in combination with other...

Страница 31: ...unicate with the computer by controlling the location of the pointer on the screen and making selection with the buttons The touchpad consists of a rectangular pad and a left and right buttons To use the touchpad place your forefinger or thumb on the pad The rectangular pad acts like a miniature duplicate of your display As you slide your fingertip across the pad the pointer also called cursor on ...

Страница 32: ...the pad and on the second tap keep your finger in contact with the pad Then move your finger across the pad to drag the selected object to your destination When you lift your finger from the pad the selected object will drop into place Scroll To scroll is to move up and down or left and right in the working area on the screen To move vertically place your finger on the right or left edge of the pa...

Страница 33: ...ange the size of the on screen pointer the speed of the pointer and so on To configure the touchpad if you are using Windows Vista go to Control Panel Hardware and Sounds Mouse Properties If you are using Windows XP you can use the standard Microsoft or IBM PS 2 driver However you can install the touchpad driver supplied with your computer to take advantage of more powerful features For informatio...

Страница 34: ...ion Do not wipe the lens using materials with rough surface such as paper towel Instead use a cotton swab to gently wipe the lens FDA regulations require the following statement for all laser based devices Caution Use of controls or adjustments or performance of procedures other than those specified herein may result in hazardous radiation exposure NOTE The DVD drive is classified as a Class 1 las...

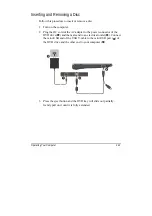
Страница 35: ...the DC cord of the AC adapter to the power connector of the DVD drive and the male end to an electrical outlet Connect the mini USB end of the USB Y cable to the mini USB port of the DVD drive and the other end to your computer 3 Press the eject button and the DVD tray will slide out partially Gently pull on it until it is fully extended ...

Страница 36: ...ntil it clicks into place To remove a disc hold the disc by its outer edge and lift it up from the tray 5 Gently push the tray back into the drive NOTE In the unlikely event that you are unable to release the DVD tray by pressing the eject button you can manually release the disc See DVD Drive Problems in Chapter 8 Eject button In use indicator ...

Страница 37: ...apter 6 for details The computer enters the Sleep Standby or Hibernation mode when the LCD is closed If you want to use the computer in Windows Vista with the LCD closed set Do Nothing to the When I Close the lid option in the Power Options System Settings Properties If you want to use the computer in Windows XP with the LCD closed set Do Nothing to the When I close the lid of my portable computer...

Страница 38: ...perating Your Computer 2 17 For displaying in higher resolutions you can connect an external monitor that supports higher resolutions See Connecting an External Monitor in Chapter 4 for more information ...

Страница 39: ...ecording try lowering the microphone recording volume The audio subsystem of your computer features Built in sound system for recording and playing sound on your computer Azalia interface high density audio codec Built in microphone Speaker on the bottom side and External audio connectors Ways of playing and recording sound vary with the operating system used See your operating system documentatio...

Страница 40: ...n external audio device make sure that you specify the use of the correct audio device in Windows Audio Output Connector can be connected to speakers headphones or earphone set Microphone Connector can be connected to an external microphone for recording voice or sound NOTE When using the external speakers headphones or microphone you cannot use the internal one ...

Страница 41: ... the recorded volume via the built in microphone is too low you can adjust it by performing the following Using Windows Vista When adjusting via the Volume icon on the system tray 1 Right click the Volume icon on your Windows system tray and select Recording Devices ...

Страница 42: ...appears Click the Levels folder and manually use the slider to increase the level of Microphone Boost 3 Click OK to exit When adjusting via the Realtek HD Audio Manager icon on the system tray 1 Right click the Realtek HD Audio Manager icon on your Windows system tray and select Realtek HD Audio Manager ...

Страница 43: ...Operating Your Computer 2 22 2 The Realtek HD Audio Manager screen appears click the Microphone folder 3 Click the Microphone Boost icon ...

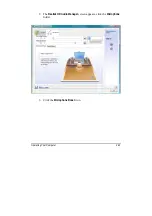
Страница 44: ...Operating Your Computer 2 23 4 Manually use the slider to increase the level of Microphone Boost 5 Click OK to exit ...

Страница 45: ... via the Volume icon on the system tray 1 Double click the Volume icon on your Windows system tray and the Master Volume window appears Click Options Properties 2 The Properties window appears Click to enable the Mic Volume item a checkmark appears Then click OK ...

Страница 46: ... 3 Click Options Advanced Controls The last column Mic Volume would show on screen 4 Click the Advanced button and the Advanced Controls for Mic Volume window appears 5 Click to enable the item Microphone Boost Click Close to exit ...

Страница 47: ...tek HD Audio Manager icon on your Windows system tray and select Realtek HD Audio Manager 2 The Realtek HD Audio Manager screen appears click the Mixer folder 3 Click the Advanced setting button on the Mic Volume column and the Advanced setting window appears 4 Click to enable the item Microphone Boost Then click OK to exit ...

Страница 48: ...hers by fax email or connect to an online service or bulletin board To connect the telephone line to the modem connect one end of the modem cable to the RJ 11 connector on the computer and the other end to the phone line NOTE When using the communication software you may have to disable power management Set the COM port of the modem to COM3 Set parameters such as modem speed baud rate and line typ...

Страница 49: ...lled See chapter 6 for details The internal 10 100 1000Base T LAN Local Area Network module allows you to connect your computer to a network It supports data transfer rate up to 1000 Mbps To connect the network cable to the LAN module connect one end of the LAN cable to the RJ 45 connector on the computer and the other end to the network hub ...

Страница 50: ...5 15 5 35 OFDM Orthogonal Frequency Division Multiplexing 802 11b 11 11 5 5 2 1 2 412 2 462 DSSS Direct Sequence Spread Spectrum 802 11g 54 54 36 18 9 2 4 OFDM Orthogonal Frequency Division Multiplexing 802 11n 100 Mbps or more 100 210 2 4 5 Spatial multiplexing uses MIMO multiple input multiple output To take advantage of the WLAN feature make sure that the WLAN driver is installed correctly See ...

Страница 51: ...ff the radio press Fn F1 To resume network connection press Fn F1 again It takes approximately 30 seconds for your computer to make a successful WLAN connection and approximately 10 seconds to disconnect Connecting to a Wireless Network Windows Vista To connect to a wireless network 1 Make sure that the WLAN radio is on see the previous section 2 Right click the Wireless Network Connection icon lo...

Страница 52: ...reless network to connect to by clicking a selection then click Connect 5 Depending on the settings you may be asked to enter a WEP key refer to your Windows online help for more information on setting a wireless network connection Connecting to a Wireless Network Windows XP To connect to a wireless network 1 Make sure that the WLAN radio is on see the previous section ...

Страница 53: ...If any wireless network is detected the following window appears on screen 3 Select a wireless network to connect to by clicking a selection then click Connect 4 Depending on the settings you may be asked to enter a WEP key refer to your Windows online help for more information on setting a wireless network connection ...

Страница 54: ...for short range about 10 meters wireless communications between devices without requiring a cable connection With Bluetooth data can be transmitted through walls pockets and briefcases as long as two devices are within range Turning On and Off the Bluetooth Feature NOTE You can still use the WLAN feature when the Bluetooth feature is turned on 1 Make sure that the RF switch is at the ON position 2...

Страница 55: ... again The status of the Bluetooth connection is indicated by the Bluetooth icon located in the system tray in the lower right part of the screen Status Icon Off blue with red logo On blue with white logo Connected blue with green logo You can use the Bluetooth Utility to configure Bluetooth connection settings and transfer files Connecting to Another Bluetooth Device 1 Make sure that the target B...

Страница 56: ...Operating Your Computer 2 35 3 Click IVT BlueSoleil and then BlueSoleil The following screen appears 4 Click View then Refresh Devices to check if any Bluetooth device is detected ...

Страница 57: ...Add New Device 6 Depending on the type of Bluetooth device that you want to connect to you will need to enter the pertinent information For detailed information on using the Bluetooth Utility see the Bluetooth Utility Help on your computer by clicking on Help then Contents and Index ...

Страница 58: ... telephony and broadband wireless data all in a mobile environment Unlike IEEE 802 11 networks 3G networks are wide area cellular telephone networks which evolved to incorporate high speed internet access and video telephony IEEE 802 11 networks are short range high bandwidth networks primarily developed for data To use the 3G feature on your computer you need to subscribe to 3G service and instal...

Страница 59: ...n and while holding it in the unlock position remove the battery pack off the computer 5 Locate the SIM card slot and insert the SIM card into the holder Make sure the beveled corner on the SIM card is facing towards the computer and that the golden contact area on the card is facing downwards ...

Страница 60: ...and information on using SIM card services contact your SIM card vendor This may be the service provider network operator or other vendor NOTE To remove the SIM card push inward to release and slide the SIM card out of the slot Turning On and Off the 3G Feature 1 Make sure that the RF switch is at the ON position 2 Right click the System Utility icon located on Windows system tray and select Quick...

Страница 61: ...ng appears onscreen To turn on the 3G feature click the 3G quick button The 3G indicator will glow in blue 4 To turn off the 3G feature click the 3G quick button again You can use the 3G software application to configure 3G connection settings ...

Страница 62: ...ter features the Fingerprint Control Center utility for enrolling your fingers for added security It contains the following Fingerprints for enrolling or editing fingerprint templates Settings for configuring the fingerprint software Help for browsing the Fingerprint Control Center online Help NOTE For an online Help information on using the Embassy Security Center you can also go to Start menu Pr...

Страница 63: ...Operating Your Computer 2 42 Enrolling Fingerprints To start enrolling your fingerprint s 1 Click Fingerprints on the main menu 2 Then click Initialize ...

Страница 64: ...g Your Computer 2 43 3 The following screen appears Read carefully the contents of the Welcome screen and then click Next to continue 4 Follow the onscreen instructions to complete enrolling your fingerprint s ...

Страница 65: ...Operating Your Computer 2 44 Changing the Settings To change the settings of your fingerprint software 1 Click Settings on the main screen 2 Then click System Settings ...

Страница 66: ...Operating Your Computer 2 45 3 The following screen appears Proceed to make the necessary settings to your fingerprint software 4 Click OK after you have finished with your settings ...

Страница 67: ...n optimal battery performance it is important that you use the battery in the proper way The topics in this chapter include What is an AC adapter How to charge the battery pack When and how to initialize the battery pack How to check the battery level How to replace the battery pack What happens when the battery is low and what actions to take What is Power Management How to save power CHAPTER ...

Страница 68: ...wer cord When you disconnect the AC adapter disconnect from the electrical outlet first and then from the computer A reverse procedure may damage the AC adapter or computer When unplugging the connector always hold the plug head Never pull on the cord The AC adapter serves as a converter from AC Alternating Current to DC Direct Current power because your computer runs on DC power but an electrical...

Страница 69: ...ge Indicator flashes red when the battery s temperature gets above 60 C 140 F If this happens the battery pack may be damaged Please contact your dealer During charging do not disconnect the AC adapter before the battery has been fully charged otherwise you will get a prematurely charged battery To charge the battery pack connect the AC adapter to the computer and an electrical outlet The Battery ...

Страница 70: ...ully charging discharging and then charging It can take several hours 1 Make sure that the computer power is turned off Connect the AC adapter to fully charge the battery pack 2 After the battery pack is fully charged turn on the computer When the message Click mouse or press Enter for Menu appears click the touchpad s left button or press the Enter key to invoke the program 3 A small window appea...

Страница 71: ... a pointed device to see the corresponding value of indicator segment that light green The value of the corresponding green segment indicates the relative percentage of the battery charge The battery pack is fully discharged when you see no segment glowing green Replacing the Battery Pack CAUTION There is danger of explosion if the battery is incorrectly replaced Replace the battery only with the ...

Страница 72: ... Place the computer upside down 3 Slide the battery security lock outward to the unlock position 4 Slide the battery release lever outward to the unlock position and while holding it in the unlock position remove the battery pack off the computer 5 Fit another battery pack into place and slide the battery security lock to the lock position ...

Страница 73: ...ches the low battery level a red circle with a white X appears above the green icon The computer s Battery Charge Indicator blinks amber to alert you to take actions Immediately save your data upon Battery Low The remaining operating time depends on how you are using the computer If you are using the audio subsystem PC card hard or USB flash disk the battery might run out of charge very quickly Al...

Страница 74: ...off When the hard disk has been idle for a set period Power to the display is turned off When the display has been idle for a set period When the entire system has been idle for a set period When you press the Fn F12 hot key When you close the cover The computer enters the Sleep Standby mode The hard disk and display are turned off and the entire system consumes less power When you press the power...

Страница 75: ...bernate tab of the Power Options Properties from the Control Panel Hibernation is a very useful feature People frequently open many applications when they use computers It takes some time to get all these applications open and running and normally they all have to be closed before the computer can be turned off When you use the hibernation feature you do not have to close the applications The comp...

Страница 76: ...en the length of time before Windows turn off the display Many USB devices use power just by being connected If you use a USB mouse you can save power by disconnecting the mouse and using the touchpad If you use a USB flash drive unplug it when you are not using it If you work with an application that uses a PC card exit the application when you finish using it If you have a PC card installed remo...

Страница 77: ...puter by connecting other peripheral devices When using a device be sure to read the instructions accompanying the device together with the relevant section in this chapter This chapter gives guidelines on installing and using these devices External monitor USB device Smart Card PC card Card Reader CHAPTER ...

Страница 78: ...or before turning on the computer 5 The monitor should respond by default If not you can switch the display to the monitor or to both simultaneous display or to multi display by pressing the Fn F5 hot key In Windows Vista you can also change the display through the Display Settings Properties In Windows XP you can also change the display through the settings in Display Properties 6 You can change ...

Страница 79: ...e USB ports for connecting USB devices such as a digital camera scanner printer modem and mouse The USB ports support transfer rates up to 12 MB s for USB 1 1 devices and 480 MB s for USB 2 0 devices To connect a USB device simply plug the device cable to one of the USB ports ...

Страница 80: ...ip that stores and transacts data between you user and the computer You need to install third party smart card software to take advantage of the smart card feature Inserting and Removing a Smart Card To insert a smart card 1 Locate the smart card slot 2 Slide the smart card with its label and embedded computer chip facing up into the slot 3 When a new card is seated use the third party smart card ...

Страница 81: ...Expanding Your Computer 4 5 To remove a smart card 1 Make sure that the third party smart card software is not accessing the smart card 2 Pull the card out of the slot ...

Страница 82: ...r the PC card Although some PC cards can be inserted and removed without turning off the computer you cannot remove or install PC cards during Sleep mode To insert a PC card 1 Locate the PC card slot on the right side of the computer 2 Slide the PC card with its label facing up into the slot until the eject button pops out 3 When a new card is seated the computer will detect it and try to install ...

Страница 83: ...e icon found on the Windows Vista taskbar icon found on the Windows XP taskbar and the Safely Remove Hardware window appears on screen 2 Select highlight the PC card from the list to disable the card 3 Push the eject button and the card will slide out slightly 4 Pull the card out of the slot ...

Страница 84: ... can use only storage cards Your Card Reader does not support cards with I O input output functions such as a wireless network card or Bluetooth card Your computer has a Card Reader The Card Reader is a small drive for reading from and writing to removable storage cards or called memory cards The Card Reader supports the MultiMediaCard MMC Secure Digital SD Memory Stick MS and Memory Stick PRO MS ...

Страница 85: ...with its connector pointing to the slot and its label facing up Slide the card into the slot until it reaches the end 3 Windows will detect the card and assign it a drive name typically E To remove a storage card 1 Click Start then Computer 2 Right click the drive with the card and select Safely Remove 3 Pull the card out of the slot ...

Страница 86: ... Components Upgrade You can upgrade your computer by changing the CPU and hard disk or adding memory However to avoid damage during the installation procedure please ask your dealer for help Do not install an internal component by yourself ...

Страница 87: ...uter BIOS is a layer of software called firmware that translates instructions from other layers of software into instructions that the computer hardware can understand The BIOS settings are needed by your computer to identify the types of installed devices and establish special features This chapter tells you how to use the BIOS Setup program CHAPTER ...

Страница 88: ...er are for your reference only The actual items or settings on your computer may differ The BIOS Setup Utility program may have been updated after the publication of this manual The settings you select in your operating system might override similar settings in BIOS Setup Utility To run BIOS Setup Utility press the Enter key or click the left touchpad button when the prompt appears on the screen d...

Страница 89: ...ining the titles of the available menus Each menu title brings a specific menu The left column of the menu displays the menu items The top right of the menu provides more detailed information when a menu item is highlighted The bottom of the menu provides keyboard instructions for moving around and making selections ...

Страница 90: ... and make selections Keyboard information can be found at the bottom of the screen A brief description of keyboard usage is listed next Key Function Selects a menu title Selects an item or option Enter 1 Brings up the sub menu when available 2 Opens or closes the option window when an item is selected Esc 1 Exits BIOS Setup Utility 2 Closes the option window if one is open F9 Loads setup defaults ...

Страница 91: ...ng BIOS Setup 5 5 Main Menu The Main menu contains the system date and time settings as well as shows the basic configuration of the system System Time sets the system time System Date sets the system date ...

Страница 92: ...cy USB Support allows you to enable support for Legacy USB device in DOS mode Boot time Diagnostic Screen allows you to display the diagnostic screen during system boot Quick Boot Mode allows the system to skip certain tests while booting This will decrease the time needed to boot the system ...

Страница 93: ...ardware and software TPM protects encryption and signature keys at their most vulnerable stages operations when the keys are being used unencrypted in plain text form TPM is specifically designed to shield unencrypted keys and platform authentication information from software based attacks TPM Support allows you to enable or disable TPM support Current TPM State shows the current TPM state Change ...

Страница 94: ...e sequence that the BIOS use to look for a boot device from which to load the operating system A brief description of keyboard usage is listed next Key Function Selects highlight a boot device Changes the boot sequence 1 to 4 Loads the four default boot sequence Shift 1 Enables or disables a device X Moves the highlighted boot device from the Boot priority order list to the Excluded from boot orde...

Страница 95: ...s can take effect Exit Saving Changes saves the changes you have made and exits BIOS Setup Utility Exit Discarding Changes exits BIOS Setup Utility without saving the changes you have made Load Setup Defaults loads the factory default values for all the items Discard Changes restores the previous values for all the items Save Changes saves the changes you have made ...

Страница 96: ... purchased the computer with Windows pre installed your dealer may have already installed the drivers If not you need to install the drivers using the disc supplied with your computer Also located on top of your keyboard is the P1 quick launch key The quick launch key utility allows you to re define customize the P1 quick launch key according to your needs This chapter describes how to install the...

Страница 97: ...he available items may differ according to your computer model Do not remove the driver disc when installing the driver An autorun program is provided on the driver disc to help you easily install the drivers As you insert the disc the autorun program automatically starts If you need to start the program manually run the Setup exe program from the Wsetup directory of the disc The main screen appea...

Страница 98: ...Installing Software Drivers 6 3 Click NEXT located on the right lower part of main screen to view the next screen as shown next Click BACK to return to the main screen ...

Страница 99: ...mputer Modem Installs the modem driver that allows you to use the modem function of the computer Touchpad Installs the touchpad driver that allows you to take full advantage of the touchpad features Bluetooth Installs the Bluetooth driver and application program that allows you to use the Bluetooth feature WLAN Installs the WLAN driver and application program that allows you to use the computer s ...

Страница 100: ...s you to use the 3G feature Acrobat Installs the Adobe Acrobat Reader program if you do not have it on your computer You need Adobe Acrobat Reader to open the manual file supplied on this driver disc User s Manual Allows you to view the User s Manual Exit Allows you to exit driver installation located on the right upper portion ...

Страница 101: ...rnet Explorer quick launch key The quick launch key utility that allows you to re define the P1 quick launch key To start the utility right click the System utility icon and select Quick Button Definition on the Windows system tray The Quick Button Definition window appears as shown next Box Cancel Open ...

Страница 102: ...tton click the Open icon to pop up the Select a File to Open dialog box as shown next and select the desired program Then click Open to complete the process The appropriate icon will then appear in the box To launch the program press the P1 quick launch key or if the Quick Button Definition window is open click the box containing the icon ...

Страница 103: ...operation and reduce the risk of damage to your computer This chapter gives you guidelines covering these areas of maintenance How to protect the computer What to note when using and storing the computer How to clean the computer What to note when using the battery pack What to note when traveling with the computer CHAPTER ...

Страница 104: ... safeguard the integrity of your computer data as well as the computer itself you can protect the computer in several ways as described in this section Using the Windows Vista Security Center Windows Security Center protects your computer against intrusion ...

Страница 105: ...security user account control For detailed information on Windows Security Center see Windows Vista Help Using the Password The power on password protects your computer against unauthorized use If the password is set the prompt requesting for the password appears on the screen whenever the computer is turned on The password is set via the BIOS Setup program See Security Menu in Chapter 5 for instr...

Страница 106: ... lock to protect your computer against theft The cable lock is available in most computer stores To use the lock loop the lock cable around a stationary object such as a table Insert the lock to the Kensington lock hole and turn the key to secure the lock Store the key in a safe place ...

Страница 107: ...te a strong magnetic field such as a TV refrigerator motor or a large audio speaker Do not move the computer abruptly from a cold to a warm place A temperature difference of more than 10 C 18 F will cause condensation inside the unit which may damage the storage media Do not place the computer on an unsteady surface General Guidelines Do not place heavy objects on top of the computer when it is cl...

Страница 108: ...at the battery pack is fully charged Doing so may avoid harm to the battery pack Operate the computer with the battery pack installed even when using external power This ensures that the battery is fully charged If you will not be using the computer for a long period of time more than two weeks remove the battery pack from the computer If you remove the battery pack make sure that the battery term...

Страница 109: ... it with you Use the AC adapter as the power source and as a battery charger Hand carry the computer Do not check it in as luggage If you need to leave the computer in the car put it in the trunk of the car to avoid exposing the computer to excessive heat When going through airport security it is recommended that you send the computer and flash disks through the X ray machine the device you set yo...

Страница 110: ...ftware or both When you encounter any problem it might be a typical problem that can easily be solved This chapter tells you what actions to take when solving common computer problems It is divided into three sections Preliminary checklist Solving common problems Resetting the computer CHAPTER ...

Страница 111: ...e that the cable connections are correct and secure Make sure that the configuration information is properly set in the BIOS Setup program Make sure that all the device drivers are correctly installed Make notes of your observations Are there any messages on the screen Do any indicators light Do you hear any beeps Detailed descriptions are useful to the service personnel when you need to consult o...

Страница 112: ...s P 8 4 DVD Drive Problems P 8 4 Display Problems P 8 5 Hardware Device Problems P 8 6 Hard Disk Drive Problems P 8 7 Keyboard Mouse and Touchpad Problems P 8 7 LAN Problems P 8 8 WLAN Problems P 8 8 Modem Problems P 8 8 Power Management Problems P 8 10 Software Problems P 8 11 Sound Problems P 8 11 Startup Problems P 8 12 Other Problems P 8 12 ...

Страница 113: ...tializing the Battery Pack in Chapter 3 for instructions The battery operating time indicated by the battery meter does not match the actual operating time The actual operating time can be different from the estimated time depending on how you are using the computer If the actual operating time is much less than the estimated time initialize the battery See Initializing the Battery Pack in Chapter...

Страница 114: ...tended and then remove the disc Display Problems Nothing appears on the screen During operation the screen may automatically turn off as a result of power management Press any key to see if the screen comes back The brightness level might be too low Increase brightness by pressing the Fn F7 hot key The display output might be set to an external device To switch the display back to the LCD press th...

Страница 115: ...re that you turn on the external monitor before turning on the computer Press the Fn F5 hot key to toggle through the display options or change the Display Settings Properties of Windows Vista via settings in Display Properties of Windows XP Hardware Device Problems The computer does not recognize a newly installed device The device may not be correctly configured in the BIOS Setup program Run the...

Страница 116: ...agmenter to defragment the files Keyboard Mouse and Touchpad Problems The keyboard does not respond Try connecting an external keyboard If it works contact an authorized dealer as the internal keyboard cable might be loose The numeric keypad is disabled Make sure that the Num Lock is switched on Check if the Num Lock Indicator glows or not The external keyboard does not work Make sure that the key...

Страница 117: ...at the WLAN feature is turned on Transmission quality is poor Your computer may be in an out of range situation Move your computer closer to the Access Point or another WLAN device it is associated with Check if there is high interference around the environment and solve the problem as described next Radio interference exists Move your computer away from the device causing the radio interference s...

Страница 118: ...the BSSID to another radio channel Your computer may be in an out of range situation Move your computer closer to the Access Point it is associated with Make sure that your computer is configured with the same security option encryption to the Access Point Use the Web Manager Telnet of the Access Point to check whether it is connected to the network Reconfigure and reset the Access Point I cannot ...

Страница 119: ...y or Hibernation mode immediately If the computer is performing an operation it normally waits for the operation to finish The computer does not resume from Sleep Standby or Hibernation mode The computer automatically enters Sleep Standby or Hibernation mode when the battery pack is empty Do any one of the following Connect the AC adapter to the computer Replace the empty battery pack with a fully...

Страница 120: ...rectly installed Make sure that the computer is not in Sleep Standby mode If using an external speaker make sure that the speaker is properly connected Distorted sound is produced Make sure that the volume control is not set too high or too low In most cases a high setting can cause the audio electronics to distort the sound The sound system does not record Adjust the playback or recording sound l...

Страница 121: ...ating system not found appears on the screen after you turn on the computer If this message appears when you are booting from the hard disk insert a bootable disc in the DVD drive and check the condition of the hard disk The message Invalid system disk or Disk error appears on the screen after you turn on the computer If you are deliberately trying to boot from a disc replace the disc with a boota...

Страница 122: ...ave performed everything as described above and still have the incorrect date and time every time you turn on the computer the RTC Real Time Clock battery is at the end of its life Call an authorized dealer to replace the RTC battery ...

Страница 123: ...e hard disk drive in use indicator if it flashes irregularly the program may be accessing data and preventing you from using the keyboard If you are sure the operation has stopped and you cannot use the restart function of the operating system reset the computer Reset the computer by any one of these methods Press Ctrl Alt Del If the above action does not work turn off the computer Wait for at lea...

Страница 124: ... 1 Watt Keyboard Standard keys numeric keypad 12 function keys a special Fn Function key and Windows keys Quick keys ECO power saving and P1 user defined hot keys Pointing device PS 2 compatible glide touchpad with scroll bar and 2 buttons water resistant Hard disk drive 1 8 inch diameter PATA interface 4200 rpm support rubber protection at 4 corners security key reserved G Sensor function issues ...

Страница 125: ... TPM 1 2 AC adapter Universal AC adapter 45 Watt input 100 240 Volt output 15 Volt Power Battery 3 6 cell Li ion battery 2600 5200 mAh Dimension W D H 296 209 12 5 30 8 mm 11 7 8 2 0 5 1 2 inch Weight 1 15 kg 2 5 lb Temperature Operating 0 C 32 F to 35 C 95 F Storage 20 C 4 F to 60 C 140 F Environment Humidity Operating 10 to 90 non condensing Storage 5 to 95 non condensing EMC CE VCCI FCC Regulat...

Страница 126: ...ements and safety notices on your computer NOTE Marking labels located on the exterior of your computer indicate the regulations that your model complies with Please check the marking labels and refer to the corresponding statements in this appendix Some notices apply to specific models only APPENDIX ...

Страница 127: ... is no guarantee that interference will not occur in a particular installation If this equipment does cause harmful interference to radio or television reception which can be determined by turning the equipment off and on the user is encouraged to try to correct the interference by one or more of the following measures Reorient or relocate the receiving antenna Increase the separation between the ...

Страница 128: ...ge radioélectrique édicté par le ministère des Communications du Canada Safety Notices About the Battery Caution Texts Concerning Lithium Batteries DANISH ADVARSEL Lithiumbatteri Eksplosionsfare ved fejlagtig håndtering Udskiftning må kun ske med batteri af samme fabrikat og type Levér det brugte batteri tilbage til leverandøren NORWEGIAN ADVARSEL Eksplosjonsfare ved feilaktig skifte av batteri Be...

Страница 129: ...able At the end of its useful life under various state and local laws it may be illegal to dispose of this battery into the municipal waste stream Check with your local solid waste officials for details in your area for recycling options or proper disposal About the AC Adapter Use only the AC adapter supplied with your computer Use of another type of AC adapter will result in malfunction and or da...

Страница 130: ...ce Use caution when installing or modifying telephone lines Avoid using the telephone function other than a cordless type during an electrical storm There may be a remote risk of electric shock from lightning Do not use the telephone function to report a gas leak in the vicinity of the leak Do not use this product near water for example near a bathtub wash bowl kitchen sink or laundry tub in a wet...

Страница 131: ...compliance with the FCC RF exposure guidelines The maximum reported Body Maximum SAR Measurement 1g value is 0 096 W Kg Radio Frequency Interference Requirements and SAR The FCC with its action in ET Docket 93 62 has adopted a safety standard for human exposure to Radio Frequency RF electromagnetic energy emitted by FCC certified equipment The wireless LAN module meets the Human Exposure limits fo...

Страница 132: ...use High gain wall mount or mast mount antennas are designed to be professionally installed and should be located at a minimum distance of 30 cm 12 inches or more from the body of all persons Please contact your professional installer VAR or antenna manufacturer for proper installation requirements Explosive Device Proximity Warning WARNING Do not operate a portable transmitter near unshielded bla...

Страница 133: ...manual and operated in a commercial environment However there is no guarantee that interference will not occur in a particular commercial installation or if operated in a residential area If harmful interference with radio or television reception occurs when the device is turned on the user must correct the situation at the user s own expense The user is encouraged to try one or more of the follow...

Страница 134: ...rnir un écran de blindage maximal Si le matériel ou son antenne d émission est installé à l extérieur il doit faire l objet d une licence European Union CE Marking and Compliance Notices Statements of Compliance English This product follows the provisions of the European Directive 1999 5 EC Danish Dette produkt er i overensstemmelse med det europæiske direktiv 1999 5 EC Dutch Dit product is in nav...

Страница 135: ... within 5 15 5 25 GHz frequency range it is restricted to indoor usage environments and the antenna of this device must be integral CAUTION Due to the fact that the frequencies used by 802 11a b g n wireless LAN devices may not yet be harmonized in all countries 802 11a b g n products are designed for use only in specific countries or regions and is not allowed to be operated in countries or regio...

Страница 136: ...epartments in Which the Wireless LAN Module Can Be Used Indoors Only The wireless LAN module can currently be used indoors only in the following 38 departments of mainland France Please turn off your wireless LAN radio when operating the device in areas places other than the 38 departments listed 01 Ain Orientales 36 Indre 66 Pyrénées 02 Aisne 37 Indre et Loire 67 Bas Rhin 03 Allier 41 Loir et Che...

Страница 137: ...se approval Turning Off the Wireless LAN Radio NOTE Turning the wireless LAN radio off is not the same as disabling the wireless LAN card It is not necessary to disable the card to meet the regulatory requirements While operating the computer in those French departments that do not allow use of the wireless LAN equipment the user of the equipment must turn off the wireless LAN radio in order to co...

Страница 138: ...4 液晶面板 X X X O O O 5 硬盘 X O O O O O 6 光驱 X O O O O O 7 键盘 X O O O O O 8 充电电池组件 X X O O O O 9 适配器 X X X O O O 10 电源线 X O O O O O 11 外部信号连接线 O O O O O O 12 钮扣电池 O O X O O O 13 风扇 X O O O O O 14 散热模块 金属部分 X O O O O O 15 喇叭 X O O O O O O 表示该有害物质在该部件所有均质材料中的含量均在 SJ T 11363 2006 规定的限量 要求以下 X 表示该有害物质至少在该部件的某一均质材料中的含量超出 SJ T 11363 2006 规定 的限量要求 本产品使用技术无法突破之 EU RoHS 除外项目 并于下方使用项目说明 ...

Страница 139: ...连接用高融点锡焊上 铅为 85wt 以上的有铅锡焊 2 电子陶瓷部件 压电组件 陶瓷介质材料等 内的含铅量 3 电子部件的玻璃内的含铅量 4 两种以上元素组成之焊料 用于连接微处理器封装与针头且铅含 量超过 80wt 并少于 85wt 5 铅于覆晶集成电路封装内用于铸模与基板之电子接点之焊锡 6 于钢材 铝材 铜材中的含铅量 7 通孔盘状及平面数组陶瓷多层电容器焊料所含的铅 8 电子接点的电镀 其要求高可靠性 且没有替代性材料之镉 9 电池内的含铅量 10 电池内的含镉量 11 使用于钮扣电池之含汞量 ...

Страница 140: ...king battery level 3 4 Initializing 3 4 Replacing 3 5 Safety notices B 3 Taking care 3 3 7 6 Troubleshooting 8 4 Battery power Indicator 1 13 BIOS Setup 5 1 Exiting 5 10 Legacy USB 5 6 Password 5 8 Starting 5 2 Bluetooth wireless feature Connecting to Bluetooth device 2 23 Driver installation 6 4 Sending file 2 26 Using 2 23 Boot sequence 5 9 Booting 2 2 Brightness 2 6 C Canada Class B compliance ...

Страница 141: ... 6 1 Driver OS support 6 2 DVD drive 1 6 2 11 Inserting a disc 2 12 Troubleshooting 8 4 DVD Dual drive See DVD drive E EEPROM A 1 EMC requirements B 8 Environmental specifications A 2 European Union CE marking and compliance notices B 9 Euro symbol 2 7 External monitor Connecting 4 2 F FCC Class B regulations B 2 FDA regulations 2 11 Fn key 2 5 Function keys 2 5 H Hard disk drive Troubleshooting 8...

Страница 142: ...ng 8 10 Mouse Troubleshooting 8 7 MultiMediaCard See Storage card Mute 2 7 N Network See LAN Num lock 2 6 Indicator 1 13 Numeric keys 2 6 O Operating system 1 5 2 2 P Password 5 8 PC card 4 5 Inserting 4 6 Removing 4 6 Slot 1 7 Troubleshooting 8 6 Point 2 9 POST 1 5 Power A 2 Power button 1 13 2 2 Power connector 1 8 Power Management 3 7 Troubleshooting 8 10 Power saving Enable disable 2 4 Power s...

Страница 143: ...ttery problem 8 4 Display problem 8 5 DVD drive problem 8 4 Hard disk drive problem 8 7 Hardware problem 8 7 Keyboard problem 8 7 LAN problem 8 8 Modem problem 8 10 Mouse problem 8 7 Other problem 8 13 Power Management problem 8 10 Software problem 8 11 Sound problem 8 11 Startup problem 8 12 Touchpad problem 8 7 WLAN problem 8 8 Turning off 1 5 2 2 Turning on 1 4 Typewriter keys See Keyboard U Up...

Страница 144: ...Index I 5 ...

Отзывы: