Introduction
13
1
1.7 Connecting the Camera
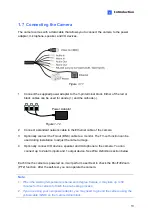
The camera comes with a data cable that allows you to connect the camera to the power
adapter, microphone, speaker, and I/O devices.
Figure 1-11
1.
Connect the supplied power adapter to the 3-pin terminal block. Either of the red or
black cables can be used for anode (+) and the cathode (-).
Power Adaptor
Figure 1-12
2.
Connect a standard network cable to the Ethernet cable of the camera.
3.
Optionally connect the TV-out (BNC) cable to a monitor. The TV-out function can be
used during installation to adjust the camera image.
4.
Optionally connect I/O devices, speaker and microphone to the camera. You can
connect up to 2 alarm inputs and 1 output device. See
Wire Definition
section below.
Each time the camera is powered on, it will perform a self-test to check the Pan/Tilt/Zoom
(PTZ) function. After the self-test, you can operate the camera.
Note:
1. When the working temperature is below zero degree Celsius, it may take up to 30
minutes for the camera to finish the pre-heating process.
2. If you are using your own power adapter, you may need to ground the camera using the
yellow cable (GND) on the 3-pin terminal block.

