background image

25

Unit Start Up

•  Check that supply voltage matches nameplate data.
•  Fuses, breakers and wire size are correct.
•  Confirm that the 15kW or 20kW auxiliary heat kit
     is wired correctly (see "Electrical Data" section if     
     applicable).
•  Low voltage wiring is complete.

•  Piping is complete and water system is cleaned
 and 

flushed.

•  Air is purged from the closed loop system.
•  Isolation valves are open, water control valves or pumps
 are 

wired.

•  Condensate line is open and correctly pitched.
•  Transformer switched to 208v if applicable.
•  DIP switches are set correctly.
•  Blower rotates freely.
•  Blower speed is correct.
•  Air filter/cleaner is clean and in position.
•  Service/access panels are in place.
•  Return air temperature is between 50-80°F heating and
 60-95° 

cooling.

•  Check air coil cleanliness to insure optimum performance. 
 

Clean as needed according to maintenance guidelines. 


To obtain maximum performance the air coil should be


cleaned before startup. A 10 percent solution of


dishwasher detergent and water is recommended for


both sides of coil. A thorough water rinse should follow.

Maintenance Filters

Filters must be clean to obtain maximum performance.  They 
should be inspected monthly under normal operating conditions 
and be replaced when necessary.  Units should never be operated 
without a filter.  Always replace the filter with the same type as 
originally furnished.

Condensate Drain

In areas where airborne bacteria produce slime in the drain pan, it 
may be necessary to treat chemically to minimize the problem.  The 
condensate drain can pick up lint and dirt, especially with dirty filters.

Blower Motors

The ECM motor is equipped with sealed ball bearings and requires 
no periodic lubrication.

Air Coil

The air coil must be cleaned to obtain maximum performance.  
Check once a year under normal operating conditions and, if dirty, 
brush or vacuum clean.  Care must be taken not to damage the 
aluminum fins while cleaning.

Caution:  Fin edges are sharp.

ASTON SERIES AIR HANDLER INSTALLATION MANUAL

Содержание GAH022

Страница 1: ...I N S TA L L AT I O N M A N U A L GEOTHERMAL HEAT PUMPS AFF ORDABLE RENEWABLE CLEAN A S T O N S E R I E S A I R H A N D L E R...

Страница 2: ......

Страница 3: ...tallation Information 5 11 Hydronic Models 12 13 Electrical Data 14 15 Wiring Schematics 16 18 ECM Blower Control 19 Blower Performance Data 20 Dimensional Data 21 24 Unit Startup 25 Replacement Proce...

Страница 4: ...1 3 4 6 7 8 9 10 11 12 Model GAH G Series Air Handler Unit Capacity Refrigeration DX Models with Nominal CFM 022 MBTUH 800 026 MBTUH 925 030 MBTUH 980 036 MBTUH 1225 042 MBTUH 1425 048 MBTUH 1625 060...

Страница 5: ...H026 GAH030 GAH036 GAH042 GAH048 GAH060 Air Coil Total Face Area ft2 m2 Tube outside diameter in mm Number of rows Fins per inch Suction line connection in mm sweat Liquid line connection in mm sweat...

Страница 6: ...glass or constructed of ductboard for the first few feet On systems employing a metal duct system canvas connectors should be used between the unit and the ductwork If air noise or excessive airflow i...

Страница 7: ...eeze It is recommended that the trap material be of a type that will allow for expansion of water when it freezes Drain lines must be in conformance with local codes Air Handler Configuration The air...

Страница 8: ...installed on combustible flooring protect the edges of the floor opening with sheet metal over wrap or other non combustible material 9 Bottom air discharge units should be sealed well to the floor to...

Страница 9: ...is secured to the A coil for shipping The indoor and outdoor compressor section is shipped with a factory charge and the service valves are not to be opened until the line set and air handler have be...

Страница 10: ...actory set 33P609 03 factory set 33P609 05 factory set open 2 turns 33P609 06 open 2 turns Note When installing these air handlers follow the table for initial txv setting Check sub cooling and superh...

Страница 11: ...11 General Installation Information cont Figure 4 Decrease Superheat Open Valve Increase Superheat Close Valve ASTON SERIES AIR HANDLER INSTALLATION MANUAL...

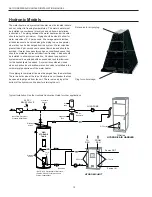
Страница 12: ...n tank to allow room for the heated liquid to expand A system is considered closed when a check valve or backflow prevention valve is installed in the cold water pipe upstream of the water heater Once...

Страница 13: ...6 0 1 4 1 4 1 4 1 2 1 2 1 2 1 2 9 0 2 8 2 6 2 5 2 4 2 4 2 4 2 3 12 0 4 6 4 4 4 2 4 0 4 0 4 0 3 9 15 0 7 0 6 8 6 6 6 0 6 0 5 9 5 8 Water Presure Drop Hydronic Coil Entering Water Temperature F EAT F 10...

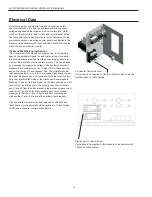
Страница 14: ...of Circuit Breaker One and on the L2 side of Circuit Breaker Two The voltmeter should read approximately 0 volts If the meter reads high voltage the aux iliary heat breakers need to be rewired so that...

Страница 15: ...765 single 900 4 0 34 7 40 0 38 7 44 0 48 4 55 0 50 60 042 0 0 7 0 7 0 7 0 8 8 8 8 15 15 9 6 32 765 single 900 7 0 34 7 40 0 41 7 47 0 52 1 58 8 60 60 14 4 49 147 single 1 275 7 0 52 0 60 0 59 0 67 0...

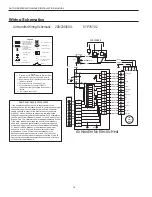
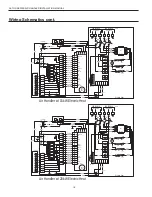
Страница 16: ...iring Optional block DC Voltage PCB traces Internal junction Quick connect terminal Thermal Limit Switch Field wire lug Ground HE PB SW1 Heater element Power block DIP package 10 position Legend N O N...

Страница 17: ...Gry 6 Yel 15 Yel 7 P2 P1 C 1 2 3 4 Gray ER4 NO ER3 NO ER2 NO ER1 NO C 1 2 3 4 HE3 TS3 NOTE 2 Grn 9 Air Handler 5kW Electric Heat Thermostat R C Y1 O W Y2 Transformer G Grn 2 3 4 5 1 Blk Wh Yel 24V 20...

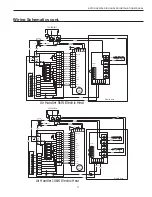
Страница 18: ...Yel 22 P2 Gray ER4 NO NOTE 2 ER3 NO ER2 NO ER1 NO C 1 2 3 4 C 1 2 3 4 P1 PNK 19 Pnk 23 Pnk 27 HE4 TS4 Pnk 18 Air Handler w 15kW Electric Heat Thermostat R C Y1 O W Y2 Transformer G Grn 2 3 4 5 1 Blk W...

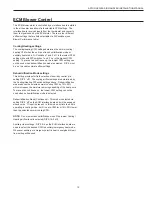
Страница 19: ...r field selection of humidity control via setting DIP 9 off The cooling airflow settings are determined by the Cooling Heating DIP switch settings above Dehumidification mode reduces the selected norm...

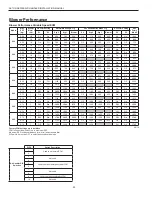
Страница 20: ...0 580 440 On Off 975 0 50 1 2 Off Off 800 630 425 Off Off 900 036 0 50 1 2 On On 1300 1025 760 Off 1105 871 760 On On 1300 0 50 1 2 Off On 1225 950 685 Off 1041 808 685 Off On 1250 0 50 1 2 On Off 115...

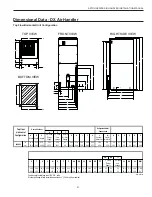
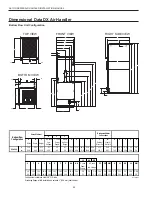
Страница 21: ...2 0 3 9 26 7 39 4 Condensate is stainless steel 3 4 O D tube Discharge flange is field installed and extends 1 25 4 mm from cabinet 026 060 Refrigerant Water Connections GG HH II S T U V W X Y Z AA B...

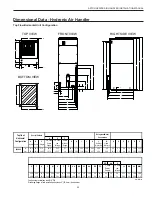
Страница 22: ...ondensate is stainless steel 3 4 O D tube Rev 4 28 14 Discharge flange is field installed and extends 1 25 4 mm from cabinet Refrigerant Water Connections 026 060 CC DD EE S T U V W X Y Z AA BB 1 cond...

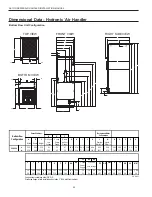
Страница 23: ...2 7 9 2 0 3 9 26 7 39 4 Condensate is stainless steel 3 4 O D Discharge flange is field installed and extends 1 25 4 mm from cabinet 026 060 Refrigerant Water Connections GG HH II S T U V W X Y Z AA B...

Страница 24: ...2 4 Condensate is stainless steel 3 4 O D Rev 8 15 14 Discharge flange is field installed and extends 1 25 4 mm from cabinet Refrigerant Water Connections 026 060 CC DD EE S T U V W X Y Z AA BB 1 cond...

Страница 25: ...coil should be cleaned before startup A 10 percent solution of dishwasher detergent and water is recommended for both sides of coil A thorough water rinse should follow Maintenance Filters Filters mus...

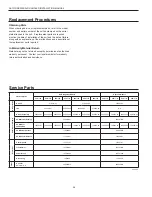
Страница 26: ...ronic Models 022 R 026 R 030 R 036 R 042 R 048 R 060 R 026 H 036 H 048 H 060 H Refrigeration Air Coil 61S641 02 61S640 02 61S642 02 TXV 33P609 01 33P609 03 33P609 05 33P609 06 N A ECM Motor Blower Blo...

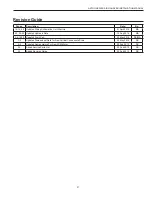
Страница 27: ...t Up 01 April 2015 MA 5 7 22 24 Updated Hydronic Data 15 Aug 2014 MA 4 6 19 20 Updated Drain Pan 20 May 2014 DS MA All Updated Dimensional Data for New Vertical Condensate Drain 02 May 2014 DS All Upd...

Страница 28: ......

Страница 29: ......

Страница 30: ...R 410A Size 2 5 Tons Document Type Installation Manual Part Number IM1008HG Release Date 07 15 2015 The manufacturer has a policy of continual product research and development and reserves the right t...

Отзывы: