


20
FR
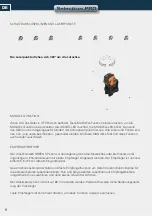
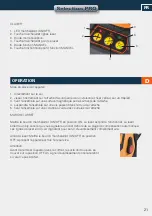
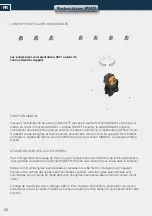
DESCRIPTION
C
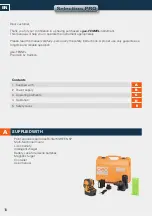
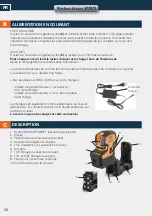
ALIMENTATION EN COURANT
Diode de
charge
B
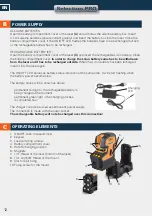
PILES ALCALINES
Ouvrez le couvercle du logement piles
(4)
et retirez le boîtier piles. Insérez 4 x AA piles alcalines
(attention à la polarité) et remettez le boîtier dans le laser. Fermez le couvercle. Si la diode mar-
che/arrêt commence a clignoter les piles doivent être échangées (le jeu complet) ou l‘accu doit
être rechargé.
ACCU (KIT)
Ouvrez le couvercle du logement piles
(4)
et insérez l‘accu. Fermez le couvercle.
Pour charger l‘accu il fault le retirer du laser et le charger hors de l‘instrument.
Après le rechargement le remettez dans l‘instrument.
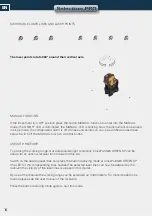
La diode marche/arrêt sert comme témoin de piles en même temps. Elle commence à clignoter
si la tension de l‘accu devient trop faible.
L‘ état de piles est affiché comme suit sur le chargeur:
· lumiére rouge permanente = l‘accu est en
train d‘être chargé
· lumière verte permanente = l‘accu est complète-
ment chargé.
Le chargeur sert également comme alimentation en courant
permanente. La connexion se fait par la douille extérieure sur
le derrièr du laser.
L‘ accu ne va pas être chargé sur cette connexion!
5
1. Bouton MARCHE/ARRÊT (sécurité de transport)
2. Clavier
3. Fenêtre de sortie faisceau/points laser
4. Couvercle du logement de piles
5. Trou traversant pour suspension en paroi
6. Aimants
7. 1/4“ filetage du laser (sol du laser)
8. 1/4“ et 5/8“ filetage du support
9. Fente pour fixation des courroies
10. Vis de fixation pour le support
6
1
2
3
4
9
10
3
6
Содержание CrossPointer5 SP
Страница 1: ...BEDIENUNGSANLEITUNG USER MANUAL MODE D EMPLOI www geo fennel com DE EN FR CrossPointer5 GREEN SP ...
Страница 9: ...9 DE ...
Страница 17: ...17 EN ...
Страница 25: ...25 FR ...
Страница 26: ...26 ...
Страница 27: ...27 ...


