background image


1.24.4


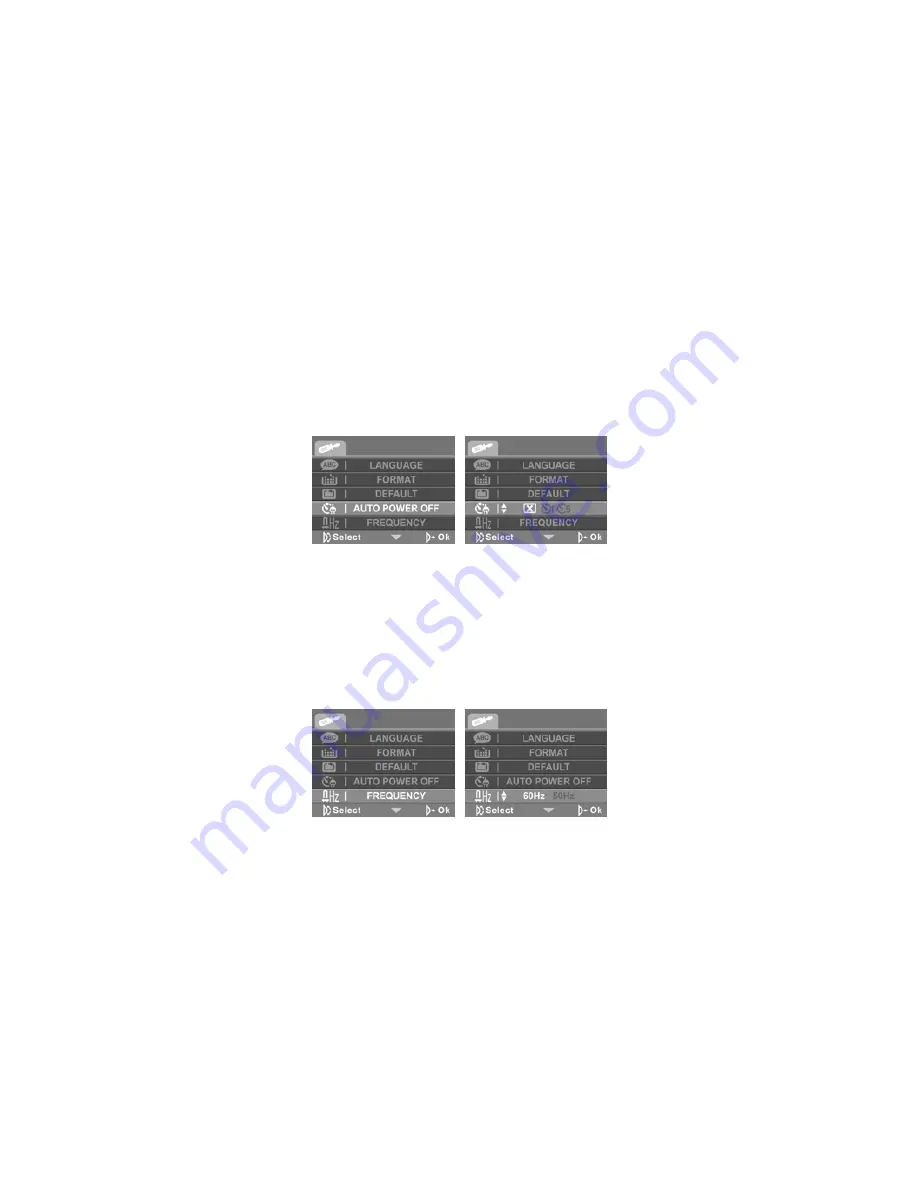
Auto power off 

Use this function to switch the camera off automatically after a period of inactivity for 
power saving. 

1.


Turn on the video camera and switch to 

SET

 mode. 

2.


Use the scroll wheel to highlight the 

AUTO POWER OFF 

option. Press the 

scroll wheel inwards to display the submenu. 

3.


Use the scroll wheel to select 

Off

1 minute

, or 

5 minutes. 

Press the scroll 

wheel inwards to confirm. 


1.24.5


Frequency 

Use the Frequency option to set the frequency system for your area.


To set the frequency:


1.


Turn on the video camera and switch to 

SET

 mode. 

2.


Use the scroll wheel to highlight the 

FREQUENCY 

option. Press the scroll 

wheel inwards to display the submenu. 

3.


Use the scroll to select 

60 Hz or 50 Hz.

 Press the scroll wheel inwards to 

confirm. 


1.24.6


TV standard 

Use the TV option to set the TV system for the area. 

1.


Turn on the video camera and switch to 

SET

 mode. 

Содержание G-SHOT DV511

Страница 1: ...nce with the instructions may cause harmful interference to radio communications However there is no guarantee that interference will not occur in a particular installation If this equipment does cause harmful interference to radio or television reception which can be determined by turning the equipment off and on the user is encouraged to try to correct the interference by one or more of the foll...

Страница 2: ...OFF and remove the batteries Continued use in this state might cause fire or electric shock Consult the store of purchase Do not disassemble change or repair the camera This might cause fire or electric shock For repair or internal inspection ask the store of purchase Do not use the camera in areas near water This might cause fire or electric shock Take special care during rain snow on the beach o...

Страница 3: ...damage cords and cables resulting in fire and electric shock Notes on Battery Usage When you use the battery carefully read and strictly observe the Safety Instructions and the notes described below Different battery types and surrounding temperatures may affect the battery performance Avoid using batteries in extremely cold environments as low temperatures can shorten the battery life and reduce ...

Страница 4: ...ew 5 1 4 6 Back view 5 1 4 7 Adjusting the LCD display 6 1 4 8 About the LEDs 9 Getting started 9 1 5 Inserting an SD card 9 1 6 Inserting the batteries 11 1 7 Turning on the video camera 12 1 8 Changing modes 12 1 9 Before you start 13 1 9 1 Setting the date and time 13 1 9 2 Setting the language 13 1 10 Movie and voice recorder mode 15 1 10 1 Shooting a video clip 15 1 10 2 Recording an voice fi...

Страница 5: ... 25 1 16 Photo mode 25 1 16 1 Photo mode icons 25 1 16 2 Using the macro function 27 1 16 3 Using the zoom function 27 1 16 4 Using the LED white light 27 1 16 5 Quick access controls 27 1 17 Movie Playback mode 28 1 17 1 Movie Playback mode icons 28 1 18 Photo Playback mode 28 1 18 1 Photo Playback mode icons 28 1 19 Thumbnail mode 30 1 20 USB mode 31 1 20 1 Using the mass storage feature 31 1 20...

Страница 6: ... 47 1 23 8 Photo playback menu 48 1 23 9 Delete 48 1 23 10 Protect 50 1 23 11 Slide show 52 1 23 12 DPOF 53 1 24 System menu 54 1 24 1 Language 54 1 24 2 Format 54 1 24 3 Default 55 1 24 4 Auto power off 56 1 24 5 Frequency 56 1 24 6 TV standard 56 1 24 7 Date time 58 1 24 8 Beep 58 1 24 9 Memory status 59 Installing software and drivers 60 Mass Storage 60 To install Presto Video Works 60 1 25 Pre...

Страница 7: ...vii Troubleshooting 65 ...

Страница 8: ...produced transmitted transcribed stored in a retrieval system or translated into any language or computer language in any form or by any means electronic mechanical magnetic optical manual or otherwise without the prior written permission of the manufacturer Before You Start Take some test shots before performing a formal recording Before taking pictures with this DV camera in any important occasi...

Страница 9: ...ium 4 2 8 GHz CPU or higher At least 512 MB of RAM or higher Standard USB 1 1 port or higher Video Card 64MB or higher Video Card Note A USB 1 1 port will enable you to transfer files to and from your host PC but transfer speeds will be much faster with a USB 2 0 port 1 2 Features The video camera offers a variety of features and functions including 720p Digital camcorder Digital camera max 16 Meg...

Страница 10: ... or appears damaged contact your dealer immediately Quick Start Guide Video camera CD ROM and application software 4xAAA alkaline batteries USB AV cable Pouch 1 4 About the camera Refer to the following illustrations to familiarize yourself with the buttons and controls of this video camera 1 4 1 Front view ...

Страница 11: ...3 Lens LED white light Microphone REC Self timer LED 1 4 2 Top view Macro button Shutter button Zoom Volume button 1 4 3 Bottom view Battery compartment Tripod mount 1 4 4 Right view ...

Страница 12: ...LCD screen cover ...

Страница 13: ...5 1 4 5 Left view Hand strap Macro switch 1 4 6 Back view Mode dial Playback button Scroll wheel USB AV Output Power LED REC STOP button ...

Страница 14: ...1 4 7 Adjusting the LCD display Flip and twist the LCD screen as shown while capturing a still image or recording a video clip ...

Страница 15: ...ess the up and down to adjust the exposure setting and inwards to adjust the flashlight setting z In Photo Playback mode 1 Press up and down to scroll through stored images 2 Press up and down to move the zoomed picture and inwards to toggle the movement direction from up down to left right z In Movie Playback mode 1 Press up and down to scroll through stored movies and inwards to play pause movie...

Страница 16: ...n z In Photo and Movie modes press to zoom in and out z In Photo Playback mode 1 Press the button right to zoom in your photo 2 Press the button left to show all stored files in a 2x2 matrix thumbnail view Press again to a 3x3 matrix view z In Movie Playback mode 1 Press the button left to show all stored video clips in a 2x2 matrix thumbnail view Press again to a 3x3 matrix view 2 Press to increa...

Страница 17: ...onds self timer left Getting started Read this section to learn how to start using the video camera This section covers basic functions such as switching on inserting the battery and memory cards and configuring preliminary settings See later chapters for advanced functions 1 5 Inserting an SD card An SD card can be installed in the video camera to provide additional storage space for still images...

Страница 18: ...2 Insert an SD card as shown Make sure the gold contacts are facing downwards 3 Press down the SD card compartment cover 4 Push the SD card compartment cover inwards ...

Страница 19: ...recommended by the manufacturer or your dealer Note Install the batteries exactly as described here Ensure that the polarity of the batteries is correct Installing the batteries incorrectly could cause damage to the camera and possibly start a fire 1 Open the battery compartment cover 2 Insert the batteries as shown 3 Close the battery compartment cover ...

Страница 20: ... on the video camera Press and hold the power button to turn the video camera on off 1 8 Changing modes The video camera can operate in three modes Movie Photo and SET Move the mode dial to toggle different modes ...

Страница 21: ...el up down to highlight DATE TIME Press the scroll wheel inwards to confirm 2 Press the scroll wheel up down to highlight each field and inwards to select a field 3 Adjust each value by moving the scroll wheel up and down Press the scroll wheel inwards to save your changes 1 9 2 Setting the language 1 Turn on the video camera and move the mode dial to SET Move the scroll wheel up down to highlight...

Страница 22: ... the following languages English Arabic Dutch Portuguese Turkish Korean Russian Italian Spanish French German Japanese Traditional Chinese and Simplified Chinese After the language is selected press the scroll wheel inwards to confirm ...

Страница 23: ...C STOP button to start recording 4 Press the REC STOP button again to stop recording 5 The video clip is automatically saved with a unique file name Notes The maximum length of each video recording file is 4G The size and quality affect the length of the recording High resolution and high quality settings will result in larger files and therefore shorter length Movie mode ...

Страница 24: ...ile 1 Turn on the video camera and switch to Voice mode 2 Press the REC STOP button to start recording 3 Press the REC STOP button again to stop recording 4 The voice file is automatically saved with a unique file name Voice mode ...

Страница 25: ... video clip press the scroll wheel inwards 4 When viewing the video clip press the zoom button left or right to adjust the volume 5 To view the video clip in rewind and fast forward modes long press and hold the scroll wheel up and down to fast forward and rewind at 2X 4X or 8X speeds 6 To skip to the previous or next clip press the scroll wheel up or down 7 Press the REC STOP button to stop playi...

Страница 26: ...roll through the audio files Press the scroll wheel inwards to playback the audio file 3 When viewing the audio press the zoom button left or right to adjust the volume 4 To skip to the previous or next file press the scroll wheel up or down 5 Press the REC STOP button to stop playing 6 Press the Playback button again to return to Voice mode Voice playback mode indicator ...

Страница 27: ...11 1 Taking a still picture 1 Turn on the camera and switch to Photo mode 2 Use the LCD screen to frame the picture 3 Press the shutter button to capture the image 4 The picture is automatically saved with a unique file name Photo mode ...

Страница 28: ...the zoom button right to zoom in on the picture and press left to zoom out 4 Press the scroll wheel up and down to move the zoomed image vertically or horizontally Press the scroll wheel inwards to change the direction of movement 5 Press the zoom button left when fully zoomed out to view thumbnails of all stored files 6 Press the Playback button again to return to Photo mode Playback mode ...

Страница 29: ...eo camera to a TV as shown with the USB AV cable provided Using the camera Read this section to learn how to use the camera 1 14 Movie mode Use Movie mode to capture video clips and store them in the internal memory or on an SD card 1 14 1 Movie mode icons Use the following picture to familiarize yourself with the Movie mode icons and symbols ...

Страница 30: ... and the storage capacity of an SD card is used indicates that SD card is not inserted and internal memory is used 3 File resolution indicator 4 Image quality indicator 5 Date and time 6 Remaining recording time 7 Battery indicator 8 Macro indicator 9 Histogram indicator 10 Effect indicator 11 White balance indicator 12 LED white light indicator 13 Movie mode indicator 14 EV compensation indicator...

Страница 31: ...subjects close to the lens In macro mode subjects can be as close as 15 16 cm While in Photo or Movie modes move the macro button on the side of the video camera to activate macro function and an icon displays on the LCD screen Move the macro button again to return to normal mode ...

Страница 32: ...ts in dark environments Press the scroll wheel inwards to choose from the following lighting options Off On and Night modes An icon displays on the screen when activated 1 14 5 Quick access controls You can also adjust the settings of exposure and lighting by pressing the scroll wheel up and down or inwards In Movie mode press the scroll wheel up or down to adjust the EV compensation setting Press...

Страница 33: ...2 4 5 3 See the table below for a description of each icon and symbol 1 Voice mode indicator 2 Displays the number of files saved 3 SD card indicator 4 Remaining recording time 5 Battery indicator 1 16 Photo mode Use Photo mode to capture still pictures and store them in the internal memory or on an SD card 1 16 1 Photo mode icons Use the following picture to familiarize yourself with the Photo mo...

Страница 34: ...s indicator indicates that an SD card is inserted and the storage capacity of an SD card is used indicates that SD card is not inserted and internal memory is used 3 File size indicator 4 Picture quality indicator 5 Self timer indicator 6 Face detect indicator 7 Date and time 8 Histogram indicator 9 Burst mode indicator 10 Battery indicator 11 Macro indicator 12 Date stamp indicator 13 Effect indi...

Страница 35: ... 16 4 Using the LED white light See section 1 14 4 Using the LED white light 1 16 5 Quick access controls You can also adjust the settings of the exposure and lighting by pressing the scroll wheel up down or inwards In Photo mode press the scroll wheel up or down to adjust the EV compensation settings Press the scroll wheel inwards to choose from the three lighting options Press the REC Stop butto...

Страница 36: ...icon and symbol 1 Displays the number of current movie total number of recorded video clips 2 Displays movie resolution 3 Date and time 4 Shows time elapsed total movie length 5 Battery status indicator 6 File protect indicator 7 Playback mode icon 8 Volume level 1 18 Photo Playback mode Use Photo Playback mode to review all the image files stored in the video camera 1 18 1 Photo Playback mode ico...

Страница 37: ...e below for a description of each icon and symbol 1 Displays the number of current image total number of saved images 2 Displays photo size 3 Date and time 4 Battery status indicator 5 File protect indicator 6 Playback mode icon ...

Страница 38: ...age video clip displays on the screen Press the zoom button left to view four thumbnail images video clips on the LCD screen Press the zoom button left again to view nine thumbnail images video clips on the LCD screen 3 Press the scroll wheel up and down to highlight an image or a video clip and press inwards to view the image or playback the video clip in full screen mode 4 Press the zoom button ...

Страница 39: ... connect a PC Note Batteries are needed when using this feature as the USB port does not supply power for the camera Using the menus Read this section to learn how to configure the camera settings and use the advanced features 1 21 Movie menu When in Movie mode press the MENU button to show the Movie options menu 4 1 1 White balance Use this option to correct color difference for different lightin...

Страница 40: ...4 Press the MENU button again to exit the menu ...

Страница 41: ...e 1 Turn the video camera on and ensure it is in Movie mode 2 Press the MENU button and use the scroll wheel to highlight the QUALITY option Press the scroll wheel inwards to display the submenu 3 Use the scroll wheel to select Fine or Normal Press the scroll wheel inwards to confirm 4 Press the MENU button again to exit the menu ...

Страница 42: ...1 Turn the video camera on and ensure it is in Movie mode 2 Press the MENU button and use the scroll wheel to highlight the EFFECT option Press the scroll wheel inwards to display the submenu 3 Use the scroll wheel to select Color Sepia or B W Press the scroll wheel inwards to confirm 4 Press the MENU button again to exit the menu ...

Страница 43: ...a on and ensure it is in Movie mode 2 Press the MENU button and use the scroll wheel to highlight the RESOLUTION option Press the scroll wheel inwards to display the submenu 3 Use the scroll wheel to select QVGX VGA D1 XGA or HD Press the scroll wheel inwards to confirm 4 Press the MENU button again to exit the menu Note Make sure you use the correct software while playing the videos on PC ...

Страница 44: ...camera on and ensure it is in Movie mode 2 Press the MENU button and use the scroll wheel to highlight the CAPTURE MODE option Press the scroll wheel inwards to display the submenu 3 Use the scroll wheel to select Movie or Voice mode Press the scroll wheel inwards to confirm 4 Press the MENU button again to exit the menu ...

Страница 45: ...isplay Movie Playback menu 2 Use the scroll wheel to highlight the DELETE option Press the scroll wheel inwards to display the submenu 3 Use the scroll wheel to select Cancel Delete One or Delete All Press the scroll wheel inwards to confirm If you select Delete One the playback screen appears again Use the scroll wheel to locate the file you want to delete and press inwards to confirm If you sele...

Страница 46: ...enu Note Once deleted files cannot be recovered Make sure the files are transferred to PC via USB cable or saved to another storage device Files that have been protected will not be deleted You have to unlock the files first before deleting them ...

Страница 47: ...tect One or Protect All Press the scroll wheel inwards to confirm If you select Protect One the playback screen appears again Use the scroll wheel to locate the file you want to protect and press inwards to confirm A lock icon is displayed to show that the file is protected Note To unlock a file repeat the above steps The lock icon disappears when the file is unlocked If you select Protect All thr...

Страница 48: ...4 Press the MENU button again to exit the menu ...

Страница 49: ...nditions 1 Turn the video camera on and ensure it is in Photo mode 2 Press the MENU button and use the scroll wheel to highlight the WHITE BALANCE option Press the scroll wheel inwards to display the submenu 3 Use the scroll wheel to select Auto Sunny Cloudy Tungsten or Fluorescent Press the scroll wheel inwards to confirm 4 Press the MENU button again to exit the menu ...

Страница 50: ...emory space 1 Turn the video camera on and ensure it is in Photo mode 2 Press the MENU button and use the scroll wheel to highlight the QUALITY option Press the scroll wheel inwards to display the submenu 3 Use the scroll wheel to select from Fine or Normal Press the scroll wheel inwards to confirm 4 Press the MENU button again to exit the menu ...

Страница 51: ...k 1 Turn the video camera on and ensure it is in Photo mode 2 Press the MENU button and use the scroll wheel to highlight the EFFECT option Press the scroll wheel inwards to display the submenu 3 Use the scroll wheel to select Color Sepia or B W Press the scroll wheel inwards to confirm 4 Press the MENU button again to exit the menu ...

Страница 52: ...ce 1 Turn the video camera on and ensure it is in Photo mode 2 Press the MENU button and use the scroll wheel to highlight the SIZE option Press the scroll wheel inwards to display the submenu 3 Use the scroll wheel to select 1M 3M 5M 12M or 16M Press the scroll wheel inwards to confirm 4 Press the MENU button again to exit the menu ...

Страница 53: ...t is in Photo mode 2 Press the MENU button and use the scroll wheel to highlight the DATE STAMP option Press the scroll wheel inwards to display the submenu 3 Use the scroll wheel to select whether to show the date stamp on the screen Press the scroll wheel inwards button to confirm 4 Press the MENU button again to exit the menu ...

Страница 54: ...st mode 1 Turn the video camera on and ensure it is in Photo mode 2 Press the MENU button and use the scroll wheel to highlight the BURST MODE option Press the scroll wheel inwards to display the submenu 3 Use the scroll wheel to select Single or Burst Press the scroll wheel inwards button to confirm 4 Press the MENU button again to exit the menu ...

Страница 55: ...ress the MENU button and use the scroll wheel to highlight the FACE DETECT option Press the scroll wheel inwards to display the submenu 3 Use the scroll wheel to select OK or Cancel to enable or disable the Face detect Press the scroll wheel inwards button to confirm 4 Press the MENU button again to exit the menu Note Face Detect may be unavailable in some specific mode settings or environments ...

Страница 56: ... wheel to highlight the DELETE option Press the scroll wheel inwards to display the submenu 3 Use the scroll wheel to select Cancel Delete One or Delete All Press the scroll wheel inwards to confirm If you select Delete One the playback screen appears again Use the scroll wheel to locate the file you want to delete and press inwards to confirm If you select Delete All use the scroll wheel to selec...

Страница 57: ...menu Note Once deleted files cannot be recovered Make sure the files are transferred to PC via USB cable or saved to another storage device Files that have been protected will not be deleted You have to unlock the files first before deleting them ...

Страница 58: ...rotect All Press the scroll wheel inwards to confirm If you select Protect One the playback screen appears again Use the scroll wheel to locate the file you want to protect and press inwards to confirm A lock icon is displayed to show that the file is protected Note To unlock a file repeat the above steps The lock icon disappears when the file is unlocked If you select Protect All three options ar...

Страница 59: ...51 4 Press the MENU button again to exit the menu ...

Страница 60: ...Press the Playback button and then press the MENU button to display the Photo Playback menu 2 Use the scroll wheel to highlight the AUTOPLAY option Press the scroll wheel inwards to display the submenu 3 Use the scroll wheel to select OK or Cancel and press the scroll wheel inwards to confirm 4 The images will be displayed one after another Press the scroll wheel inwards to stop the slide show ...

Страница 61: ...lay the submenu 3 Use the scroll wheel to select from Cancel Single Print or Print All and press the scroll wheel inwards to confirm 1 Single Print The most recent picture is displayed on the screen Press the zoom button left and right to select the number of prints and the scroll wheel up and down to select other photos You can set a maximum of nine prints for each picture Note To remove DPOF fro...

Страница 62: ...uage See section 1 9 2 Setting the language 1 24 2 Format Use this function to format the current storage media This format action will delete everything on the media 1 Turn on the video camera and switch to SET mode 2 Use the scroll wheel to highlight the FORMAT option Press the scroll wheel inwards to display the submenu 3 Use the scroll wheel to select OK or Cancel and press the scroll wheel in...

Страница 63: ...efault settings 1 Turn on the video camera and switch to SET mode 2 Use the scroll wheel to highlight the Default option Press the scroll wheel inwards to display the submenu 3 Use the scroll wheel to select OK or CANCEL and press the scroll wheel inwards to confirm ...

Страница 64: ...minute or 5 minutes Press the scroll wheel inwards to confirm 1 24 5 Frequency Use the Frequency option to set the frequency system for your area To set the frequency 1 Turn on the video camera and switch to SET mode 2 Use the scroll wheel to highlight the FREQUENCY option Press the scroll wheel inwards to display the submenu 3 Use the scroll to select 60 Hz or 50 Hz Press the scroll wheel inwards...

Страница 65: ... 2 Use the scroll wheel to highlight the TV STANDARD option Press the scroll wheel inwards to display the submenu 3 Use the scroll wheel to select NTSC or PAL and press the scroll wheel inwards to confirm ...

Страница 66: ...tion to enable disable operation sound 1 Turn on the video camera and switch to SET mode 2 Use the scroll wheel to highlight the BEEP option Press the scroll wheel inwards to display the submenu 3 Use the scroll wheel to select OK or CANCEL and press the scroll wheel inwards to confirm ...

Страница 67: ... saved in the video camera 1 Turn on the video camera and switch to SET mode 2 Use the scroll wheel to highlight the MEMORY STATUS option Press the scroll wheel inwards to display the submenu 3 The number of files saved and the free memory space are displayed on the screen Press the scroll wheel inwards again to exit ...

Страница 68: ...age in Windows Explorer Files can be dragged and dropped in the same way as with an ordinary disk Presto Video Works Presto Video Works is an advanced software application for editing video To install Presto Video Works 1 Insert the supplied CD ROM in the CD ROM drive 2 If the CD ROM does not automatically boot use Windows Explorer to execute the InstallMgr exe file in the root directory The follo...

Страница 69: ...ive 2 If the CD ROM does not automatically boot use Windows Explorer to execute the InstallMgr exe file in the root directory The following screen is displayed 3 Click Install to begin the installation process and follow the instructions on screen More information about Presto Mr Photo can be found in the help files when the application is started Install button ...

Страница 70: ...manual 1 Insert the supplied CD ROM in the CD ROM drive 2 If the CD ROM does not automatically boot use Windows Explorer to execute the InstallMgr exe file in the root directory The following screen is displayed 3 Click User s Manual to begin viewing the user s manual User s Manual ...

Страница 71: ... effects Color B W Sepia Lens Fixed lens Wide F 3 2 f 7 5mm Focus range Normal 1 5m infinity Macro 15 16 cm Still image Formats JPEG EXIF 2 2 DCF DPOF Resolution 1M 3M 5M 12M 16M Firmware Interpolation Movie clips MJPEG AVI Resolution QVGX VGA D1 XGA HD 720p Frame rate 30 fps max Zoom Movie Digital Zoom 8X Advanced Zoom 2X Camera Digital Zoom 8X Advanced Zoom 2X Still Image Playback Digital Zoom 1...

Страница 72: ... compensation 2 0 EV 2 0 EV Self timer Off 5 10 seconds PC interface USB 2 0 high speed TV out format NTSC PAL Shutter Electronic shutter 1 8 1 2000 second Auto power off Off 1 min 5 min Power supply 4 x AAA Alkaline Ni Cd Ni Mh batteries 4 x 1 5V or Li ion Battery NP40 Dimension 68 H x 41 W x 111 D mm Weight Approx 218 5g without batteries ...

Страница 73: ...ly See 1 6 Inserting the batteries Replace the batteries The camera suddenly turns off The auto power off function was enabled The camera is running out of battery power Turn the power on again Replace the batteries The captured image is not stored in memory Before the image is saved the power has been cut off When the battery indicator turns red replace the batteries immediately ...

Страница 74: ...ose normal or macro mode See 1 16 2 Using the macro function Memory card cannot be used The memory card is protected The memory card contains non DCF images taken by other cameras Unlock the memory card Format the memory card See 1 24 2 Format Before formatting the card ensure you back up the files All buttons are inactive Short circuit occurred when connecting the camera with other devices Remove...

Отзывы: