Genicom LN28 Скачать руководство пользователя страница 37

Nov 00

Genicom

Publication No. GEG-99018A

GENICOM LN28 and microLaser 280 User Guide

2-9

Selecting Print Media

Has staples or paperclips attached

Is categorized as thermal paper, coated paper, or carbon paper

Is an envelope that is embossed, is made of extremely thick paper, or is padded

Is an envelope that has metal clasps

Is a sheet of labels that has the backing sheet exposed between individual labels

Correct Paper Storage

It is important to store paper correctly prior to placing it in the printer, since improper storage can
cause frequent paper jams and poor print quality. Use the following guidelines when storing paper
for use in the printer:

Store reams of paper on a flat surface, and always store them stacked horizontally.

Store reams of paper in an area away from both direct sunlight and high humidity

Open sealed reams only when you are ready to load the paper into the paper tray, and always
close and seal partial reams of paper.

Do not stack partial reams of paper

Print Media Capacities

Your printer can hold up to 3,150 sheets of standard weight paper, depending upon the options
installed. The printer can be configured in the following five variations:

Printer (650 sheets)

Printer with 500 sheet feeder(1150 sheets)

Printer with two 500 sheet feeders (1650 sheets)

Printer with high capacity feeder(2650 sheets)

Printer with high capacity feeder and 500 sheet feeder (3150 sheets)

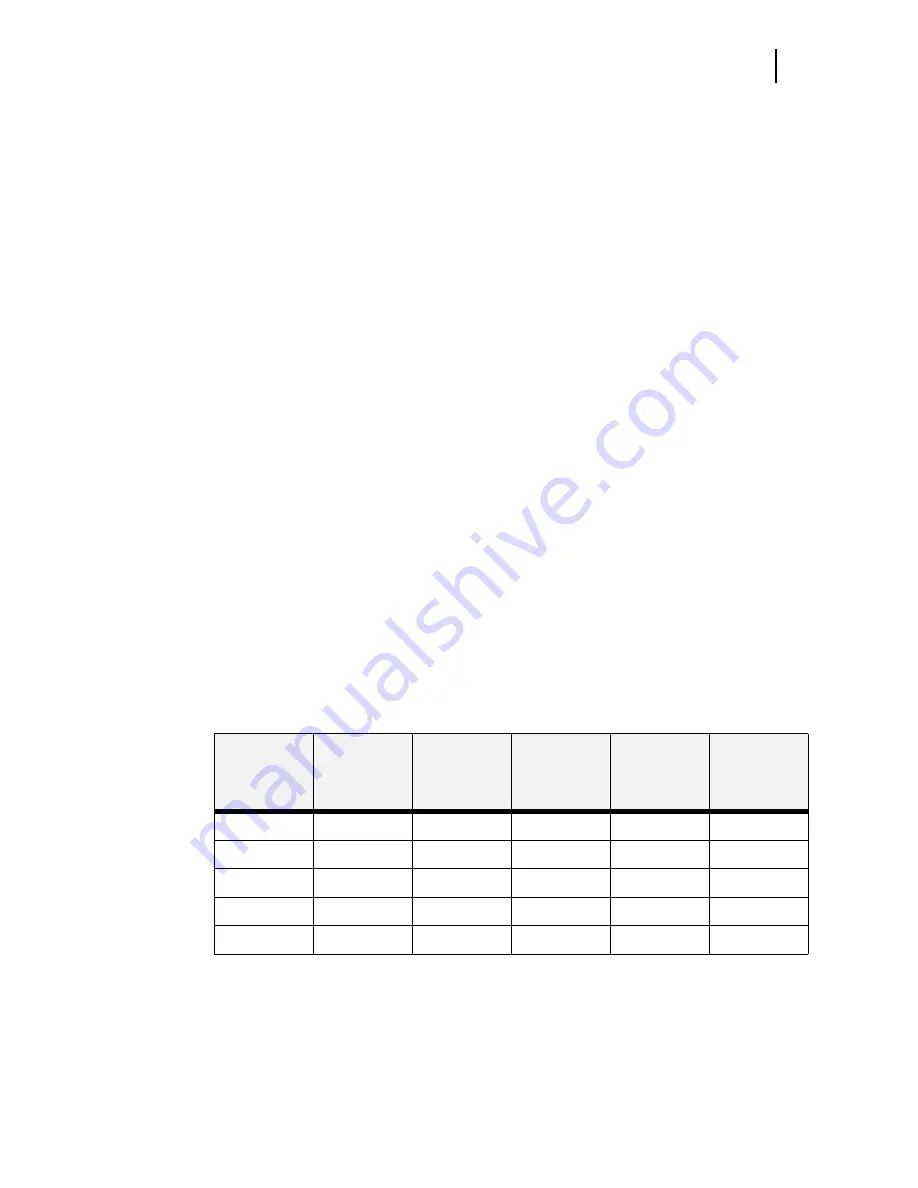
The following table shows the five configurations and the breakdown of paper capacity:

If you want to use paper that is an odd size or weight, you must use the front paper tray. The front
tray can hold the following quantities of non-standard print media:

Envelopes : 10

Transparencies: 30

Front Tray
(standard)

Tray 1
(standard)

Tray 2
(option)

Tray 3
(option)

High
Capacity
Feeder
(option)

Total Paper
Capacity

150

500

--

--

--

650

150

500

500

--

--

1,150

150

500

500

500

--

1,650

150

500

--

--

2,000

2,650

150

500

500

--

2,000

3,150

Содержание LN28

Страница 1: ...Nov 00 Genicom Publication No GEG 99018A GENICOM LN28 and microLaser 280 User Guide SIB012F...

Страница 2: ...d microLaser 280 is Copyrighted 1999 by GENICOM LLC All Rights Reserved This software may not be reproduced modified displayed transferred or copied in any form or in any manner or on any media in who...

Страница 3: ...Nov 00 Genicom Publication No GEG 99018A GENICOM LN28 and microLaser 280 User Guide iii...

Страница 4: ...Publication No GEG 99018A Genicom Nov 00 iv GENICOM LN28 and microLaser 280 User Guide...

Страница 5: ...n 3 Conventions 3 About the Printer 4 Features 4 Available Configurations 4 Chapter 1 Getting Started 1 1 About this Chapter 1 2 Package Contents 1 2 CD ROM Contents 1 2 Printer Location Requirements...

Страница 6: ...nter to the Host Computer 2 4 Parallel Port 2 4 USB Port 2 5 Selecting Print Media 2 8 Paper and Print Media To Avoid 2 8 Correct Paper Storage 2 9 Print Media Capacities 2 9 Print Media Weight Type a...

Страница 7: ...Interface 4 2 Replacing Printer Components 4 3 Replacing the Toner Cartridge 4 3 Replacing the Fuser 4 7 Replacing the Transfer Roll 4 10 Cleaning the Printer 4 14 Cleaning the Exterior 4 14 Cleaning...

Страница 8: ...Miscellaneous Problems 5 35 Printer is Inoperative 5 35 Printer Operates Erratically 5 36 Printer Makes Unusual Noises 5 37 Room Lights Dim or Flicker When Printer Starts 5 38 Printer Interferes with...

Страница 9: ...ed Rolls 7 25 Moving the 500 Sheet Feeder 7 29 Moving the Printer and 500 Sheet Feeder a Short Distance 7 29 Moving the Printer and 500 Sheet Feeder a Long Distance 7 29 Chapter 8 Using the High Capac...

Страница 10: ...ut Tray 9 8 Solving Offset Output Tray Problems 9 8 Interpreting Offset Output Tray Error Messages 9 9 Installation Problems 9 9 Clearing an Offset Output Tray Paper Jam 9 10 Correcting Miscellaneous...

Страница 11: ...microLaser 280 User Guide xi EMC Compliance B 3 Appendix C GENICOM Part Numbers C 1 GENICOM Part Numbers C 2 Printers C 2 Paper Handling Options C 2 Network Interfaces C 3 DRAM FLASH SIMM and Hard Dis...

Страница 12: ...Publication No GEG 99018A Genicom Nov 00 xii GENICOM LN28 and microLaser 280 User Guide...

Страница 13: ...Nov 00 Genicom Publication No GEG 99018A Preface In this Chapter Welcome on page 2 About this Manual on page 2 About the Printer on page 4...

Страница 14: ...e printer and describes the space and environment requirements of the printer Chapter 2 Using the Printer This chapter provides information concerning the daily use of the printer including procedures...

Страница 15: ...mbers This appendix lists the part numbers for GENICOM LN28 and microLaser 280 printers options and consumables Printer Orientation Throughout this guide the four sides of the printer are referred to...

Страница 16: ...c image to the printer where the printer turns the electronic image into a black and white printed image Features Your laser printer has the following features Quality printing at a high speed The pri...

Страница 17: ...IEEE 1284 Parallel and USB Printer Languages PCL5e Adobe Postscript 3 NOTE Various optional accessories are also available for the printer Please see Appendix C GENICOM Part Numbers to order optional...

Страница 18: ...Publication No GEG 99018A Genicom Nov 00 6 GENICOM LN28 and microLaser 280 User Guide About the Printer...

Страница 19: ...Chapter 1 Getting Started In this Chapter About this Chapter on page 1 2 Package Contents on page 1 2 Printer Location Requirements on page 1 3 Parts of the Printer on page 1 5 Optional Printer Access...

Страница 20: ...kaging CD ROM Contents The two CD ROMs provided with your printer include the following contents Electronic Library CD ROM The Electronic Library CD ROM contains printer drivers software and documenta...

Страница 21: ...ront to back 18 1 in 460 mm Space Requirements A certain amount of space is required for proper operation of the printer and also for performing printer maintenance and replacing consumables The follo...

Страница 22: ...LN28 and microLaser 280 User Guide Printer Location Requirements Figure 1 2 Side view of the printer Environment Requirements Use the following guidelines to determine the best location for the printe...

Страница 23: ...all outlet or plug the printer into a wall outlet that does not meet the current draw requirement of the printer Consult an elec trician if you are uncertain about the voltage rating of an AC wall out...

Страница 24: ...eating Power cord connector Provides point of connection for power cord Rear cover Provides access to the rear of the printer allows you to remove jammed paper Offset output tray cover Covers the comp...

Страница 25: ...e 1 7 Parts of the Printer Figure 1 6 Control Panel LCD Display Shows error messages and other status messages also displays menus submenus and settings LED Indicators Show printer status Pushbuttons...

Страница 26: ...jobs using an offset Duplexer Enables two sided printing High Capacity Feeder HCF Holds up to 2000 sheets A4 or Letter paper The printer can accommodate one 500 sheet feeder when the HCF is installed...

Страница 27: ...itially fed from the front paper tray or one of the other paper trays 2 The image is transferred from the photosensitive drum onto the paper 3 The fuser fixes the toner permanently on the paper 4 Afte...

Страница 28: ...Publication No GEG 99018A Genicom Nov 00 1 10 GENICOM LN28 and microLaser 280 User Guide Paper Path...

Страница 29: ...this Chapter on page 2 2 Connecting the Printer to the AC Outlet on page 2 2 Turning Power On and Off on page 2 3 Connecting the Printer to the Host Computer on page 2 4 Selecting Print Media on page...

Страница 30: ...es for selecting print media Connecting the Printer to the AC Outlet 1 Insert the power cord into the AC connector on the rear of the printer 2 Verify that the power switch of the printer is in the O...

Страница 31: ...appears on the display This message indicates that the printer is warming up and is not ready to print After about 60 seconds the status message changes to Ready indicating that the printer is ready...

Страница 32: ...Press the NEXT button until the text Parallel is shown on the second line of the display 7 Press the SELECT button to enter the parallel submenu 8 Verify that the second line of the display contains...

Страница 33: ...USB Port The USB port of your printer provides a reliable high speed bi directional connection between your printer and PC The USB standard is designed to deliver complex graphic rich documents to the...

Страница 34: ...onsidered a self powered device and will not draw power from the USB port 2 Power on the host system and the printer and allow the two systems to finish booting 3 Attach the USB cable to both the prin...

Страница 35: ...press OK 7 Choose the PPD file that corresponds to your printer 8 Choose the correct printer 9 Press Create 10 You now have a desktop shortcut to the GENICOM USB printer and are ready to print Using t...

Страница 36: ...he previous step After you have pressed the SELECT button the first line of the display should contain the text USB Setup and the second line should contain the text Format 21 Press the RETURN button...

Страница 37: ...you are ready to load the paper into the paper tray and always close and seal partial reams of paper Do not stack partial reams of paper Print Media Capacities Your printer can hold up to 3 150 sheets...

Страница 38: ...018A Genicom Nov 00 2 10 GENICOM LN28 and microLaser 280 User Guide Selecting Print Media Labels 30 Paper 150 NOTE Expect a slight reduction in image quality when you print on envelopes labels transpa...

Страница 39: ...mmodated Letter A4 Paper Tray main tray and optional 500 sheet A4 Letter paper feeder 16 to 24 lbs 64 to 200g m2 A4 LEF 297 x 210mm 11 7 x 8 27 inches Letter LEF 279 4 x 215 9mm 8 5 x 11 inches Execut...

Страница 40: ...feeder 16 to 24 lbs 60 to 135 g m2 A4 LEF SEF 297 x 210mm 11 7 x 8 27 inches Letter LEF SEF 279 4 x 215 9mm 11 x 8 5 inches Legal 13 SEF 330 2 x 215 9mm 13 x 8 5 inches Legal 14 SEF 355 6 x 215 9mm 1...

Страница 41: ...Nov 00 Genicom Publication No GEG 99018A GENICOM LN28 and microLaser 280 User Guide 2 13 Loading Print Media Use the following procedure to load paper into the 500 sheet A4 letter paper tray 1 14 2 3...

Страница 42: ...transportation problems make sure the length and width guides are adjusted to match the paper size and are locked firmly into place 4 5 CAUTION Do not overload the tray and make sure the paper stack...

Страница 43: ...he tray has two guides that are located on the left and right sides of the tray These guides allow you to adjust the size of the area that holds the print media Use the following guidelines when loadi...

Страница 44: ...the paper guides so they match the size of the paper that you are loading 3 Lift the front tray up and out as shown on the label inside the front tray 4 Stack the paper that you will load in the fron...

Страница 45: ...Envelopes in the Front Tray 1 Open the front tray by pulling on the hand grip on the top of the tray 2 Slide the paper guides all the way to the sides of the front tray 3 Pull the front tray up and ou...

Страница 46: ...en 6 Load the stack of envelopes into the front tray by sliding the stack between the paper guides and then pushing the envelope stack into the tray until it will not go any further 7 Slide the paper...

Страница 47: ...y by pulling on the hand grip on the top of the tray 2 Slide the paper guides all the way to the sides of the front tray 3 Load transparencies into the front tray one at a time sliding each transparen...

Страница 48: ...stack Loading Postcards into the Front Tray 1 Open the front tray by pulling on the hand grip on the top of the tray 2 Slide the paper guides all the way to the sides of the front tray 3 Position the...

Страница 49: ...ushing the stack of postcards into the tray until it will not go any further 5 Slide the paper guides up against the stack of postcards 6 Check the postcard stack to make sure it is not loaded at an a...

Страница 50: ...zes and types have a tendency to curl upon output and may also have prob lems with static electricity that prevent the paper from stacking properly in the output tray To help prevent these problems ra...

Страница 51: ...is Chapter on page 3 2 Control Panel Features on page 3 2 Navigating the Control Panel Menus on page 3 4 Menu Structure on page 3 6 Paper Menu on page 3 6 Interface Menu on page 3 9 PS Menu on page 3...

Страница 52: ...ontrol panel is located on the front of the printer and contains the display indicators and pushbuttons that allow you to view and change the printer settings The figure below shows the control panel...

Страница 53: ...ter is IDLE Printer is ACTIVE processing a job Printer is WAITING a partial job has been printed and the printer is waiting for additional job data Green POWER is off POWER is on Power Saver Mode ON Y...

Страница 54: ...If you press the NEXT button repeatedly the second line of the display cycles through the main menus in the following order Paper Menu Interface Menu PS Menu PCL Menu System Menu Quality Menu Functio...

Страница 55: ...Paper Menu 1 Press the MENU button on the control panel 2 Press the NEXT button until the text Paper Menu is shown on the second line of the dis play 3 Press the SELECT button to enter the paper menu...

Страница 56: ...e second line of the dis play 3 Press the SELECT button to enter the Paper Menu 4 Press the NEXT button to move through the submenus Copies Default Source Manual Feed Output Tray Media Size Type Tray...

Страница 57: ...S to scroll through the list of available output trays 2 Press SELECT to set a tray as the default Media Size Type This submenu allows you to set the media size and type for the Front Tray and set the...

Страница 58: ...rint or not print blank pages of a document Print Print Do Not Print 1 Press NEXT or PREVIOUS to toggle between PRINT and DO NOT PRINT 2 Press SELECT to save this setting Output Linking This submenu a...

Страница 59: ...nu allows you to choose the type of interface The parallel and USB ports can not be ON simultaneously Parallel On USB Off Parallel On Off USB On Off 1 Press NEXT or PREVIOUS to toggle between PARALLEL...

Страница 60: ...ing Settings Print PS Errors This submenu allows you to choose to either print or not print PS errors Off On Off 1 Press NEXT or PREVIOUS to toggle between ON print and OFF do not print 2 Press SELECT...

Страница 61: ...ows you to choose a font source Internal Internal 1 Press NEXT or PREVIOUS to scroll through the available font sources 2 Press SELECT to choose and set a source Font Number This submenu allows you to...

Страница 62: ...equals either a cariage return alone or a carriage return and a line feed together CR CR CR CR CR CR LF 1 Press NEXT or PREVIOUS to choose from CR CR or CR CR LF 2 Press SELECT to save this setting L...

Страница 63: ...NEXT or PREVIOUS to scroll through the available languages English French Francais German Deutsch Italian Italiano or Spanish Espanol 2 Press SELECT to choose and set the language Power Saver This su...

Страница 64: ...submenu allows you to turn jam recovery on or off On On Off 1 Press NEXT or PREVIOUS to toggle between ON and OFF 2 Press SELECT to save this setting Hex Print This submenu allows you to print hexade...

Страница 65: ...ocedures in the following table to access and change the system settings Submenus Default Setting Available Settings Procedure for Changing Setting Resolution This submenu allows you to set the resolu...

Страница 66: ...n the control panel 2 Press the NEXT button to move through the submenus Front Tray 1 Tray 2 Tray 3 Face Down and Toner 3 Press the SELECT button to enter a submenu 4 Use the procedures in the followi...

Страница 67: ...ia Type and Level for Tray 2 1 Press NEXT or PREVIOUS to scroll through the media size media type and level settings for Tray 2 2 Press SELECT to view a specific setting Tray 3 This submenu allows you...

Страница 68: ...Publication No GEG 99018A Genicom Nov 00 3 18 GENICOM LN28 and microLaser 280 User Guide Status Menu...

Страница 69: ...the Printer In this Chapter About this Chapter on page 4 2 Upgrading Printer Firmware on page 4 2 Replacing Printer Components on page 4 3 Cleaning the Printer on page 4 14 Moving the Printer on page...

Страница 70: ...ut firmware upgrades Upgrading Firmware Using the Parallel Interface To upgrade the printer using the parallel interface go to the DOS prompt and use the copy com mand to copy the new file to the prin...

Страница 71: ...on end Keep the cartridge out of the reach of children and in an area where the temperature remains between 32 F and 95 F and the humidity remains between 15 to 85 If you bring a cold toner cartridge...

Страница 72: ...8 and microLaser 280 User Guide Replacing Printer Components 2 Locate the finger grip near the top cover of the printer and pull the top cover up and back to open it 3 Remove the old toner cartridge f...

Страница 73: ...lacing Printer Components 4 Remove the new toner cartridge from its packaging 5 Rock the toner cartridge back and forth and then shake it horizontally to ensure that the toner is evenly distributed 6...

Страница 74: ...e channels on the inside of the printer and lower the toner cartridge into the printer 8 Close the top cover Disposing of the Print Cartridge 1 Place the used toner cartridge inside the new toner cart...

Страница 75: ...er NOTE In the following procedure the left and right sides of the printer are those to the left and right of a person facing the rear of the printer Use the following procedure to remove and replace...

Страница 76: ...nd grip on the rear of the printer and pull it toward you to open the rear cover 3 Release the fuser by pressing the top of the fuser latch on the left side of the printer 4 Grasp the handles at the e...

Страница 77: ...sp the fuser by the handles Tilt the right end of the fuser downwards slightly and insert the right end of the fuser under the catch on the right side of the printer frame 7 Ensure that the fuser pins...

Страница 78: ...the plug of the power cord into the AC outlet 11 Turn the printer on by pressing I on the power switch on the right side of the printer Replacing the Transfer Roll The transfer roll is the electricall...

Страница 79: ...loors and other surfaces set the toner cartridge on a drop cloth or some old newspaper after removing it from the printer 1 Turn the printer off by pressing the O on the power switch on the right side...

Страница 80: ...Carefully lift the roll out of the clips and remove it from the printer 5 Remove the new transfer roll from its packaging and hold it as shown below 6 Press the ends of the new transfer roll into the...

Страница 81: ...ide 4 13 Replacing Printer Components 7 Slide the pegs on the end of the toner cartridge into the slots inside the printer and lower the toner cartridge into the printer 8 Close the top cover 9 Turn t...

Страница 82: ...ter appearance Use the following procedure to clean the exterior of the printer 1 Turn the printer off by pressing the O on the power switch on the right side of the printer and disconnect the AC powe...

Страница 83: ...lly spill toner inside the printer when installing a new toner cartridge Use the following procedure to clean the interior of the printer only when necessary NOTE This procedure involves removing the...

Страница 84: ...the printer off by pressing the O on the power switch on the right side of the printer and disconnect the AC power cord from the wall outlet 2 Remove all of the paper from the main paper tray and from...

Страница 85: ...ewspaper 5 Open all printer doors 6 For minor cleaning use a soft dry cloth and carefully wipe only those areas of the printer interior that appear to be dirty For major cleaning use a small vacuum cl...

Страница 86: ...oLaser 280 User Guide Cleaning the Printer 8 Slide the pegs on the end of the toner cartridge into the slots inside the printer and lower the toner cartridge into the printer 9 Close the top cover 10...

Страница 87: ...on the right side of the printer Cleaning Feed Rolls Rubber feed rolls drive sheets of paper out of the front paper tray into the printer and also drive sheets of paper out of the main paper tray into...

Страница 88: ...Printer 1 Turn the printer off by pressing the O on the power switch on the right side of the printer and disconnect the AC power cord from the wall outlet 2 Remove the main paper tray and set it on a...

Страница 89: ...g the Printer 4 Reach into the main paper tray well and rotate the feed roll to the down position as shown in the figure below 5 Using a soft cloth slightly moistened with plain water carefully wipe t...

Страница 90: ...e main paper tray 9 Verify that the power switch of the printer is in the O off position then insert the plug of the power cord into the AC outlet 10 Turn the printer on by pressing I on the power swi...

Страница 91: ...e toner cartridge on a drop cloth or some old newspaper after removing it from the printer 1 Turn the printer off by pressing the O on the power switch on the right side of the printer and disconnect...

Страница 92: ...dge cavity and locate the D shaped rubber front tray feed rolls and the white plastic rolls next to them 5 Using a soft cloth slightly moistened with plain water carefully wipe the feed rolls 6 Slide...

Страница 93: ...80 User Guide 4 25 Cleaning the Printer 8 Verify that the power switch of the printer is in the O off position then insert the plug of the power cord into the AC outlet 9 Turn the printer on by pressi...

Страница 94: ...r off by pressing the O on the power switch on the back of the printer 2 Unplug the AC power cord from the AC wall outlet 3 Disconnect the printer from the host computer 4 Wait 30 minutes for the prin...

Страница 95: ...s use the following procedure to prepare the printer for storage 1 Turn the printer off by pressing the O on the power switch on the right side of the printer 2 Unplug the AC power cord from the AC wa...

Страница 96: ...Publication No GEG 99018A Genicom Nov 00 4 28 GENICOM LN28 and microLaser 280 User Guide Storing the Printer for Long Periods of Time...

Страница 97: ...5 Troubleshooting In this Chapter About this Chapter on page 5 2 Installation Problems on page 5 2 Paper Jams on page 5 4 Print Image Quality Problems on page 5 27 Miscellaneous Problems on page 5 35...

Страница 98: ...s image black spots or vertical lines on the page refer to Print Image Quality Problems on page 5 27 and complete the procedure provided for the specific image problem that you have encountered Miscel...

Страница 99: ...Step 7 Connecting the Power Cord and Turning the Printer On on page 2 15 of the Installation Guide The power cord is not properly plugged into an AC outlet or into the AC connector on the rear of the...

Страница 100: ...by pressing the I on the power switch on the right side of the printer 8 If this procedure does not eliminate the noise smoke or smell or if the problem returns turn the printer off unplug the AC powe...

Страница 101: ...per tray or the cassette The paper is wrinkled or curled The paper guide is not set correctly Occasional paper jams result from simple things such as static electricity sticking paper together causing...

Страница 102: ...ncludes replacing a consumable item or calling a service technician to troubleshoot and correct the problem Clearing an E1 E2 1 or E2 2 Paper Jam If an E1 E2 1 or E2 2 error code precedes the error me...

Страница 103: ...80 User Guide 5 7 Paper Jams 3 If the jam occurred while feeding from the front paper tray remove all paper from the front tray including any paper that may be jammed inside the tray 4 If the jam occu...

Страница 104: ...No GEG 99018A Genicom Nov 00 5 8 GENICOM LN28 and microLaser 280 User Guide Paper Jams 5 Remove any jammed or wrinkled paper from the paper tray 6 Remove any jammed paper from the inside of the paper...

Страница 105: ...18A GENICOM LN28 and microLaser 280 User Guide 5 9 Paper Jams 7 If the jam occurred while feeding from Tray 2 or 3 remove the paper tray associated with that feeder and inspect the inside of the paper...

Страница 106: ...No GEG 99018A Genicom Nov 00 5 10 GENICOM LN28 and microLaser 280 User Guide Paper Jams 8 Open the rear door of the feeder for tray 2 or tray 3 and remove any jammed paper then close the rear door of...

Страница 107: ...8A GENICOM LN28 and microLaser 280 User Guide 5 11 Paper Jams 9 Remove the front tray by lifting up slightly and pulling the tray out from the printer 10 Remove the toner cartridge 11 Remove any jamme...

Страница 108: ...tion No GEG 99018A Genicom Nov 00 5 12 GENICOM LN28 and microLaser 280 User Guide Paper Jams 12 Reinsert the front tray into the printer 13 Reload any paper into the front tray 14 Close the front tray...

Страница 109: ...roLaser 280 User Guide 5 13 Paper Jams 15 Slide the pegs on the toner cartridge into the channels on the inside of the printer and lower the toner cartridge into the printer 16 Reinstall the main pape...

Страница 110: ...Jam If an E3 or E4 error code precedes the error message on the first line of the control panel display paper has jammed somewhere between the registration sensor and the exit sensor Use the followin...

Страница 111: ...0 User Guide 5 15 Paper Jams 3 If the jam occurred while feeding from the front paper tray remove all paper from the front tray including any paper that may be jammed inside the tray 4 If the jam occu...

Страница 112: ...No GEG 99018A Genicom Nov 00 5 16 GENICOM LN28 and microLaser 280 User Guide Paper Jams 5 Remove any jammed or wrinkled paper from the paper tray 6 Remove any jammed paper from the inside of the pape...

Страница 113: ...18A GENICOM LN28 and microLaser 280 User Guide 5 17 Paper Jams 7 If the jam occurred while feeding from Tray 2 or 3 remove the paper tray associated with that feeder and inspect the inside of the pape...

Страница 114: ...on No GEG 99018A Genicom Nov 00 5 18 GENICOM LN28 and microLaser 280 User Guide Paper Jams 8 Open the rear door of the feeder for Tray 2 or 3 and remove any jammed paper then close the rear door of th...

Страница 115: ...nt tray by lifting up slightly and pulling the tray out from the printer 10 Remove the toner cartridge 11 Remove any jammed paper from the toner cartridge well NOTE At this point you must wait at leas...

Страница 116: ...n the rear of the printer and pull it to open the rear cover of the printer 13 Open the fuser transport by pulling down on the spring loaded lever 1 Remove any jammed paper from the fuser 2 Make sure...

Страница 117: ...Genicom Publication No GEG 99018A GENICOM LN28 and microLaser 280 User Guide 5 21 Paper Jams 15 Reinsert the front tray into the printer 16 Reload any paper into the front tray 17 Close the front tray...

Страница 118: ...d microLaser 280 User Guide Paper Jams 18 Slide the pegs on the toner cartridge into the channels on the inside of the printer and lower the toner cartridge into the printer 19 Reinstall the main pape...

Страница 119: ...trays that you removed Clearing an E0 Jam If an E0 error code precedes the error message on the first line of the control panel display paper has jammed at the high capacity feeder Use the following...

Страница 120: ...drawer is properly closed 4 Check the display to make sure the printer is ready for printing Clearing an E7 Jam If an E7 error code precedes the error message on the first line of the control panel di...

Страница 121: ...e duplex printing unit and pull it toward you to remove it Carefully remove any jammed paper from the duplex unit or from within the printer NOTE If you can not remove the jammed paper refer to the pr...

Страница 122: ...y and make sure the printer is ready for printing Clearing an E8 Jam If an E8 error code precedes the error message on the first line of the control panel display paper has jammed at the offset output...

Страница 123: ...ems can be caused by exhausted or damaged consumables such as the toner cartridge These problems area easily corrected by simply replacing the con sumable Major Print Image Quality Problems can be cau...

Страница 124: ...ay have tem porarily depleted the toner in the printer developer system Running 20 copies of minimum text should increase image darkness 2 Replace all of the paper in the paper trays with newly opened...

Страница 125: ...ne The toner cartridge may be damaged 6 Call your service technician This image quality problem may be caused by a malfunctioning or broken component that requires service Image is extremely dark and...

Страница 126: ...is procedure corrects the problem but the identical problem returns in less than 50 prints call for service 1 Remove the toner cartridge from the printer then reinstall it making sure it is securely s...

Страница 127: ...this print image problem Faint ghost images appear randomly on the page The image is generally a shadowy version of the previously printed page The quality of the main image is usually not affected Th...

Страница 128: ...clean the printer system of small amounts of toner that may have contaminated the paper path as a result of a recent paper jam 3 Remove the toner cartridge and inspect it for small pieces of paper th...

Страница 129: ...er jam a piece of paper may tear off and lodge between the drum and the toner cartridge frame This paper scrap creates a channel that allows toner from the clean ing system to leak out onto paper as i...

Страница 130: ...procedure If one of the steps in this procedure corrects the problem but the identical problem returns in less than 50 prints call for service 1 Inspect the finished print If the image is extremely l...

Страница 131: ...mage quality problem may be caused by a malfunctioning or broken component that requires service Miscellaneous Problems Some printer problems may not generate error codes or produce observable print i...

Страница 132: ...urn the printer to normal operation A thermal shutdown may indicate there is a more serious problem with the printer If the problem reoccurs call for service 5 Call your service technician This proble...

Страница 133: ...e surges or drops at the AC wall outlet can cause sensitive printer components to func tion erratically In some instances wide voltage swings can seriously damage the printer 6 Call your service techn...

Страница 134: ...urrent draw may result in nearby lights momentarily dimming 2 Have an electrician check your building wiring There may be a problem with the AC outlet or the AC wiring in the building that needs the a...

Страница 135: ...Messages and Error Messages The control panel display shows a warning message or error message when there is a problem with the printer Some messages indicate routine status conditions such as an empt...

Страница 136: ...y in tray 1 is low Add paper to the tray See Loading the Main Tray on page 2 12 Paper Low Tray 2 The paper supply in Tray 2 is low Add paper to the tray Paper Low Tray 3 The paper supply in Tray 3 is...

Страница 137: ...The top cover or rear cover is open Close the top or rear cover E5 COVER OPEN Offset Tray The offset tray cover is open Close the offset tray cover E5 COVER OPEN Close HCF Cover The HCF cover is open...

Страница 138: ...E Call Service The fuser has failed HCF UNIT FAILURE Call Service The HCF has failed OFFSET TRAY FAIL Call Service The offset tray has failed DUPLEX FAILURE Call Service The duplexer has failed MAIN M...

Страница 139: ...ter 6 Using the Duplexer In this Chapter About this Chapter on page 6 2 About the Duplexer on page 6 2 Installing the Duplexer on page 6 2 Testing the Duplexer on page 6 5 Solving Duplexer Problems on...

Страница 140: ...k into the printer to print the second side The printer can image two pages at a time therefore the duplex unit will process two pages sides 1 and 3 then refeed these pages for sides 2 and 4 Major Com...

Страница 141: ...Nov 00 Genicom Publication No GEG 99018A GENICOM LN28 and microLaser 280 User Guide 6 3 Installing the Duplexer Use the following procedure to install the duplexer 1 2 3...

Страница 142: ...Publication No GEG 99018A Genicom Nov 00 6 4 GENICOM LN28 and microLaser 280 User Guide Installing the Duplexer 4 5 6...

Страница 143: ...ports paper correctly 1 Turn the printer on by pressing the I on the power switch on the right side of the printer 2 Once the printer has warmed up and displays the Ready message on the control panel...

Страница 144: ...he action to take to correct the problem If the control panel shows an error message that concerns another part of the printer refer to Chap ter 5 Troubleshooting for a complete list of all warning an...

Страница 145: ...t either your sales represen tative or a service provider and report your problem If the printer is not operational after you have removed the duplexer refer to Chapter 5 Troubleshooting After correct...

Страница 146: ...gh multiple actions that may solve this duplexer prob lem Proceed one step at a time until the problem is solved you may not need to complete the entire procedure If one of the steps in this procedure...

Страница 147: ...nstructions on installing the driver 6 Call your service technician This problem may be caused by a malfunctioning or broken component that requires service Duplexer Operates Erratically The following...

Страница 148: ...m and causing erratic operation 4 Reinstall the printer driver software The printer driver software running on the host computer may be damaged Reinstalling the software is an easy and inexpensive way...

Страница 149: ...he printer and inspect the inside of the duplexer for jammed paper or obviously broken components Broken components or scraps of paper lodged inside the duplexer may be brushing against moving parts a...

Страница 150: ...the Duplexer Use the following procedure to remove the duplexer 1 Turn off the printer and disconnect the AC power cord from the AC wall outlet 2 Locate the hand grip on the back of the printer and pu...

Страница 151: ...r 4 Slip the lower mounting pins out of the brackets inside the rear of the printer and lift the duplex unit out of the printer 5 Close the rear cover 6 Insert the plug of the AC power cord into the A...

Страница 152: ...Publication No GEG 99018A Genicom Nov 00 6 14 GENICOM LN28 and microLaser 280 User Guide Removing the Duplexer...

Страница 153: ...Feeder on page 7 2 Installing the 500 Sheet Paper Feeders on page 7 3 Testing the 500 Sheet Feeder on page 7 10 Selecting Print Media on page 7 10 Loading Print Media on page 7 13 Solving 500 Sheet Fe...

Страница 154: ...rinter supplies all of the operating power that is needed by the feeder and motors and circuit boards inter nal to the feeder provide the feeder with drive and operational logic At the start of a prin...

Страница 155: ...plastic bag containing two thumbscrews 2 Place the paper feeder on a sturdy level surface NOTE Do not move the printer once the paper feeder is installed 3 Remove the paper tray from the paper feeder...

Страница 156: ...essing O on the power switch on the right side of the unit and disconnect the power cord from the AC outlet NOTE Installing the paper feeder while the printer is on may damage the printer or paper fee...

Страница 157: ...printer with the three pegs on the paper feeder and lower the printer onto the paper feeder NOTE Be sure to lower the printer gently Components inside the printer may be damaged by lowering the print...

Страница 158: ...h on the right side of the printer NOTE If an error message appears on the control panel display see Chapter 5 Troubleshooting Installing Two Paper Feeders Use the following procedure to install two p...

Страница 159: ...r Feeders 4 Align the three holes on the bottom of the upper feeder with the three stubs on the lower feeder and place the upper paper feeder on top of the lower paper feeder 5 Insert the two thumbscr...

Страница 160: ...sing O on the power switch on the right side of the unit and disconnect the power cord from the AC outlet NOTE Installing the paper feeder while the printer is on may damage the printer or the paper f...

Страница 161: ...paper feeders aligning the three stubs on the upper paper feeder with the holes on the bottom of the printer NOTE Be sure to lower the printer gently Components inside the printer may be damaged by l...

Страница 162: ...the control panel dis play use any software application to print a few sheets from each of the feeder trays 3 If the feeder does not feed paper or if the control panel displays an error message refer...

Страница 163: ...clasps Is a sheet of labels that has the backing sheet exposed between individual labels Correct Paper Storage It is important to store paper correctly prior to placing it in the printer since improp...

Страница 164: ...ity meet your expectations Paper Source Weight Paper Type and Feed Direction Paper Sizes Accommodated Letter A4 Paper Tray main tray and optional 500 sheet A4 Letter paper feeder 16 to 24 lbs 64 to 20...

Страница 165: ...A4 letter paper tray however the procedure is the same for the A3 ledger paper tray A3 Paper Tray optional 500 sheet A3 Ledger paper feeder 16 to 24 lbs 60 to 135 g m2 A4 LEF SEF 297 x 210mm 11 7 x 8...

Страница 166: ...ation No GEG 99018A Genicom Nov 00 7 14 GENICOM LN28 and microLaser 280 User Guide Loading Print Media Use the following procedure to load paper into the 500 sheet A4 letter or A3 ledger paper tray 1...

Страница 167: ...transportation problems make sure the length and width guides are adjusted to match the paper size and are locked firmly into place 4 5 CAUTION Do not overload the tray and make sure the paper stack...

Страница 168: ...er feeder Some error codes indicate much more serious problems that may require the help of a service technician If the paper feeder is inoperative after installation refer to Installation Problems on...

Страница 169: ...g message printer continues operating and line 1 shows printer status Tray 2 Missing applies to first paper feeder if installed Tray 2 is not installed Install the tray Tray 3 Missing applies to secon...

Страница 170: ...r through the main paper tray or the front tray to make sure the printer is still operational If the printer is operational when the feeder is not attached contact either your sales rep resentative or...

Страница 171: ...LN28 and microLaser 280 User Guide 7 19 Solving 500 Sheet Feeder Problems 3 If the jam occurred while feeding from Tray 2 or 3 remove the paper tray associated with that feeder and inspect the inside...

Страница 172: ...8A Genicom Nov 00 7 20 GENICOM LN28 and microLaser 280 User Guide Solving 500 Sheet Feeder Problems 4 Open the rear door of the feeder for tray 2 or tray 3 and remove any jammed paper then close the r...

Страница 173: ...LN28 and microLaser 280 User Guide 7 21 Solving 500 Sheet Feeder Problems 5 Remove the front tray by lifting up slightly and pulling the tray out from the printer 6 Remove the toner cartridge 7 Remov...

Страница 174: ...G 99018A Genicom Nov 00 7 22 GENICOM LN28 and microLaser 280 User Guide Solving 500 Sheet Feeder Problems 8 Reinsert the front tray into the printer 9 Reload any paper into the front tray 10 Close the...

Страница 175: ...If you removed either tray 2 or tray 3 reinstall it 13 Close the top cover Correcting Miscellaneous Paper Feeder Problems Some paper feeder problems may not cause an error message and may not interfer...

Страница 176: ...feeder 2 Test the printer by printing a few sheets from the main tray If you cannot print a sheet of paper from the main tray and the printer does not display an error code go to Inoperative Printer o...

Страница 177: ...es or makes more noise than usual either while idle or while printing The feeder feeds paper without a problem The control panel does not display an error code The following procedure guides you throu...

Страница 178: ...eder that you are cleaning and clean the feed rolls in the paper tray well of that feeder 1 Turn the printer off by pressing the O on the power switch on the right side of the printer and disconnect t...

Страница 179: ...ser Guide 7 27 Maintaining the 500 Sheet Feeder 5 Rotate the feed roll back into the feed position 6 Reinstall the feeder paper tray 7 Verify that the power switch of the printer is in the O off posit...

Страница 180: ...cation No GEG 99018A Genicom Nov 00 7 28 GENICOM LN28 and microLaser 280 User Guide Maintaining the 500 Sheet Feeder 8 Turn the printer on by pressing I on the power switch on the right side of the pr...

Страница 181: ...he origi nal printer packaging to reinstall the printer Moving the Printer and 500 Sheet Feeder a Long Distance Use the following procedure to move the printer and 500 sheet feeder a long distance 1 T...

Страница 182: ...Publication No GEG 99018A Genicom Nov 00 7 30 GENICOM LN28 and microLaser 280 User Guide Moving the 500 Sheet Feeder...

Страница 183: ...Feeder on page 8 2 Installing the High Capacity Feeder on page 8 3 Testing the High Capacity Feeder on page 8 10 Selecting Print Media on page 8 10 Loading Paper into the High Capacity Feeder on page...

Страница 184: ...paper in either A4 or Letter size The printer supplies all of the operating power that is needed by the high capacity feeder Motors and circuit boards internal to the high capacity feeder provide the...

Страница 185: ...Capacity Feeder with a Paper Feeder Use the following procedure to install the high capacity feeder and a paper feeder together Paper Tray Electrical Connector Mounting Pins Anti Tip Ski 1 2 7 9 11 12...

Страница 186: ...and disconnect the power cord from the AC outlet NOTE Installing the high capacity feeder while the printer is on may damage the printer or the high capacity feeder 2 Remove the high capacity feeder...

Страница 187: ...mall plastic bag containing two thumbscrews 5 Remove the paper tray from the printer and from the paper feeder 6 Align the three small holes on the bottom of the paper feeder with the metal stubs on t...

Страница 188: ...rinter with the metal stubs on top of the paper feeder and lower the printer onto the paper feeder 9 Insert the two thumbscrews supplied with the paper feeder into the holes on the base of the printer...

Страница 189: ...wn when you turn on the printer see the Chapter titled Error Messages in the User Manual Installing Only the High Capacity Feeder Use the following procedure to install the high capacity feeder 1 Turn...

Страница 190: ...unit while the printer is on may damage the printer or the high capacity feeder 2 Remove the high capacity feeder from its packaging and place it on a level surface Remove any cardboard inserts and pa...

Страница 191: ...the metal stubs on top of the high capacity feeder and place the printer on top of the high capacity feeder 6 Insert the two thumbscrews supplied with the high capacity feeder into the holes on the b...

Страница 192: ...8 13 Selecting Print Media Your printer can print on a variety of media including plain paper labels transparencies and enve lopes Always use print media that meet the guidelines for use with this pri...

Страница 193: ...edia that you can use in the high capacity feeder and also indi cates the feed orientation long edge feed LEF or short edge feed SEF If you have concerns about a specific brand or type of media try sa...

Страница 194: ...igh Capacity Feeder 3 Hold a stack of paper with both hands as illustrated in the figure below 4 Gently place the paper into the paper tray Make sure the paper stack does not exceed the maximum paper...

Страница 195: ...cate much more serious prob lems that may require the help of a service technician If the high capacity feeder is inoperative after installation refer to Installation Problems on page 8 15 and complet...

Страница 196: ...ray 2 is not installed Install the tray Tray 3 Missing applies to HCF if one 500 sheet paper feeder is installed Tray 3 is not installed Install the tray Paper Low Tray 2 applies to HCF if no 500 shee...

Страница 197: ...through the main paper tray or the front tray to make sure the printer is still operational If the printer is operational when the high capacity feeder is not attached contact either your sales repres...

Страница 198: ...stack from the paper drawer 4 Inspect the paper for any obvious signs of damage If the paper is damaged replace the entire stack with new undamaged paper 5 While the paper is out of the drawer inspec...

Страница 199: ...n firmly close all of the printer and feeder doors and covers Interlock switches monitor the position of printer doors and covers When a door is closed the interlock switch is activated and the high c...

Страница 200: ...ftware running on the host computer may be damaged Reinstalling the software is an easy and inexpensive way to isolate or eliminate the problem Refer to the DRIVERS folder on the Electronic Library CD...

Страница 201: ...ior that appear to be dirty For major cleaning use a small vacuum cleaner with a disposable bag and crevice tool attach ment Use a soft haired brush to dislodge dirt and sweep it into the vacuum nozzl...

Страница 202: ...entually become coated with paper dust and must be cleaned Frequent feed jams in the front tray or main tray indicate that the feed rolls need to be cleaned 1 Turn the printer off by pressing the O on...

Страница 203: ...e included in the original packaging to reinstall the printer Moving the High Capacity Feeder a Long Distance 1 Turn the printer off by pressing the O on the power switch on the right side of the prin...

Страница 204: ...igh Capacity Feeder 13 Repack the high capacity feeder into the original shipping box 14 Once the high capacity feeder is in the new location refer to Installing the High Capacity Feeder on page 8 3 C...

Страница 205: ...out this Chapter on page 9 2 About the Offset Output Tray on page 9 2 Installing the Offset Output Tray on page 9 3 Testing the Offset Output Tray on page 9 8 Solving Offset Output Tray Problems on pa...

Страница 206: ...ffset output tray is an optional output tray that attaches to the top rear of the printer and can hold up to 500 printed sheets The printer supplies all of the operating power that is needed by the of...

Страница 207: ...y Before installing the offset output tray remove it from its packaging and verify that you have received the following items If any of the items are missing or damaged contact your dealer Throughout...

Страница 208: ...tray 2 Turn the printer off by pressing O on the power switch on the right side of the unit and disconnect the power cord from the AC outlet NOTE Installing the offset output tray while the printer is...

Страница 209: ...th the offset output tray in place of the standard cover Align the tabs on the cover with the holes on the printer and snap the cover in place 5 Pull on the recessed area near the top of the rear of t...

Страница 210: ...t Output Tray 7 Connect the wiring on the offset output tray paper diverter to the rear cover 8 Remove the small cover on the left side of the top of the printer 9 Gently lower the offset output tray...

Страница 211: ...28 and microLaser 280 User Guide 9 7 Installing the Offset Output Tray 10 Tighten the screw attached to the right metal fitting of the offset output tray 11 Close the rear cover of the printer 12 Atta...

Страница 212: ...w sheets to the offset output tray 3 If the feeder does not feed paper or if the control panel displays an error message refer to Solving Offset Output Tray Problems on page 9 8 Solving Offset Output...

Страница 213: ...erative return to the installation procedure and carefully repeat all of the installation steps 3 If the offset output tray is still inoperative after reinstallation remove it from the printer so you...

Страница 214: ...recedes the error message on the first line of the control panel display paper has jammed at the offset output tray Use the following procedure to clear a paper jam in this loca tion 1 Pull on the han...

Страница 215: ...50 prints call for service 1 Open and then firmly close all of the printer and offset output tray doors and covers Interlock switches monitor the position of printer doors and covers When a door is c...

Страница 216: ...iled instructions on installing the drivers 3 Call your service technician This problem may be caused by a malfunctioning or broken component that requires service Offset Output Tray Makes Unusual Noi...

Страница 217: ...ntire procedure If one of the steps in this procedure corrects the problem but the identical problem returns in less than 50 prints call for service 1 Open the offset output tray cover and inspect the...

Страница 218: ...e power switch on the right side of the printer Moving the Offset Output Tray Moving the Offset Output Tray a Short Distance Use the following procedure to move the offset output tray a short distance...

Страница 219: ...with the original printer cover 6 Remove the output paper tray from the offset output tray 7 Remove the paper guide from the offset output tray 8 Unscrew the thumbscrew on the right metal fitting of...

Страница 220: ...Publication No GEG 99018A Genicom Nov 00 9 16 GENICOM LN28 and microLaser 280 User Guide Moving the Offset Output Tray...

Страница 221: ...Nov 00 Genicom Publication No GEG 99018A Appendix A GENICOM Customer Support In this Chapter About this Appendix on page A 2 GENICOM Worldwide Offices on page A 4...

Страница 222: ...et The GENICOM server provides access to technical reports new product announcements a trade show schedule and other general information about GENICOM You can access the GENICOM server via any one of...

Страница 223: ...3 Sources of Support GENICOM Service If you have a hardware problem you cannot resolve contact GENICOM Service at 888 367 3772 Other important GENICOM phone numbers GENICOM Sales 800 436 4266 GENICOM...

Страница 224: ...5 Gibbes Street Unit 12 Chatswood NSW 2067 Australia Telephone 61 29 417 6411 Fax 61 29 417 6739 GENICOM Belgium GENICOM Belgium c o Airport Business Center Vuurberg 80 B 1831 Machelen Belgium Telepho...

Страница 225: ...5232 BC s Hertogenbosch The Netherlands Telephone 31 736458150 Fax 31 736446894 GENICOM Singapore GENICOM Singapore 15 Beach Road 04 09 Beach Centre Singapore 189677 Singapore Telephone 65 338 3438 F...

Страница 226: ...Publication No GEG 99018A Genicom Nov 00 A 6 GENICOM LN28 and microLaser 280 Installation Guide GENICOM Worldwide Offices...

Страница 227: ...Nov 00 Genicom Publication No GEG 99018A Appendix B Safety Notes and Regulatory Compliance In this Chapter About this Appendix on page B 2 Safety Notes on page B 2 Regulatory Compliance on page B 2...

Страница 228: ...ch off and unplug the printer and contact your point of purchase The fuser becomes very hot in normal operation If a paper jam has occurred turn the power off and wait at least 10 minutes before remov...

Страница 229: ...T The length of the power cord must be 10 feet 3 meters or less This equipment generates uses and can radiate radio frequency energy If the equipment is not installed and used in accordance with the i...

Страница 230: ...Publication No GEG 99018A Genicom Nov 00 B 4 GENICOM LN28 and microLaser 280 User Guide Regulatory Compliance...

Страница 231: ...Nov 00 Genicom Publication No GEG 99018A Appendix C GENICOM Part Numbers In this Chapter About this Appendix on page C 2 GENICOM Part Numbers on page C 2...

Страница 232: ...aser Printer US 110V ML280N CA microLaser 280 Laser Printer Ethernet US 110V ML280A CA microLaser 280 Laser Printer Bundle US 110V includes Ethernet Duplex HiCap Feeder and Offset Output tray LN28N CA...

Страница 233: ...0 100BaseT MLXXXF SI RS 232C 422 Serial Option ML280N CS IBM Coax SCS Network Interface ML280N TS IBM Twinax SCS Network Interface ML280N CI IBM Coax IPDS Network Interface ML280N TI IBM Twinax IPDS N...

Страница 234: ...ectronic Library Contents include but are not limited to the following documents GENICOM LN28 and microLaser 280 User Guide Network Interface Installation Guide Ethernet Network Interface Installation...

Отзывы: