background image

49

 /

• 

Only charge the battery with the 

charger it belongs to. 

• 

Don’t allow the battery to fall.

• 

Don’t ever open up the battery; this can 

cause the battery to short circuit.

• 

Do not store or carry the battery with any 

metal objects (e.g. paper clips, nails, 

screws, keys, coins) that could cause short 

circuits

• 

Keep the battery away from heat (i.e. 

strong sunrays and fire).

• 

Protect the battery from coming in contact 

with water and other fluids.

• 

Do not clean the battery with a pressure 

washer. Use a damp rag when cleaning 

the battery. Never use aggressive cleaning 

solutions.

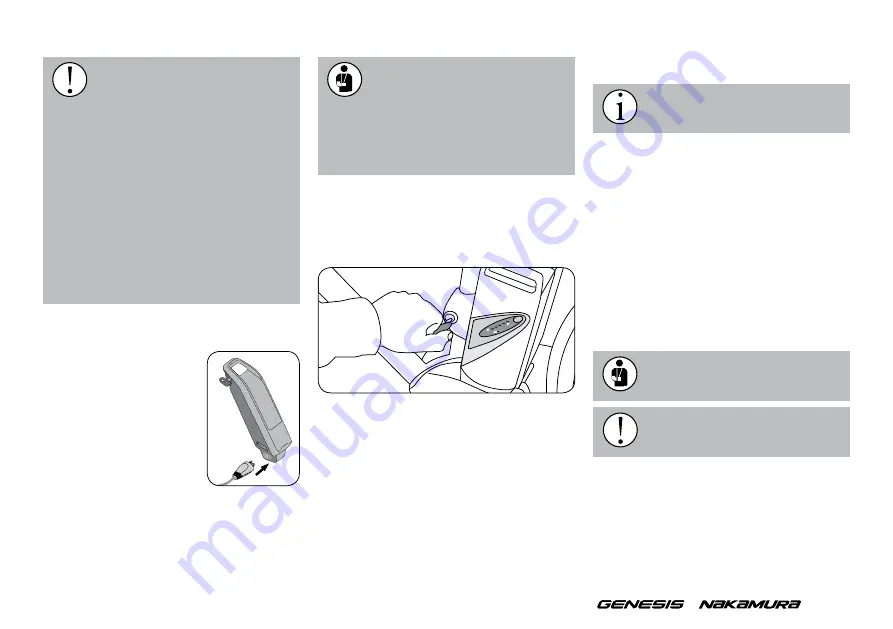
Loading process 

In some models you can 

charge the battery while it 

is mounted in the pedelec. 

Please read the component 

manufacturer’s operating in-

structions in this regard. You 

may also remove the battery 

from its holder and charge it 

somewhere else. This is es-

pecially recommended in cold 

temperatures so that the battery can be charged 

in warmer conditions. This allows the battery to 

charge more quickly. 

Removing the battery

Charger: 

To ensure the full lifespan of the battery, it should 

be charged in an environment between 10˚C and 

30˚C. 

• 

Only use the charger that came with your bike 

or one from the same manufacturer.

• 

Use the charger in a dry room and don’t cover 

it up while it is in use. It could otherwise short 

circuit or cause a fire.

• 

When you clean the charger, unplug it from the 

electrical socket first.

• 

After charging, remove the battery from the 

charger and unplug the charger.

Charging the battery

1. After removing the battery from its packaging, 

stick the power plug into an electrical socket 

with a voltage between 230 and 240 volts.

1. To unlock the battery, put the key into the lock 

and open it. 

2. Depending on where your battery is placed on 

your pedelec, remove it from its holder. Hold 

onto it tight as it is heavy.

3. To avoid having the key break or losing it, re-

move it and place it in a safe place. 

For safety reasons, always place the 

charger on a dry, non-flammable sur

-

face.

Please note that a sudden change of 

temperature from cold to warm can 

cause condensation to build up in 

the charger. Avoid this by storing the battery 

in the same place it is charged. Only use the 

charger your battery came with or one which 

is designed for the battery. There is otherwise 

a risk of fire.

Read the operating instructions for 

the charger before beginning to 

charge the battery.

Charging the battery: Never place or 

store several batteries on top of each 

other. 

Содержание Children's bike

Страница 1: ...Original instruction manual City bike Trekking ATB bike Mountain bike Racing bike Youth bike ISO 4210 2014 Children s bike ISO 8098 2014 Toy bikes ISO 8124 2014 Pedelec E bike EN 15194...

Страница 2: ...grip Shifter Bell Brake lever Brake cable Adjustable stem Headset Front headlight with reflector Shifter cable Suspension fork Fixture of front mudguard Disc brake calliper Brake disc Wheel Hub dynamo...

Страница 3: ...in bike enduro mountain bike dirt street freestyle bike cross bike ATB bike fat bike single speed fixie bike or a pedelec e bike could have a different appearance This manual only applies to the bicyc...

Страница 4: ...Seat tube Head tube Chain stays Seat stay Seat Seat post Seat post clamp Brake Cassette Quick release Dropout Rear derailleur Front derailleurs Chain Chain ring Crank arm Pedal Stem bearing or headset...

Страница 5: ...ith punctures 29 Brakes 30 Gears 33 Suspension 36 Inspection plan 37 Lubrication 39 Bolted connections 40 If you have acquired a time trial or triathlon bike 41 TT Time Trial bikes 41 Disc wheels spec...

Страница 6: ...riding your bicycle on public roads you should inform yourself about the applicable national regulations in your spe cific country To begin however we would like to provide you with some in formation...

Страница 7: ...are that riding a bicycle is danger ous As a cyclist you are particularly at risk Al ways be aware that you are safer in a car than you are on a bicycle While on a bike you do not have an airbag or bo...

Страница 8: ...To ensure that you enjoy a safe and comfortable riding position please allow your specialist re tailer to set up your handlebars and stem Adjust the seat to a safe and comfortable posi tion for you se...

Страница 9: ...ure by doing the following If you place your thumb on a pumped up tyre you should not be able to sig nificantly change its shape by applying pressure Check the tyres and rims Scan them for any damage...

Страница 10: ...sitting securely on both the front chain wheel and rear sprockets It must be engaged fully with the cogs If you set off and the chain jumps off a cog you may fall at the risk of very severe injury If...

Страница 11: ...ot liable for damage resulting from use outside of intended use This applies particularly to damage resulting from non adherence to the safety instructions e g in terms of use on terrain overloading o...

Страница 12: ...xtreme im pact This includes riding over steps bike jump ing extreme use in authorised biking competi tions doing tricks and performing stunts Type 7 All Mountain spring travel approx 120 150mm and ap...

Страница 13: ...to damage resulting from non adherence to the safety instructions e g in terms of Using the bicycle on rough terrain for very high jumps steep descents or hard riding in bike parks Carrying excess we...

Страница 14: ...humb needs to be used to completely close it Possible positions of quick release skewers and quick release axles If your bike is equipped with one or several quick release axles then read the correspo...

Страница 15: ...ead the instruction manual provided by your brake manu facturer Inappropriately installed wheels may shift while you are driving or detach from the vehicle This may damage the bicycle and lead to seve...

Страница 16: ...uick release axle is inserted into the left hand side of the fork Quick release axle systems of other manu facturers Other manufacturers can increase the tightness of the axle by untightening the drop...

Страница 17: ...aking sure that the widest part of your foot is positioned above the pedal axle How to correctly determine your saddle height Estimate your appropriate saddle height and ad just it accordingly Sit on...

Страница 18: ...fixing then read the component manufacturer s enclosed instruc tions to assist you with the setup Before you start riding please test to see if your seat post and seat are se cure To do this hold the...

Страница 19: ...ing the position of the stem also changes the position of the han dlebars You should always be able to safely reach and use grips and controls Please ensure that all cables and lines are long enough t...

Страница 20: ...ially on long inclines This type of braking system can become very hot from continuous braking You should also use the front brake to slow down on long inclines Wait until the back pedal brake has coo...

Страница 21: ...ike is equipped with a backpedal brake Help your child practice riding and using the bike on a play street or in a safe and traffic free area To prepare the child for riding on public roads you should...

Страница 22: ...ch the ground with the tip of his or her foot This is important so that the child is able to quickly support itself when he or she needs to stop or feels uncertain For children and adolescents the hei...

Страница 23: ...to keep its balance and make the necessary counter movements That is why you have to be par ticularly careful when you first remove the sta bilisers This is very unfamiliar for the child and it first...

Страница 24: ...permitted to ride with a bicycle trailer attached to the bike Full suspension bicycles are not suit able for use with trailers and child bike trailers The bearings and attachments are not de signed t...

Страница 25: ...of the seat post and serious accidents Always use the instructions to install the included accessories Make sure to use the correct tightening torques for all the screw fittings See page 40 Tightenin...

Страница 26: ...f you feel confident you can check this yourself and install a replacement bulb Suitable bulbs are available from your specialist retailer It is not possible to replace the bulbs in modern LED lights...

Страница 27: ...supplied by various energy sourc es depending on the riding situation Make sure you read the component manufacturer s enclosed instructions You must stop riding immediately if a foreign body is trapp...

Страница 28: ...fferent than riding with out one You must keep this in mind when riding in traffic Before riding on public roads practice riding your bike with an empty trailer in a safe and quiet environment As feat...

Страница 29: ...ommended period of use is exceeded a malfunction may occur which can in turn result in injury Any kind of rip puncture or colour change occur ring in an overused area is an indication that the compone...

Страница 30: ...tred by a specialist retailer All screw connections have to be tightened with the correct torque If the torque is not correct the screws may break or loosen other parts see page 40 Torques for screwed...

Страница 31: ...e of carbon fiber to high temperatures Sun exposure caused by simply leaving the wheel in the car can result in high temperatures This can damage the component s structure This may result in component...

Страница 32: ...case of light systems this is mandatory In the case of other components the manufacturer s warranty will usually cease to exist if non approved replaced parts are installed If you install non original...

Страница 33: ...wheel according to the steps listed above The following applies for rear wheels If your bicycle uses a derailleur gear system change gear to the smallest sprocket In this position the rear derailleur...

Страница 34: ...nd rims manufacturer s instructions Please take note of the running di rection of the tyre when installing it 6 Reattaching the wheel Reattach the wheel securely back in the frame or fork with the cor...

Страница 35: ...e rubber brakes for brake pads are almost all made with grooves and notches The grooves and notches help recognize when the rubber brakes have been subject to too much wear and tear If the grooves and...

Страница 36: ...raking system please first read the instructions provided by the component manufacturer Please do not touch the brake disk while it is rotating or directly after brak ing This could result in injury o...

Страница 37: ...contact your bicycle specialist retailer Brakes are vital to your safety on the bike You should therefore maintain them on a regular basis This re quires specialist knowledge and tools Allow your spec...

Страница 38: ...vel Source SRAM A combination of hub and derailleur gears This type of gear system is made by SRAM and provided under the name of Dual Drive This type of gear system has a three gear hub and an addi t...

Страница 39: ...the attached instruction manual It is helpful to have a bike specialist tell you about the bike s functions and demonstrate how to as semble and reassemble the bike Twist grip shifter increasing pedal...

Страница 40: ...stock suitable spray lubricant for greasing your sus pension regularly both after every clean and otherwise The same applies for suspension seat posts Most suspension seat posts can be adjusted to the...

Страница 41: ...part of the bicycle Tighten all screws to the recom mended torque Screws may other wise break off or become detached from other parts see page 40 Full suspension bicycles are not suit able for use wit...

Страница 42: ...metres Work undertaken Check the following Chain Sprockets Check the brake pads for wear replace them if required Clean Chain Sprockets Grease The chain with suitable lubricant Check the following All...

Страница 43: ...ing with the threads during assembly During assembly Assembly grease Contact points of the carbon parts During assembly Carbon assembly paste Sliding surfaces on the quick releases Once a year Grease...

Страница 44: ...ew of seat rails to seat post clamp 20 Nm Brake blocks 6 Nm Dynamo attachment 10 Nm Seat post clamping bolt on carbon frames 5 Nm Bottle holder on carbon frames 2 Nm Bolted connection Torque Front der...

Страница 45: ...nsitive than the conventional kinds of bicycle wheels Rims made from materials other than aluminium can display a different or even worse braking action and possibly catch you off guard Therefore prac...

Страница 46: ...ling and safely securing car bon components with a low mounting torque Never expose carbon parts to high tempera tures Even in the back of cars the sun s rays can generate such a heat that it can put...

Страница 47: ...ike by its foot pedals to a bike carrier or roof rack The pedal could separate and cause a serious acci dent to occur A carbon bike is not made to be transported on the roof of a car because the wheel...

Страница 48: ...alist retailer to dispose of any discarded carbon parts Environmental protection tips In Germany Austria and all nations which apply EU law the common conditions for warranty liability for material de...

Страница 49: ...develops in recent years Please bear in mind as is the case with any sporting activity riding a pedelec can also be dangerous risky and can cause injuries For your own safety always wear a suitable he...

Страница 50: ...u step on a pedal This boost is unusual and can lead to falls or cause dan gerous traffic accidents and injury to occur 2 sec 1 2 Various versions of motors and batteries Pedelecs are manufactured wit...

Страница 51: ...le paths are also the same as for bicycles Outside of this scope of applica tion as well as in some areas within the EU spe cial regulations may apply Inform yourself on the current legal regulations...

Страница 52: ...quick releases Instructions about electrics and electronics Your pedelec is supplied with the corresponding operating manual for the integrated motor from the component manufacturer For more informat...

Страница 53: ...he charger that came with your bike or one from the same manufacturer Use the charger in a dry room and don t cover it up while it is in use It could otherwise short circuit or cause a fire When you c...

Страница 54: ...arged If this stage is fully charged the LED will shine permanently If all of the LEDs go out this means the charging is complete 3 If the charging is complete you should remove the power plug from th...

Страница 55: ...ou should store it in a dry and well ventilated area When storing never stack batteries on top of each other or place them close to each other Ideally you should place them in a room temperature from...

Страница 56: ...delec Support level The higher the applied sup port level the lower the range Style of riding You can save energy by oper ating the gears appropriately In lower gears you apply less strength which in...

Страница 57: ...sprocket Keep in mind that only certain com ponents of the s pedelec can be ex changed with components of another design Otherwise the validity of approval and insurance coverage will be nullified If...

Страница 58: ...tear is not a material defect and is therefore not covered by the guarantee Typical compo nents to which this applies are Tyres Brake pads Drive components Spokes By car Using a car you can transport...

Страница 59: ...and images Veidt Anleitungen Friedrich Ebert Stra e 32 D 65239 Hochheim Germany Veidt Anleitungen email de Legal inspection by a lawyer s office special ising in intellectual property These operating...

Страница 60: ...______________ ___________________________________ ___________________________________ Materials used ___________________________________ ___________________________________ __________________________...

Страница 61: ...___________________________________ ___________________________________ Materials used ___________________________________ ___________________________________ ___________________________________ ____...

Страница 62: ...58 Notes...

Страница 63: ...59...

Страница 64: ...60 Notes...

Страница 65: ...stamp __________ ____________________________________________ Date Signature assembling party retailer The following operating manuals were supplied and explained c Bicycle Plus c Gear system c Brake...

Страница 66: ...___________________ Serial number _______________________ Gear system _______________________ Engine number _______________________ Battery number _______________________ Key number __________________...

Страница 67: ...U7 Please read Make note of the bicycle identification and delivery document Notes...

Страница 68: ...Intersport Austria Flugplatzstra e 10 4600 Wels Austria Tel 43 7242 233 0 info genesisbikes at Intersport Edition 2 11 2016 EN...

Отзывы: