background image

PAGE

PAGE

CURSOR

CURSOR

PAGE

PAGE

CURSOR

CURSOR

PAGE

PAGE

CURSOR

CURSOR

 owners 

manual

wk1000


Page51

the digital signal processor

THE DIGITAL SIGNAL PROCESSOR

1

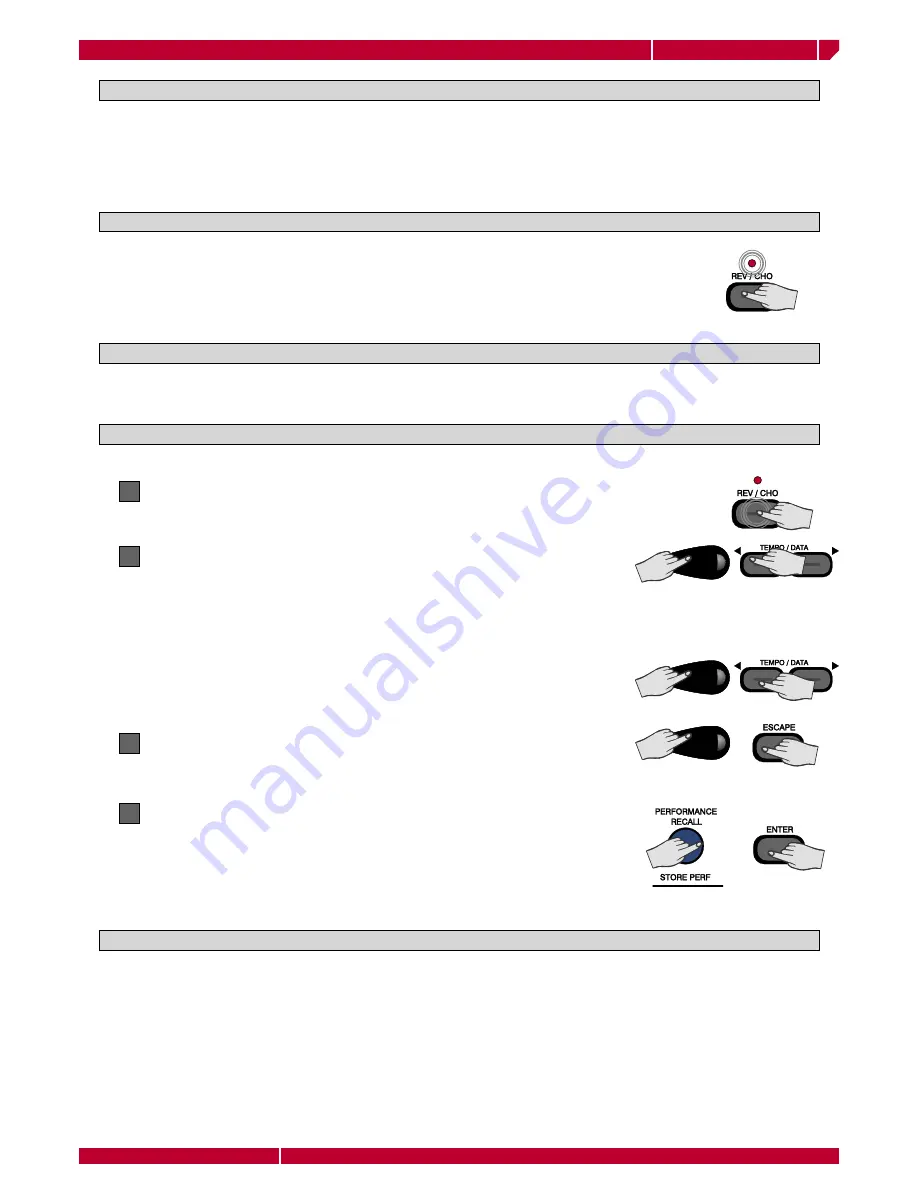
Press and the REV/CHO button for a few seconds

When it is active (the LED indicator is ON), the current Performance is processed from 
the type of effect assigned both to the Reverb and to the Chorus unit of the DSP. The 
overall processed sounds can be heard over the internal speakers and from the LEFT e 
RIGHT outputs. When it is not active (the LED is OFF) , the sound is not processed by the 
DSP and no effect is given.

The wk1000 allows you to process Performances (Style/RealTime, Song Style e Song Performance) through 
the on-board multi-effect processor and to make the overall sound more realistic. The Digital Signal Proc-
essor is made by two units that process the Performances with Reverb and Modulation/Delay effects. Each 
section has independent effects Send control to regulate the effect volume level in the current Performance. 
The DSP control buttons are located in the UTILITY area.

REV/CHO

If a different Performance is selected, or if the same Performance is selected 
again before saving the changes, the new effect settings will be lost and the 
Performance will be restored to the previous setting.

TO ASSIGN THE EFFECTS

The way to assign effects to the current Performance is identicaI, no matter what the selected mode is 
(Style/Real Time, Song Style, Song).

HOW TO SELECT THE TYPE OF EFFECT

The effect currently assigned to the Performance is indicated in the display.

2

Use CURSOR to move and the TEMPO/DATA buttons to assign a different 
effect

You can scroll 22 different types of effect available for each DSP unit. The same 
effect can be selected from both the DSP units. The same effect can be selected 
from both the DSP units

To control the general effect VOLUME, move with the CURSOR button to the 
volume page and modify its value using the TEMPO/DATA buttons.

The selected effects have now been assigned to the current Performance.

3

To exit the effect function, use the CURSOR button or press ESCAPE.

4

Press and hold STORE PERFORMANCE for a few seconds. Press ENTER to save 
the changes in the current Performance.

You can disable the effects assigned to the current Performance at any time by pressing the REV/CHO but-
ton you will either enable (led ON) ) or disable (led OFF OFF) the DSP.

DISABLING THE EFFECTS

Содержание WK1000

Страница 1: ...D I G I T A L K E Y B O A R D S owners manual wk1000 English...

Страница 2: ...l kitchen sink in a wet basement or near a swimming pool or the like 5 This product should only be used by a stand or cart that is recommended by the manufacturer 6 This product either alone or in com...

Страница 3: ...ge13 Connections page14 Power page14 Pedals page15 Computer page15 Video interface page15 Headphones page15 Music stand page15 The display page16 Data entry page16 Example to assign a different sound...

Страница 4: ...neral disk handling tips page38 Inserting a floppy disk into the drive page38 Ejecting a floppy disk page38 Disk protection page38 Handling floppy disks page38 Back up copies page38 Cleaning the disk...

Страница 5: ...s page51 Controlling the effect send level page52 The midi page53 Chord channel page54 Midi numeration page54 The main applications of midi page54 Preliminary operations page54 Controlling an expander...

Страница 6: ...ge of the MIDI GENERAL functions In order to restore wk1000 to its default conditions set by the factory proceed as follows Press and hold the UPPER 1 located on the right of the display and the numbe...

Страница 7: ...a Midi File that exceeds the available Sequencer mermory wk1000 features 96 ROM Styles that add automatic accompaniments to the 3 Real Time keyboard sections Upper 1 Upper 2 Lower Each Style features...

Страница 8: ...s LOWER MEMORY notes in the Lower section of the keyboard continue to sound display indicator ON or stop indicator OFF after releasing the keys played in the Lower section of the keyboard 10 V A R I A...

Страница 9: ...ring data to disk SAVE or from disk LOAD 24 LYRICS Enables led ON or disables led OFF the song lyrics in the display playing a Midifile 25 SOUND Enables led ON or disables led OFF the numeric keypad t...

Страница 10: ...I General chapter 3 MIDI MIDI interface equipped with MIDI IN and MIDI OUT sockets to connect wk1000 to other MIDI devices keyboard computer etc MIDI cables are not supplied with the instrument When u...

Страница 11: ...rd 1 The group of Keyboard activator keys Upper 2 Upper 1 Lower shows that UPPER 1 is active the led is ON The UPPER 1 section of the keyboard is now playing The PIANO sound plays over the whole keybo...

Страница 12: ...o select sounds step by step SELECT STYLES AND PLAY WITH AUTOMATIC ACCOMPANIMENTS The default set up always recall the style 1 but you can select any style in the following way Press the SINGLE TOUCH...

Страница 13: ...TIONS USE THE HEADPHONES If you have purchased the optonal Generalmusic pedals volume and footswitch pedals connect them to the relative Volume and Damper pedal on the rear panel Pedals will add the f...

Страница 14: ...Press TRANSPOSE b to lower the pitch or TRANS POSE to raise the pitch 2 Each time the TRANSPOSE b key is pressed the display will show a decrease of one semitone Each time the TRANSPOSE key is pressed...

Страница 15: ...to the disk drive 1 Press the FLOPPY DISK key 2 The DISK icon lights up and the cursor arrowhead moves to the LOAD indication in the disk menu The display shows the first available file type complete...

Страница 16: ...ck Songs To enable this mode press the STYLE key led ON select the desired number 104 110 on the numerif keypad and press the RECORD key Song mode to playback Songs from a disk or from the memory To e...

Страница 17: ...disable the function press and hold the STYLE TEMPO LOCK once again STYLE LOCK ON indicated in the display Selecting a Performance the Style does not change Only the keyboard sounds are changed the St...

Страница 18: ...down the same button to activate the STORE PERFORMANCE command which allows you to save the panel situation to the current Performance STYLE PERFORMANCES 96 default non programmable Performances are...

Страница 19: ...DRUM KITS Drumkits assign a different percussive sound to each note of the keyboard Banks 2 and 3 of the PERCUS SIVE Sound Group contain 20 Drumkits Bank 4 contains a special drumkit location 112 con...

Страница 20: ...allows the wk1000 to be connected to an external amplification system key board amplifier domestic stereo system mixing console etc The signal is processed by the instrument s internal digital effect...

Страница 21: ...wk1000 appropriate speed to communicate with the PC refer to the MIDI GENERAL chapter Connect the optional Volume and Damper pedal to the relative sockets The default Control Change CC messages appear...

Страница 22: ...hand accompaniment chord The Metronome ON OFF status The Tempo setting and metronome beat The disk drive functions The overall Transpose setting The Sequencer measure counter The values relating to fu...

Страница 23: ...existing characters The keyboard default setting is OVERWRITE E2 SPACE Add a space F2 DELETE Deletes the current selection or the successive characters G2 BACKSPACE Deletes the previous characters Up...

Страница 24: ...de you can play over the entire extension of the keyboard either using a single Sound or two Sounds layered If you wish to play in FULL mode just turn off the LOWER section by pressing the LOWER key l...

Страница 25: ...UPPER 1 and 2 both ON Sound 8 and 9 are layered over the entire keyboard D UPPER 1 and LOWER both on Sound from track 7 left of the split and Sound from track 9 on the right E UPPER 2 and LOWER both...

Страница 26: ...in the display Enter the Sound number with the numeric keypad 2 Repeat the operation to change the sound of another section The Sound shown in the display is always the one assigned to the sec tion i...

Страница 27: ...ns are quite simple By programming a performance you will always recall your favourite Sound combinations Styles and panel settings HOW TO PROGRAMME A PERFORMANCE BEWARE The instrument MUST NOT be set...

Страница 28: ...DATA buttons to modify each values You can exit any edit page at any time without losing your temporary modifications Save your modifications if you decide to change to a new Performance Selecting a...

Страница 29: ...NTER The Performance is saved to the new location 3 PERFORMANCE NAME To change the Performance name proceed as follows Keep the STORE PERF buttons pressed for a few seconds 1 Use the symbol located be...

Страница 30: ...tros 4 Fills and 4 End ings wk1000 STYLES The Styles provide automatic accompaniments that are based on the chord played on the keyboard the accompaniment patterns change to suit the current chord Eac...

Страница 31: ...urrent group es P11 GranPNO will appear in the display Each func tion key selects one of the 9 Performances of the selected group RECALLING A STYLE FROM A PERFORMANCE Each Performance contains a Style...

Страница 32: ...press START STOP to start the Style with the Intro INTRO can also be enabled during the normal Style playing Stops a Style accompaniment playing an ending coda The corre sponding display indicator tu...

Страница 33: ...down the FILL buttons you will listen to the entire Fill pattern playing continuously You can preset a Fill pattern before starting a Style In this case Fill will be used as an INTRO FILL A adds the...

Страница 34: ...r example TEMPO DATA button control the volume of a blinking track To select a Style with Single Touch Play active and recall the original Style tempo from the ROM A Recall a Performance where a user...

Страница 35: ...board split FINGERED 1 At least three notes are needed for the chords to be recognised Use the CURSOR button to select the ARRANGER MODE you wish to modify and the TEMPO DATA keys to change the select...

Страница 36: ...Style In addition this button activates the ARRANGE ON OFF button LED on and the ARRANGE MEMORY function corresponding display indicator on When SINGLE TOUCH PLAY is OFF selecting Styles recalls only...

Страница 37: ...nt Harmony Type setting and only operates when the keyboard is split HARMONY By holding down the HARMONY button for about 2 seconds the display shows the cur rently selected Harmony Type The PAGE butt...

Страница 38: ...ctive Led OFF mode REV CHO To modify Reverb or the Chorus and their Send keep the REV CHO key pressed for at least one second The parameter that can be modified starts blinking Use the CURSOR key to m...

Страница 39: ...the 8 digit dis play area and an extension shown in the 3 digit display area which specifies the type of file In file types that include SONGS in PK WK STYLES and ALL formats the extension is not dis...

Страница 40: ...file compatibili GM quando il parametro General MIDI impostato ON GENERAL MIDI GM GMX format is an extension of the General MIDI specifically by Generalmusic that makes the first three sound banks of...

Страница 41: ...ding to the selected Song 111 117 in the numeric keypad Then press PLAY STOP to start the execution RECOGNIZING A FILE FROM ITS EXTENSION Most of the wk1000 compatible files are recognized from their...

Страница 42: ...drive If the disk is write protected remove the protection 1 Press ss the FLOPPY DISK button and move to the SAVE page using the PAGE button 2 Press the CURSOR buttons to select the file format you w...

Страница 43: ...d disk and insert it in the drive If the disk is write protected remove the protection 1 Press ss the FLOPPY DISK button and move to the DELETE page using the PAGE button 2 Select the Song you wish to...

Страница 44: ...s they are of extreme importance in case the data contained either in the instrument or in other Floppy Disks get lost or damaged To transfer data from a Floppy Disk to another it is necessary to go t...

Страница 45: ...on with a cyclic course For example in case location 111 is already engaged the next song loaded will engage location 112 etc E g to select the Song from location 111 Press the 100 button and then inp...

Страница 46: ...g the display if all tracks are active including tracks from 9 to 6 use the F9 function key to toggle between the two group of tracks you will see that no track is free to play along with the Song in...

Страница 47: ...tions below very carefully Select the song or MIDI file and press the START STOP button to start the playback Press the LYRICS button to enable the Karaoke function led ON Connect the RGB cable suppli...

Страница 48: ...as an ALL data package SONG STYLE PERFORMANCE Refer to the DISK chapter for explanations regarding how to load Song Styles to wk1000 memory from disk then proceed as follows SONG STYLE SELECTION wk10...

Страница 49: ...the Sequencer SEQ the Sample memory SMP or the Performances PFM select the InitSEQ option if you select InitALL Performances and Samples will be erased then press ENTER twice wk1000 is now ready to r...

Страница 50: ...delete It is possible to clear data from USER SONGS and USER STYLES If you do not like a track of a Song or a MidiFile you can cancel it by selecting the Song 111 117 You can choose to cancel the enti...

Страница 51: ...elect any of the USER STYLE locations 96 103 2 Location 96 is selected in this example The display will show the selected location number User01 The number changes with each Style selected 01 96 02 97...

Страница 52: ...the first available empty location Alternatively you can disengage a location erasing the contents with the Clear Style function explained in detail in the relative paragraph SETTING THE TIME SIGNATUR...

Страница 53: ...ss the START STOP button to stop recording 9 Press the Function button corresponding to the newly recorded track twice In our example press F2 BASS F2 10 You can now record some other tracks repeating...

Страница 54: ...OVERDUB 1 Set the RIFF in RECORD MODE 3 Stop the recording and repeat the procedure in each track you wish to modify 2 Play the notes you wish to add to the pattern These will be added overdub the ex...

Страница 55: ...6 Select the CLEAR ALL function using the TEMPO DATA to completely can cel the Style 7 Once the desired section has been selected Track RIFF Tempo All press ENTER twice to confirm The User Styles are...

Страница 56: ...select the Performance Name page 1 Select a USER STYLE and press the REC button to switch to RECORD MODE 2 Press the PAGE button to select the PERFORMANCE NAME page 3 the alpha numeric function is set...

Страница 57: ...selected or if the same Performance is selected again before saving the changes the new effect settings will be lost and the Performance will be restored to the previous setting TO ASSIGN THE EFFECTS...

Страница 58: ...ance track CHOSEND Controls the CHORUS level in each Perforrmance track 1 Select the track you wish to modify using the function buttons Note the Performance or Single Touch mode must not be selected...

Страница 59: ...connect the same MIDI ports both IN or both OUT between two instruments In the connections with external MIDI devices the tracks of the external device and wk1000 must be tuned to the same MIDI channe...

Страница 60: ...s screen The TEM PO DATA buttons set the MIDI channel number 5 Press the PAGE button to select the MIDI CHANNEL mode and to the relative tracks 4 Connect the wk1000 MIDI OUT to the expander MIDI IN 1...

Страница 61: ...u can change sounds set volumes and pan levels select and control the effects etc When you send messages to wk1000 to select Sounds the Sound selection message must be received on the MIDI channel ass...

Страница 62: ...o 87 Styles from 81 to 88 LATIN 1 CC 0 32 CC 32 0 From 88 to 95 Styles from 82 to 96 LATIN 2 RAM Memory Locations From 96 to103 CC 0 44 CC 32 0 From 0 to 7 From 1 to 8 USER STYLES The Style controls c...

Страница 63: ...bility with other Generalmusic instruments SELECTING SOUND BANKS VIA MIDI BK 1 2 3 5 6 CC 00 CC 00 vv vv bank value Prg Chng from 1 to128 vv vv bank value Prg Chng from 1 to128 wk1000 offers additiona...

Страница 64: ...L or the single sections SEC Use the TEMPO DATA buttons To select ALL or SEC VOLUME PEDAL If the PAGE button is pressed the display will show the following functions Tuning Dynamic Serial Computer Use...

Страница 65: ...number appears in the display Use the F9 Function button to toggle between Group A tracks 01 08 to Group B tracks 09 16 Press ENTER to enable this track function Use the TEMPO DATA buttons to set the...

Страница 66: ...n saved to Store Performance MIDI DUMP Once finished press twice the ENTER button 4 Start the Recording procedure in the external device 3 Use the PAGE buttons to select the DUMP page Now select the t...

Страница 67: ...wk1000 appendix owners manual wk1000 Page61 Appendix...

Страница 68: ...ChorusGtr2 808_Tom 28 MutedGtr Muted2 Dyn Muted GtCutNse 29 OverdrGt WhaGtr1 5thOverdr2 StrnSlap 30 DistGtr FuzzGtr HeavyGt2 Rain 2 31 HarmonxGtr SlowHarmx2 HarmGtr32 Thunder BASS 32 AcoustcBs1 Acoust...

Страница 69: ...ce VocBells2 Angels2 92 BowedGlass2 Prophet12 Prophet22 93 MetalPad2 Bright22 Analogic2 94 HaloPad2 Slave2 Atmosphere2 95 SweepPad Machiner2 Decay32 SYN SFX 96 IceRain2 Noiseres BigRoom 97 Soundtrack2...

Страница 70: ...pose b display lcd multifunction backlit display lyrics on display 2 x 24 characters styles 96 styles 8 user progr 4 variations 5 tracks drums bass acc 1 acc 2 acc 3 styles control arranger on off low...

Страница 71: ...127 0 127 Change True number System Exclusive o o System Song Position x x Song Select x x Common Tune x x System Clock o o Start Stop Real Time Commands o o Continue Aux Active sensing o o Messages...

Страница 72: ...S p A Via delle Rose 12 47842 S Giovanni in Marignano RN Italy Tel 39 0541 959511Fax 39 0541 957404 www generalmusic com STOCK CODE 271445 Specifications are subject to change without prior notice PRI...

Отзывы: