General Dynamics Itronix GD6000 Скачать руководство пользователя страница 45

General Dynamics Itronix | 72-0136-005  

GD6000 User Guide

Your computer delivers superior power and performance. However, 

some users and the applications they use may demand more. This 

computer allows you to upgrade key components when you need 

increased performance.

note

  Contact your authorized dealer if you decide to per-

form a key component upgrade.

Additionally, the GD6000 has several equipment and accessory 
options to further enhance your mobile computing experience. 
This section highlights some of the most popular accessories 
used with the GD6000. Click 

here

 for a complete list of optional 

peripherals and accessories. 

Caution

  When purchasing any additional accessories, 

purchase only those accessories that are approved for use with 
your computer. If you use items that are not approved for use 
with this computer, you may cause your computer to malfunc-
tion, or to emit or receive electromagnetic radiation in excess 
of local regulations. For non-proprietary accessories such as 
PC Cards or printers, ensure that the accessory functions prop-
erly with your computer before making the purchase.
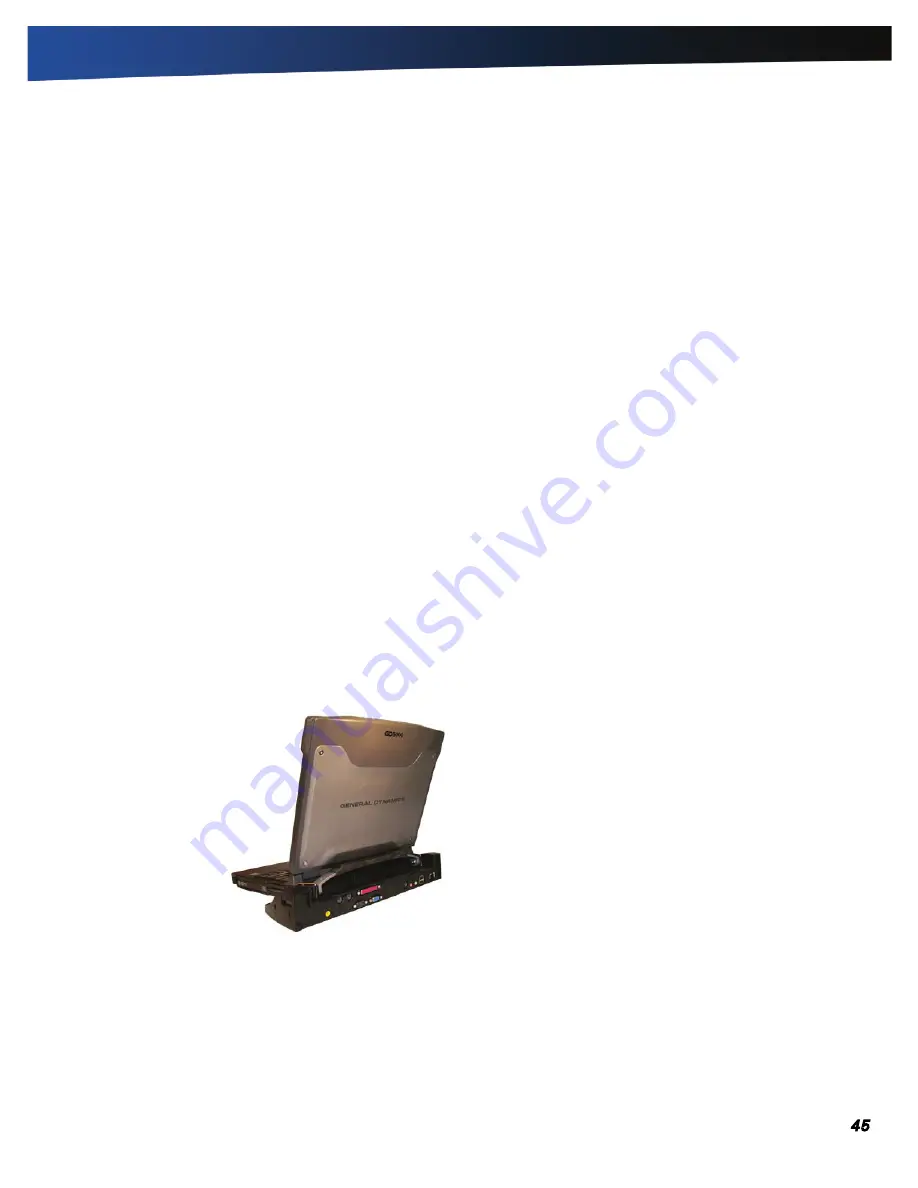
Office Dock

The GD6000’s Office Dock enables you to use it as a desktop 
computer. Once setup, the dock provides drop-in convenience 
with no cables to attach or detach from your GD6000. 

Simply place the computer in the dock and turn it on. The 
Office Dock’s wizard will guide you through the various steps 
to properly install the Office Dock.  

The Office Dock allows you to continue to access all your com-
puter’s ports and bays. Additionally, it includes the following 
ports typical of a business-class desktop computer:

„

„

Four USB 2.0 ports

„

„

IEEE 1394 port (FireWire™)

„

„

RJ-45 10/100/1000 Ethernet 
port

„

„

9-pin legacy serial port

„

„

25-pin parallel port

„

„

15-pin external monitor/
CRT port

„

„

Two PS/2 ports so you 
can attach a mouse and a 
keyboard

„

„

DC-in power port

„

„

Mono microphone interface

„

„

Stereo speaker interface

Once in the dock, the computer’s battery is recharged and 
conditioned automatically whether the computer is active, 
suspended or even powered off.

Undocking the GD6000

The GD6000 must be undocked prior to removing it from the 
Office or Vehicle Dock. To undock your GD6000:

Windows XP

1. 

Click on 

Start

 to display the Start Menu.  (At the bottom of the 

Start Menu next to the 

Log Off

 and 

Shutdown

 commands will 

be the 

Undock Computer

 command.)

2. 

Click on 

Undock Computer

3. 

Wait for the system to display “

Windows has finished un-

docking the computer. If you need to remove the comput-

er from the Docking Station, please do so now

.”  

4. 

Open the 

Start 

Menu once more and make sure the 

Undock 

Computer

 menu item is no longer displayed before pressing 

the release button on the Docking Station.

Windows Vista

1. 

Click on the 

Start 

Button.

2. 

Point to the arrow next to the padlock icon  to bring up the


Shut Down

 sub-menu. Click on 

Undock

.  You will see a popup 

message from the system tray that the 

Undock is Complete

3. 

Undock your computer by pressing the release button.

Windows 7

1. 

Select 

Start

.

2. 

Select the arrow next to the 

Shut down

 menu and click on 

Undock

. You will see a popup message from the system tray 

when the undock is complete.

3. 

Undock your computer by pressing the release button.

Optional Equipment and Accessories

Содержание GD6000

Страница 1: ...General Dynamics Itronix 72 0137 001 GD6000 User Guide...

Страница 2: ...19 Touchpad 20 How to Use the Touchpad 20 Adjusting the Touchpad Settings 20 Touchpad Precautions 20 Touchpad Buttons 20 Display 21 Calibrating the optional Touch Screen 21 Adjusting Display Brightnes...

Страница 3: ...35 Battery Tips 35 Tip 1 Avoid excessive heat and cold 35 Tip 2 Prevent wasted power 35 Tip 3 Calibrate your battery 35 Tip 4 Get a good charge 35 Tip 5 Prevent data loss 36 Tip 6 Clean terminals 36...

Страница 4: ...will not spin up so the computer can t boot up 54 Keyboard and Mouse Troubleshooting 54 Something unexpected happens when I press a key 54 Incorrect characters appear on the screen when I press certa...

Страница 5: ...ed this computer meets ENERGY STAR program requirements for computers Compliance Statements Federal Communication Commission Interference State ment This equipment has been tested and found to comply...

Страница 6: ...empt repairs of this equipment yourself without obtaining manufacturer authorized parts and docu mentation If the trouble is causing harm to the telephone network the telephone company may request you...

Страница 7: ...ot be co located or operating in conjunction with any other antenna or transmitter than specified in the filing This device may contain a WLAN radio transmitter a WAN radio transmitter and a PAN radio...

Страница 8: ...Check your packing slip for a complete list of items included in your package Standard Features XGATransmissive HiBright Display Shock mounted Hard Disk Drive HDD Includes a heater to protect the HDD...

Страница 9: ...the power outlet before cleaning Use a damp cloth for cleaning Do not use aerosols solvents or strong detergents CAUTION The computer may be damaged if exposed to con taminants Shield the unit from al...

Страница 10: ...ata may wish to use backup devices Don t leave passwords anywhere on your notebook or carrying case Be careful when placing your notebook on an airport security conveyor belt In most airports security...

Страница 11: ...canner The optional swipe style fingerprint scanner can be used for all standard security 7 Touchpad Buttons Use like the buttons on a mouse 8 Battery Removable Lithium Ion battery 9 Touchpad Use for...

Страница 12: ...ve is located on the bottom of the unit NOTE make sure the unit is powered off before removing the Hard Disk Drive to prevent data corruption 5 Security Slot The Security Slot can be used with a stand...

Страница 13: ...network Connection speed is 10 100 1000 Mbps 3 Two 2 0 USB Ports Connects to USB devices e g USB digital camera 4 Modem Jack RJ11 Connects a phone line to the internal fax data modem It can transmit d...

Страница 14: ...artment User expandable memory slot 3 Hard Disk Lock Slide this to lock or unlock the hard disk drive 4 Hard Disk Drive Removable hard disk drive for data storage 5 Battery Locks Slide these locks tow...

Страница 15: ...keys A through Z to the UPPER CASE position When you press an alphabetic key the character appears as a capital letter When you press Shift with other keys the characters on the upper part of the key...

Страница 16: ...light brightness if you have the optional EL keyboard Fn F6 Display Brightness Down Decreases the screen brightness Fn F7 Display Brightness Up Increases the screen brightness Fn F8 Audio Volume Down...

Страница 17: ...to lower case While in the upper case mode pressing the Shift key results in lowercase characters when entered You still have to use the Shift key to display characters located on the upper portion of...

Страница 18: ...a complete list of Windows key combinations Application Key Opens the application s context menu same as right click Application Launch Button The Application Launch Button is the right button above...

Страница 19: ...tinue radio communication No Light The battery is fully charged or a main battery pack is not fully inserted 4 Touchpad Steady Green Touchpad is activated No Light Touchpad is disabled 5 Hard Disk Dri...

Страница 20: ...indows Vista 1 Click on Start Control Panel Hardware and Sound Mouse This will bring you to the Mouse Properties window 2 Click on the last tab Device Settings then on the Synaptics Touchpad V6 2 and...

Страница 21: ...Select 4 pts Cal 4 Touch and hold the tip of the pen to the center of each blink ing symbol as they appear on the screen until calibration is complete 5 Select OK to save and exit NOTE Under Calibrat...

Страница 22: ...e it Also do not place any object on top of the computer when the display is closed Lid Switch Your computer has a lid switch that automatically suspends your computer when you close the display and r...

Страница 23: ...p side of a PC Card is usu ally identified with a label Insert the card into the slot with the top up and the edge with pinhole contacts going in first You will feel some resistance as the card slides...

Страница 24: ...is reading from a DVD or CD the LED on the Optical Disk Drive will flash Do not attempt to remove a disk while this light is active Do not insert any foreign objects into the disk tray Do not force th...

Страница 25: ...etup and Hard Disk password If you forget your password please get in touch with your dealer or an authorized service center Fingerprint Scanner Option The optional swipe style fingerprint scanner can...

Страница 26: ...and the environment with rugged features that enable you to use them in extreme operating conditions we design computers that use less energy reducing environmental pollution That s why our ENERGY STA...

Страница 27: ...ocket turning it slightly to make a good connection CAUTION The vehicle adapter is not intended to be used continuously It is intended to provide a convenient temporary power source for powering and c...

Страница 28: ...roperties to open the Display Properties dialogue box 3 Select the Settings tab 4 Click on the 2 in the Monitors section 5 Check Extend my Windows desktop onto this monitor 6 Select Apply and OK to sa...

Страница 29: ...the greatest possible coverage to the user HSDPA High Speed Downlink Packet Access HSDPA is a 3G GSM Mobile protocol in the HSPA family which provides a road map for UMTS based networks to increase th...

Страница 30: ...The GD6000 has several embedded antenna options to support wireless communications They require no user action Antenna 1 CRMA Express Antenna 2 GPS Antenna 3 WLAN Antennas 4 Bluetooth Diversity Anten...

Страница 31: ...trical wires 4 Radio signals reflect off other buildings Even in the signal shadow the signal could be reflected back by another building 5 Try not to hold the unit If possible place it in vehicle on...

Страница 32: ...onnect the AC adapter to the computer then to a power source 2 Calibrate the battery to set the gas gauge to accurately reflect battery capacity You only need to do this once with a new bat tery or wi...

Страница 33: ...tion 1 Select Start Control Panel Mobile PC 2 Click Power Options and select DynaPower Battery Calibra tion from the menu on the left side of the screen The Cali bration Window will pop up asking if y...

Страница 34: ...ith a charged battery Refer to Battery Tips for more information about how you can conserve battery power Refer to Managing Power for infor mation about how you can setup your computer to effectively...

Страница 35: ...6 Increase it by pressing FN F7 Use the AC adapter or vehicle adapter whenever possible Use the General Dynamics Itronix Power Saver utility XP or DynaPower utility Vista Windows 7 These utilities pro...

Страница 36: ...e your computer for more than a few days shutdown your computer or put it into hibernate mode Remove the battery before storing the computer Tip 6 Clean terminals Dirty terminals can be a cause of cha...

Страница 37: ...when you see this prompt NOTES The BIOS password settings affect this option If a user or supervisor password has been previously entered you will be asked for a password The touch screen is not acti...

Страница 38: ...s the IDE0 Model Name HDD0 Serial Number Displays the IDE0 Serial Number ATAPI Model Name Displays the ATAPI Model Name System Board Version Displays the current system board version System BIOS Versi...

Страница 39: ...en during boot Network Boot Enabled Disabled When enabled the system can boot from the network This setting requires a reboot to take effect NOTE The LAN must be selected as the first boot item on the...

Страница 40: ...ce is powered on when the system reboots GPS Support Enabled Disabled If enabled the GPS device is powered on when the system reboots WWAN Support Enabled Disabled If enabled the WWAN device powers on...

Страница 41: ...tr 0 25 Cntr 0 50 Determines the system Spread Spectrum range Stealth Mode Configuration Stealth mode is a feature that allows the computer to be used in an environment where sound and light could be...

Страница 42: ...rightness level is set at 0 The default level is mid range Wireless Radios Off All wireless devices are set to off during a suspend resume or boot The radio on off button can be used to manually turn...

Страница 43: ...y screen as seen when both Supervisor and User passwords are installed Field Setting Function Supervisor Password Is Clear Shows if a password has been set User Password Is Clear Shows if a password h...

Страница 44: ...riority order use the up and down arrow keys to highlight a device Then press F5 or F6 to move the device higher or lower on the priority list The Exit Menu Field Function Exit Saving Changes Exit the...

Страница 45: ...uter s ports and bays Additionally it includes the following ports typical of a business class desktop computer Four USB 2 0 ports IEEE 1394 port FireWire RJ 45 10 100 1000 Ethernet port 9 pin legacy...

Страница 46: ...of quality you need when selecting a surge suppressor This depends on factors such as surge environ ment the type of equipment to be protected and the quality of the electrical wiring and service Surg...

Страница 47: ...memory cards approved for use in your computer Failure to do so may void your warranty 1 Hold the memory card by its edges with the edge connector side towards the slot CAUTION Do not touch the memory...

Страница 48: ...y 9 cell battery pack for longer run time AC Adapter The compact AC adapter charges your battery pack and supplies power to your computer You can order a spare AC adapter so you do not need to carry i...

Страница 49: ...shock and vibration Do not expose the computer to dust and dirt Do not place objects on top of the computer Do not place the computer on uneven surfaces Periodically inspect the computer and accessor...

Страница 50: ...mize downtime After you have installed all your applications and have your computer configured as desired create a backup of drive C using the Hard Disk Backup and Recovery Utility Then use the Window...

Страница 51: ...last Restore Entire Contents of Drive C If none of the above steps restore your disk image to a stable state you may need to restore your disk to its original factory image or an image you saved usin...

Страница 52: ...portal at www gd itronix com CCC The CCC receives calls from 5am 5pm Pacific Daylight Time Monday through Friday except on holidays Sorry 1 800 numbers ARE NOT accessible from Mexico Technical Service...

Страница 53: ...tart Battery Troubleshooting The battery does not charge To prevent possible damage to the battery the system will not allow a charge if the battery temperature is extremely hot or cold such as in a c...

Страница 54: ...then select the Appearance tab to make changes to the color scheme For Windows Vista and Windows 7 Right click on your Desktop select Personalize then Window Color and Appear ance to change your color...

Страница 55: ...olume by pressing Fn F9 The computer won t turn on The battery may not be installed properly or it may not be fully charged Make sure a fully charged battery is properly installed Connect external pow...

Страница 56: ...hanges I receive an out of memory error message Too many applications may be running at the same time Close applications you don t need Make sure you have enough space on your hard disk at least 15 fr...

Страница 57: ...increase display brightness How do I clean the display To clean the display assembly use a soft dry cloth In some cases you can use a small amount of water to remove streaks or smears Do not use paper...

Отзывы: