background image

INTRODUCTION:

4

FEATURES:

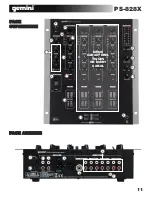
CONNECTIONS:

1

6

7

CONTROLS:

8

10

11

12

Congratulations on your purchase of 

Gemini PS-828X

12.5” 4 channel

stereo mixer. This-state-of-the-art mixer features the latest technological
advances and is backed by a 1 year warranty, excluding the cross fader.
The cross fader is backed by a separate 90 day warranty.
Prior to use we suggest that you carefully read all the instructions.

- 12.5” 4 Stereo channel mixer
- 5 line, 2 Phono inputs 2 microphone jacks 1/4” (6.35mm)
- 3 band rotary line EQ with cut feature & rotary gain channel control
- Separate Cue Switch for each channel
- Rotary cue volume, CUE/PGM rotary knob
- VU meter on each channel
- Talkover switch
- Removable face plate for user replaceable Rail Glide cross fader

Ensure that the 

POWER SWITCH

is in the 

OFF

position prior to making any connections.

POWER SUPPLY

This unit comes with a 

POWER SUPPLY.

Plug in to the rear panel

POWER SUPPLY 

socket before plugging it in to a proper power

source.

The 

MASTER RCA OUTPUT

connects the mixer to your main amplifier using standard audio 
cables with 

RCA

-type connectors.

The 

RECORD RCA OUTPUT

The 

RECORD

output jacks can be used to connect the mixer to the

record input of your recording unit, thus enabling you to record your
mix with 

RCA

cables.

BALANCED OUTPUTS

The 

PS-828X

has balanced

XLR 

outputs controlled by the master

output rotary.

2

3

4

5

The 

PS-828X

has 

2 PHONO (PH/LN) and 5 LINE RCA INPUTS

each channel has two corresponding lines and can be chosen via the
channel line switches (see 12)
When switched to the PH position you may use any Turntable with a
magnetic cartridge, remember to connect your ground wire (see

GROUNDING SCREW

) or there may be a system hum.

And when the switch is in the 

LN

position you may connect any line

level device as described before (Mp3, CD, Tape etc).

NOTE: CONNECTING A LINE LEVEL DEVICE TO A PH INPUT MAY CAUSE
THAT MIXER CHANNEL TO OVERLOAD AND OR DISTORT

.

Now you may plug the 

RCA’s

from your playable medium into each

input to be connected to their respective 

CHANNELS

(CH).

GROUNDING SCREW

When using (a) turntable(s), you will need to ground the 

RCA

cable(s) by screwing in the grounding fork(s) to the 

GROUNDING

SCREW located on the rear panel of the 

PS-828X

mixer.

Attach a 

PHONO

(Turntable) ground line to the silver 

GROUND

THUMB SCREW

that is situated at the bottom middle of the rear

panel.

MIC (MICROPHONE) INPUT

The main 

MIC

or Microphone input is located in middle of the back

panel of the 

PS-828X

and will accept a standard 1/4” connector.

There is also an AUX MIC input located at the top left hand corner of
the front panel. You can control the gain of both together and even
set the low’s and the high’s for the

MIC 

(See 

CONTROLS

).

HEADPHONE OUTPUT

The 

HEADPHONE OUTPUT

located at the front bottom right hand

corner of the 

PS-828X

will accept any headphone with a standard

1/4” connector and or adapter and will allow you to 

CUE

your music

program before you play it, you can adjust the volume and 

PGM

mix

of the 

HEADPHONE

(see 

CONTROLS

).

Then when all of your connections have been made turn on the
mixer by pressing the 

POWER SWITCH

.

MICROPHONE VOLUME

Allows you to adjust the volume of the microphone signal.

MICROPHONE EQ 

and 

TALKOVER SWITCH

The 

MICROPHONE EQ 

Let’s you to control the low frequency and

the high frequency of the microphone signal. The 

TALKOVER

switch

allows you to quickly attenuate the main output so the microphone
can be heard over the main music program.

MIXER CHANNEL
(NOTE: ALL 4 CHANNELS HAVE THE SAME FEATURES)

CHANNEL INPUT SELECTOR

The 

CHANNEL INPUT SELECTOR

switches allow you to choose

which input will be controlled by that channels corresponding
volume 

FADER

.

For example on 

CHANNEL

(1) the 

INPUT SELECTOR

allows you to

choose between 

PHONO 1 

and 

LINE 1

, on 

CHANNEL

(2) the

INPUT SELECTOR SWITCH 

will let you choose between 

PHONO 2

and 

LINE 2

and on 

CHANNEL

(3) you can choose between 

LINE 3

and the 

LINE 4

input, and on 

CHANNEL

(4) you can choose 

between 

LINE 5

and 

MIC 2

.

9

PS-828X

PRECAUTIONS:

1. All instructions should be read before using this equipment.

2. To reduce the risk of electrical shock, do not open the unit.
Please refer all servicing needs to a 

Gemini

-qualified service

technician.

3. Do not expose this unit to direct sunlight or a heat source such
as a radiator or stove.

4. This unit should be cleaned only with a damp cloth. Avoid sol-
vents or other cleaning detergents.

5. When moving this equipment it should be placed in its original
carton and packaging. This will reduce the risk of damage during
transit.

6. DO NOT EXPOSE THIS UNIT TO RAIN OR MOISTURE

.

7. DO NOT USE SPRAY CLEANERS OR LUBRICANTS ON
CONTROLS, SURFACES OR SWITCHES.

IN THE USA ~ IF YOU EXPERIENCE PROBLEMS WITH THIS UNIT CALL GEMINI CUSTOMER SERVICE AT:    

1 (732) 346-0061. DO NOT ATTEMPT TO RETURN THIS EQUIPMENT  TO YOUR DEALER.

Содержание PS-828X

Страница 1: ...ERATIONS MANUAL MANUAL DE INSTRUCCIONES MANUEL D INSTRUCTIONS BEDIENUNGSHANDBUCH FOR ENGLISH READERS Page 2 Page 5 PARA LECTORES EN ESPAÑOL Página 6 Página 9 UTILISATEURS FRANCAIS Page 10 Page 13 FÜR DEUTSCHE LESER Seite 14 Seite 17 ...

Страница 2: ...ype power outlet This is a safety feature If you are unable to insert the plug into the outlet contact your electrician to replace your obsolete out let Do not defeat the safety purpose of the grounding type plug POWER CORD PROTECTION Power supply cords should be routed so that they are not likely to be walked on or pinched by items placed upon or against them paying par ticular attention to cords...

Страница 3: ...BACK PS 828X TOP 1 3 2 3 4 5 6 7 8 8 10 12 13 14 15 16 17 18 19 20 21 23 11 22 9 SAME FEATURES ON EVERY CHANNEL ...

Страница 4: ... is situated at the bottom middle of the rear panel MIC MICROPHONE INPUT The main MIC or Microphone input is located in middle of the back panel of the PS 828X and will accept a standard 1 4 connector There is also an AUX MIC input located at the top left hand corner of the front panel You can control the gain of both together and even set the low s and the high s for the MIC See CONTROLS HEADPHON...

Страница 5: ... ADJUSTMENT selector lets you choose between two fader CURVE settings positioning the switch to the right will give you a gradual CROSSFADE and positioning the switch to the left will give you a quick CROSSFADE CROSS FADER The CROSS FADER allows you to mix evenly from one source to an other On the PS 828X The CROSSFADER is assignable between either channels 1 and 2 or channels 3 and 4 depending on...

Страница 6: ...chufe y la clavija no son compatibles un electricista deberá cambiar el enchufe En ningún caso deberá forzarse PROTECCIÓN DEL CABLE DE CORRIENTE Los cables de corriente deben protegerse para que nadie los pise ni corran el riesgo de pinzarse por elementos colocados encima o que los aprisionen Debe prestarse especial atención al cable al enchufe a los ex tensores de cable y al punto por donde el ca...

Страница 7: ...PANEL TRASERO PS 828X PANEL SUPERIOR 1 2 3 4 5 6 7 8 8 10 12 13 14 15 16 17 18 19 20 21 23 11 22 9 LAS MISMAS CARACTERISTICAS EN CADA CANAL 7 ...

Страница 8: ...er giradiscos con cápsula magnética acordándose de conectar la masa ver conexión de TOMA DE TIERRA o podría haber zumbidos Y cuando está en posición LN puede conectar cualquier unidad de nivel de línea como Mp3 CD cassette etc NOTA CONECTANDO UN APARATO DE LINEA EN UNA ENTRADA DE PH PUEDE CREAR SOBRECARGA DEL MEZCLADOR Y DISTORSIÓN Ahora puede conectar los RCA desde su fuente de sonido a sus re sp...

Страница 9: ...de arriba el CROSSFADER actuará entre los canales 1 y 2 en la parte inferior el CROSSFADER actuará entre los canales 3 y 4 Los selectores de AJUSTE DE CURVA permite escoger entre dos CURVAS de fader posicionando el interruptor hacia la derecha la CURVA será gradual y hacia la izquierda el cambio es instantáneo CROSSFADER El CROSSFADER permite mezclar de una fuente a otra En la PS 828x el CROSSFADE...

Страница 10: ...ion doivent être déroulés et rangés proprement afin d éviter de se prendre les pieds dedans en particulier les cordons reliés aux prises électriques ANTENNE EXTERIEURE Si vous reliez votre appareil à une antenne ou un câble extérieur assurez vous de la présence d une connexion à la terre afin d éviter les surten sions et les décharges d électricité statique L article 810 du National Electrical Cod...

Страница 11: ...FACE ARRIERE PS 828X FACE SUPERIEURE 11 8 10 12 13 14 15 16 17 18 19 20 21 23 11 22 9 1 2 3 4 5 6 7 8 MÊME CARACTÉRIS TIQUES ON EVERY CANAL ...

Страница 12: ... écoute ENTREES MICROPHONE MIC La PS 828X possède 2 entrées microphones MIC 8 l une située sur le panneau de la face arrière et l autre en face avant En haut à gauche Utilisez un connecteur JACK 6 35mm standard Les réglages Gain 10 High Aigue Low Bass 11 sont disponibles pour chaque micro Vous reportez à la section REGLAGES pour de plus amples détails Un talkover permet de donner priorité au micro...

Страница 13: ...AGE DE COURBE Cette touche permet d assigner tel ou tel canal au CROSSFADER Lorsque cette touche est en position HAUTE les canaux 1 2 seront assignés au CROSSFADER En position BASSE les canaux 3 4 seront alors assignés au CROSSFADER Vous pouvez modifier la coupure du CROSSFADER via la commutateur CURVE ADJUST MENT lorsque celui ci est situé à drotie la coupure sera progressive Lorsqu il est situé ...

Страница 14: ...ann noch dass sie von darauf stehenden oder gegen sie stoßenden Gegenständen gequetscht wer den Achten Sie besonders auf Kanten Sicherung Stecker und Buchsen AUSSENANTENNENERDUNG Wenn Sie eine Außenantenne oder ein Radio Fernsehkabelsignal an das Produkt anschließen achten Sie darauf dass die Antenne oder das Kabel geerdet sind um dafür zu sorgen dass Überspannungen und elektrostatische Aufladunge...

Страница 15: ...HINTEN OBEN 1 2 3 4 5 6 7 8 8 10 12 13 14 15 16 17 18 19 20 21 23 11 22 9 Dieselben Eigenschaften auf jedem Kanal 15 PS 828X ...

Страница 16: ...nen Sie Mikro fone mit 6 3 mm Klinkenstecker anschließen Oben links auf dem Mixer steht Ihnen mit dem AUX MIC Eingang ein weiterer Mikro foneingang zur Verfügung Sie können die Vorverstärkung für beide Mikrofone Gain und die hohen und tiefen Frequenzen regeln Siehe REGLER KOPFHÖRER AUSGANG An den KOPFHÖRER AUSGANG auf der rechten Vorderseite des PS 828X können Sie Kopfhörer mit 6 3 mm Klinkensteck...

Страница 17: ...ter nicht gedrückt regelt der CROSSFADER zwischen Kanal 1 und 2 ist der Schalter gedrückt werden die Kanäle 3 und 4 geregelt Mit der KURVEN TASTE bestim men Sie das Regelverhalten des CROSSFADERS In der rechten Schalterposition verfügt der CROSSFADER über ein lineares Regelverhalten in der linken Schalterposition arbeitet er mit einer schnelleren Charakteristik CROSSFADER Mit dem CROSSFADER können...

Страница 18: ... Gemini UK will pay to re turn the unit to you if it is considered under warranty IN GERMANY Die allgemeinen gesetzlichen Gewährleistungen bleiben von den Herstellergarantien unberührt Der Garantieanspruch erlischt bei Ein griffen durch den Käufer oder durch Dritte sowie bei unsachgemässer Be handlung Gewährleistungsansprüche sind auss chließlich gegenüber Ihrem Fach händler geltend zu machen WARR...

Страница 19: ...he express written permission of GCI Technologies Corp It is recommended that all maintenance and service on this product is performed by GCI Technologies Corp or its authorized agents GCI Technologies Corp will not accept liability for loss or damage caused by maintenance or repair performed by unauthorized personnel Worldwide Headquarters 1 Mayfield Ave Edison NJ 08837 USA Tel 732 346 0061 Fax 7...

Отзывы: