GeChic On-Lap 1502 Скачать руководство пользователя страница 10

Section 3 Windows 10/ 8.1 Touch Gesture Description 

Common Touch 

Gesture

 Introduction: 

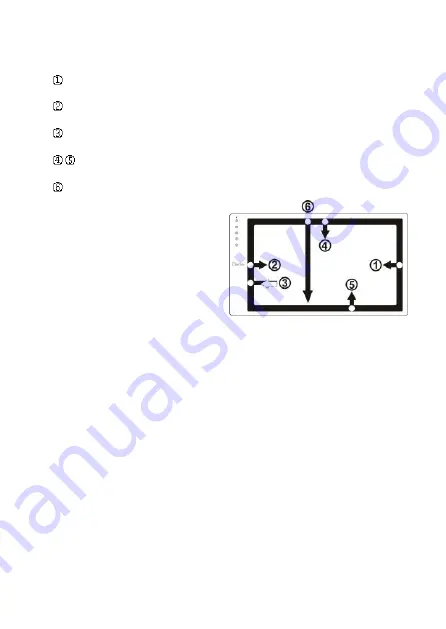
1.  Use finger to swipe in from edge:


Swipe in from the right edge of the screen (Arrow 1) : Open the five 

charms 

 Search, Share, Start, Devices, and Settings


Swipe in from the left edge of the screen (Arrow 2) : Switch between 

apps


Swipe in from the left edge of the screen then out toward the left 

edge of the screen (Arrow 3): Display all apps


Swipe in from the top edge (Arrow 4) or bottom edge (Arrow 5): 

Display commands of app, like Add New, Reminder, etc.


With touch, drag the app from the top edge of screen (Arrow 6) to the 

bottom of the screen: Close app 


2. 

Select item: Tap on the item to open. This function is similar to clicking 
on mouse.  

3. 

Press and hold the item for a few seconds then release: Display item 
information. This function is similar to right-clicking on mouse. 

4. 

Zoom in and out: Touch the item with two fingers then move fingers 
toward each other (pinch) or away from each other (stretch). 

5. 

Slide finger on the screen, horizontally or vertically, to move through 
content. This function is similar to scrolling with a mouse. 

Chapter 4 Hot Keys and OSD Instructions 

Section 1 Hot Keys and LED Light Description 

* The buttons are capacitive touch module. Please touch the buttons by the fingertip 
gently. Do not press the buttons with stress or continuously, which may cause them fail 

to response. “Increase/up” or “Decrease/down” continuously shall be done by 

touching the button and holding. Do not touch two buttons at the same time, due it may 
cause no response or fault response. 


LED Lights Description


It shows green light when turn on On-Lap Monitor and shows red light when 
shut down. 

Fig.: Finger touch illustration, arrow 
indicates movement direction 

Содержание On-Lap 1502

Страница 1: ...Manual of 1502 Read Me Before First Usage...

Страница 2: ...Touch Output and Power Cable 4 Section 3 Connect the 5V 2A Charger Optional 6 Section 4 Install the VESA 100 Mount Optional 6 Chapter 3 Power On and Off the On Lap Monitor 7 Section 1 Power On and Of...

Страница 3: ...Chapter 1 Content Description Section 1 On Lap Monitor and Accessories 1 Parts Description 1 Fig 1502 parts buttons and LED light Description Fig On Lap 1502 input output ports...

Страница 4: ...B Touch Power Cable is inserted into the correct port in order to have touch function capability 5 Unstable power input will interfere with touch signal resulting in inaccu rate or failed touch functi...

Страница 5: ...udio Jack 6 Please notice the plug is applicable to its AC adapter only Section 4 Safety Instructions Please read this Manual carefully and observe the operation instructions and precautionary notes D...

Страница 6: ...HDMI port of On Lap 1502 Connect the other end HDMI A type connector to laptop tablet game console or DVD player s HDMI port Or connect VGA Video Cable s VGA connector to VGA port of On Lap 1502 Conn...

Страница 7: ...1502 If one USB port on laptop is unable to provide enough power please connect the two USB connectors to two USB ports on laptop this can provid twice the power On Lap 1502 has two Micro USB ports US...

Страница 8: ...Lap 1502 USB port or else touch function cannot be used Section 4 Install the VESA 100 Mount Optional From diagram below place VESA 100 mount to mount arm or wall mount use four screws to secure the...

Страница 9: ...from right side of screen Devices select 2nd Monitor select Extend Mode 2 Resolution setting Windows 7 system Click on icon Click on Control Panel Appearance and Personalization Click on Display Conn...

Страница 10: ...elease Display item information This function is similar to right clicking on mouse 4 Zoom in and out Touch the item with two fingers then move fingers toward each other pinch or away from each other...

Страница 11: ...hed touch this button will move down the Section 2 OSD Description 1 Basic Button Operation Press button to launch the OSD panel Press or to view the functions To adjust a certain function press to la...

Страница 12: ...eo signal ex 1080P 720P 576P 480P can use such func tion Use this function can adjust the image scan area 5 Manual Image Adjust Auto Adjust Only when input VGA signal can use such function Will auto m...

Страница 13: ...n I2 C protocol The host can request EDID information over the DDC2B channel The On Lap Monitor is able to inform the host system of its identity and depending on the level of DDC used communicate add...

Страница 14: ...262K colors Pixel Pitch 0 179mm Viewing Angle Typical U D R L 80 80 80 80 Contrast Ratio 400 1 Typical Response Time 17 5 ms Typical Brightness 220 cd m2 Maximum Horizontal Scan Range 30KHz to 83KHz a...

Страница 15: ...p Monitor s video input port and laptops video output port Image disappears or image size is too big too small or image is not centered The trouble may be caused by VGA video input Please adjust resol...

Страница 16: ...p 1502 has stable and sufficient power Please plug other USB cable to your device s USB port and On Lap 1502 s port For transmitting touch signal Can I use On Lap 1502 monitor with Raspberry pi or som...

Страница 17: ...GeChic Corporation 5F 3 No 138 Zhongming S Rd West Dist Taichung Taiwan R O C Customer Service service gechic com w w w g e c h i c c o m...

Отзывы: