GE JGRP20WEJWWGE Скачать руководство пользователя страница 14

4

31-2000792   Rev. 0

Instrucciones de Instalación

4


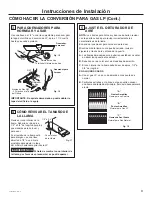
CONEXIONES ELÉCTRICAS

Un abastecimiento y receptáculo eléctrico adecuado debe ser 
usado para operar las partes eléctricas de su horno.

A.

  El cordón del horno tiene un enchufe de tres patas y debe 

ser usado con un receptáculo de tres hoyos que haga 
tierra adecuadamente con corriente alterna normal de 
casa de 120 Voltios, 60 Ciclos.

B.

  Instale el receptáculo eléctrico más abajo del horno en 

el lado izquierdo, en un lugar donde se pueda alcanzar 
fácilmente a través de las puertas del gabinete. (Vea Fig. 6).

C.

  Si no tiene un receptáculo de tres hoyos que haga tierra, 

haga que un electricista calificado le cambie el antiguo.

D.

  Un adaptador para hacer tierra se necesitará para 

convertir el receptáculo viejo hasta que pueda ser 
reemplazado. Este método es sólo provisorio, y un 
electricista calificado lo debería probar para estar seguro 
que cumple con los requerimientos.

Siempre desenchufe el cordón del horno antes de hacer 
cualquier reparación al horno. Cuando desenchufe el horno, 
siempre tome el enchufe, nunca el cordón.

ADVERTENCIA


NUNCA USE UN CORDÓN DE 

EXTENSIÓN PARA CONECTAR EL HORNO A LA 
ELECTRICIDAD.

ADVERTENCIA


Bajo ninguna circunstancia corte 

o saque la pata para hacer tierra del cordón del horno. 
No proveer una polarización adecuada podría crear una 
condición peligrosa.

5


CONEXIONES DEL GAS

ADVERTENCIA


No haga funcionar los quemadores 

de este horno cuando use gas LP (embotellado) antes 
de convertir el regulador de presión y el orificio del 
quemador para uso con gas LP.

Vea la página 2 para todos los requerimientos de gas.

A.

  Cierre el suministro del gas en la válvula de cierre.

B.

 Saque el horno existente (si es necesario).

C.

  Bote todos los conectores viejos o usados.

ADVERTENCIA


Nunca reutilice conectores flexibles 

viejos. El uso de conectores flexibles viejos puede causar 
escapes de gas y heridas personales. Siempre utilice 
conectores nuevos cuando instale una estufa a gas.

D.

  Asegúrese de no ejercer presión sobre el juego de la línea 

de conexión.

Para prevenir cualquier escape, use un compuesto para 
unión de cañerías que sea resistente al gas LP sobre los 
hilos machos exteriores.

E.

8VHXQDFDxHUtDGHHQWUDGDGHƎ

F.


(OKR\RSDUDODFDxHUtDGHHQWUDGDGHEHUtDVHUGHƎ
PtQDƎPi[DODGHUHFKDGHODOtQHDGHFHQWUR\Ǝ

detrás del frente de la superficie del gabinete.

G.

 Instale la válvula de cierre en la cañería.

H.

 Saque el cajón y la puerta del horno.

L

N

Enchufe con pata para 
hacer tierra polarizado 
adecuadamente y receptáculo 
que hace tierra

Receptáculo polarizado 
que hace tierra 
adecuadamente

Ojo de metal 
para hacer 
tierra

Tornillo de montaje 
para la placa del 
receptáculo

Método Preferido

Método Provisorio

Fig. 4

Fig. 5

Ubicación Recomendada del Cierre Principal  
(El regulador también tiene una manilla de cierre)

8-1/2” 
Min. 

9-5/8” 
Max.

22”

13-1/2”

22”
to
28”

Fig. 6

INSTALACIÓN DEL HORNO

Содержание JGRP20WEJWWGE

Страница 1: ...NG If the information in this manual is not followed exactly a fire explosion or gas leak may result causing property damage personal injury or death DO NOT STORE OR USE GASOLINE OR OTHER FLAMMABLE VA...

Страница 2: ...rd does not cover the thermal efficiency of household cooking gas appliances since it is regulated by the Energy Policy and Conservation Act of 1975 the National Energy Conservation Policy Act of 1978...

Страница 3: ...rdance with safety standards at this height If the floor is to be the solid bottom two runners FHQWHUHG ZLWKLQ WKH FXWRXW RSHQLQJ DSDUW PD EH used to support the oven These runners must support 130 lb...

Страница 4: ...ation may create a hazardous condition 5 GAS CONNECTIONS WARNING Do not operate the burners of this oven when using LP bottled gas before converting the pressure regulator and burner orifice for LP ga...

Страница 5: ...orm D Turn off main gas supply E Stop any leaks found F Turn main gas supply on to make sure all leaks were stopped G Replace the regulator cover using the 4 screws previously removed WARNING ALL LEAK...

Страница 6: ...2 If the flames blew away or fluttered from the burner close the air shutter more than the original setting F Make the adjustment G Retighten the air shutter screw H Close the door and recheck the fla...

Страница 7: ...ont B With the screws provided secure the oven to the wall C If the cabinet cutout is 38 high use the short trim and attach to the bottom of the front frame with screws provided I WKH FXWRXW LV KLJKHU...

Страница 8: ...uirements of the authority having jurisdiction Failure to follow instructions could result in serious injury or property damage The qualified agency performing this work assumes responsibility for the...

Страница 9: ...ld be approximately 1 2 to 3 4 long IN SOME CASES A With LP gas some yellow tipping on the outer cone is normal B Foreign particles in the gas line may cause an orange flame at first but this will soo...

Страница 10: ...hat the regulator is in the NG position For LP applications ensure that the hood has been tightened to the LP position 2 If the flames blew away or fluttered from the burner close the air shutter more...

Страница 11: ...en este manual no se sigue exactamente podr a resultar un incendio una explosi n o un escape de gas que causen da o a la propiedad heridas personales o muerte NO ALMACENE O USE GASOLINA U OTROS VAPORE...

Страница 12: ...t Edition Para obtener una copia escriba a American Gas Association 1515 Wilson Boulevard Arlington Rosslyn VA 22209 Esta norma no cubre la eficiencia termal de los aparatos para cocinar a gas de la c...

Страница 13: ...idad a esta altura Si el piso va a ser el fondo s lido dos soportes centrados D XQR GHO RWUR GHQWUR GHO FRUWH SXHGHQ VHU XVDGRV SDUD sujetar el horno Estos soportes deben sostener 130 libras y deben s...

Страница 14: ...ligrosa 5 CONEXIONES DEL GAS ADVERTENCIA No haga funcionar los quemadores de este horno cuando use gas LP embotellado antes de convertir el regulador de presi n y el orificio del quemador para uso con...

Страница 15: ...rre el suministro principal del gas E Detenga cualquier escape que haya encontrado F Abra el suministro principal del gas para asegurarse que todos los escapes han sido detenidos G Coloque nuevamente...

Страница 16: ...s llamas soplaban en direcci n opuesta al quemador cierre el obturador m s que la posici n original F Haga el ajuste G Apriete nuevamente el tornillo del obturador H Cierre la puerta y revise nuevamen...

Страница 17: ...roveen asegure el horno a la pared C 6L HO FRUWH GHO JDELQHWH HV GH GH DOWXUD XWLOLFH OD moldura corta y p guela al fondo del marco frontal con los tornillos que se proveen 6L HO FRUWH HV GH PiV GH GH...

Страница 18: ...oridades que tienen jurisdicci n El no seguir las instrucciones podr a resultar en serias heridas o da o a la propiedad La agencia calificada que hace este trabajo asume la responsabilidad de la conve...

Страница 19: ...ORQJLWXG EN ALGUNOS CASOS A Con el gas LP un poco de amarillo en las puntas es normal B Part culas extra as en la l nea del gas podr an causar una llama anaranjada al principio pero esto desaparecer...

Страница 20: ...licaci n NG aseg rese de que el regulador se encuentre en la posici n NG Para las aplicaciones de LP aseg rese de que la campana se haya ajustado en la posici n LP 2 Si las llamas soplaban en direcci...

Отзывы: