background image

64

DIAGNÓSTICO ELECTRÓNICO MANUAL INICIADO (Cont.)

3.  Los símbolos en la pantalla indican el 

funcionamiento del interruptor de POSICIÓN. Vea 
la Figura 15

4.  Use el botón 

RECHARGE (Recarga)

 para hacer 

avanzar la válvula manualmente en cada ciclo y 
controle el funcionamiento correcto del interruptor. 
NOTA: Asegúrese de que el agua esté en 
contacto con la sal, y que no esté separada por 
un puente de sal (consulte la sección Rotura de 
un Puente de Sal).

5.  Mientras esté en esta pantalla de diagnóstico, 

la siguiente información está disponible y podrá 
ser beneficiosa por diferentes razones. Esta 
información es retenida por la computadora desde 
la primera vez que el encendido eléctrico es 
aplicado al controlador electrónico.

a.  Presione el botón 

UP (Arriba) para mostrar 

la cantidad de días que se aplicó corriente 
eléctrica sobre este control electrónico.

b.  Presione el botón  

DOWN (Abajo) para 

mostrar el número de regeneraciones iniciadas 
por el control electrónico desde que el código 
numérico fue ingresado.

6.  Mantenga presionado el botón 

MODE/SET 

(Modo/ Configuración)

 hasta que el código 

del modo (F30 para GXSH30V) aparezca en 
la pantalla. Este código identifica el modo del 
suavizante. Si se muestra un código de modo 
incorrecto, el suavizante funcionará sobre datos 
de configuraciones incorrectas.

7.  Para cambiar el número del código, presione el 

botón UP (Arriba)  

o DOWN (Abajo) 

hasta 

que se visualice el código correcto.

8.  Para regresar a la pantalla de la hora actual, 

presione el botón 

MODE/SET (Modo/ 

Configuración).

9.  Presione el botón 

MODE/SET (Modo/ 

Configuración),

 para regresar a la pantalla de la 

hora actual. Si el código fue modificado, realice 
todas las configuraciones del temporizador. 

NOTA: 

Si el control queda en una pantalla 

de diagnóstico o una pantalla titilante al 
configurar horarios o la dureza, la hora actual 
automáticamente regresa si no se presiona un 
botón dentro de los cuatro minutos.

El interruptor esta abierto

El interruptor esta cerrado

Medidor  

de agua

Figura 15

Solución de problemas avanzados para el servicio técnico

Содержание GXSF30V02

Страница 1: ...rol panel Model GXSF30V Systems tested and certified by NSF International against NSF ANSI Standard 44 for the chemical reduction claims specified on page 3 and certified to NSF ANSI 372 C USA R Syste...

Страница 2: ...fter the system WARNING Discard all unused parts and packaging material after installation Small parts remaining after the installation could be a choke hazard The water softening system works on 24 v...

Страница 3: ...efer to Cleaning Iron Out of the Water Softening System section Canada working pressure limits 1 4 7 0 kg cm2 This model is efficiency rated The efficiency rating is valid only at the minimum stated s...

Страница 4: ...oned However you should avoid using HOT water because the water heater will fill with the hard water FILL Salt dissolved in water is called brine Brine is needed to clean the hard minerals from resin...

Страница 5: ...g system is interrupted the control display is blank and the blue indicator light is off but the control keeps correct time for 24 hours When power is restored you have to reset the present time only...

Страница 6: ...e It appears as small cloudy yellow orange or reddish suspended particles After the water stands for a period of time the particles settle to the bottom of the container Generally these irons are remo...

Страница 7: ...sure all the parts shown below are present Additional parts must be purchased to complete the installation Thoroughly check the water softener for possible shipping damage and parts loss Also inspect...

Страница 8: ...n over current device such as a circuit breaker or fuse Always install the water softener between the water inlet and water heater Any other installed water conditioning equipment should be installed...

Страница 9: ...the length needed Flexible drain hose is not allowed in all localities check your plumbing codes If local codes do not allow use of a flexible drain hose a rigid valve drain run must be used Purchase...

Страница 10: ...e bypass valve Soldering heat will damage the adaptors and valve WARNING A copper or galvanized cold water pipe may be used to ground electrical outlets in the home Failure to maintain this ground pat...

Страница 11: ...ot included Pipe 1 1 2 air gap Floor Drain Secure Valve Drain Hose in place over Floor Drain Salt Storage Tank Overflow Hose Overflow Drain Elbow Conditioned Water To Outside Faucets Plug in Power Sup...

Страница 12: ...from the top down see Figure 7 and 10 IMPORTANT Be sure the clips snap firmly into place so the single bypass valve will not pull out MOVE WATER SOFTENER INTO PLACE WARNING Excessive Weight Hazard Use...

Страница 13: ...er installation do all sweat soldering before connecting pipes to the NPT adapters and bypass valve Torch heat will damage plastic parts WARNING If solder is used to make pipe connection use only lead...

Страница 14: ...EST FOR LEAKS To prevent air pressure in the water softener and plumbing system complete the following steps in order 1 Fully open two or more softened cold water faucets close to the water softener l...

Страница 15: ...oned To have fully conditioned hot water immediately wait until the initial recharge is over Then drain the water heater following instructions for water heater until water runs cold WARNING Discard a...

Страница 16: ...ept changes A beep sounds while pressing buttons for control programming One beep signals a change in the control display Repeated beeps mean the control will not accept a change from the button you h...

Страница 17: ...laboratory to request a water hardness test kit at 1 800 949 8220 Option 4 If your report shows hardness in parts per million ppm or milligrams per liter mg l simply divide by 17 1 to get the equivale...

Страница 18: ...ay provide erratic operation For example the blue indicator light may flash showing that more salt is required when the actual salt level in the tank is well above the Level 0 In some cases the DAYS T...

Страница 19: ...ll provide the most efficient usage of water but may use more salt The degree of difference between these two cycles is highly dependent on the water usage and hardness at a particular installation NO...

Страница 20: ...s and Err is in the display electrical problem with system see page 25 LOW SALT SIGNAL When the DAYS TO EMPTY drops to 15 the blue indicator light and DAYS TO EMPTY in the display will flash every sec...

Страница 21: ...rrosive fumes that weaken and shorten the life of some water softening system parts CLEANING IRON OUT OF THE WATER SOFTENING SYSTEM Your water softening system takes hardness minerals calcium and magn...

Страница 22: ...le and venturi Wash and rinse the parts in warm water until clean If needed use a small brush to remove iron or dirt Also check and clean the gasket NOTE Some models have a small flow plug located in...

Страница 23: ...e is under it The following is the best way to check for a salt bridge Salt should be loose all the way to the bottom of the tank Take a broom handle or like tool and carefully push it down into the s...

Страница 24: ...r if the tank is empty refill with recommended salt Press for 3 seconds the RECHARGE button to start an immediate recharge and restore soft water supply External power supply unplugged at wall outlet...

Страница 25: ...s it the abrasive feel you may have been accustomed to The slippery feel is the clean feel of soft water Water Softener not using any salt Water softening system is a demand unit Does not use much sal...

Страница 26: ...Sanitization Procedures At completion of recharge cycle approx 2 hours run water from faucets to purge the salty water Low water pressure Check pressure Drain height 8 or less pressure should be minim...

Страница 27: ...ow to further isolate the problem Procedure for removing error code from display 1 Unplug transformer from electrical outlet 2 Correct problem 3 Plug in transformer 4 Wait 8 minutes The error code wil...

Страница 28: ...lectrical power applied b Press the DOWN button to display the number of regenerations initiated by the electronic control since the code number was entered 6 Press and hold the MODE SET button until...

Страница 29: ...e and cleaning of the water softening system section If the water softening system does not draw brine check nozzle and or venturi dirty or defective defective nozzle and venturi seal nozzle and ventu...

Страница 30: ...30 8 7 6 5 11 16 146 5 999 29 4 12 2 13 3 7 8 9 10 56 56 17 19 20 22 23 23 24 30 26 Exploded View...

Страница 31: ...31 Cross section View Seal Wear Strip 124 109 110 111 112 113 114 116 115 117 118 120 119 146 106 105 103 130 107 108 130 121 147 152 122 123 130 151 130 132 136 140 138 141 145 Exploded View...

Страница 32: ...COVER VALVE 1 0107 WS03X10010 WASHER WAVE 1 0108 WS26X10002 ROTOR DISC ASM 1 0109 WS19X10010 CAP 1 0110 WS03X10011 SEAL O RING 1 125 X 1 37 1 0111 WS19X10005 SUPPORT SCREEN 1 0112 WS03X10013 SCREEN 1...

Страница 33: ...n Authorized GE Appliances Service location for service In Alaska the limited warranty excludes the cost of shipping or service calls to your home Some states do not allow the exclusion or limitation...

Страница 34: ...y is extended to the original purchaser for products purchased for home use within Canada In home warranty service will be provided in areas where it is available and deemed reasonable by Mabe to prov...

Страница 35: ...nimum Buyer Renter ______________________________________________ Date _______________ Seller ____________________________________________________ Date _______________ Seller s Address________________...

Страница 36: ...ded warranty and learn about special discounts that are available while your warranty is still in effect You can purchase it on line anytime GE Appliances Services will still be there after your warra...

Страница 37: ...para los reclamos sobre reducci n de qu micos especificados en la p gina 39 y certificados para NSF ANSI 372 C USA R Sistema probado y certificado por Water Quality Association en cumplimiento con CSA...

Страница 38: ...erci rese de usar exclusivamente el transformador incluido El transformador se debe conectar nicamente a un tomacorriente interior con conexi n a tierra de 120 voltios Utilice nicamente sales para des...

Страница 39: ...sulte la secci n Limpieza del Hierro con el Sistema Suavizante de Agua L mites de presi n en Canad 1 4 7 0 kg cm2 Este modelo cuenta con una calificaci n de eficiencia El ndice de eficiencia es v lido...

Страница 40: ...E debido a que el calentador de agua se llenar con el agua dura LLENADO La sal disuelta en agua es llamada salmuera La salmuera es necesaria para limpiar los minerales duros de las diminutas part cula...

Страница 41: ...una recarga de inmediato y al finalizar en unas dos horas contar con un nuevo suministro de agua suave Una vez iniciada ya no podr cancelar esta recarga FUNCI N MEMORIA Si el suministro el ctrico del...

Страница 42: ...rt culas turbias suspendidas de color amarillo anaranjado o rojizo Una vez que el agua se asent por un per odo de tiempo las part culas quedan en el fondo del envase Generalmente estos hierros son eli...

Страница 43: ...o Dos llaves ajustables 2 accesorios para conectar la tuber a de su residencia a las roscas hembras NPTF de 2 5 cm 1 en el alojamiento del filtro Es posible que se necesite partes adicionales para com...

Страница 44: ...disyuntor o fusible Siempre instale el suavizante de agua entre la entrada de agua y el calentador de agua Cualquier otro equipamiento para el acondicionamiento de agua deber a ser instalado entre la...

Страница 45: ...o est permitido en todas las localidades consulte sus c digos de plomer a Si los c digos locales no permiten el uso de una manguera de drenaje flexible se deber usar un drenaje con v lvula r gida Adqu...

Страница 46: ...dores y la v lvula ADVERTENCIA Una tuber a de cobre o galvanizada de agua fr a podr a usarse para conectar a tierra los tomacorrientes el ctricos en la casa No mantener esta conexi n a tierra podr a r...

Страница 47: ...dor de Transpiraci n NPT de 1 no incluido Tuber a 1 1 2 air gap Drenaje por Suelo Secure Valve Drain Hose in place over Floor Drain Manguera de Desborde del Salmuera Tanque Adaptador para Desbordes Ag...

Страница 48: ...cia abajo consulte las Figuras 7 y 10 IMPORTANTE Aseg rese de que las abrazaderas queden firmes de modo que la v lvula de desviaci n simple no se suelte MUEVA EL SUAVIZANTE DE AGUA A SU LUGAR ADVERTEN...

Страница 49: ...desviaci n El calor de la linterna da a las partes pl sticas ADVERTENCIA Si se har n soldaduras para la conexi n de las tuber as use s lo soldadoras y fundidores libres de plomo para evitar el envenen...

Страница 50: ...e agua a la manguera de desborde del tanque de almacenamiento de sal PRUEBA DE P RDIDAS Para evitar la presi n de aire en el suavizante de agua y en el sistema de plomer a complete los siguientes paso...

Страница 51: ...on agua caliente acondicionada de forma inmediata espere hasta que la recarga inicial est terminada Luego drene el calentador de agua siguiendo instrucciones para el calentador de agua hasta que el ag...

Страница 52: ...tido suena al presionar los botones para la programaci n del control Un pitido se ala un cambio en la pantalla de control Pitidos repetidos indican que el control no aceptar un cambio desde el bot n q...

Страница 53: ...un kit de evaluaci n de la dureza del agua al 1 800 949 8220 Opci n 4 Si su informe muestra una dureza en partes por mill n ppm o miligramos por litro mg l simplemente divida esto por 17 1 para obtene...

Страница 54: ...emanas de funcionamiento DAYS TO EMPTY D as Hasta Vaciarse podr tener un funcionamiento err tico Por ejemplo la luz Indicadora azul podr titilar mostrando que se necesita m s sal cuando el nivel de sa...

Страница 55: ...o es posible que se use m s sal El grado de diferencia entre estos dos ciclos es altamente dependiente del uso y el nivel de dureza del agua en una instalaci n particular NOTA Las Regulaciones de Cali...

Страница 56: ...ra La luz titila y Err aparece en la pantalla problema el ctrico con el sistema SE AL DE NIVEL DE SAL BAJO Cuando la funci n DAYS TO EMPTY D as Hasta Vaciarse cae a 15 la luz azul indicadora y DAYS TO...

Страница 57: ...bi n puede liberar gases corrosivos que debilitan y acortan la vida til de algunas partes del sistema suavizante de agua LIMPIEZA DEL HIERRO DEL SISTEMA SUAVIZANTE DE AGUA Su sistema suavizante de agu...

Страница 58: ...t n limpias De ser necesario use un pincel peque o para retirar el hierro o la suciedad Tambi n controle y limpie la junta NOTA Algunos modelos cuentan con un enchufe de flujo peque o ubicado en la bo...

Страница 59: ...st debajo de sta La siguiente es la mejor forma de controlar la formaci n de un puente de sal La sal deber a estar suelta hasta el fondo del tanque Tome un mango de escoba o una herramienta similar y...

Страница 60: ...ga para comenzar una recarga de inmediato y restablecer el suministro de agua suave Suministro de corriente externa desenchufado del tomacorriente de pared o el cable de corriente no est conectado al...

Страница 61: ...La sensaci n resbalosa es la sensaci n pura del agua suave Consulte la secci n Ajuste de la Dureza del Agua Suavizante de Agua sin uso de sal El sistema suavizante de agua es una unidad de demanda No...

Страница 62: ...n Al completar el ciclo de recarga aprox 2 horas deje correr el agua en los grifos para purgar el agua salada Presi n baja del agua Controle la presi n Altura del drenaje de 8 o menos la presi n debe...

Страница 63: ...a n m s el problema Procedimiento para eliminar el c digo de error de la pantalla 1 Desenchufe el transformador del tomacorriente el ctrico 2 Corrija el problema 3 Enchufe en el transformador 4 Esper...

Страница 64: ...s iniciadas por el control electr nico desde que el c digo num rico fue ingresado 6 Mantenga presionado el bot n MODE SET Modo Configuraci n hasta que el c digo del modo F30 para GXSH30V aparezca en l...

Страница 65: ...do y Limpieza del Sistema Suavizante de Agua Si el sistema suavizante de agua no hace que ingrese salmuera controle Suciedad o defectos en la boquilla y o el venturi Defecto en el sellado de la boquil...

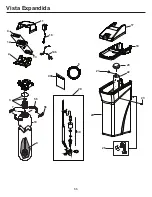
Страница 66: ...66 Vista Expandida 8 7 6 5 11 16 146 5 999 29 4 12 2 13 3 7 8 9 10 56 56 17 19 20 22 23 23 24 30 26...

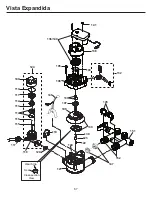
Страница 67: ...67 Vista Expandida Cross section View Seal Wear Strip 124 109 110 111 112 113 114 116 115 117 118 120 119 146 106 105 103 130 107 108 130 121 147 152 122 123 130 151 130 132 136 140 138 141 145...

Страница 68: ...WS03X10010 ARANDELA ONDULADA 1 0108 WS26X10002 ENSAMBLE DE ROTOR Y DISCO 1 0109 WS19X10010 TAPA 1 0110 WS03X10011 SELLO ANILLO O 1 125 X 1 37 1 0111 WS19X10005 PANTALLA DE SOPORTE 1 0112 WS03X10013 PA...

Страница 69: ...ue traiga el producto a una Ubicaci n del Servicio T cnico de GE Appliances Autorizado para recibir el servicio En Alaska la garant a excluye el costo de env o o llamadas del servicio a su hogar Algun...

Страница 70: ...electr nico si fallara debido a un defecto en los materiales o la fabricaci n Durante esta garant a limitada de tres a os usted ser responsable por cualquier trabajo o costos relacionados con el servi...

Страница 71: ...un m nimo de 2 a os Comprador Arrendatario_____________________________________ Fecha ______________ Vendedor _________________________________________________ Fecha ______________ Domicilio del Vend...

Страница 72: ...uentos especiales que est n disponibles mientras su garant a a n est vigente La puede adquirir en cualquier momento a trav s de Internet Los servicios de GE Appliances a n estar n all cuando su garant...

Отзывы: