background image

10

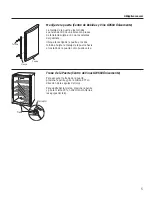
Reversing the Door. 

(GVS04 Beverage and Wine Center Only)


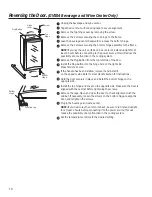
Unplug the beverage and wine center.
Tape the door shut with masking tape to secure alignment.

Remove the top hinge cover by removing the screw.
Remove the 2 screws securing the top hinge to the frame.
   Lean the beverage center backward to access the bottom hinge.
Remove the 2 screws securing the bottom hinge assembly to the frame. 
NOTE: If you lay the unit on its back, be sure to let it stand upright for at 

least 2 hours before connecting to the power source; this will reduce the 

possibility of a malfunction in the cooling system. 
Remove the Plug Button from the top left side of the door.
   Install the Plug Button into the hinge hole on the right side.  

Press firmly to secure. 
   If the handle has been installed, remove it and install it  

on the opposite side. Refer to Door Handle section for instructions.
   Hold the door securely in place and install the bottom hinge on the 

opposite side.
   Install the top hinge and cover on the opposite side. Make sure the door is 

aligned with the cabinet before tightening the screws. 
   Remove the tape. Open and close the door to check alignment with the 

cabinet. If necessary, loosen the screws on the bottom hinge, realign the 

door, and retighten the screws.
   Plug in the beverage and wine center. 
NOTE: If you had to lay the unit on its back, be sure to let it stand upright 

for at least 2 hours before connecting it to the power source; this will 

reduce the possibility of a malfunction in the cooling system.
   Set the temperature controls to the desired setting.

Hinge 

cover

Top 

Hinge

Bottom 

Hinge

Plug Button

Bottom 

Hinge

Leveling Leg

Screw

Содержание GVS04

Страница 1: ...and Cleaning 8 9 Replacing the Light Bulb 9 Reversing the Door GVS04 only 10 Troubleshooting Tips 11 12 Consumer Support Consumer Support 16 Warranty 15 Write the model and serial numbers here Model _...

Страница 2: ...hawed completely In Wine Center Beverage and Wine Centers with automatic icemakers avoid contact with the moving parts of the ejector mechanism or with the heating element that releases the cubes Do n...

Страница 3: ...r replace immediately all power cords that have become frayed or otherwise damaged Do not use a cord that shows cracks or abrasion damage along its length or at either end When moving the appliance aw...

Страница 4: ...s Each side 0 Top 0 Back 0 Before connecting the appliance to the power source let it stand upright for approximately 2 hours This will reduce the possibility of a malfunction in the cooling system fr...

Страница 5: ...ndle and two screws Secure the door handle to the side of the door as shown Door Handle GVS04 Beverage and Wine Center Only Screw Door Handle GEAppliances com 5 To secure the door lock push the key in...

Страница 6: ...y accept your change NOTE When you change the temperature setting there may be a 5 minute delay until the compressor starts to run Fahrenheit and Celsius The temperature display can be changed between...

Страница 7: ...ly to avoid potential damage to the shelf Slide the shelf into the tracks along the sides of the cabinet until it stops Wooden Shelves 7 As with any refrigeration product there is a slight temperature...

Страница 8: ...y new looking and rust free for years Apply a coat of kitchen appliance wax when the wine chiller is new and then at least twice a year Cleaning the Outside IMPORTANT Unplug the wine center beverage a...

Страница 9: ...move any beverages and shelves as needed for access The light bulb is located behind a light shield in the ceiling of the wine center beverage and wine center near the back To remove the light shield...

Страница 10: ...Press firmly to secure If the handle has been installed remove it and install it on the opposite side Refer to Door Handle section for instructions Hold the door securely in place and install the bott...

Страница 11: ...s is normal Temperature control set at the coldest setting See About the control and settings Appliance is too close to the wall See the Installation Guidelines section for the correct clearances Appl...

Страница 12: ...re in the display is not the temperature that was just set This is normal After you set the temperature the display will go back to showing the actual temperature Condensation on front of door Applian...

Страница 13: ...Notes GEAppliances com 13...

Страница 14: ...Notes 14...

Страница 15: ...or home use within the USA If the product is located in an area where service by a GE Authorized Servicer is not available you may be responsible for a trip charge or you may be required to bring the...

Страница 16: ...is still in effect You can purchase it on line anytime or call 800 626 2224 during normal business hours GE Consumer Home Services will still be there after your warranty expires Parts and Accessorie...

Страница 17: ...4 5 Instrucciones de operaci n Ajustes de control 6 Espacio interior 5 Cuidado y limpieza 8 9 C mo invertir el vaiv n de la puerta 9 Reemplazo de la bombilla 10 Solucionar problemas 11 12 Soporte al...

Страница 18: ...a congelar comidas que hayan estado totalmente congeladas en forma previa En Centro de Vinos Centro de Bebidas y Vinos con m quinas de hacer hielo autom ticas evite el contacto con las partes m viles...

Страница 19: ...e CA 60 Hz 15 o 20 amperes Esto garantiza el mejor funcionamiento y adem s previene la sobrecarga de los circuitos del hogar lo cual podr a ocasionar riesgos de incendio debido al recalentamiento de c...

Страница 20: ...exiones el ctricas A cada costado 0 Parte superior 0 Parte posterior 0 Antes de conectar el aparato a la fuente de energ a d jelo reposar en posici n vertical por aproximadamente 2 horas Esto reducir...

Страница 21: ...los dos tornillos Sujete la manija de la puerta hacia el costado de la puerta como puede verse Manija de la puerta Centro de Bebidas y Vino GVS04 nicamente Para asegurar la traba de la puerta presione...

Страница 22: ...ede cambiarse entre Fahrenheit y Celsius presionando y sosteniendo la tecla por aproximadamente 5 segundos Luz indicadora The La luz indicadora se enciende cuando el compresor est funcionando para enf...

Страница 23: ...o de refrigeraci n existe una ligera varianza de temperatura en diferentes ubicaciones dentro del gabinete Este gabinete para vinos cuenta con una capacidad m xima de almacenamiento de 30 botellas El...

Страница 24: ...or a os Aplique una capa de cera para cocina electrodom sticos cuando el centro de vinos est nuevo y de ah en adelante por lo menos dos veces por a o Limpieza del exterior Descongelaci n IMPORTANTE De...

Страница 25: ...Este tipo de bombilla se encuentra disponible en la mayor a de las ferreter as y tiendas de repuestos para automotores ADVERTENCIA Usar una bombilla de m s de 15 vatios puede da ar los controles el c...

Страница 26: ...mente para asegurar Si la manija ha sido instalada qu tela e inst lela en el lado opuesto Consulte la secci n Manija de la puerta para obtener instrucciones Sostenga la puerta firmemente en su lugar e...

Страница 27: ...recuentemente Esto es normal El control de temperatura est en el nivel m s fr o Consulte la secci n Acerca de los controles y ajustes El aparato est muy cerca de la pared Consulte la secci n Pautas pa...

Страница 28: ...ser igual o superior a la temperatura establecida del aparato La temperatura en la pantalla no es la temperatura que se estableci Esto es normal Despu s de establecer la temperatura la pantalla regres...

Страница 29: ...Notas 13...

Страница 30: ...Notas 14...

Страница 31: ...ible para facilitar el servicio requerido Da os sobre el acabado tales como xido sobre la superficie deslustres o manchas peque as no informadas dentro de las 48 horas luego de la entrega Lo que GE no...

Страница 32: ...en cualquier momento o llamar al 800 626 2224 durante horas normales de oficina GE Consumer Home Services estar a n ah cuando su garant a termine Piezas y accesorios GEAppliances com Aquellos individu...

Отзывы: