35
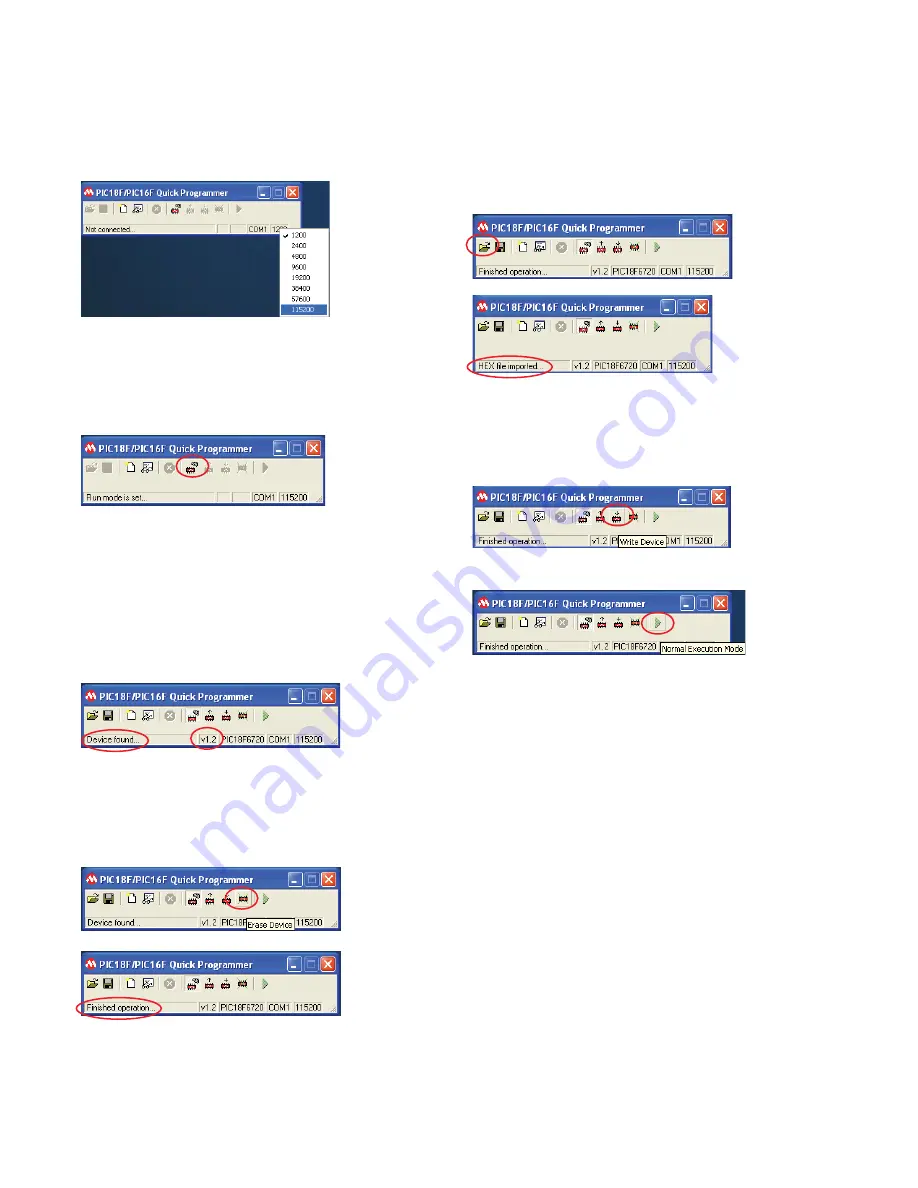
6. Next, change the Baud Rate. Right click on the bottom
right box, and then select 115200. If any problems
occur while downloading, try 57600 instead.
7. Go over to the box where the serial port is shown as
COM1. Right click on this, and select the appropriate
COM PORT for where you have plugged your cable in.
8. Click on the CONNECT TO DEVICE icon.
9. In the left most box in the bottom of the PIC18F/
PIC16F QUICK PROGRAMMER BOX, you should see
DEVICE FOUND… You should also see that the box
to the right of DEVICE FOUND… will be filled in with a
version number, such as V1.2. If not, please re-check
your cabling, com port selection, or try a slower Baud
Rate, and click on CONNECT TO DEVICE again. Make
sure the button is down.
10.Click on the ERASE DEVICE icon. You will see
ERASING: and a progress count in the lower left
box. This takes about 2 minutes. Wait until you see
the FINISHED OPERATION… message.
11.It will bring up Open HEX File window. Browse to
the hex file to download, e.g.
Dngp_download.version.dd_MMM_YYYY.hex.
Open file and in a few seconds it will display HEX File
Imported.
12.Click on the WRITE DEVICE icon. You will see
WRITING: and a progress count in the lower left
box. This takes about 3 minutes. Wait until you see
the FINISHED OPERATION… message.
13.Click on the NORMAL EXECUTION MODE icon.
A box will pop up, asking if you wish to continue.
Click
YES
14.The newly upgraded unit should start up on its own.
Go to the FIRMWARE -> VERSION INFO menu and
check that the unit is showing new software.
Troubleshooting for Firmware Upgrade
If any problems occur during software download, cold
restart the DNGP by the following steps.
Step 1:
Turn the DNGP power off.
Step 2:
Press and hold the UP, DOWN and ENTER buttons.
Step 3:
Apply power to the DNGP. Alarm light will be on
and the D17 led will be flashing.


