174
232003110G (03)
CAUTION
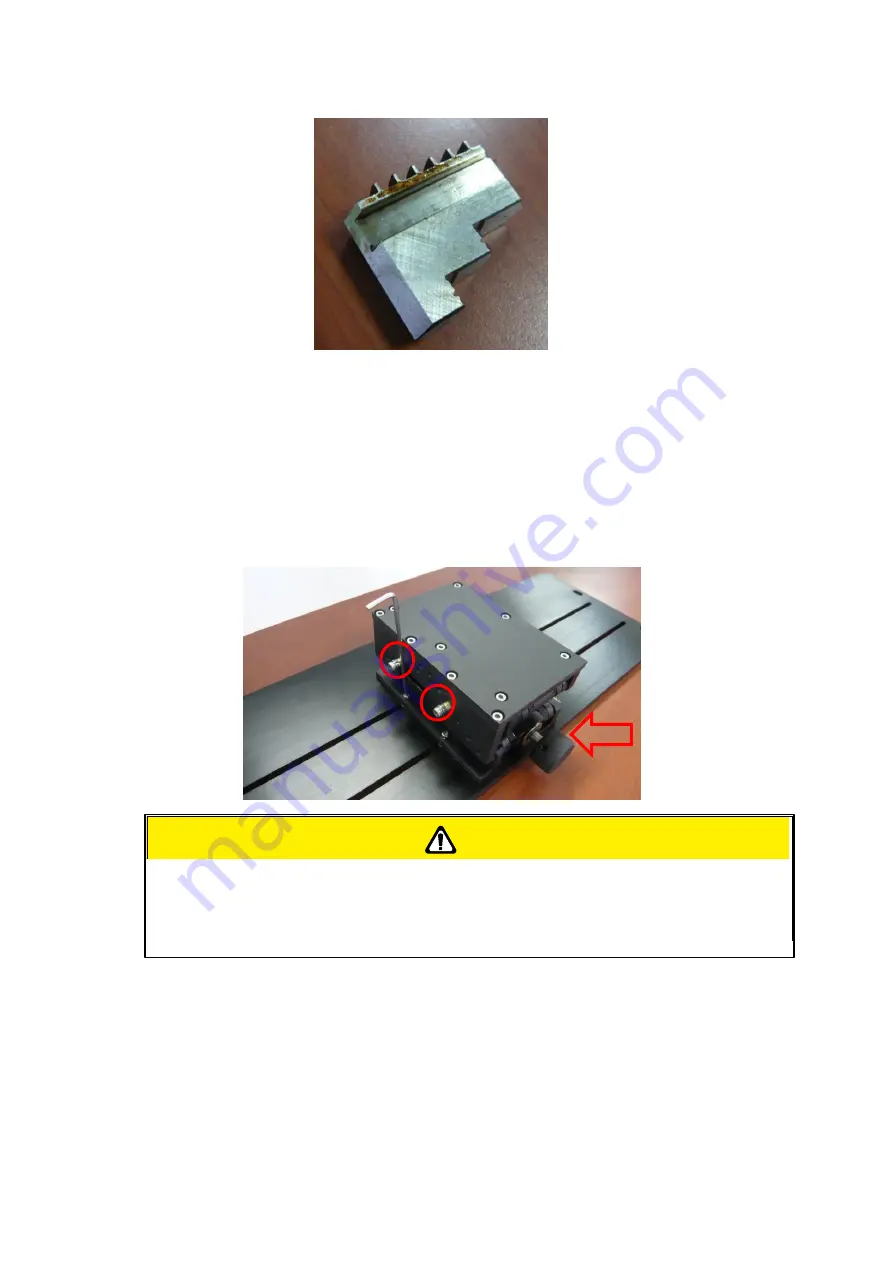
The rear end of the Rotary Chuck a o can be locked or unlocked to slide its position by using an
Allen key as shown below.
Dial the lever indicated with red arrow below to move up or down the rear end which will adjust its
leveling to match clamping end. The red circle marked leveling screws can be removed and
reassembled to different height level of openings with Allen key.
4) Manually move the laser carriage to the proper X/ Y location on the work object where you will do
laser engraving or cutting. Hit the Auto Focus button on Touch Screen and the laser machine will now
properly focus at the location to be laser engraved or cut.
5) Prepare the graphic you would like to work with the Rotary Chuck, print it to GCC laser Print
Driver,
and go to “Paper” page of the Print Driver.
If your work piece is small, please apply 4" focal lens for operation to prevent the
lens carriage from colliding with the rotary attachment.
Содержание LaserPro S400
Страница 1: ...Spirit Series User Manual...
Страница 8: ...6 232003110G 03...
Страница 9: ...7 232003110G 03...
Страница 10: ...8 232003110G 03...
Страница 11: ...9 232003110G 03...
Страница 12: ...10 232003110G 03...
Страница 13: ...11 232003110G 03...
Страница 14: ...12 232003110G 03...
Страница 15: ...13 232003110G 03...
Страница 16: ...14 232003110G 03...
Страница 17: ...15 232003110G 03...
Страница 18: ...16 232003110G 03...
Страница 19: ...17 232003110G 03...
Страница 20: ...18 232003110G 03...
Страница 21: ...19 232003110G 03...
Страница 22: ...20 232003110G 03...
Страница 23: ...21 232003110G 03...
Страница 24: ...22 232003110G 03...
Страница 25: ...23 232003110G 03...
Страница 26: ...24 232003110G 03...
Страница 27: ...25 232003110G 03...
Страница 28: ...26 232003110G 03...
Страница 29: ...27 232003110G 03...
Страница 49: ...47 232003110G 03 3 Chapter 3 Mechanical Overview Front View Top View Right View Left View Rear View...
Страница 52: ...50 232003110G 03 3 5 Rear View...
Страница 56: ...54 232003110G 03...
Страница 57: ...55 232003110G 03...
Страница 62: ...60 232003110G 03...
Страница 73: ...71 232003110G 03 5 Press Active 6 Press OK when activation is complete 7 Register Paralle Desktop...
Страница 75: ...73 232003110G 03 11 Select CD ROM drive with the Windows installation CD 12 Enter the Windows OS product key...
Страница 87: ...85 232003110G 03 5 1 3 Touch Screen Navigation Chart...
Страница 140: ...138 232003110G 03...
Страница 152: ...150 232003110G 03...
Страница 154: ...152 232003110G 03 Step 3 Edit the characters for the website...
Страница 166: ...164 232003110G 03 Engraving effects achieved with the different lenses Cutting edges achieved with the different lenses...
Страница 180: ...178 232003110G 03 6 Gently cover the SmartLID...
Страница 193: ...191 232003110G 03 9 Chapter 9 Basic Troubleshooting...
Страница 195: ...193 232003110G 03 10 Chapter 10 Appendix Glossary LaserPro S400 Specification Sheet...


