background image

Page 6-5

Operating Instructions

44DT

Remove the release liner from the take-up core 
by doing the following.

Lift the right end upward and out of the 
support and then pull the hex end out of 
the support.

Unwind or cut the liner from the core.  
Do not damage or throw away the core. 

Put the shaft, with the core, back on the 
machine by inserting the left end (hex 
end) in the left side of the drive and lower 
the bearing into the right side of the 
machine.

To remove the film supply shaft, grasp the shaft, 
press it to the right until the left end of the hex 
shaft clears the brake hub, and raise the left end 
of the shaft out of the machine.  
Do this for the top and bottom supply shafts.

Slide the core off the shaft and core adaptors. 

Tip: 

Twist the shaft while pulling to remove the 

core easier.

Clean all rollers and idlers if needed. See the 

Operator Maintenance 

chapter.

4.

a.

b.

c.

4.

5.

1.

To load films onto the supply shafts:

If the supply shaft is on the machine, remove it 
by grasping it, pressing it to the right until the left 
end of the hex shaft clears the brake hub, and lift 
the left end out of the machine.  
This applies to the top and bottom supply shafts.

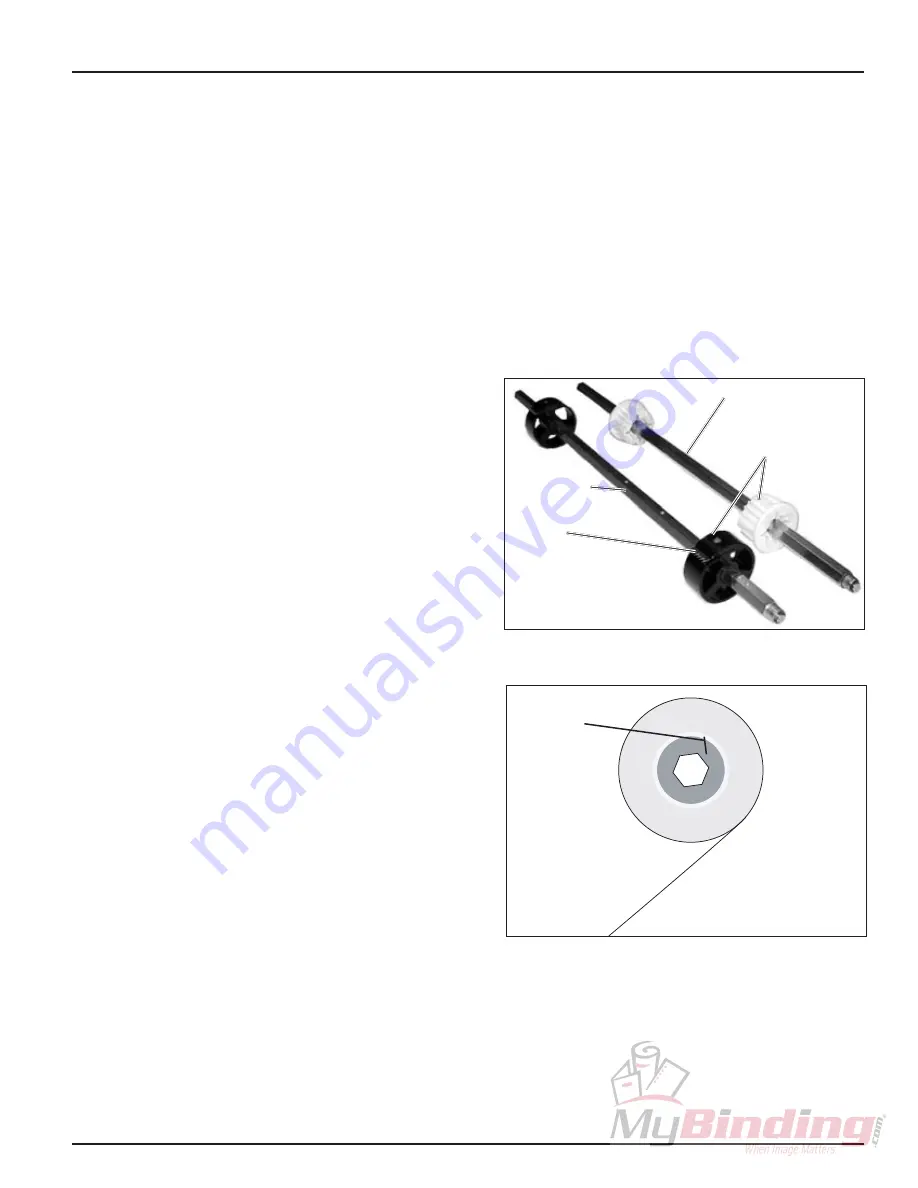
Use the set screws in the core adaptors to move 
the adaptors if needed. The grippers on the core 
adaptors should be pointing in the opposite 
direction that the film unwinds from the roll. 

Fig. 6-6. Core Adaptors on the Shafts.

Fig. 6-7. Direction of Core Adaptor Gripper on Poly-in Film.

Slide the new roll on to the shaft and core 
adaptors. Refer to Fig. 6-4. 

Poly-in and Poly-out 

Films to determine how the film unwinds from the 
roll. 

1.

2.

3.

Gripper

Supply shaft

Take-up shaft

Core adaptor

Gripper

Содержание 44DT

Страница 1: ...Provided By http www MyBinding com http www MyBindingBlog com GBC 44DT Laminator Installation Operation Manual...

Страница 2: ...44DT Laminator INSTALLATION OPERATION MANUAL Document Number 930 122 REV REV DATE 11 24 04 Do not duplicate without written permission...

Страница 3: ......

Страница 4: ...on 6 1 Standby Mode 6 2 Loading Film 6 2 Removing and Installing the Safety Shield 6 3 Removing and Installing the Feed Table 6 4 Loading Film Onto the Supply Shafts 6 4 Thermal and AccuShield Films C...

Страница 5: ...Operating Instructions Page ii 44DT...

Страница 6: ...ng safety precautions must be observed when installing and using the laminator Failure to observe these warnings could result in severe bodily damage or death GENERAL Keep hands long hair loose clothi...

Страница 7: ...aminator Failure to observe this warning could result severe personal injury or death Disconnect the plug from the receptacle and contact your dealer distributor when one or more of the following has...

Страница 8: ...UFACTURER BE LIABLE FOR ANY SPECIAL INCIDENTAL OR CONSEQUENTIAL DAMAGES WHETHER OR NOT FORESEEABLE This limited warranty shall be void if the laminator has been misused mishandled damaged by negligenc...

Страница 9: ...Operating Instructions Page 2 44DT...

Страница 10: ...dth Height Depth Weight 55 in 137 cm 22 in 56 cm 22 in 56 cm 222 lbs 100 kg Electrical Requirements Voltage Current Power U S Receptacle 220 V 60 Hz 12 5 Amps 2800 W NEMA 6 15R Heat Capacity Max tempe...

Страница 11: ...cy energy and if not installed and used in accordance with the instruction manual may cause harmful interference to radio communications Operation of this equipment in a residential area is likely to...

Страница 12: ...aminator on a stable flat surface capable of supporting the weight of the machine and any materials The surface should be at least 30 inches 0 76 m high to assure comfortable positioning during operat...

Страница 13: ...Operating Instructions Page 4 2 44DT...

Страница 14: ...m rollers come into contact and the point at which the items for lamination are introduced into the laminator SAFETY SHIELD The safety shield prevents entanglement entrapment and inadvertent contact w...

Страница 15: ...ting Grippers on the supply shafts ensures proper tension on the lm The supply shaft core adaptors lock in place with a set screw The release liner take up core adaptors are held in place by friction...

Страница 16: ...t ashes when the heat is out of range TEMPERATURE Displays the programmed temperature setting Also displays current temperature when the MEAS button is pressed SPEED Displays the set speed Functions T...

Страница 17: ...REVERSE Press and hold the REVERSE button to reverse the direction of the rollers Release the button to stop RUN Press and release the RUN button for continuous running The safety shield must be insta...

Страница 18: ...ne WARNING Make sure the safety shield and feed tray are in their proper positions You could be burned and your ngers and hands could be trapped and crushed in the hot rollers Clothing jewelry and lon...

Страница 19: ...the laminator will be used within one hour you may leave it turned on STANDBY MODE The 44DT automatically goes into a standby mode after it has been idle for 3 hours The heat roller temperature is low...

Страница 20: ...loaded together Either roll is loaded with the adhesive side against a roller There are two methods of loading lm Using a threading card Tacking new film to existing film Prior to loading lm the safe...

Страница 21: ...owing set of instructions To remove existing lms If you are loading lm for the rst time skip these instructions and start with the next instructions To load lms To remove existing lms Put the roller p...

Страница 22: ...tors Tip Twist the shaft while pulling to remove the core easier Clean all rollers and idlers if needed See the Operator Maintenance chapter 4 a b c 4 5 1 To load films onto the supply shafts If the s...

Страница 23: ...ft is also loaded When loading AccuShield lms nothing is loaded on the bottom supply shaft and the separator bar must be in place If the top supply shaft is not positioned on the front position follow...

Страница 24: ...12 Notice that the supply shaft is mounted on the rear of the machine The brake and support must be positioned in the rear position for PSA lms To move the supply shaft see To move the supply shaft i...

Страница 25: ...pply shaft is used for laminating lms and the bottom supply shaft is used for mounting lm or kraft paper If you are not applying mounting lm to a laminate kraft paper should be used on the bottom supp...

Страница 26: ...place the safety shield and feed table Refer to Safety Shield Removal and Installation and Feed Table Removal and Installation in this section Check the film alignment and adjust the tension as needed...

Страница 27: ...s section Check the film alignment and adjust the tension as needed See the Film Alignment section in this chapter 3 4 4 5 6 7 8 9 10 11 Webbing PSA Films Refer to the Configuration for PSA Film secti...

Страница 28: ...button on the control panel and guide the threading card into the machine until the rollers pull the card on its own 7 8 9 10 WARNING Keep your ngers and hands away from the nip point while the machin...

Страница 29: ...Make sure to carefully align the edges of the films before tacking them together Cut remaining top film web between the supply roll and rollers Do not allow the adhesive to stick to the rollers or th...

Страница 30: ...e to the proper laminating setting Place the item to be laminated on the feed table then press RUN 1 2 3 Guide the item into the rollers Once the item has cleared the back of the machine press STOP Re...

Страница 31: ...tor Set Up for Pre treating Boards With Single Liner Mounting Film 7 8 Fig 6 28 Laminator Set Up for Pre treating Boards With Double Liner Mounting Film To pre treat boards Load the laminator as shown...

Страница 32: ...e force to turn by hand Film tension should be enough to introduce a minor amount of drag as the lm unrolls Insuf cient tension causes wrinkles while too much tension causes stretching necking Uneven...

Страница 33: ...glitter as they may damage the rollers Do not force items into the nip area of the rollers An item that is not easily drawn into the laminator by the rollers is probably too thick to laminate Wrinkle...

Страница 34: ...will not be damaged by dirt and adhesives You will nee a 3M Scotch Brite pad and a clean rag moistened with water and dish soap Never clean rollers with abrasive sharp or pointed objects Do not use an...

Страница 35: ...n on top or bottom roll of film is too loose Adjust tension per Film Tension section Grippers on core adaptors pointing in the wrong direction Load film per Loading Film Onto the Supply Shafts section...

Страница 36: ...Page 7 3 Operating Instructions 44DT...

Страница 37: ......

Отзывы: