background image

15

MODEL C-5000-TC SERIES TIME CLOCK - INSTRUCTIONS

Programming Start Fan and Start Wash Times

1. Press Prog. key  1 2 3 4 5 6 7  will appear in display.

(Pressing Prog. key again, display will show the number
of free programs; Fr 20).  Press again to return to 1st
program.

2.  Press 

E

 key, 

¤

 ON symbol will appear.  Pressing the key

again will toggle to OFF 

¡

.  Select ON for start fan or OFF

for start wash.

3.  Press h to select hour for switching time.

4.  Press m to select minute for switching time.

5.  If the program is to occur every day of the week, (24 hour

time control) ignore Day key and press Prog. key to
advance to the next program.

6.  If 7 day time control is desired, press Day key.  1 2 3 4 5

6 (Mon thru Sat) block of days appears in display.
Pressing Day key again, 1 2 3 4 5 (Mon thru Fri) appears
in display.  Pressing Day key again, 6 7 (Sat and Sun)
appears in display.  Pressing Day key again, 1 (Mon)
appears in display.  Repeated presses will cycle through
all days of the week, and back to 1 thru 7 (Mon thru Sun).
Select day or block of days desired with the Day key.

7. Press Prog. key and repeat steps 2 thru 6 to enter

additional programs of ON (start fan) and/or OFF (start
wash) times.

8.  Press 

¹

 key to enter run mode.

IMPORTANT:  The output relays will switch ON (or OFF)
only at the programmed times.  After programming is
completed, if a channel should be ON, it must be
manually turned ON with the
 

E

    key.  For example,

programming is completed at 2PM and CH1 was pro-
grammed to be ON at 8AM and OFF at 5PM.  After
pressing the
 

¹

key, CH1 will be OFF; press 

E

  to turn it

ON.  It will assume automatic operation at the 5PM OFF
time
.

Review and Change of Programs

1. To review a program at any time, press Prog. key.

Programs will be displayed in the sequence they were
entered with repeated presses of Prog. key.

2.  To change a program, select the program to be changed

with the Prog. key, and enter the new time of day, and/or
days of week just as in the programming steps shown
above.  The old program is overwritten with the new
selections.  Press Prog. to store the new program.

3.  To delete an individual program, select the program as in

Step 1 and press the m key and then the h key until “-:-
” appears in the display.  Press either Prog. or 

¹

 key until

“-:-” flashes.  The program is deleted after a few seconds.

Manual Override

While in the Run mod, ( 

¹

 symbol is displayed), pressing the

key will reverse the load status (switch load OFF if it is ON,
or switch ON if it is OFF).  A hand symbol appears in display
to indicate the override is active.  At the next scheduled
switching time, automatic time control will resume, eliminat-
ing the override.

Pressing the 

E

 key a second time [

¤

] appears in the

display indicating the load is switched permanently ON.
Pressing the 

E


key a third time, [

¡

] appears in the

display indicating the load is switched permanently OFF.
Pressing the 

E

 key a fourth time returns to automatic,

¹

 appears in the display.

General Information

The circular keypads are positioned to provide a sequential
path for programming.  Starting with Prog. to select a
program, clockwise to 

E

 to select ON or OFF, then h for

hour, m for minute, and finally  Day to select day or days of
the week.  If an input is missing or incomplete, the missing
segments will flash when the 

¹

 or program key is depressed.

(For example, if no ON or OFF is selected, the ON symbol will
flash).  The missing entry must be completed before pro-
gramming can resume.  While programming, pressing the h,
m, or Day key longer than 2 seconds will cause a rapid roll
of the parameter.

• A program consists of:

1. ON or OFF command,
2. Hour and minute, and
3. Day or multiple days on which it is to occur.

• Res. is the reset which clears the time of day and deletes

all program information.

• The  ±1h key sets clock time up or down one hour for

daylight savings time adjustment in the spring and fall.

• Military (24:00 hr.) or AM/PM (12:00 hr.) time may be

selected by pressing and holding the h key while depress-
ing the ±1h key.

Note:  A flashing display indicates either incomplete data
entry or the battery is low.  Check to see if days and ON or
OFF times are entered and check the power supply to the
time control.
IMPORTANT:  Depress reset key before beginning to set
time and program

Setting Time and Day of Clock

1.  Select military (24:00 hr.) or AM/PM (12:00 hr.) time mode

by depressing and holding h key while pressing ±1h key
to toggle between military and AM/PM.  (AM appears in
display when in AM/PM mode.)

2.  Press and hold down 

¹

 key, and proceed as follows:

A. If setting the time when daylight savings time is in

effect, press ±1h key once (+1h will appear in display).

B. Set hour with h key.  Scroll the clock until either AM or

PM appears as required.  If AM or PM does not appear
in display, the unit is in military time.  GO back to
Number 1 to change AM/PM mode.

C.Set minutes with the m key.

D.Press Day key repeatedly to the day of the week.  (1 is

Monday, 7 is Sunday)

E. Release 

¹

 key, colon will begin flashing.  If the days are

flashing, the day of the week was not entered (see Step D).

AM - - : - -

Содержание CG Series

Страница 1: ... SERIES WATER WASH VENTILATORS WITH MODEL C 5000 COMMAND CENTER AN ILLINOISTOOL WORKS COMPANY 10900 S W AVERY STREET TUALATIN OREGON 97062 U S A 1 800 547 9696 503 691 2010 FAX 503 692 6048 email info gaylordusa com GAYLORD INDUSTRIES EFFECTIVE DATE 4 05 ...

Страница 2: ...lord Heat Reclaim Unit Quencher Fire Protection Sys tem or Roof Top Air Handling Equipment etc please refer to the corresponding supplementary equipment manuals If you have further questions please call us toll free at 1 800 547 9696 We are more than happy to help Sincerely Edson C Gaylord President CEO GAYLORD INDUSTRIES 10900 S W AVERY STREET TUALATIN OREGON 97062 U S A 1 800 547 9696 503 691 20...

Страница 3: ...M 19 BACKFLOWPREVENTOR 20 VACUUMBREAKER 20 RPDEVICE 20 DRAINS 21 C 5000STATUSLIGHTCHART 21 MEASURINGINLETSLOTVELOCITY 22 24 OPTIONALCONTINUOUSCOLDWATERMIST 25 PARTSLISTS MODELGPC 5000SERIESCONTROLCABINET 26 MODELGPC 5000 RPSERIESCONTROLCABINET 27 MODELGPC 5000 RP SSERIESCONTROLCABINET 28 OPTIONALCONTINUOUSCOLDWATERMIST 29 MODELGPC 5000SERIESCONTROL 30 DAMPERCONTROLSWITCH 31 DETERGENTPUMP 32 MISCEL...

Страница 4: ... 350 857 1 396 065 1 558 537 JAPAN PATENT NUMBERS 650 269 797 637 917 077 1 045 507 726 884 1 580 556 Japan Patent application pending Japan Trademark registration 874 453 NEW ZEALAND PATENT NUMBERS 162 024 167 964 New Zealand Trademark B 95557 SWEDEN TRADEMARK 120 229 SWITZERLAND PATENT NUMBERS 560 358 2 PATENTS Copyright 2005 Gaylord Industries ALL RIGHT RESERVED NO PART OF THIS BOOK MAY BE REPR...

Страница 5: ... a small slopedgreasecollectinggutteronthebacksideofthedamper whichdrainsoffliquefiedgrease preventingitfromre entrain ing into the airstream 3 CG SERIES VENTILATOR PRINCIPLE OF OPERATION Baffle 2 This baffle is located on the interior back wall of the ventilator and is a stainless steel pipe equipped with brass spray nozzles on 8 to 10 centers Refer to Figure 1 During the wash cycle hot detergent...

Страница 6: ...tedon8 to10 centersonthetwowashpipes BAFFLES mounted on the interior back wall of the ventilator Refer to Figure 3 At the end of the wash cycle the water is automaticallyshutoff andtheinterioroftheventilatorisclean ready for the next day s operations There are three standard wash cycle times that are set depending upon the type of cooking equipment being used Thesettingsare3minutesforlight dutyequ...

Страница 7: ...he fire damper would then close and the exhaust fan would shut off Toresumenormaloperations openthefireswitchandflipthe toggle switch to the position marked normal Replace the glass rod and close the cover CG SERIES VENTILATOR PRINCIPLE OF OPERATION TESTINGINTERNALFIREMODE The internal fire protection system may be tested periodically bypushingthe FireTestSwitch whichislocatedinsidethe electrical ...

Страница 8: ...d in the interior of the ventilator remainingoutoftheairstreamuntilremoveddailybythewash cycle Baffle 1 This baffle is located at the air inlet of the ventilator and is formedaspartoftheinspectiondoor Thereisasmallgrease collecting gutter on the back side of the baffle which drains off liquefied grease preventing it from re entraining into the airstream Baffle 2 This baffle is on the interior back...

Страница 9: ...ndard wash cycle times that are set depending upon the type of cooking equipment being used Thesettingsare3minutesforlight dutyequipment 5minutes for medium duty equipment and 9 minutes for heavy duty equipment However adequate cleaning is dependent upon water pressure water temperature daily grease accumula tion thelengthofthewashcycle frequencyofwashcycleand the type of detergent being used It m...

Страница 10: ...The internal fire protection system may be tested periodically bypushingthe FireTestSwitch whichislocatedinsidethe electrical compartment of the control cabinet Pushing this switch will cause the following ThermostaticallyActivated Fuse Link Activated 1 Water turns on and 1 Water turns on and will run for 5 minutes will run for 5 minutes 2 Exhaust fan shuts off 2 Exhaust fan shuts off 3 Damper clo...

Страница 11: ...aseaccumula tion the length and frequency of the wash cycle and thetypeofdetergentbeingused Refertowashtiming instructions on Page 14 for setting the length of the wash cycle NOTE Some control cabinets are equipped with a lowdetergentswitch Ifsoequipped the WashOn light will flash if the detergent tank is empty or if the detergentpumpismalfunctioninganddetergentisnot pumping 2 Afterthewashcycleis ...

Страница 12: ...ry trained service agencies are certified by Gaylord Industries Inc to perform these inspections For the name andphonenumberofyournearestagentcall1 800 547 9696 E L U D E H C S N O I T C E P S N I M E T S Y S T S U A H X E s n o i t a r e p o g n i k o o c l e u f d i l o s g n i v r e s s m e t s y S y l h t n o M s a h c u s s n o i t a r e p o g n i k o o c e m u l o v h g i h g n i v r e s s m...

Страница 13: ...ure an airtight system C Poppet checks within the foot valve pump head and brasscheckvalveshouldbecleanandoperatingfreely D Detergent lines should be free and clear DETERGENTFLOW Detergentflowisinitiallyfactorysetaccordingtothepipesize of the control cabinet refer to chart Generally the factory setting will be sufficient to provide adequate cleaning of the ventilator However adequate cleaning is d...

Страница 14: ...ryers Sprayonandrinseorwipe off For extremely soiled areas gentle agitation followed by a soaking period will result in more thorough cleaning DON TbeafraidtoexperimentwithFORMULAG 510because it contains no phosphates nitrates enzymes sulfates sul fonates or silicates DETERGENT FOR THE WASH SYSTEM LIMITEDWARRANTY G 510 CHEMICAL DIVISION warrants that FOR MULAG 510willnotcausecleansingagent dam age...

Страница 15: ...ES COMMAND CENTER INSTRUCTIONS MODEL C 5000 SERIES COMMAND CENTER GENERAL The Model C 5000 Series Command Center controls all of the functions of the Gaylord Water Wash Ventilator The C 5000 Series Command Center is available in four basic models They are Model Description of Operation C 5000 Manual start fan and start wash C 5000 TC Programmable time clock opera tion of the start fan and start wa...

Страница 16: ...y the suffix 3 immediately following the S suffix TO SET TIMES There are up to five three position toggle switches for setting the wash time of each group Set each toggle switch on one of the three positions 3 5 or 9 minutes as required by the type of cooking equipment under the ventilators Refer to the recommended wash time chart below Set the delay time for 1 15 or 30 minutes using the toggle sw...

Страница 17: ...F if it is ON or switch ON if it is OFF A hand symbol appears in display to indicate the override is active At the next scheduled switching time automatic time control will resume eliminat ing the override Pressing the E key a second time appears in the display indicating the load is switched permanently ON Pressing the E key a third time appears in the display indicating the load is switched perm...

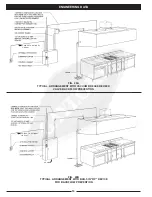
Страница 18: ...RANGEMENT WITH VACUUM BREAKER CHECK VALVE BACKFLOW PREVENTION FIG 20B TYPICAL ARRANGEMENT WITH BUILT IN RP DEVICE FOR BACKFLOW PREVENTION 16 ENGINEERING DATA 2 WIRES TO OPTIONAL FIRE SW 2 WIRES TO OPTIONAL FIRE SW DRAIN ...

Страница 19: ...be fresh conditioned heated or cooled air brought into the kitchen area with the remaining 20 to 25 allowed to flow into the kitchen from adjacentareas NOTE RECOMMENDEDPERCENTOFMAKE UPAIRFOR MA SERIESVENTILATORSINCORPORATINGINTEGRAL MAKE UP AIR WILL VARY REFER TO THE GAYLORD MASTER ENGINEERING DATA SHEET FOR SPECIFIC REQUIREMENTS NOTE AIRVOLUMEANDSTATICPRESSUREREQUIRE MENTS ARE BASED UPON OPERATIO...

Страница 20: ...r rotation of exhaust fan wheel 4 Proper size of exhaust fan fan must deliver nameplaterating 5 Ductwork inspection panel left open B The Gaylord Ventilator must have its own exhaust system and no other exhaust such as dishwasher hoods should be tied into it C Exhaust Fan Discharge 1 There should be no screen over the discharge If one is found it should be removed 2 The direction of discharge shou...

Страница 21: ... Pressure should be 40 pounds minimum 2 8 kg cm2 while the ventilators are washing If the pressure is below minimum an increaseisnecessary 80pounds 5 6kg cm2 isthe maximum pressure recommended and if above 80 pounds 5 6 kg cm2 a pressure regulator should be used C Water Temperature Check the temperature gauge within the control cabinet The hot water used for cleaning should be between 140 F and 18...

Страница 22: ...t installer or distributor call Watts Regulator at 508 688 1811 BACKFLOW PREVENTORS Model GPC 5000 Series control cabinet uses a vacuum breaker checkvalveassemblyforbackflowprevention Model GPC 5000 RPSeriescontrolcabinetusesareducedpressure principledevice RP forbackflowprevention RefertoPages 26 through 28 for illustrations of each The type of backflow preventor used is dictated by state county ...

Страница 23: ... s r o f n o s i t h g i l r o t c e l e S y a l e D h s a W y a l e d g n o l r o m u i d e m 8 r o f f f o y a l e d g n o l r o f n o s i t h g i l r o t c e l e S y a l e D h s a W y a l e d m u i d e m r o t r o h s 9 h s a w t h g i l r o f n o s i t h g i l r o t c e l e S e m i T h s a W t s 1 0 1 h s a w y v a e h r o f n o s i t h g i l r o t c e l e S e m i T h s a W t s 1 1 1 h s a w t...

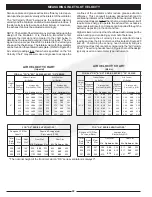
Страница 24: ...m i t p O x a M 3 4 0 5 2 0 7 2 5 8 2 0 0 3 0 0 4 0 5 4 0 7 4 0 0 5 0 2 9 0 9 9 0 5 0 1 0 0 1 1 0 0 1 1 0 5 2 1 0 0 3 1 0 8 3 1 0 0 0 1 0 8 0 1 0 4 1 1 0 0 2 1 0 0 2 1 0 5 3 1 5 2 4 1 0 0 5 1 0 0 2 1 0 0 2 1 0 0 2 1 0 6 2 1 0 6 2 1 0 2 4 1 0 0 5 1 5 7 5 1 0 5 1 0 6 1 0 7 1 0 8 1 0 4 2 0 7 2 0 8 2 0 0 3 0 5 5 0 9 5 5 2 6 0 6 6 0 7 6 0 5 7 0 8 7 0 3 8 0 0 6 0 4 6 0 8 6 0 2 7 5 2 7 0 2 8 8 4 8 0 0 9 ...

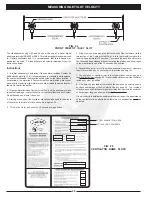
Страница 25: ...MEASURING INLET SLOT VELOCITY 23 FIG 23A FIG 23B FIG 23C CROSS SECTION OF TYPICAL VENTILATOR INLET SLOTS ...

Страница 26: ...lator place the probe head in the middle of the slot on the inlet slot plane as shown in figure 23A 4 Turn on the meter and push the 16 second average button 5 Slide the probe head along the slot to the end of the ventilator or to the intersection of the Custom Air baffle at a rate that would complete the reading in approximately 16 seconds If you reach the end of the slot before the 16 seconds ha...

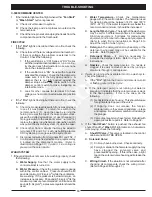
Страница 27: ...xhaust fan opening the controlcabinetdoorandcheckthewaterpressuregauge in the cold water loop Water flow pressure should be at 40 psi 2 8 kg cm2 If it is not adjust the pressure regulator until 40 psi 2 8 kg cm2 is achieved 2 Mist Nozzles Turn on the exhaust fan look into the air inlet slot and check each mist nozzle for proper spray Remove and clean the nozzle if necessary TROUBLE SHOOTING 1 If t...

Страница 28: ...N 1 A flashing fire light indicates the control isinan External Fire Mode e x h a u s t f a n o n f i r e d a m p e r o p e n a n d w a t e r w a s h n o z z l e s o n 2 A solid fire light indicates the control isinan Internal Fire Mode e x h a u s t f a n o f f f i r e d a m p e r c l o s e d a n d w a t e r w a s h n o z z l e s o n GAYLORD INDUSTRIES INC MODEL GPC 5000 SERIES CONTROL CABINET TY...

Страница 29: ...k i n g i s c o m p l e t e d p u s h S t a r t W a s h T h i s w i l l t u r n o f f t h e e x h a u s t f a n a n d b e g i n a t i m e d w a s h c y c l e NOTE 2 4h o u rk i t c h e n s m u s t p u s h S t a r t W a s h a tl e a s t o n c e a d a y o ra sn e e d e d f o r p r o p e r c l e a n i n g 3 T o s e tt h el e n g t h o f t i m e f o rt h ew a s h c y c l e o p e n t h i s c a b i n e ...

Страница 30: ... c o m p l e t e d p u s h S t a r t W a s h T h i s w i l l t u r n o f f t h e e x h a u s t f a n a n d b e g i n a t i m e d w a s h c y c l e NOTE 2 4h o u rk i t c h e n s m u s t p u s h S t a r t W a s h a tl e a s t o n c e a d a y o ra sn e e d e d f o r p r o p e r c l e a n i n g 3 T o s e tt h el e n g t h o f t i m e f o rt h ew a s h c y c l e o p e n t h i s c a b i n e t d o o r a...

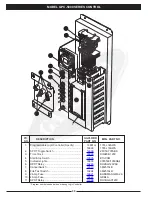
Страница 31: ...NO NO 1 Ball Valve 171N 1 2 2 Solenoid Valve 10135 8210G2 A Replacement Coil 120 Volt 10156 238210032D 220 Volt 10157 238210058D B Solenoid Valve Repair Kit Pipe Size 1 2 14387 310 387 3 Pressure Gauge 10276 1005 H 02L 4 Pressure Reducing Valve 10924 25AUB 5 Vacuum Breaker 288A Specify Size A Vacuum Breaker Repair Kit 288A RK Specify Size 6 Water Check Valve 600 Specify Size 7 Line Strainer AT Spe...

Страница 32: ...20E 120V 4 Start Stop Switch 10035 E13 00M 5 Indicator Lights 10835 93F3539 1050QA4 6 DPDTRelay 10283 RH2BU 120VAC 7 Cancel Switch 10010 3832510LB 8 Fire Test Switch 16894 3832510LR 9 2 Amp Fuse 16821 BUSSMAN GMA 2A 10 4 Amp Fuse 16822 GDB4A 11 SPDT Relay 11399 RH1BU AC120V PC NO DESCRIPTION MFG PART NO GAYLORD PART NO Program number needed when ordering Logic Controller ...

Страница 33: ... l i t n e v r o f s g n i r p S d o R g n o l 0 6 1 o t 7 2 1 s r o t a l i t n e v r o f s g n i r p S d o R n i p h t i w s e l d n a H H S s n i p h t i w e g a k n i L n o i s n e t x E H S s t l o b g n i t n u o m h t i w e t e l p m o c t e k c a r B H S e l d n a H L d a e r h t e l a m e f w l l a B t e s e R d e R d u t s w l l a B t e s e R d e R h c t a C r e g g i r T e t e l p m o c...

Страница 34: ...32 DETERGENT PUMP ...

Страница 35: ...33 MISCELLANEOUS VENTILATOR PARTS ...

Страница 36: ...34 WIRING DIAGRAM FOR GPC 5000 WITH ELECTRIC FIRE DAMPER 120 VOLT ...

Страница 37: ...35 WIRING DIAGRAM FOR GPC 5000 WITH FUSE LINK FIRE DAMPER 120 VOLT ...

Страница 38: ...WIRING DIAGRAM FOR GPC 5000 S5 WITH ELECTRIC FIRE DAMPER 120 VOLT 36 ...

Страница 39: ...WITH FUSE LINK FIRE DAMPER 120 VOLT WIRING DIAGRAM FOR GPC 5000 S5 37 ...

Страница 40: ...WIRING DIAGRAM FOR GPC 5000 WITH ELECTRIC FIRE DAMPER 220 VOLT 38 ...

Страница 41: ...WITH FUSE LINK FIRE DAMPER 220 VOLT WIRING DIAGRAM FOR GPC 5000 39 ...

Страница 42: ...WIRING DIAGRAM FOR GPC 5000 S5 WITH ELECTRIC FIRE DAMPER 220 VOLT 40 ...

Страница 43: ...WITH FUSE LINK FIRE DAMPER 220 VOLT WIRING DIAGRAM FOR GPC 5000 S5 41 ...

Страница 44: ... through stainless steel perforated panels as illustrated MAW Series or optional registers Typical supply volume is 80 of the exhaust or more depending on air bal ance desired Supply air temperatures should range from 60 to 65 F 16 to 18 C but may be as low as 50 F 10 C depending on air volume distribution and internal heat load MODEL MAW SERIES FRONT FACE DISCHARGE MODEL MAI SERIES INTERNAL DISCH...

Страница 45: ... s liters per second N Newtons dm decimeters Kpa 1000 Pascals N m2 Newtons per square meter CFM cubic feet per minute psi pounds per square inch C degrees Celsius m3 s cubic meters per second kg m2 kilograms per square meter BAR one atmospheric pressure meter L Liters F degrees Fahrenheit 1000 millibars 14 7 psi WATER FLOW VOLUME TO CONVERT TO MULTIPLY BY U S ounce Liters 02958 U S gal Liters 3 78...

Страница 46: ......
Страница 47: ...ntative SuchlaborshallonlybeprovidedMondaysthroughFridaysduringthehoursbetween 8 a m and 4 p m Requests for repairs or replacement parts should be made to GAYLORD INDUSTRIES 10900SWAveryStreet Tualatin Oregon97062 1149 Outside the United States all replacement parts furnished under this warranty shall be F O B Gaylord Industries Tualatin Oregon U S A The owner shall pay the necessary freight deliv...

Страница 48: ...VICE AGENCY CALL OR WRITE TO GAYLORD INDUSTRIES AN ILLINOIS TOOL WORKS COMPANY 10900 S W AVERY STREET TUALATIN OREGON 97062 U S A Call 503 691 2010 1 800 547 9696 Fax 503 692 6048 email info gaylordusa com LOCAL SERVICE AGENCY FORM NO TM CG RG 1199 COPYRIGHT 2005 GAYLORD INDUSTRIES LITHO IN U S A ...

Отзывы: