GATTONI 9000 Скачать руководство пользователя страница 14

art. 9000- 9010-9100 - 9110

CIRCLE ONE - CIRCLE TWO

14 

IT


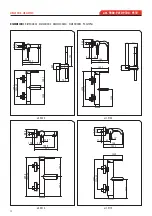
Prima di procedere a manutenzioni di questo tipo chiuderei rubinetti d’arresto, scaricare l’acqua e seguire le istruzioni seguenti:


Aiutarsi con un oggetto appuntito per fare leva sul bottoncino 

(1)

 per estrarlo dalla sua sede, con una chiave a brugola da 2,5 mm 


svitare il grano 

(2)

, estrarre la maniglia 

(3)

. Con una chiave esagonale da 30 mm svitare la ghiera 

(4)

 che fi ssa la cartuccia deviatrice 

(5)

, estrarla dal 


corpo del rubinetto ed eff ettuare la manutenzione o sostituzione. Prima di procedere al rimontaggio della cartuccia verifi care che il piano d’appoggio 


della stessa all’interno del rubinetto non presenti abrasioni o depositi di impurità che potrebbero compromettere la tenuta della guarnizione. 


Non utilizzare utensili appuntiti nel tentativo di rimozione delle impurità poiché eventuali graffi   potrebbero compromettere la tenuta 


della guarnizione. Verifi care che la guarnizione di base della cartuccia sia inserita correttamente nell’apposita sede. 


Per il rimontaggio prestare attenzione alla posizione di inserimento della cartuccia nel corpo del rubinetto, il perno di riferimento sporgente dal fondo 


della cartuccia deviatrice deve infatti essere inserito nell’apposita sede del corpo. Premere la cartuccia sino in fondo ed avvitare la ghiera.

EN


Before performing this type of maintenance, close the taps, drain the water and follow these instructions:


Use a pointed object to make leverage on the button 

(1)

 to extract it from its seat. Unscrew the grub screw

 (2)

 with a 2.5 mm Allen key and remove 

 the 

handle 

(3)

. Use a 30 mm Allen key to unscrew the ring nut 

(4)

 which fi xes the diverter cartridge 

(5)

, extract it from the tap body and perform 


maintenance or replacements. Before refi tting the cartridge, make sure that its support surface inside the tap has no abrasions or fi lth build-ups which 


could jeopardise the sealing of the gasket. Do not use sharp tools to try to remove this fi lth as any scratches could jeopardise the sealing of the gasket. 


Check that the basic gasket of the cartridge is inserted properly in its seat. When refi tting the cartridge, pay attention to the position in which it is 


inserted in the tap body. The reference pin protruding from the bottom of the diverter cartridge must be inserted in the specifi c seat of the body. Push 


the cartridge all the way in and screw the ring nut 

(4)

.

E

1

30 mm

2,5 mm

2

3

4

5

Содержание 9000

Страница 1: ...th mixer with shower kit Mitigeur bain douche mural avec kit de douche Einhand Wannenf llmischer mit Brausegarnitur Mezclador monomando ba o externo con ducha flexo y suporte duplex INSTALLAZIONE E MO...

Страница 2: ...ler un r ducteur de pression l entr e de l installation Temp rature eau chaude non sup rieure 65 C Application de filtres l entr e de l installation Surtout en cas de nouvelles installations afin d vi...

Страница 3: ...age l ext rieur de la bain 4 Fixation du support de douchette 6 Remplacement de la cartouche 8 CircleTwo Remplacement de l a rateur 17 Dimensions 18 Entretien du produit 19 R clamation 20 DE INHALTSVE...

Страница 4: ...corative flanges 3 onto the eccentric fittings until they come into contact with the wall using a 30 mm hex wrench tighten the two caps 4 having previously inserted the seal with net 5 between the cap...

Страница 5: ...andere Ende des Schlauchs nach Einsetzen der Dichtung 6 an der Armatur anschlie en ES Conforme a la configuraci n deseada del ba o colocar los tubos de alimentaci n en la pared situ ndolos a una dista...

Страница 6: ...rt 9000 9010 9100 9110 CIRCLE ONE CIRCLETWO 6 C 5 4 1 3 ASSEMBLAGGIO SUPPORTO DOCCETTA SHOWER HOLDER FIXING FIXATION DU SUPPORT DE DOUCHETTE BEFESTIGEN DES DUSCHHALTERS FIJACI N PORTAMANGO DE DUCHA 2...

Страница 7: ...percer les deux trous de la paroi 6 et de commutateurs sur les chevilles En utilisant les vis 4 fix es la paroi de montage 5 Ins rez la rosace 3 et le support 2 sur le connecteur puis le serrer tout...

Страница 8: ...guarnizione Verificare che la guarnizione di base della cartuccia sia inserita correttamente nell apposita sede Per il rimontaggio prestare attenzione alla posizione di inserimento della cartuccia nel...

Страница 9: ...es made could jeopardize the tightness of the seal Check that the cartridge base seal is properly inserted in its seat When reassembling pay attention to the position where the cartridge is placed ins...

Страница 10: ...tuelles raflures pourraient compromettre l tanch it du joint V rifier que le joint de base de la cartouche est ins r correctement dans l emplacement pr vu cet effet Pour le remontage faire attention l...

Страница 11: ...da eventuelle Kratzer die Dichtheit der Dichtung beeintr chtigen k nnten berpr fen ob die Dichtung an der Basis der Kartusche korrekt in ihren Sitz eingelegt ist Bei der erneuten Montage auf die Einsc...

Страница 12: ...mpurezas ya que un posible ara azo podr a poner en peligro el ajuste de la junta Comprobar que la junta de la base del cartucho est insertada correctamente en su correspondiente lugar A la hora de vol...

Страница 13: ...CIRCLE ONE CIRCLETWO 13 art 9000 9010 9100 9110 RU 2 5 1 2 3 29 4 5 4 10 D 1 29 mm 2 5 mm 2 3 4 5...

Страница 14: ...l corpo del rubinetto il perno di riferimento sporgente dal fondo della cartuccia deviatrice deve infatti essere inserito nell apposita sede del corpo Premere la cartuccia sino in fondo ed avvitare la...

Страница 15: ...ogement appropri du bo tier Appuyer sur la cartouche jusqu au fond et visser le collier de serrage 4 DE Vor Beginn vonWartungsarbeiten dieser Art zuerst die Sperrventile schlie en dasWasser ablassen u...

Страница 16: ...compruebe que la superficie de apoyo del mismo dentro del grifo no presente abrasiones o dep sitos de impurezas que podr an perjudicar la estanqueidad de la junta No utilice herramientas puntiagudas p...

Страница 17: ...erator 1 using the provided key 2 FR Pour retirer et remplacer l a rateur 1 utiliser la cl fournie 2 DE Zum Aus und Einbau der Luftsprudler 1 der Schl ssel 2 benutzen ES Para la sustituci n del airead...

Страница 18: ...155 5 49 78 5 183 30 DIMENSIONI DIMENSIONS DIMENSIONS ABMESSUNGEN DIMENSIONES G1 2 54 149 9 171 17 5 G1 2 64 153 20 155 5 309 6 154 1 art 9000 art 9010 54 17 5 G1 2 64 153 20 146 153 8 155 5 309 6 148...

Страница 19: ...lker Azeton verschiedene Desinfektionsmittel enthalten l sst die Garantie des Herstellers verfallen ES CUIDADO DEL PRODUCTO Limpiar peri dicamente el filtro aireador e inmediatamente tras su primer us...

Страница 20: ...trollo EN By claim please indicate the following control number FR En cas de r clamation svp veuillez citer le num ro suivant DE Bei Reklamation bitte folgende Kontrolnummer angeben ES En caso de recl...

Отзывы: