background image

Instructions for SL500DCL/SL800DCL

www.gatexpertstore.com

8

Step 4 - Motor Pad Footing

·

The motor pad concrete footing requires an area of no less than 500mm long x 350mm wide
and a minimum depth of 200mm (Standard requirement).

·

Ensure surface is level and parallel to the driveway.

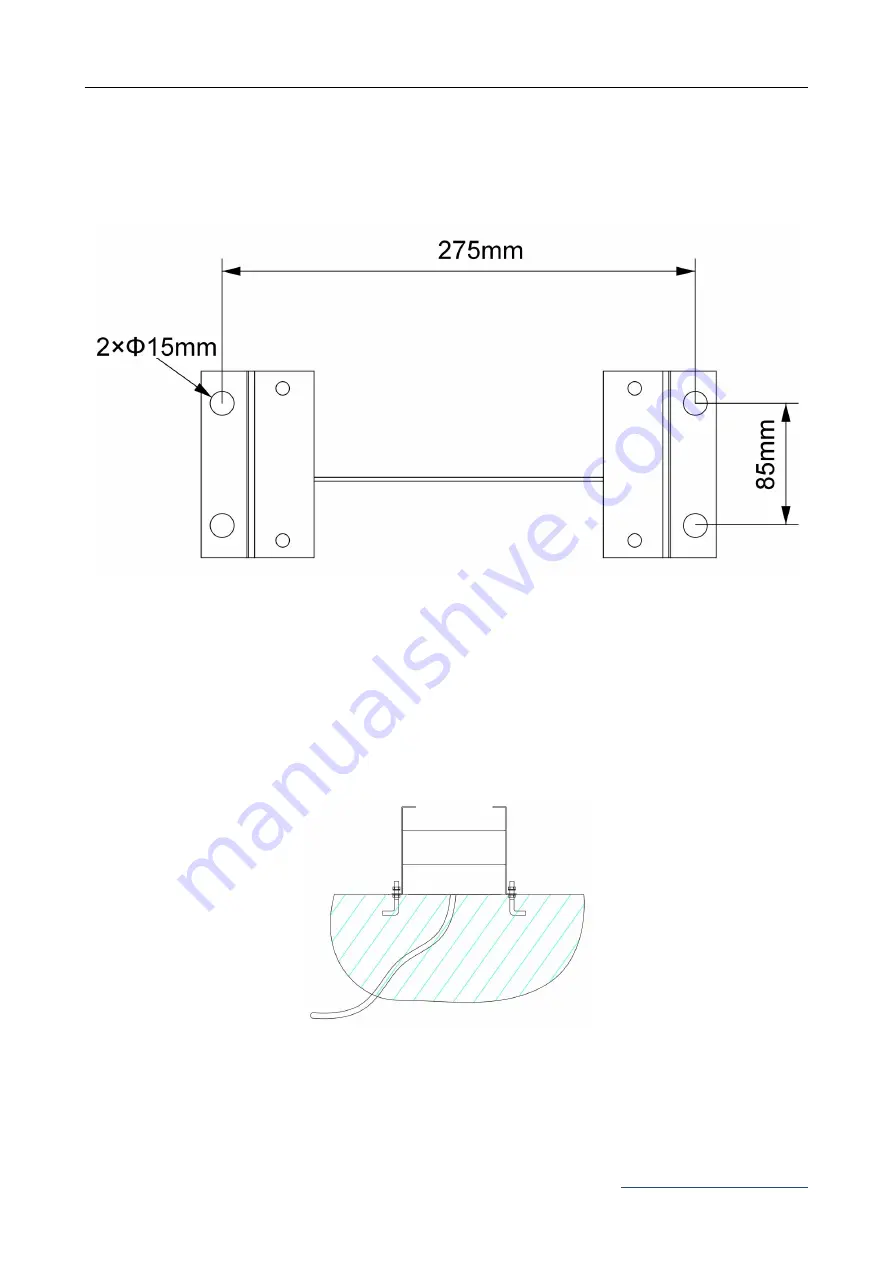
Mounting Plate Dimensions

Figure 9

Step 5 - Fitting Mounting Base and Motor

·

Fit anchor bolts(included in kit) or expansion bolts(should be prepared by users) according to

holes in mounting base (as per Figure 9).

·

Position the mounting base and fix it as per Figure 10.

·

Bolt motor to its base using the M8x40 bolts with spring and flat washers provided and tighten

as required.

Figure 10

Содержание SL500DCL

Страница 1: ...www gatexpertstore com Sliding Gate Opener User Manual SL500DCL SL800DCL Website www gatexpertstore com E mail sales gatexpertstore com...

Страница 2: ...efully incorrect installation could affect gate operation When mounting and positioning this product please ensure the power cable is unplugged The motor cover will need to be removed to mount the mot...

Страница 3: ...or replace for free 4 The malfunction and damages caused by incorrect use or man fault is not covered by this warranty CONTACT US E mail sales gatexpertstore com Please fill in the order information...

Страница 4: ...owering on 12 Step 9 Testing Travel and Limit Stops 13 Programming and Wiring 14 Terminal Instructions 15 Wiring to the Terminal 15 Connecting Infrared Photocells 17 Operation Interface Instruction 18...

Страница 5: ...art up Delay Setting L3 37 Opening Direction Setting L4 38 Alarm Lamp Setting L5 39 Other Menu Setting 40 Emergency Stop Distance Setting L1 41 Buzzer Setting L2 42 Battery Level Checking 44 Restore F...

Страница 6: ...e output gear stops rotating Finally press the closing button the output gear rotates to the opposite direction This will give you an understanding of the way in which the opener will move the gate Fi...

Страница 7: ...vent injury to person or damage to property Instruct all users about the control systems provided and the manual opening operation in case of emergency Ensure that the power cable is connected to a RC...

Страница 8: ...ion No Picture Name Quantity 1 Motor 1 2 Manual Release Keys 2 3 Remote Controls 2 4 Accessories Box 1 4 1 Sprocket Cover 1 4 2 Chain Including 2 Chain Links 6m 4 3 Tie Rod 2 4 4 Square Screw 4 4 5 Ro...

Страница 9: ...X65 4 Nut M8 4 Flat Washer 8 2 Spring Washers 8 2 4 11 Inner Hexagon Head Bolt M6X20 4 4 12 Hexagon Head Bolt M8X40 4 4 13 Nut M6 16 Nut M8 16 4 14 Flat Washer 6 16 Flat Washer 8 16 4 15 Spring Washer...

Страница 10: ...60dB Working Duty S2 20min Recording of up Remote Controls 32 Remote Frequency 433 92 MHz Working Temperature 20 C 70 C Package Weight 16 2KG 17 2KG Battery Specification 12V 9Ah 1pc Installation Befo...

Страница 11: ...not plugged in at any stage before Step 8 Step 1 Gate Preparation Ensure that the sliding gate is correctly installed The gate is horizontal and level and the gate can glide back and forth smoothly w...

Страница 12: ...rotates freely by hand Figure 6 Figure 6 Step 3 Removing Installing Motor Cover Unscrew the two cover screws located at each side of the motor cover Figure 7 Sprocket cover installation as Figure 8 Fi...

Страница 13: ...re surface is level and parallel to the driveway Mounting Plate Dimensions Figure 9 Step 5 Fitting Mounting Base and Motor Fit anchor bolts included in kit or expansion bolts should be prepared by use...

Страница 14: ...gnment Ensure output sprocket and chain are correctly aligned Under no circumstances should the gate opener output sprocket carry any weight of the gate It is the task of the gate castors or wheels to...

Страница 15: ...oving It is extremely dangerous that without or incorrect installation of the limit switch stops can cause crash of gate damage of internal structure of the motor moreover the gate may slide off the g...

Страница 16: ...switch stop onto the top of chain at the point where it meets the magnetic limit switch on the motor Tighten locking screws of limit switch stop Test the magnetic limit switch stops by moving the gat...

Страница 17: ...is completed Step 8 Powering on Ensure that the outer cover has been fitted and fastened back onto the motor base Before powering up the gate opener make sure the gate can travel by hand in manual mod...

Страница 18: ...me is 10 15mm from closed gate end catch Testing the Open Position Press remote the sliding gate will begin to open The limit switch stop will hit the limit switch and the sliding gate will stop When...

Страница 19: ...nal X2 Terminal Set Button Indicator Light X5 Terminal Hall Line Programming and Wiring Any works to the 110V 220V AC must only be performed by a licensed electrician Ensure power is off before any mo...

Страница 20: ...ure 20 ANT Extra Antenna GND Extra Antenna Shield COM Common Terminal for External Push Button STP External Stop Push Button Switch PED External Close Push Button Switch OSC External Open Push Button...

Страница 21: ...Close Limit Switch X4 Terminal 24VBAT Battery Positive 24VBAT Battery Negative Battery Specification 24V 9Ah 12VBAT Battery Positive 12VBAT Battery Negative Battery Specification 12V 9Ah Note and mus...

Страница 22: ...nfrared Photocell is blocked the gate will stop and open immediately to protect user and property security To install photocells connect wiring as per Figure 21 You must remove the wire jumper between...

Страница 23: ...1 Operation Interface Instruction Figure 22 Indicator Lights L0 Green Indicating the control board working status and menu status L1 L5 Red Indicating the settings parameters errors and battery level...

Страница 24: ...to open the gate then release to stop running Press to close the gate then release it to stop running 3 Press PROG button once to exit the manual control mode Indicator light L3 will be off B Operatio...

Страница 25: ...se do not move or remove it anymore A Operation Instruction a Press button for 2 sec motor will automatically start it s travel learning b During gate closing the indicator lights will be on from L5 t...

Страница 26: ...tandby mode to enter into the first function of remote control management 2 Different functions can be selected through and buttons 3 Press SET button to enter into the corresponding parameter setting...

Страница 27: ...red to the gate opener can individually control the operation of one opener The rest buttons on this remote control can be used to pair to other openers Figure 24 A Operation Instruction 1 Press and h...

Страница 28: ...pener will be separately used for gate opening closing and stop Please refer to Figure 26 for the usage for the forth button on the remote control Figure 25 A Operation Instruction Open Close Stop Ped...

Страница 29: ...will be on in sequence then all will flicker once and off If an alarm lamp is connected it ll be on for one sec Learning is complete thereafter B Operation Graphic Illustration Note If there is no op...

Страница 30: ...on the remote control once The indicator lights L1 L5 will be on in sequence then all will flicker once and off Learning is complete thereafter B Operation Graphic Illustration Remote Control Delete...

Страница 31: ...dicator lights L1 L5 will be on for one sec B Operation Graphic Illustration Remote Control Quick Learning Remote control quick learning function enables user to pair the remote controls without openi...

Страница 32: ...ove status The alarm lamp will be off Then remote control learning is complete 3 The system will automatically exit the learning mode after pairing finished Note The remote control working mode will b...

Страница 33: ...ights L1 L5 will show the current running speed The default is L5 3 Press or button to adjust the running speed Indicator lights L1 L5 will indicate different speed status The more the indicator light...

Страница 34: ...Press SET button once to enter into setting mode Indicator lights L1 L5 will show the current slow stop speed The default is L1 4 Press or button to adjust the slow stop speed Indicator lights L1 L5...

Страница 35: ...elect the reverse option Indicator light L3 will be steady on 3 Press SET button once to enter into setting mode Indicator lights L1 L5 will show the current setting The default is L2 4 Press or butto...

Страница 36: ...ance enables the gate to run more smoothly which will extend the service life of gate and gate opener A Operation Instruction 1 Press and hold PROG button for 3 sec to enter into basic menu Indicator...

Страница 37: ...B Operation Graphic Illustration Auto close Function Setting L5 When the gate is completely open the control board will send the auto close signal to enable the gate to close automatically according t...

Страница 38: ...nd off B Operation Graphic Illustration L1 L2 L3 L4 L5 Cancel Auto close function L1 L2 L3 L4 L5 L1 L2 L3 L4 L5 L1 L2 L3 L4 L5 L1 L2 L3 L4 L5 L1 L2 L3 L4 L5 Indicator light status Off On Flicker Statu...

Страница 39: ...is different for users from different regions the control board for this product offers 3 different working modes for users to choose 1 Standard Mode L1 Terminals for external buttons OSC Single butto...

Страница 40: ...into advanced menu Indicator light L0 will flicker twice then L1 will be steady on 3 Press SET button once to enter into working mode setting Indicator lights L1 L3 will show the current selection Th...

Страница 41: ...ress SET button once to enter into acceleration setting Indicator lights L1 L5 will show the current acceleration value The default is L2 5 Press or button to set the acceleration value Indicator ligh...

Страница 42: ...the input signal of infrared sensor When the gate opener receives the opening closing signal it ll start to work after a certain time the settled delay time A Operation Instruction 1 Press and hold PR...

Страница 43: ...ion Instruction 1 Press and hold PROG button for 3 sec to enter into basic menu Indicator light L0 will flicker once then L1 will be steady on 2 Press PROG button again for 3 sec to enter into advance...

Страница 44: ...that reminding you to re set the running travel for the gate Before re setting it s extremely important to enter into manual control mode to confirm the polarities of the limit switch stops are corre...

Страница 45: ...n once to save and system will automatically exit The indicator lights L1 L5 will be on in sequence then all will flicker once and off B Operation Graphic Illustration Other Menu Setting 1 Press PROG...

Страница 46: ...e to the gate brings by impact force of emergency stop Users can set the distance to their required A Operation Instruction 1 Press and hold PROG button for 3 sec to enter into basic menu Indicator li...

Страница 47: ...utton once to save and system will automatically exit The indicator lights L1 L5 will be on in sequence then all will flicker once and off B Operation Graphic Illustration Buzzer Setting L2 This setti...

Страница 48: ...PROG button again for 3 sec to enter into advanced menu L0 will flicker twice then L1 will be steady on 3 Press PROG button for 3 sec for the third time to enter into other menu setting L0 will flicke...

Страница 49: ...hand A Operation Instruction 1 Press SET button once Indicator lights L1 L5 will indicate the current battery level Table 3 Battery Level 2 Press PROG button once to exit the battery level checking In...

Страница 50: ...s SET once L1 L5 off Battery Level 11 3V Battery Level 11 7V Battery Level 12 0V L1 L5 will indicate the current battery level Battery Level 12 3V Battery Level 12 6V Off Press PROG once Status Instru...

Страница 51: ...avel Table 4 Error Instruction Maintenance The gate should be checked every month to make sure it operates normally For the sake of safety each gate is suggested to be equipped with infrared protector...

Страница 52: ...terminal has a jumper wire if connect photocell please ensure the wiring is correct and the photocell type is N C 2 Ensure that the photocell mounting position can be mutually aligned 3 Remove the obs...

Страница 53: ...Instructions for SL500DCL SL800DCL www gatexpertstore com 48 Drawing and Measurements Figure 29...

Отзывы: