


CHAPTER 3: Setting Up and Getting Started
24
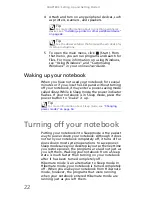
To restart your notebook:
•
Click
(Start),
click the arrow next to the lock
icon, then click Restart. The notebook turns off,
then turns on again.
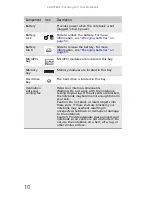
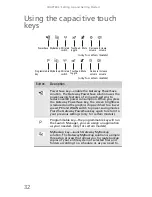
Using the status indicators
Status indicators inform you when a drive is being used
or when a button has been pressed that affects how
the keyboard is used. The status indicators are located
below the screen.
Important
If your notebook does not turn off immediately,
complete the following steps until the notebook turns off:
1. Press and hold the power button for about five seconds,
then release it.
2. Unplug the power cord and remove the battery for more
than 10 seconds.
Important
If none of the indicators are on, you may need to press F
N
+F1
to toggle the status indicators on.
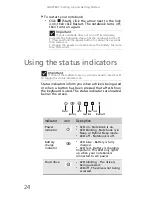
Indicator
Icon
Description
Power
indicator
❥
LED on - Notebook is on.
❥
LED blinking - Notebook is in
Sleep or Hybrid Sleep mode.
❥
LED off - Notebook is off.
Battery
charge
indicator
❥
LED blue - Battery is fully
charged.
❥
LED red - Battery is charging.
Important: This LED only lights
up when your notebook is
connected to AC power.
Hard drive
❥
LED blinking - The drive is
being accessed.
❥
LED off - The drive is not being
accessed.
Bluetooth
HDD
Caps lock
Num lock
Battery
Power
Содержание NV-40
Страница 1: ...NOTEBOOK REFERENCEGUIDE ...
Страница 2: ......
Страница 10: ...CHAPTER 1 About This Reference 4 ...
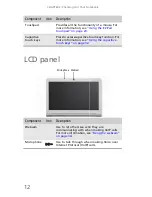
Страница 11: ...CHAPTER2 5 Checking Out Your Notebook Front Left Right Back Bottom Keyboard area LCD panel ...
Страница 68: ...CHAPTER 5 Managing Power 62 ...
Страница 89: ...CHAPTER8 83 Troubleshooting Safety guidelines First steps Troubleshooting Telephone support ...
Страница 118: ...CHAPTER 8 Troubleshooting 112 ...
Страница 130: ...APPENDIX A Legal Information 124 ...
Страница 140: ...134 Index ...
Страница 141: ......
Страница 142: ...MU WD100 001 MAN SJV40 REF GDE R0 ...
Страница 143: ...ORDINATEUR PORTABLE GUIDE DU MATÉRIEL NOTEBOOK REFERENCEGUIDE ...
Страница 144: ......
Страница 152: ...CHAPITRE 1 À propos de ce guide 4 ...
Страница 153: ...CHAPITRE2 5 Vérification de votre ordinateur portable Avant Gauche Droite Arrière Bas Zone du clavier Écran ACL ...
Страница 210: ...CHAPITRE 5 Gestion de l alimentation 62 ...
Страница 231: ...CHAPITRE8 83 Dépannage Directives de sécurité Premières étapes Dépannage Support par téléphone ...
Страница 262: ...CHAPITRE 8 Dépannage 114 ...
Страница 284: ...136 Index ...
Страница 285: ......
Страница 286: ...MU WC400 002 MAN SJM50 REF GDE R0 MU WC400 002 ...


