11
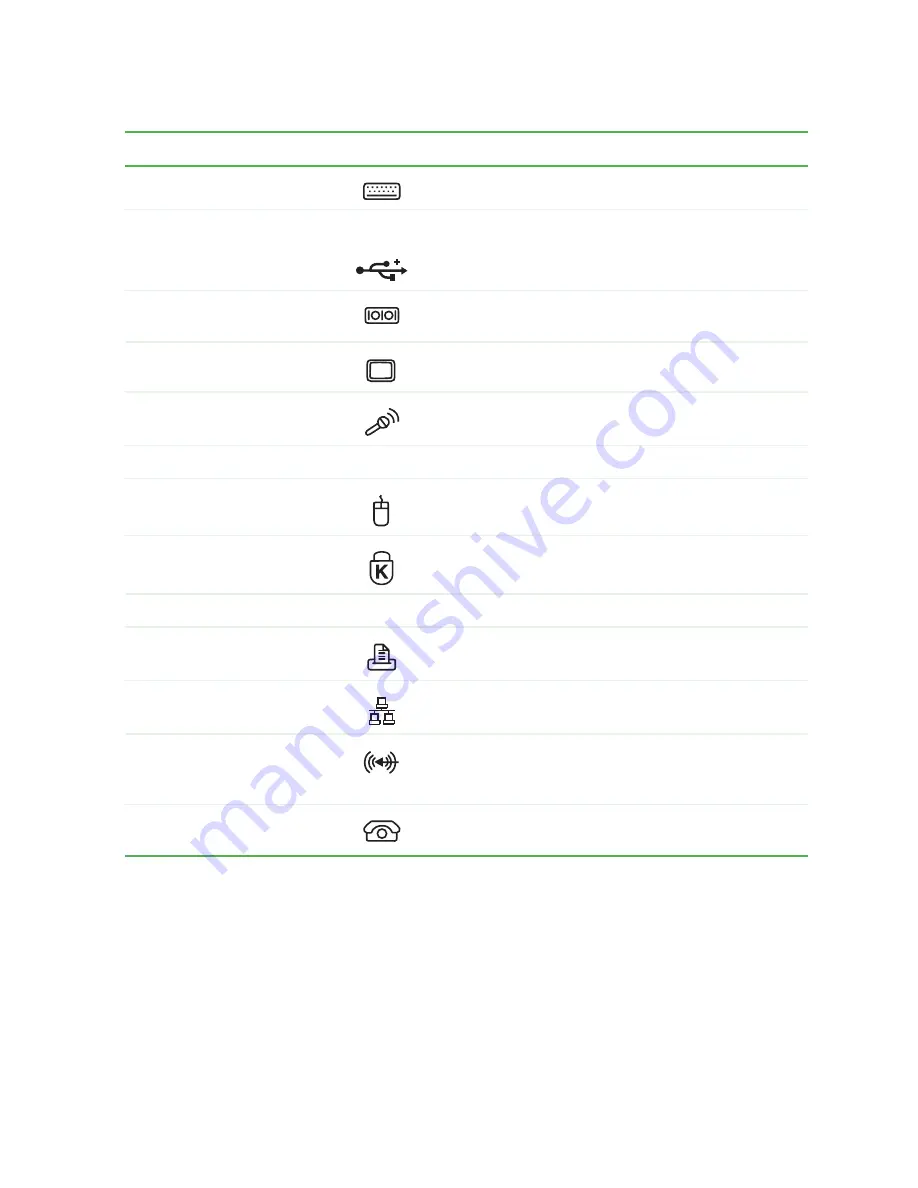
Gateway Micro Tower Back
www.gateway.com
Component
Icon
Description
PS/2 keyboard port
Plug a PS/2 keyboard into this port.
USB ports
USB v2.0
Plug USB (Universal Serial Bus) devices (such as a
mouse, keyboard, or printer) into these ports.
Serial port
Plug a serial device (such as a digital camera) into
this port.
Monitor port
Plug a monitor into this port.
Microphone jack
Plug a microphone into this jack. This jack is
color-coded red or pink.
Power connector
Plug the power cable into this connector.
PS/2 mouse port
Plug a PS/2 mouse into this port.
Kensington™ lock slot
Secure your computer to an object by connecting a
Kensington cable lock to this slot.
Case cover shipping screw
Remove this screw before opening the case.
Parallel port
Plug a parallel device (such as a printer) into this port.
Ethernet (Network) jack
Plug an Ethernet network cable or a device (such as
a DSL or cable modem) into this jack.
Audio input (Line in) jack
Plug an external audio input source (such as a
stereo) into this jack so you can record sound on your
computer. This jack is color-coded blue.
Telephone jack (optional)
If your modem has a telephone jack, plug the cable
for a telephone into this jack.
Содержание E-4100
Страница 1: ...Your Gateway Computer Customizing Troubleshooting E 4100 user s guide...
Страница 2: ......
Страница 26: ...20 Chapter 1 Checking Out Your Gateway E 4100 Computer www gateway com...
Страница 44: ...38 Chapter 3 Getting Help www gateway com...
Страница 63: ...57 Creating CDs and DVDs www gateway com The screen you use to add files opens...
Страница 92: ...86 Chapter 5 Maintaining Your Computer www gateway com...
Страница 102: ...96 Chapter 6 Restoring Software www gateway com...
Страница 108: ...102 Chapter 7 Upgrading Your Computer www gateway com 6 Push in on the cover release handle...
Страница 109: ...103 Gateway Mid Tower Case www gateway com 7 Pull the side panel away from the case...
Страница 116: ...110 Chapter 7 Upgrading Your Computer www gateway com 4 Slide the release lever toward the open side of the case...
Страница 124: ...118 Chapter 7 Upgrading Your Computer www gateway com 5 Flip the power supply retention clip out...
Страница 131: ...125 Gateway Micro Tower Case www gateway com 7 Pull up on the cover release handle 8 Lift the side panel up...
Страница 132: ...126 Chapter 7 Upgrading Your Computer www gateway com 9 Lift the side panel away from the case...
Страница 136: ...130 Chapter 7 Upgrading Your Computer www gateway com 6 Unlock the release lever...
Страница 190: ...184 Chapter 9 Troubleshooting www gateway com...
Страница 208: ...202 Appendix B Safety Regulatory and Legal Information www gateway com...
Страница 217: ......


