background image

If you need to remove the battery, wait until the screen turns off 

before removing the battery.

Turning the Device On and Off Using REC

You can use 

REC

 to turn the device on and off in recording 

mode. This feature allows you to start recording quickly, while 

automatically turning off the device to conserve battery power 

when you are not recording.

NOTE: 

The device does not turn off using 

REC

 unless you use 

REC

 to turn on the device.

1

With the device turned off, slide 

REC

 toward the lens.

The device turns on and starts recording video.

2

When you are finished recording, slide 

REC

 away from the 

lens.
The device stops recording and turns off.

Modes

You can operate your device in several modes.

VIEWFINDER

: Displays the camera viewfinder and status 

information.

PLAYBACK

: Allows you to view recorded videos and photos.

DASHBOARD

: Displays sensor data in charts and data fields 

(VIRB Elite only).

SETUP

: Allows you to change camera settings.

Changing Modes

1

Select 

MODE

 to cycle through the available modes.

The modes cycle from left to right. The icon for the selected 

mode appears larger, and the name of the selected mode 

appears at the bottom of the screen.

2

Stop selecting 

MODE

 when the desired mode appears.

Viewfinder

You can use the viewfinder to set up shots, view status 

information, and level the camera (VIRB Elite only).
Select 

MODE

 > 

VIEWFINDER

.

À

Battery status

Á

Recording time remaining on the memory card

Â

Current video mode
Select to view the level (

page 3

).

Select to view the status page (

page 3

).

Leveling the Device

NOTE: 

This feature is available for VIRB Elite only.

You can use the on-screen level when you mount the device to 

ensure your videos and photos are perfectly level.

1

Select 

MODE

 > 

VIEWFINDER

 >  .

The level appears.

2

Adjust the device until the degree of roll 

À

 and degree of 

pitch 

Á

 are both 00°, and the brown section of the level 

Â

 is 

even with the horizon line 

Ã

.

Calibrating the Level

You can calibrate the level if it does not seem accurate. It may 

be necessary to calibrate the level when using the device in 

extreme temperatures.

1

Select 

MODE

 > 

VIEWFINDER

 >  .

2

Place the device flat on a level surface, with the screen 

facing up.

3

Select 

OK

.

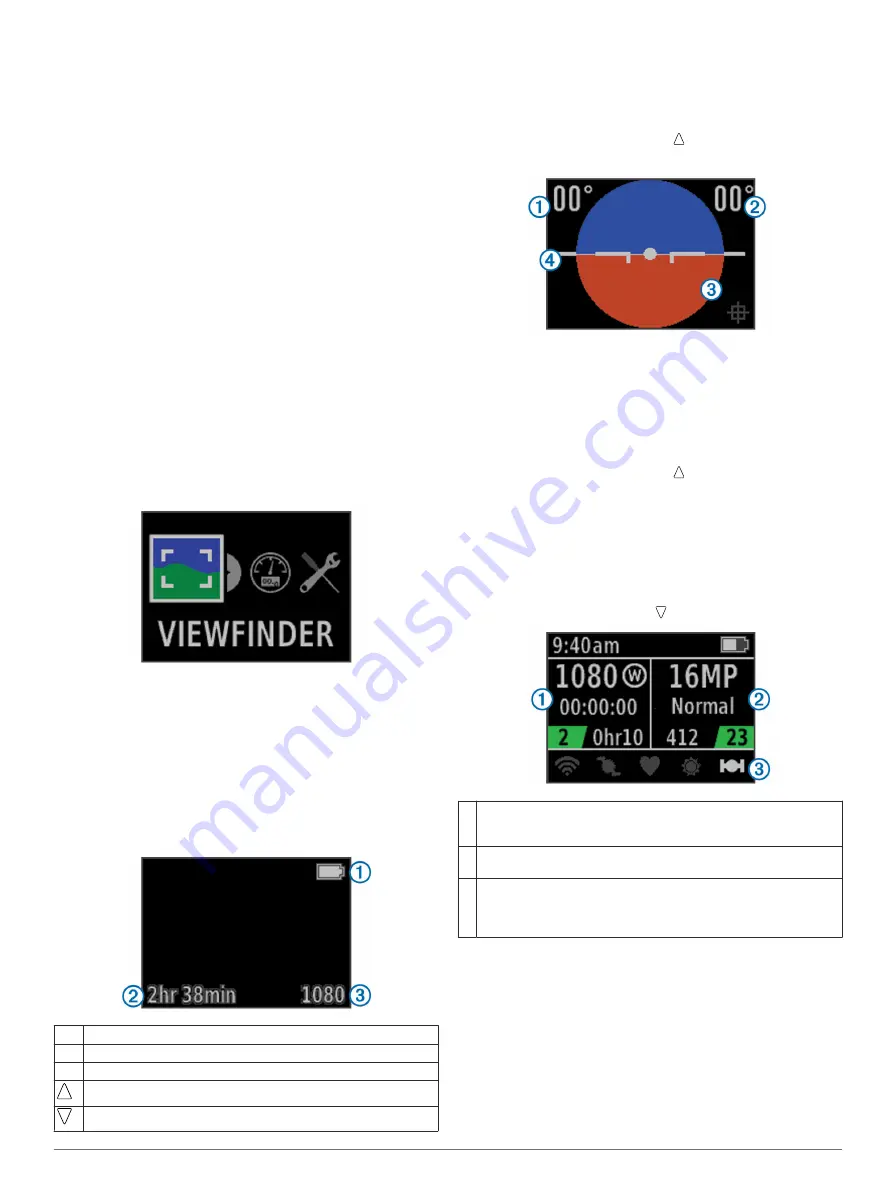
Status Page

The status page provides at-a-glance details about the current 

settings of your device.
Select 

MODE

 > 

VIEWFINDER

 >  .

À

Displays the video mode, field of view, elapsed time, interval or 
loop setting (if set), number of stored videos, and time remaining on 
the memory card.

Á

Displays the photo resolution, camera mode, timer count (if set), 
photos remaining, and number of stored photos.

Â

Displays the sensors being used (VIRB Elite only) including Wi-Fi®, 
cadence, heart rate, tempe™, and GPS. The sensor icons are gray 
when disabled, flashing when searching for a signal, and white 
when enabled or connected.

Video

Recording a Video

NOTE: 

If the battery power becomes very low while recording 

video, the device automatically stops recording, saves the 

video, and safely turns off.

1

Slide 

REC

 toward the lens to start recording video.

If the device is off, it turns on automatically. The device starts 

recording video, and the viewfinder appears.

Viewfinder

3

Содержание VIRB Elite

Страница 1: ...VIRB Series Owner s Manual September 2013 190 01627 00_0A Printed in Taiwan ...

Страница 2: ...n logo are trademarks of Garmin Ltd or its subsidiaries registered in the USA and other countries Garmin Connect VIRB ANT ANT fēnix tempe and BaseCamp are trademarks of Garmin Ltd or its subsidiaries These trademarks may not be used without the express permission of Garmin microSD and the microSDXC logo are trademarks of SD 3C LLC Mac is a trademark of Apple Inc Microsoft and Windows are registere...

Страница 3: ...I 6 Connecting Headphones 6 Outputting Composite Video 6 Deleting Photos and Videos 6 Tracks 6 Recorded Track Log Data 6 Dashboards 7 Viewing the Dashboards 7 Pairing Your ANT Sensors 7 Remote Control 8 Controlling the Device Remotely 8 Controlling Multiple VIRB Devices Remotely 8 Operating the Device Using Your Mobile Device 8 Troubleshooting 8 My device does not turn on 8 My device display is ha...

Страница 4: ......

Страница 5: ... NOTICE To prevent corrosion thoroughly dry the mini USB port the weather cap and the surrounding area before charging or connecting to a computer Do not attempt to use the device to charge a battery that was not provided by Garmin Attempting to charge a battery that was not provided by Garmin can damage the device and void the warranty NOTE The battery will not charge when outside the temperature...

Страница 6: ...s 2 Remove the film from the adhesive mounting base À and press the base firmly onto the mounting surface You can use either the flat base or the curved base depending on the contour of the mounting surface 3 Allow the base to bond to the mounting surface for at least 24 hours 4 Place the coupler Á into the base 5 Place the threaded ring  over the coupler and tighten it onto the base 6 Snap the m...

Страница 7: ...he level page 3 Select to view the status page page 3 Leveling the Device NOTE This feature is available for VIRB Elite only You can use the on screen level when you mount the device to ensure your videos and photos are perfectly level 1 Select MODE VIEWFINDER The level appears 2 Adjust the device until the degree of roll À and degree of pitch Á are both 00 and the brown section of the level  is ...

Страница 8: ...20 16 9 30 Normal Slow Mo HD 1280 720 16 9 60 1 2 speed Super Slow Mo 848 480 16 9 120 1 4 speed Time Lapse 1920 1080 16 9 30 Varies Field of View Settings You can change the field of view when Lens Correct is set to Off Field of view is only available for the 1080p video mode Select MODE SETUP VIDEO Field of View Wide Captures a wide view of your surroundings Use this mode for open areas close ra...

Страница 9: ...icrophone to the MIC IN connector on the accessory cable To stop using the external microphone you must disconnect the accessory cable from the device Photos Taking a Photo Your device provides several methods for taking a photo Select MODE VIEWFINDER aim the camera using the viewfinder and select From anywhere in the user interface hold While recording a video select to capture a photo at the sam...

Страница 10: ...ng composite video and stereo audio 1 Pull up the weather cap from the mini USB port 2 Connect mini USB plug on the audio video cable to the mini USB port on the device 3 On the device when prompted to output video select Yes The device enters playback mode You cannot exit playback mode until you disconnect the cable 4 Connect an RCA composite video cable to the composite video output connector of...

Страница 11: ...isplays the current heart rate À maximum and minimum heart rates Á heart rate graph  and time scale à When connected to a sensor tempe displays the current temperature À maximum and minimum temperatures Á temperature graph  and time scale à When connected to a sensor cadence displays the current cadence À maximum and minimum cadences Á cadence graph  and time scale à Viewing the Dashboards 1 Se...

Страница 12: ... Your Mobile Device NOTE This feature is available for VIRB Elite only You can remotely view and control photo and video recording using a compatible mobile device running the free Garmin VIRB app The app connects using a direct Wi Fi connection between your VIRB device and your compatible mobile device Go to www garmin com VIRB or the application store for your mobile device for compatibility inf...

Страница 13: ...NOTICE Avoid chemical cleaners solvents and insect repellents that can damage plastic components and finishes Do not store the device where prolonged exposure to extreme temperatures can occur because it can cause permanent damage The device is water resistant to IEC Standard 60529 IPX7 It can withstand immersion in 1 meter of water for 30 minutes Prolonged submersion can cause damage to the devic...

Страница 14: ...i IEEE 802 11 b g at 2 4 GHz Getting More Information You can find more information about this product on the Garmin website Go to www garmin com outdoor Go to www garmin com learningcenter Go to http buy garmin com or contact your Garmin dealer for information about optional accessories and replacement parts 10 Device Information ...

Страница 15: ...rt rate 6 K keys 2 L language 9 M memory card 1 microphone connecting 5 microSD card See memory card mounting the device 2 mounts optional 2 P pairing ANT sensors 7 photos settings 4 5 taking 5 viewing 5 power key 2 3 R remote control 8 S settings 9 software updating 9 version 9 specifications 9 speed 6 storing data 9 system settings 9 T temperature 6 9 time settings 9 zones and formats 9 tones 9 ...

Страница 16: ...99 0800 023 3937 035 539 3727 47 815 69 555 00800 4412 454 44 2380 662 915 35 1214 447 460 34 93 275 44 97 46 7744 52020 Garmin International Inc 1200 East 151st Street Olathe Kansas 66062 USA Garmin Europe Ltd Liberty House Hounsdown Business Park Southampton Hampshire SO40 9LR UK Garmin Corporation No 68 Zhangshu 2nd Road Xizhi Dist New Taipei City 221 Taiwan R O C 2013 Garmin Ltd or its subsidi...

Отзывы: