


If you need to remove the battery, wait until the screen turns off
before removing the battery.
Turning the Device On and Off Using REC
You can use
REC
to turn the device on and off in recording
mode. This feature allows you to start recording quickly, while
automatically turning off the device to conserve battery power
when you are not recording.
NOTE:
The device does not turn off using
REC
unless you use
REC
to turn on the device.
1
With the device turned off, slide
REC
toward the lens.
The device turns on and starts recording video.
2
When you are finished recording, slide
REC
away from the
lens.
The device stops recording and turns off.
Modes
You can operate your device in several modes.
VIEWFINDER
: Displays the camera viewfinder and status
information.
PLAYBACK
: Allows you to view recorded videos and photos.
DASHBOARD
: Displays sensor data in charts and data fields
(VIRB Elite only).
SETUP
: Allows you to change camera settings.
Changing Modes
1
Select
MODE
to cycle through the available modes.
The modes cycle from left to right. The icon for the selected
mode appears larger, and the name of the selected mode
appears at the bottom of the screen.
2
Stop selecting
MODE
when the desired mode appears.
Viewfinder
You can use the viewfinder to set up shots, view status
information, and level the camera (VIRB Elite only).
Select
MODE
>
VIEWFINDER
.
À
Battery status
Á
Recording time remaining on the memory card
Â
Current video mode
Select to view the level (
Select to view the status page (
Leveling the Device
NOTE:
This feature is available for VIRB Elite only.
You can use the on-screen level when you mount the device to
ensure your videos and photos are perfectly level.
1
Select
MODE
>
VIEWFINDER
> .
The level appears.
2
Adjust the device until the degree of roll
À
and degree of
pitch
Á
are both 00°, and the brown section of the level
Â
is
even with the horizon line
Ã
.
Calibrating the Level
You can calibrate the level if it does not seem accurate. It may
be necessary to calibrate the level when using the device in
extreme temperatures.
1
Select
MODE
>
VIEWFINDER
> .
2
Place the device flat on a level surface, with the screen
facing up.
3
Select
OK
.
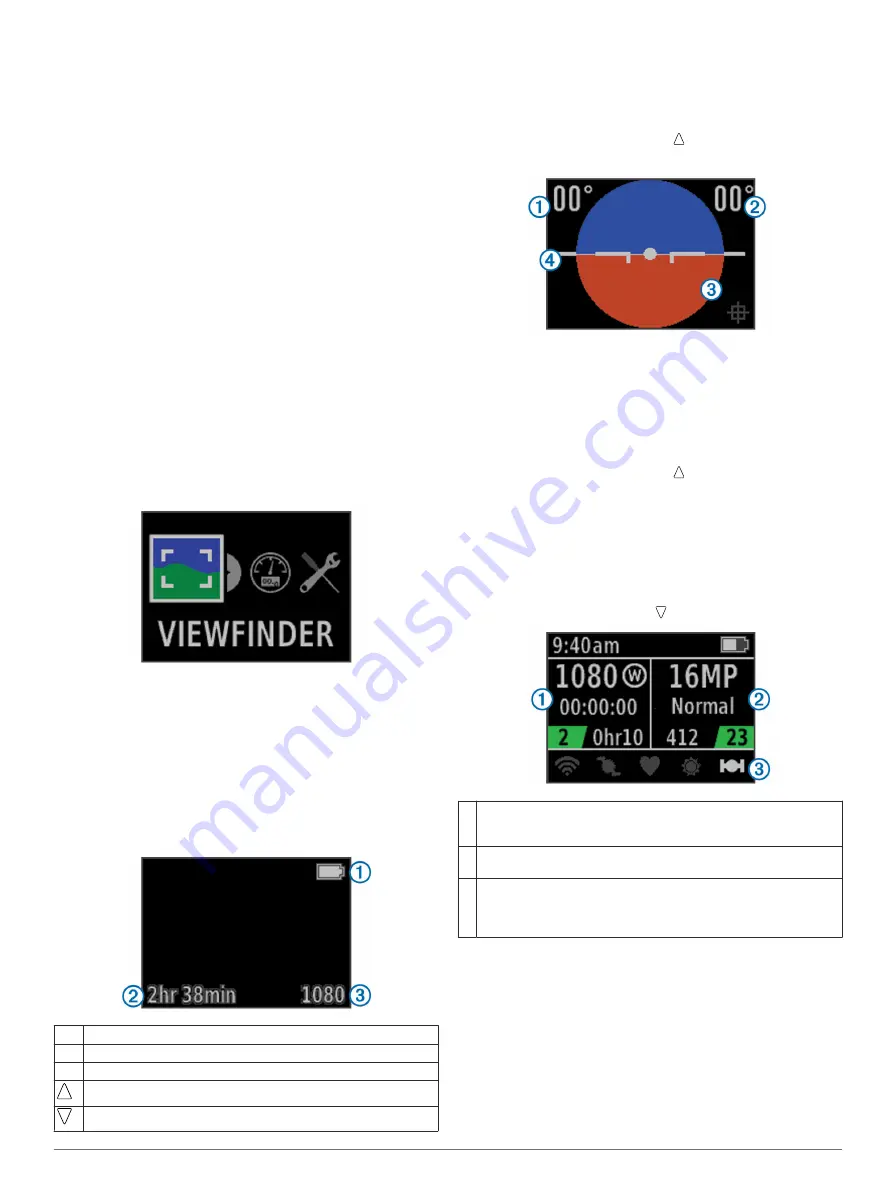
Status Page
The status page provides at-a-glance details about the current
settings of your device.
Select
MODE
>
VIEWFINDER
> .
À
Displays the video mode, field of view, elapsed time, interval or
loop setting (if set), number of stored videos, and time remaining on
the memory card.
Á
Displays the photo resolution, camera mode, timer count (if set),
photos remaining, and number of stored photos.
Â
Displays the sensors being used (VIRB Elite only) including Wi-Fi®,
cadence, heart rate, tempe™, and GPS. The sensor icons are gray
when disabled, flashing when searching for a signal, and white
when enabled or connected.
Video
Recording a Video
NOTE:
If the battery power becomes very low while recording
video, the device automatically stops recording, saves the
video, and safely turns off.
1
Slide
REC
toward the lens to start recording video.
If the device is off, it turns on automatically. The device starts
recording video, and the viewfinder appears.
Viewfinder
3
Содержание VIRB Elite
Страница 1: ...VIRB Series Owner s Manual September 2013 190 01627 00_0A Printed in Taiwan ...
Страница 4: ......


