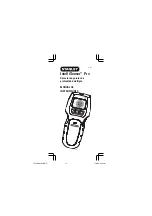
IntelliSensor
™
Pro
Multi-depth Stud Finder
INSTRUCTIONMANUAL
77-255
CALIBRA
TING
READY
38mm
109F Manual (B/E/F)
17/2/05, 3:38 PM
1
Страница 1: ...IntelliSensor Pro Multi depth Stud Finder INSTRUCTION MANUAL 77 255 CALIBRATING READY 38mm 109F Manual B E F 17 2 05 3 38 PM 1 ...
Страница 2: ...e stud s edge position A pencil line allows you to quickly note the location of the stud edges The IntelliSensorTM Pro allows the user to locate wood and metal studs up to 1 1 2 inch for metal and wood stud The IntelliSensorTM Pro provides automatic calibration auto shut off and heavy duty ABS construction Depth detection selected by side button for 1 2 inch 1 inch and 1 1 2 inch Important Readall...
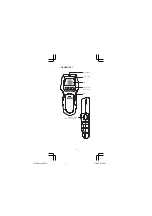
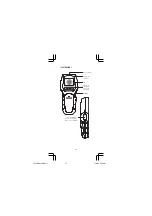
Страница 3: ...3 ILLUSTRATION 1 Indicator Mark Live Wire LED LCD Depth Detection Mode Indicator ON Button Depth Detection mode selection ON CALIBRATING READY 38mm 109F Manual B E F 17 2 05 3 38 PM 3 ...
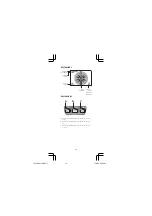
Страница 4: ...te Ready to scan Live Wire Indicator Graphic Low Battery Indicator A Wood or metal stud depth detection up to 1 2 B Wood or metal stud depth detection up to 1 C Wood or metal stud depth detection up to 1 1 2 CALIBRATING READY A B C 38mm 109F Manual B E F 17 2 05 3 38 PM 4 ...
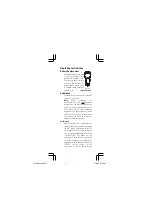
Страница 5: ...ent the unit from calibrating properly If this is done over wood or metal stud the unit will give no indication when moved away from the area Move to a different location and try again Calibrating Hold the IntelliSensorTM Pro flat against the surface making firm contact Press and hold the ON button All indicators on the LCD are displayed while the unit goes through its 1 to 3 second calibration cy...
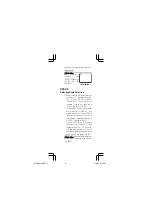
Страница 6: ...on the LCD 2 Double click Depress and hold ON button twice 2x to select to 1 read depth detection The 1 mode LED will illuminate illustration 3 The unit will then calibrate followed by a beep and a READY diplayed on the LCD 3 Triple click Depress ON button three times 3x to select 1 1 2 read depth detection The 1 1 2 mode LED will illuminate illustration 3 The unit will then calibrate followed by ...
Страница 7: ...sound a continuous beep 2 Use indicator graphic illustration 2 7 and indicator mark illustration 1 to locate and define stud edge 3 Continue sliding past the stud When the indicator turns off and the unit stops beeping the other edge has been detected 4 Double check stud location by coming back from the other direction Make additional markings 5 The midpoint of the marks indicates the stud center ...
Страница 8: ...o each side of the actual electrical wire To aid in locating the wire position scan holding the unit 1 2 inch away from the wall surface or place other hand on surface approximately 12 inches from sensor Warning shielded wires or live wires in metal conduits casings metalized walls or thick dense walls will not be detected Always turn AC power off when working near wiring TheIntelliSensor Proisdes...
Страница 9: ...rent width may be an additional stud joist or fire break When working near AC electrical wires always turn off the power Operating Tips IMPORTANT SAFETY NOTICE Insure proper detection of live wires ALWAYS hold the IntelliSensorTM Pro in the handleareaonly Graspbetweenfingersand thumb while maintaining contact with your palm Conventional Construction Doors and windows are commonly constructed with ...
Страница 10: ...tion technique described earlier WITH the piece of cardboard between the stud sensor and the surface Also it is particularly important in this application to remember to keep your free hand away from the unit Specifications Utilizing the procedure of scanning and marking from two sides IntelliSensorTM Pro will find the stud center typically within 1 8 accuracy for wood and 1 4 accuracy for metal W...
Страница 11: ...ent of the unit Any attempt to repair the product by other than factory authorized personnel will void this warranty Calibration batteries and maintenance are the responsibilityoftheuser Wherepermittedbylaw Stanley is not responsible for incidental or consequentialdamages AgentsofStanleycannot change this warranty Stanley is not responsible for damage resulting from wear abuse or alteration of thi...
Страница 12: ...ez vos yeux portez des lunettes de sécurité ADVERTENCIA Protéjase los ojos use gafas de seguridad One Year Warranty Garantie de un an Garantía de un año 2004 Stanley Tools Product Group of The Stanley Works New Britain CT 06053 T5363 109F Manual B E F 17 2 05 3 38 PM 12 ...
Страница 13: ...13 77 255 CALIBRATING READY 38mm IntelliSensor Pro Detector de parales de profundidad múltiple MANUAL DE INSTRUCCIONES 109F Manual B E F 17 2 05 3 38 PM 13 ...
Страница 14: ...ón del borde del paral Una línea trazada alápizlepermitemarcarrápidamentelaubicación de los bordes del paral El IntelliSensor Pro le permite al usuario ubicar parales de madera y de metal hasta de 1 1 2 pul para parales de metal o de madera El IntelliSensor Pro le proporciona calibración automática apagado automático y construcción extrafuerte de ABS La detección de profundidad se selecciona media...
Страница 15: ...dicadora LLED de cable energizado LCD Indicador de modalidad de detección de profundidad Botón de PRENDIDO Selección de modalidad de detección de profundidad PRENDIDO CALIBRATING READY 38mm 109F Manual B E F 17 2 05 3 38 PM 15 ...
Страница 16: ...o Gráfica del indicador Indicador de batería baja A Detección de profundidad de paral de madera o metal hasta 1 2 pul B Detección de profundidad de paral de madera o metal hasta 1 pul C Detección de profundidad de paral de madera o metal hasta 1 1 2 pul CALIBRATING READY A B C 38mm 109F Manual B E F 17 2 05 3 38 PM 16 ...
Страница 17: ...erá ser puesto directamente sobre el paral materiales densos tales como metal áreas mojadas o recién pintadas ya que esto evitará que la unidad sea calibrada apropiadamente Si esto es hecho sobre madera o metal la unidad no dará ninguna indicación cuando es retirada del área Muévala a una ubicación diferente y trate de nuevo Calibrando Sostenga el IntelliSensor Pro plano contra la superficie hacie...
Страница 18: ...ca en las pantallas LCD y se ilumine el LED USO Selección de la profundidad de detección 1 Oprima y sostenga el botón ON una vez 1 x para seleccionar lectura de detección de profundidad de 1 2 pul El LED de modalidad de 1 2 pul se iluminará ilustración 3 La unidad entonces se calibrará seguido de un biip y la palabra READY Listo aparecerá en la pantalla LCD 2 Oprima dos veces Oprima y sostenga el ...
Страница 19: ...d sobre la superficie en línea recta Entre más cerca del paral esté la unidad más barras aparecerán comoenlailustración6 Cuandoelborde del paral es detectado el indicador de madera y la barra del borde aparecerán tal como se muestra en la ilustración 7 y la unidad emitirá un biip continuo 2 Use la gráfica del indicador ilustración 2 7 y la marca del indicador ilustración 1 para ubicar y definir el...
Страница 20: ...dad estática que se pueden desarrollar sobre pirca drywall y otras superficies ampliarán el área de detección de voltaje muchas pulgadas hacia cada lado del cable eléctrico Para ayudar a localizar la posición del cable escaneé sujetandolaunidadretirada12 7mm _pul de la superficie de la pared o coloque la otra mano sobre la superficie a aproximadamente30cm 12pul delsensor Advertencia cablesblindado...
Страница 21: ...n detectados como cables energizados Siempre recuerde que los parales o vigas están normalmente espaciados a 40 ó 61 cm 16 ó 24 pulgadas entresíysonde3 8cm 1 1 2pul deancho Para evitar sorpresas esté consciente de que cualquier cosa que esté menos espaciada o que tenga un ancho diferente puede ser un paral viga o pared contra incendio adicionales Cuando esté trabajando cerca de cables eléctricos C...
Страница 22: ...papel de pared o tela a menos que contengan lámina o fibra de aluminio Yeso y Listón A menos que el yeso y el listón sean excepcionalmente gruesos o tengan malla de metal dentro la unidad no tendrá ningún problema para trabajar apropiadamente Cielos Rasos o Superficies con Textura Cuando esté tratando con una superficie áspera tal como un cielo raso atomizado use un pedazo de cartón al escanear la...
Страница 23: ... de operación 0 C a 49 C Temperatura 4 F a 150 F de almacenaje 20 C a 66 C Garantía La Stanley Works garantiza el IntelliSensor Pro contra defectos en material y mano de obra durante un año a partir de la fecha de la compra Los productos deficientes serán reparados o reemplazados a la discreción de Stanley si son enviados a The Stanley Works Customer Service Repair Department 480 Myrtle Street New...
Страница 24: ... calibración las baterías y el mantenimiento son la responsabilidad del usuario Donde sea permitido por la ley Stanley no es responsable por daños incidentales o consecuentes Los agentes de Stanley no pueden cambiar esta garantía Stanley no es responsable por daños como resultado de desgaste abuso o alteración de este producto El usuario está supuesto a seguir TODAS las instrucciones de operación ...
Страница 25: ...25 IntelliSensor Pro Detector de parales de profundidad múltiple MANUAL DE INSTRUCCIONES 77 255 CALIBRATING READY 38mm 109F Manual B E F 17 2 05 3 38 PM 25 ...
Страница 26: ...e au crayon à papier vous permet de rapidement noter l emplacement des bords du montant Le détecteur IntelliSensor Pro permet à l utilisateur de trouver les montants de bois et métalliques jusqu à une profondeur de 3 81 cm 1 1 2 po Le détecteur IntelliSensor Pro présente l étalonnage automatique l arrêt automatique et une construction très robuste de plastique ABS La profondeur de détection peut ê...
Страница 27: ...ère Voyant de câble sous tension Écran à cristaux liquides Indicateur du mode de profondeur de détection MARCHE CALIBRATING READY 38mm Bouton de MARCHE Sélection du mode de profondeur de détection 109F Manual B E F 17 2 05 3 38 PM 27 ...
Страница 28: ...r de niveau bas de pile A Profondeur de détection de montant de bois ou métallique jusqu à 12 7 mm 1 2 po B Profondeur de détection de montant de bois ou métallique jusqu à 25 4 mm 1 po C Profondeur de détection de montant de bois ou métallique jusqu à 38 1 mm 1 1 2 po CALIBRATING READY A B C 38mm 109F Manual B E F 17 2 05 3 38 PM 28 ...
Страница 29: ...emarque Pendant l étalonnage le détecteurInteIliSensor Pronedoitpasêtre placé directement sur un montant une matière dense comme du métal des surfaces mouillées ou récemment peintes car cela empêchera l unité d être correctement étalonnée Si cela est réalisé surunmontantdeboisoumétallique l unité ne donnera aucune indication quand elle sera éloignée de la zone Déplacez la et essayez de nouveau Éta...
Страница 30: ...avoir finie son étalonnage affichée le mot READY sursonécran et allumée son voyant EMPLOI Choisir la profondeur de détection 1 Appuyez une fois sur et tenez enfoncé le bouton de marche ON pour choisir la profondeur de détection de 12 7 mm 1 2 po Le voyant du mode de 12 7 mm 1 2 po sera allumé illustration 3 L unité alors s étalonnera puis émettra un bip et finalement affichera READY prête sur l éc...
Страница 31: ...té sur la surface en suivant une ligne droite Le plus près du montant se trouvera l unité le plus de barres seront allumées comme montré dans l illustration 6 Quand le bord du montant sera détecté l indicateur de bois et la barre de bord seront allumés comme montrés dans l illustration 7 et l unité émettra un bip continu 2 Servez vous du graphique indicateur illustrations 2 et 7 et de la marque de...
Страница 32: ...s charges d électricité statique qui peuventsedéveloppersurlesmursdeplâtre et autres surfaces élargiront la zone de détection de tension de plusieurs centimètres de chaque côté du fil sous tension Pour aider à situer la position du fil balayez en tenant l unité à 12 7 mm 1 2 po de la surface du mur ou placez l autre main sur la surface à environ 30 48 cm 12 po du détecteur Avertissement Les fils b...
Страница 33: ...dés nonutilisésousans tension ne seront pas détectés en tant que câbles sous tension Souvenez vous toujours que les montants ou solives sont normalement séparés de 40 64 ou 60 96 cm 16 ou 24 po et sont d une largeur de 3 81 cm 1 1 2 po Pour éviter les surprises sachez que tout ce qui se trouve plus rapproché ou d une largeur différente peut être un montant supplémentaire une autre solive ou un par...
Страница 34: ...sur les surfaces couvertes de papier peint ou de tissu à moins qu ils ne contiennent du papier ou des fibres métalliques Plâtre et latte À moins que le plâtre ou les lattes ne soient exceptionnellement épais ou contiennent de la maille métallique il n y aura aucun problème avec une unité fonctionnant correctement Plafond et surfaces à texture Quand vous avez à faire à des surfaces irrégulières com...
Страница 35: ...ésistance aux chutes jusqu à 1 83 m 6 pi Température de 0 à 49 C fonctionnement 32 à 120 F Température 20 à 66 C d entreposage 4 à 150 F Garantie Stanley Works garantit le détecteur IntelliSensor Pro contre les défauts de matériaux et de main d œuvre pendant un an à partir de la date d achat Les produits défectueux seront réparés ou remplacés selon le choix de Stanley s ils sont envoyés à The Stan...
Страница 36: ...ersonnel d usine agréé annulera cette garantie L étalonnage les piles et l entretien sont à la charge de l utilisateur Où permis par la loi Stanley ne pourra pas être tenu responsable des dégâts accidentels ou conséquents Les agents de Stanley ne peuvent pas changer cette garantie Stanley ne pourra pas être tenu responsable des dégâts dus à l usure l abus ou aux modifications de ce produit L utili...