


4
E
N
in the forward position, the pedal pod
should be pointing downward.
7
Firmly plug the cable into the spindle.
8
Insert the screw
➎
into the pedal
pod, and use the 2.5 mm hex key to
tighten the screw.
9
Rotate the crank arm to check for
clearance.
The pedal pod should not interfere
with any part of the bike.
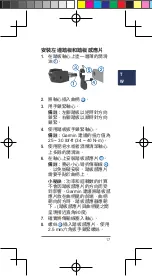
Installing the Right Pedal
1
Apply a thin layer of grease on the
pedal spindle threads.
2
Insert the spindle into the crank arm.
3
Hand tighten the spindle.
4
Use the pedal wrench to tighten the
spindle.
NOTE:
Garmin recommends torque
of 25 to 30 lbf-ft. (34 to 40 N-m).
Installing the Shoe Cleats
NOTE:
The left and right cleats are the
same.
1
Apply a thin layer of grease on the
cleat bolt threads.
2
Align the cleat
➊
, washers
➋
, and
bolts
➌
.
Содержание Vector 2S
Страница 1: ...VectorTM 2S Quick Start Manual 2 中文操作手冊 16 中文操作手册 28 คู มือ Quick Start 45 퀵스타트 매뉴얼 59 ...
Страница 22: ...22 T W 2 查閱或下載完整的網頁版操作 手冊 Vector2 存放說明 如果您要運送自行車 或長時間 不使用 Vector Garmin 建議將 Vector 拆下並放置在產品包裝盒 內 ...
Страница 27: ...27 T W 限保固所提供之權益 為產品相關適用法律所 提供之其他權利及補償的額外增補 ...
Страница 40: ...40 ...
Страница 44: ...44 维修中心 签名和盖章 故障处理 故障描述 送修地点 送修单号 送修日期 ...
Страница 66: ...K R 66 2 완전한 사용자 설명서를 원하는 형식으로 다운 받습니다 벡터 보관 만약 오랜 시간동안 자전거에서 벡터를 사용하지 않는 경우 벡터를 제거한 후 제품 상자에 보관 하는 것을 권장합니다 ...


