


GPS 500 Pilot’s Guide and Reference
4-6
SECTION 4
FLIGHT PLANS
Flight Plan Catalog Options
The following options (some covered on the preceding
pages) are available for the
Flight Plan Catalog Page:
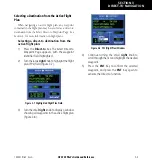
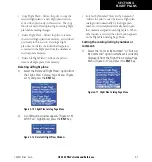
• ‘Activate Flight Plan?’ - Allows the pilot to
select the flight plan for navigation guidance, as
described previously in this section.
• ‘Invert & Activate FPL?’ - Allows the pilot to
reverse the highlighted flight plan and select it for
navigation guidance, as described previously in
this section.
• ‘Create New Flight Plan?’ - Allows the pilot to
create a new flight plan, as described previously in
this section.
• ‘Crossfill?’ - Allows the pilot to transfer a Direct-to
destination, the active flight plan, any stored flight
plan or user waypoints to a second 400-Series or
500-Series Garmin unit. Some crossfill operations
can be done automatically. If both units are set
to ‘auto’, a change in the direct-to destination or
active flight plan on one unit is seen on the other.
For additional information, see Section 8.2, Flight
Planning Page: Crossfill.
Crossfilling flight plans between two 400-
or 500-Series Garmin units:
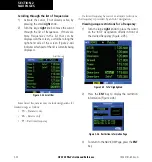
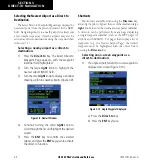
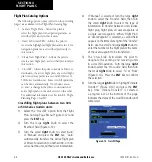
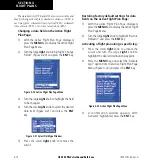
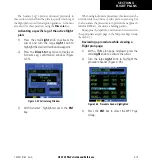
1) Select the ‘Crossfill?’ option from the Flight
Plan Catalog Page Menu (Figure 4-12) and
press the
ENT
Key.
2) Turn the large
right
knob to select the
‘Method’ field (Figure 4-13).
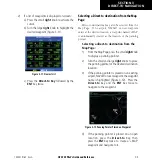
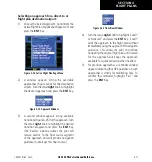
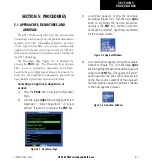
3) Turn the small
right
knob to select ‘Auto’
or ‘Manual’ and press the
ENT
Key. ‘Auto’
automatically transfers the active flight plan
or Direct-to selection to another 400- or 500-
series Garmin unit, without user intervention.
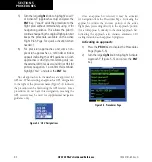
4) If ‘Manual’ is selected: Turn the large
right
knob to select the ‘Transfer’ field, then turn
the small
right
knob to select the type of
information to transfer between units (active
flight plan, flight plan, all user waypoints or
a single user waypoint). When ‘Flight Plan’
or ‘User Waypoint’ is selected, a second field
appears to the immediate right of the ‘Transfer’
field. Use the small and large
right
knobs to
enter the number of the flight plan or the name
of the user waypoint to be transferred.
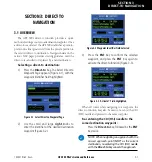
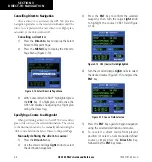
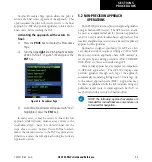
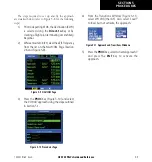
5) The ‘Cross-Side’ field allows the pilot to
designate the sending and receiving units
in a crossfill operation. Turn the large
right
knob to select the ‘Cross-side’ field, then turn
the small
right
knob to select ‘To’ or ‘From’
(Figure 4-14). Press the
ENT
Key to confirm
the selection.
6) Turn the large
right
knob to highlight ‘Initiate
Transfer?’ (Figure 4-14) and press the
ENT
Key. Once ‘Initiate Transfer?’ is selected,
a progress bar at the bottom of the page
indicates the status of the crossfill transfer until
completed.
Figure 4-14 Crossfill Page
190-00181-60 Rev. G
Содержание GPS 500
Страница 1: ...GPS 500 Pilot s Guide and Reference ...
Страница 2: ......
Страница 72: ...GPS 500 Pilot s Guide and Reference 4 16 SECTION 4 FLIGHT PLANS Blank Page 190 00181 60 Rev G ...
Страница 98: ...GPS 500 Pilot s Guide and Reference SECTION 5 PROCEDURES 5 26 Blank Page 190 00181 60 Rev G ...
Страница 134: ...GPS 500 Pilot s Guide and Reference 7 12 SECTION 7 NRST PAGES Blank Page 190 00181 60 Rev G ...
Страница 240: ...GPS 500 Pilot s Guide and Reference SECTION 14 MESSAGES ABBREVIATIONS NAV TERMS 14 12 Blank Page 190 00181 60 Rev G ...
Страница 244: ...GPS 500 Pilot s Guide and Reference APPENDIX B SPECIFICATIONS B 2 Blank Page 190 00181 60 Rev G ...
Страница 255: ......


