


Av. Kit Install. Manual
190-00067-62 Rev. E
Page 20
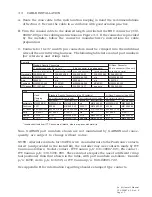
The first line of power information shows the source of external power as shown below:
External Power voltage
Battery Power
Wall Adapter
The presence of a Wall Adapter will overide the other two sources. Battery Power
will not be shown unless on the Configuration Page the Remote Battery is selected
as Installed. The higher voltage of External Power or Battery Power will determine
which is shown.
The next line shows the status of the Remote Battery as shown below:
Rmt Pak none (If on the Configuration page Remote Battery is selected as none)
Rmt Pak voltage mode auto status mode represents the mode of the charger
enable to the remote battery pack and is selectable. On enables the charger. Off
disables the charger. Auto enables the charger if the External Power is the current
source and its voltage is high enough. When in Auto mode auto status will be either
on or off reflecting whether the charger is enabled or disabled.
The next line reports the status of the internal memory battery as shown below:
Mem Batt ok/low.
Note that the TX field will light on the display but the transmitter will not
actually transmit when the UNIT is powered from the wall charger.
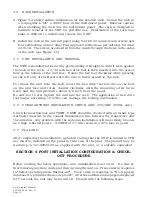
4.3.2 CDI AND FLAG TEST
Select the the CDI Test Page. Using the controls on the UNIT front panel, make
the selections indicated below and verify the interfaces as appropriate:
CDI
Full scale left
Ensure the CDI is deflected full scale left (5 dots)
Full scale right
Ensure the CDI is deflected full scale right (5 dots)
Centered
Ensure the CDI is centered
TO/FROM/FLAG
TO
Ensure TO flag is visible
FROM
Ensure FROM flag is visible
FLAG
Ensure TO and FROM are NOT visible
CDI FLAG
IN VIEW
Ensure CDI flag is in view
OUT OF VIEW
Ensure CDI flag is out of view
Содержание GNC 250
Страница 24: ...Av Kit Install Manual 190 00067 62 Rev E Page 24 FIGURE 1 1 PINOUT DEFINITION 37 PIN DSUB ...
Страница 26: ...Av Kit Install Manual 190 00067 62 Rev E Page 26 FIGURE 1 3A INTERCONNECT SCHEMATIC ...
Страница 27: ...Av Kit Install Manual 190 00067 62 Rev E Page 27 FIGURE 1 3B INTERCONNECT SCHEMATIC ...
Страница 28: ...Av Kit Install Manual 190 00067 62 Rev E Page 28 FIGURE 1 4 INTERCONNECT SCHEMATIC NOTES ...
Страница 30: ...Av Kit Install Manual 190 00067 62 Rev E Page 30 FIG 3 1 STUD MOUNT GA 56 ANTENNA INSTALLATION ...
Страница 31: ...Av Kit Install Manual 190 00067 62 Rev E Page 31 FIGURE 3 2 FLANGE MOUNT GA 56 ANTENNA INSTALLATION ...
Страница 32: ...Av Kit Install Manual 190 00067 62 Rev E Page 32 FIGURE 3 3 COAX CABLE INSTALLATION ...
Страница 34: ...Av Kit Install Manual 190 00067 62 Rev E Page 34 FIGURE 3 5 AVIATION RACK INSTALLATION ...
Страница 42: ...Av Kit Install Manual 190 00067 62 Rev E Page 42 ...
Страница 43: ...Av Kit Install Manual 190 00067 62 Rev E Page 43 ...
Страница 44: ...Av Kit Install Manual 190 00067 62 Rev E Page 44 ...


