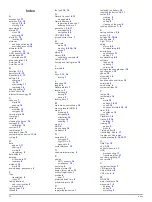
background image

Males

Percentile

20–29

30–39

40–49

50–59

60–69

70–79

Superior

95

55.4

54

52.5

48.9

45.7

42.1

Excellent

80

51.1

48.3

46.4

43.4

39.5

36.7

Good

60

45.4

44

42.4

39.2

35.5

32.3

Fair

40

41.7

40.5

38.5

35.6

32.3

29.4

Poor

0–40

<41.7

<40.5

<38.5

<35.6

<32.3

<29.4

Females

Percentile

20–29

30–39

40–49

50–59

60–69

70–79

Superior

95

49.6

47.4

45.3

41.1

37.8

36.7

Excellent

80

43.9

42.4

39.7

36.7

33

30.9

Good

60

39.5

37.8

36.3

33

30

28.1

Fair

40

36.1

34.4

33

30.1

27.5

25.9

Poor

0–40

<36.1

<34.4

<33

<30.1

<27.5

<25.9

Data reprinted with permission from The Cooper Institute. For more information, go to 

www.CooperInstitute.org

.

Recovery Advisor

You can use your Garmin device paired with the heart rate 

monitor to display how much time remains before you are fully 

recovered and ready for the next hard workout. The recovery 

advisor feature includes recovery time and recovery check. 

Recovery advisor technology is provided and supported by 

Firstbeat Technologies Ltd.

Recovery check

: The recovery check provides a real-time 

indication of your state of recovery within the first several 

minutes of a run.

Recovery time

: The recovery time appears immediately 

following a run. The time counts down until it is optimal for 

you to attempt another hard workout.

Turning On the Recovery Advisor

Before you can use the recovery advisor feature, you must put 

on the heart rate monitor and pair it with your device (

Pairing 

ANT+ Sensors

). If your fēnix 2 was packaged with a heart rate 

monitor, the devices are already paired. For the most accurate 

estimate, you should complete the user profile setup (

Setting Up 

Your User Profile

), and set your maximum heart rate (

Setting 

Your Heart Rate Zones

).

1

Hold 

MENU

.

2

Select 

Recovery Advisor

 > 

Enable

.

3

Go for a run.
Within the first several minutes of your run, a recovery check 

appears, showing your real-time state of recovery.

4

After your run, select 

Save

.

The recovery time appears. The maximum time is 4 days, 

and the minimum time is 6 hours.

Viewing Your Recovery Time

Before you can view your recovery time, you must enable the 

recovery advisor.

1

Hold 

MENU

.

2

Select 

Recovery Advisor

.

The recovery time appears. The maximum time is 4 days, 

and the minimum time is 6 hours.

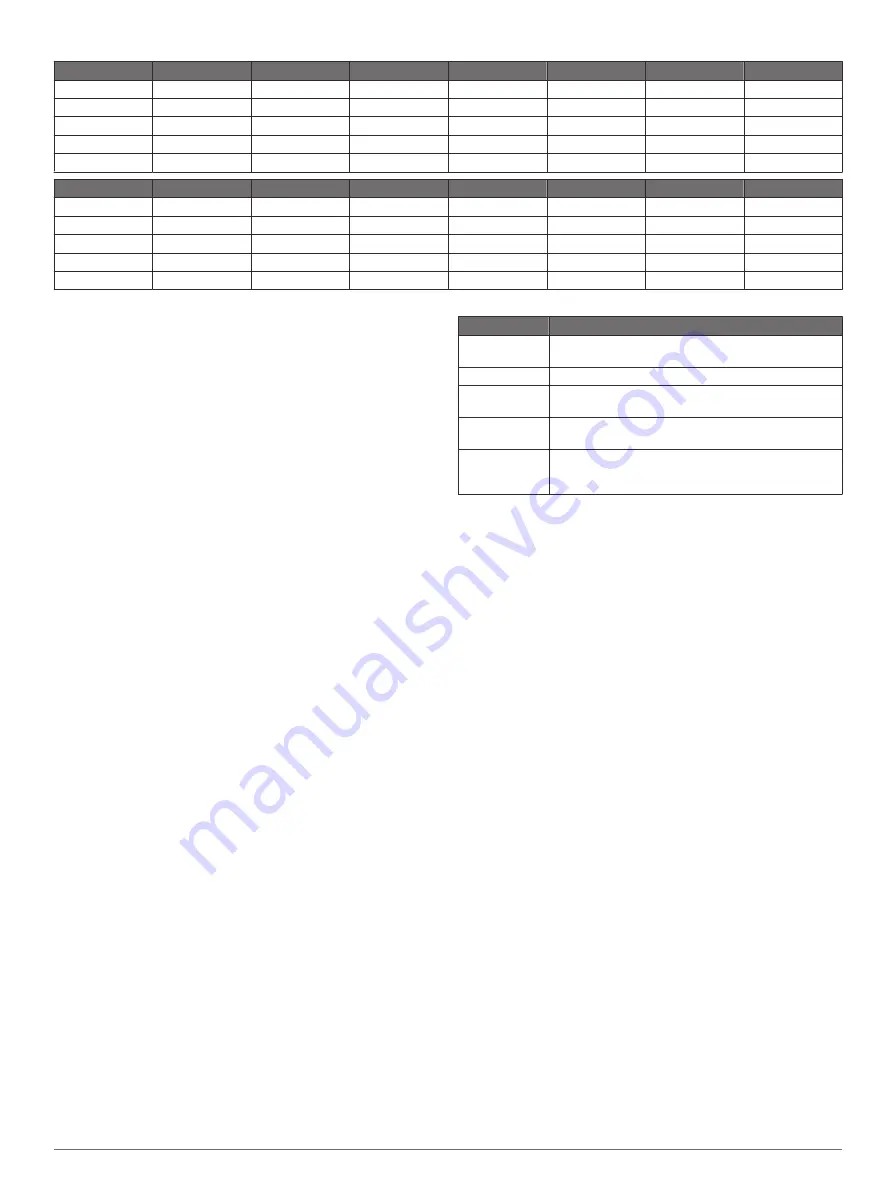
About Training Effect

Training Effect measures the impact of an activity on your 

aerobic fitness. Training Effect accumulates during the activity. 

As the activity progresses, the training effect value increases, 

telling you how the activity has improved your fitness. Training 

Effect is determined by your user profile information, heart rate, 

duration, and intensity of your activity.
It is important to know that your Training Effect numbers (1.0–

5.0) may seem abnormally high during your first few runs. It 

takes several activities for the device to learn your aerobic 

fitness.

Training Effect Description

1.0–1.9

Helps recovery (short activities). Improves endurance 
with longer activities (more than 40 minutes).

2.0–2.9

Maintains your aerobic fitness.

3.0–3.9

Improves your aerobic fitness if repeated as part of 
your weekly training program.

4.0–4.9

Highly improves your aerobic fitness if repeated 1–2 
times per week with adequate recovery time.

5.0

Causes temporary overload with high improvement. 
Train up to this number with extreme care. Requires 
additional recovery days.

Training Effect technology is provided and supported by 

Firstbeat Technologies Ltd. For more information, go to 

www.firstbeattechnologies.com

.

Viewing Your Predicted Race Times

Before you can view your projected race times, you must put on 

the heart rate monitor and pair it with your device (

Pairing ANT+ 

Sensors

). If your fēnix 2 was packaged with a heart rate 

monitor, the devices are already paired. For the most accurate 

estimate, you should complete the user profile setup (

Setting Up 

Your User Profile

), and set your maximum heart rate (

Setting 

Your Heart Rate Zones

)

Your device uses the VO2 max. estimate (

About VO2 Max. 

Estimates

) and published data sources to provide a target race 

time based on your current state of fitness. This projection also 

presumes you have completed the proper training for the race.

NOTE: 

The projections may seem inaccurate at first. The 

device requires a few runs to learn about your running 

performance.

1

Put on your heart rate monitor, and go for a run.

2

Hold 

MENU

.

3

Select 

VO2 Max

.

4

Select 

DOWN

 to view the race predictor screen.

Your projected race times appear for 5K, 10K, half marathon, 

and marathon distances.

Using Virtual Partner®

Your Virtual Partner is a training tool designed to help you meet 

your goals.

1

Hold 

MENU

.

2

Select 

Settings

 > 

Activity

.

3

Select an activity.
Virtual Partner is not available for all activities.

4

Select 

Virtual Partner

.

5

Select 

Set Pace

 or 

Set Speed

.

6

Begin your activity.

Training

9

Содержание fenix 2

Страница 1: ...fēnix 2 Owner s Manual March 2014 190 01730 00_0A Printed in Taiwan ...

Страница 2: ...ēnix Garmin Connect Garmin Express HRM Run tempe Vector and VIRB are trademarks of Garmin Ltd or its subsidiaries These trademarks may not be used without the express permission of Garmin The Cooper Institute as well as any related trademarks are the property of The Cooper Institute Firstbeat and Anayzed by Firstbeat are registered or unregistered trademarks of Firstbeat Technologies Ltd The Bluet...

Страница 3: ... Pool Swim 5 Going for an Open Water Swim 5 Swim Terminology 6 Multisport 6 Starting a Multisport Activity 6 Editing a Multisport Activity 6 Workouts 6 Following a Workout From the Web 6 Starting a Workout 6 Indoor Activities 6 Starting an Indoor Activity 6 Using History 6 Training 6 Garmin Connect 6 Setting Up Your User Profile 7 Fitness Goals 7 About Heart Rate Zones 7 About Lifetime Athletes 7 ...

Страница 4: ...ce Information 16 Device Care 16 Cleaning the Device 16 Specifications 16 Battery Information 16 Caring for the Heart Rate Monitor 16 HRM Run Specifications 16 User Replaceable Batteries 16 Replacing the Heart Rate Monitor Battery 16 Data Management 17 File Types 17 Disconnecting the USB Cable 17 Deleting Files 17 Troubleshooting 17 Resetting Your Device 17 Maximizing the Battery Life 17 Getting M...

Страница 5: ...y presses 1 Select the data page you want to view while the keys are locked 2 Hold LIGHT for two seconds and select Lock to lock the keys 3 Hold LIGHT for two seconds to unlock the keys Viewing the Data Pages Customizable data pages allow you to quickly access real time data from internal and connected sensors When you start an activity additional data pages appear From the time of day page or any...

Страница 6: ...ts 3 Select a waypoint 4 Select Average Loc 5 Move to the waypoint location 6 Select Start 7 Follow the on screen instructions 8 When the confidence reaches 100 select Save For best results collect four to eight samples for the waypoint waiting at least 90 minutes between samples Projecting a Waypoint You can create a new location by projecting the distance and bearing from your current location t...

Страница 7: ...amily friends and the Garmin community Group related items together as an adventure For example you can create an adventure for your latest hiking trip The adventure could contain the track log of the trip photos of the trip and geocaches you hunted You can use BaseCamp to create and manage your adventures For more information go to http adventures garmin com Navigation You can navigate to a route...

Страница 8: ...our computer using a USB cable 2 Go to www garmin com geocaching 3 If necessary create an account 4 Sign in 5 Follow the on screen instructions to find and download geocaches to your device Navigating to a Geocache Before you can navigate to a geocache you must download a geocache to your device Go to www garmin com geocaching for more information Navigating to a geocache is like navigating to any...

Страница 9: ...mer screen appears 5 Select START to start the timer 6 Go for a run 7 Select LAP to record laps optional 8 Select UP and DOWN to view additional data pages optional 9 After you complete your run select STOP Save to save the run A summary appears Biking Going for a Ride Before you go for a ride you should charge the device completely Charging the Device Before you can use an ANT sensor for your rid...

Страница 10: ...Connect and transfer them to your device You can schedule workouts using Garmin Connect You can plan workouts in advance and store them on your device Following a Workout From the Web Before you can download a workout from Garmin Connect you must have a Garmin Connect account Garmin Connect 1 Connect the device to your computer 2 Go to www garminconnect com workouts 3 Create and save a new workout...

Страница 11: ...maximum and minimum heart rate for zone 5 4 Enter your minimum heart rate for zones 4 through 1 The maximum heart rate for each zone is based on the minimum heart rate of the previous zone For example if you enter 167 as a minimum heart rate for zone 5 the device uses 166 as the maximum rate for zone 4 Heart Rate Zone Calculations Zone of Maximum Heart Rate Perceived Exertion Benefits 1 50 60 Rela...

Страница 12: ...ynamics data does not appear you can try these tips Make sure you have the HRM Run accessory The HRM Run accessory has on the front of the module Pair the HRM Run accessory with your fēnix 2 again according to the instructions If the running dynamics data display zeros make sure the HRM Run module is worn right side up NOTE Ground contact time appears only while running It cannot be calculated whi...

Страница 13: ...ctivity on your aerobic fitness Training Effect accumulates during the activity As the activity progresses the training effect value increases telling you how the activity has improved your fitness Training Effect is determined by your user profile information heart rate duration and intensity of your activity It is important to know that your Training Effect numbers 1 0 5 0 may seem abnormally hi...

Страница 14: ... remote function allows you to control your VIRB action camera from a distance Go to www garmin com VIRB to purchase a VIRB action camera Controlling a VIRB Action Camera Before you can use the VIRB remote function you must enable the remote setting on your VIRB camera See the VIRB Series Owner s Manual for more information 1 Turn on your VIRB camera 2 On your fēnix 2 device hold MENU 3 Select VIR...

Страница 15: ...nt minimum and maximum heart rate and a chart of your heart rate history Heart rate monitor required All Cadence Displays your current minimum and maximum cadence and a chart of your cadence history Foot pod bike cadence sensor power sensor Vector HRM Run optional Running biking custom Power Displays your current minimum and maximum generated power and a chart of your power history Power sensor Ve...

Страница 16: ... Marking Laps by Distance You can use Auto Lap to mark a lap at a specific distance automatically This feature is helpful for comparing your performance over different parts of an activity for example every 1 mile or 5 kilometers 1 Hold MENU 2 Select Settings Activity 3 Select an activity NOTE This feature is not available for all activities 4 Select Auto Lap 5 Select a distance Each time you comp...

Страница 17: ...e app Cloud backup in BaseCamp Mobile Allows you to back up saved activities to your Garmin Cloud account using BaseCamp Mobile Adventure downloads Allows you to browse adventures in the BaseCamp Mobile app and send them to your device Pairing Your Smartphone with Your fēnix 2 Device NOTE The device cannot connect to ANT sensors while Bluetooth wireless technology is turned on 1 Bring your smartph...

Страница 18: ...item in the list Select Remove to delete an item from the list Select Insert to add an item to the list Resetting the Device to Factory Settings You can restore all of the device settings to the factory default values 1 Hold MENU 2 Select Settings System Reset All Settings ANT Sensors The device is compatible with these optional wireless ANT accessories Heart rate monitor such as HRM Run Putting O...

Страница 19: ...oot pod powers off to conserve the battery When the battery is low a message appears on your device Approximately five hours of battery life remain Setting the Foot Pod Mode You can set your device to use foot pod data instead of GPS data to calculate pace and distance 1 Hold MENU 2 Select Settings Sensors Foot Pod 3 Select an option Select Indoor when you are training indoors without GPS Select A...

Страница 20: ...minute polling interval Up to 5 weeks Watch mode Caring for the Heart Rate Monitor NOTICE You must unsnap and remove the module before cleaning the strap A build up of sweat and salt on the strap can decrease the ability of the heart rate monitor to report accurate data Go to www garmin com HRMcare for detailed washing instructions Rinse the strap after every use Machine wash the strap after every...

Страница 21: ...For example your GPS location is accurate to within 3 65 m 12 ft A HR MAX The average percentage of maximum heart rate for the current activity AMB PRESS The uncalibrated ambient pressure ASCENT The total elevation distance ascended since the last reset AVG ASCENT The average vertical distance of ascent since the last reset AVG BAL The average left right power balance for the current activity AVG ...

Страница 22: ...dence for the current lap LAP DESCNT The vertical distance of descent for the current lap LAP DIST The distance traveled for the current lap LAP HR The average heart rate for the current lap LAP PACE The average pace for the current lap LAP PWR The average power output for the current lap LAPS The number of laps completed for the current activity LAP SPEED The average speed for the current lap LAP...

Страница 23: ...sition TEMP The temperature of the air Your body temperature affects the temperature sensor TIME The time since you started the activity not including time while the activity was paused TIMER The current time of the countdown timer TO COURSE The direction in which you must move to get back on the route You must be navigating for this data to appear TOD The time of day based on your current locatio...

Страница 24: ... 7 locations 3 deleting 2 editing 2 saving 2 locking keys 1 M main menu customizing 14 man overboard MOB 4 maps 3 browsing 4 navigating 4 orientation 14 settings 14 updating 1 menu 1 MOB 4 moon phase 10 multisport 6 N navigation 3 compass 3 Sight N Go 3 waypoints 2 north reference 12 O open water swimming 5 P pairing ANT sensors 14 smartphone 13 pool size 5 position format 14 power force alerts 12...

Страница 25: ...saving 2 workouts 6 loading 6 Z zones time 10 zooming 1 Index 21 ...

Страница 26: ...5 00800 4412 454 44 2380 662 915 35 1214 447 460 386 4 27 92 500 0861 GARMIN 427 646 27 0 11 251 9999 34 93 275 44 97 49 0 180 6 427646 20 ct Anruf a d deutschen Festnetz Mobilfunk max 60 ct Anruf 46 7744 52020 Garmin International Inc 1200 East 151st Street Olathe Kansas 66062 USA Garmin Europe Ltd Liberty House Hounsdown Business Park Southampton Hampshire SO40 9LR UK Garmin Corporation No 68 Zh...

Отзывы: