background image

Your route on the map

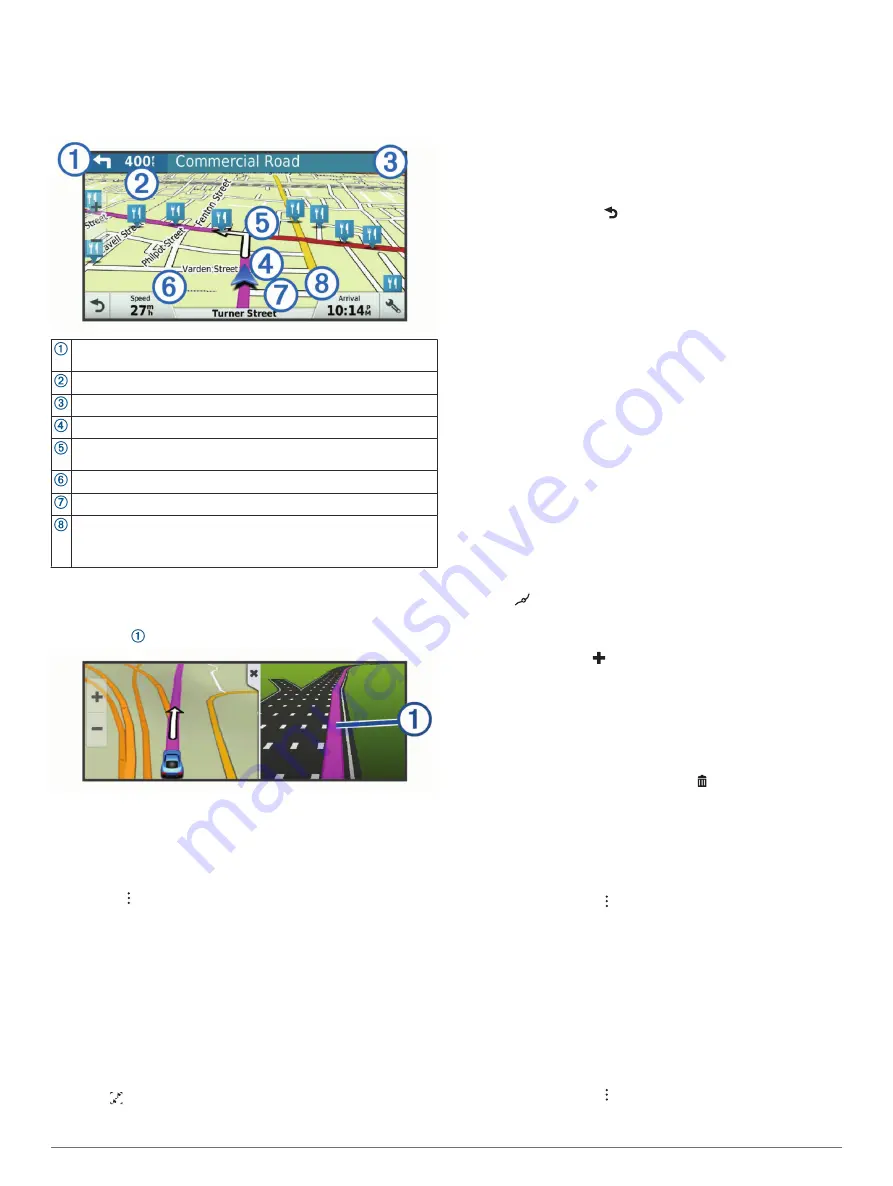
As you travel, the device guides you to your destination using 

voice prompts and information on the map. Instructions for your 

next turn or exit, or other actions appear across the top of the 

map.

Next action in the route. Indicates the next turn, exit, or other action 
and the lane in which you should travel, if available.
Distance to the next action.

Name of the street or exit associated with the next action.

Route highlighted on the map.

Next action in the route. Arrows on the map indicate the location of 
upcoming actions.
Vehicle speed.

Name of the road on which you are travelling.

Estimated arrival time.

TIP: 

you can touch this field to change the information it shows 

(

Changing the map data field

, page 10

).

Active lane guidance

As you approach a turn while navigating a route, a detailed 

simulation of the road appears beside the map, if available. A 

coloured line   indicates the proper lane for the turn.

Viewing turns and directions

While navigating a route, you can view upcoming turns, lane 

changes, or other directions for your route.

1

From the map, select an option:
• To view upcoming turns and directions as you navigate, 

select   > 

Turns

.

The map tool displays the next four turns or directions 

beside the map. The list updates automatically as you 

navigate the route.

• To view the complete list of turns and directions for the 

entire route, select the text bar at the top of the map.

2

Select a turn or direction (optional).
Detailed information appears. An image of the junction may 

appear for junctions on major roads, if available.

Viewing the Entire Route on the Map

1

While navigating a route, select anywhere on the map.

2

Select  .

Adding a location to your route

Before you can add a location to your route, you must be 

navigating a route (

Starting a route

, page 3

).

You can add locations to the middle or end of your route. For 

example, you can add a petrol station as the next destination in 

your route.

TIP: 

to create complex routes with multiple destinations or 

scheduled stops, you can use the trip planner to plan, schedule, 

and save a trip (

Planning a trip

, page 5

).

1

From the map, select   > 

Where To?

.

2

Search for a location (

Finding and saving locations

page 6

).

3

Select a location.

4

Select 

Go!

.

5

Select an option:
• To add the location as the next destination in your route, 

select 

Add As Next Stop

.

• To add the location to the end of your route, select 

Add 

As Last Stop

.

• To add the location and edit the order of destinations in 

your route, select 

Add to Active Route

.

The device re-calculates the route to include the added location 

and guides you to the destinations in order.

Shaping your route

Before you can shape your route, you must start a route 

(

Starting a route

, page 3

).

You can manually shape your route to change its course. This 

allows you to direct the route to use a certain road or go through 

a certain area without adding a destination to the route.

1

Touch anywhere on the map.

2

Select  .
The device enters route shaping mode.

3

Select a location on the map.

TIP: 

you can select   to zoom in on the map and select a 

more precise location.
The device recalculates the route to travel through the 

selected location.

4

If necessary, select an option:
• To add more shaping points to the route, select additional 

locations on the map.

• To remove a shaping point, select  .

5

When you are finished shaping the route, select 

Go!

.

Taking a detour

You can take a detour for a specified distance along your route 

or detour around specific roads. This is useful if you encounter 

construction zones, closed roads or poor road conditions.

1

From the map, select   > 

Change Route

.

TIP: 

if the Change Route tool is not in the map tools menu, 

you can add it (

Enabling map tools

, page 9

).

2

Select an option:
• To re-route for a specific distance, select 

Detour by 

Distance

.

• To detour around a specific road on the route, select 

Detour by Road

.

• To find a new route, select 

Detour

.

Stopping the route

From the map, select   > 

Stop

.

4

Navigating to your destination

Содержание DriveLuxe 50

Страница 1: ...Garmin DriveLuxe 50 Owner s manual ...

Страница 2: ...rmin Express myTrends nüMaps Guarantee and nüMaps Lifetime are trademarks of Garmin Ltd or its subsidiaries These trademarks may not be used without the express permission of Garmin Android is a trademark of Google Inc Apple and Mac are trademarks of Apple Inc registered in the U S and other countries The Bluetooth word mark and logos are owned by the Bluetooth SIG Inc and any use of such word mar...

Страница 3: ...ocations 8 Finding your last parking spot 8 Viewing current location information 8 Finding emergency services and fuel 8 Getting directions to your current location 8 Adding a shortcut 8 Removing a shortcut 8 Saving Locations 8 Saving a Location 8 Saving your current location 8 Editing a favourite location 9 Assigning categories to a saved location 9 Deleting a favourite location 9 Using the Map 9...

Страница 4: ...Settings 17 Proximity alerts settings 17 Device and privacy settings 17 Restoring settings 17 Device information 17 Specifications 17 Power cables 17 Charging the Device 17 Device maintenance 17 Device Care 17 Cleaning the outer casing 17 Cleaning the Touchscreen 17 Avoiding theft 17 Resetting the device 18 Removing the Device Mount and Suction Cup 18 Removing the Device from the Mount 18 Removing...

Страница 5: ...ys the updates available for your device 6 Select an option To install all available updates click Install All To install a specific update click View Details and click Install next to the update you want The Garmin Express application downloads and installs the updates onto your device Map updates are very large and this process may take a long time on slower internet connections NOTE if a map up...

Страница 6: ...s The status bar is located at the top of the main menu The status bar icons display information about features on the device You can select some icons to change settings or view additional information GPS signal status Hold to view GPS accuracy and acquired satellite information Viewing GPS signal status page 19 Bluetooth technology status Select to view the Bluetooth settings Bluetooth settings ...

Страница 7: ...have an active subscription to download and store safety camera data Go to garmin com speedcameras to check availability and compatibility or to purchase a subscription or one time update You can purchase a new region or extend an existing subscription at any time NOTE in some regions some product bundles include pre loaded red light and speed camera data with subscription free updates You can use...

Страница 8: ...d a petrol station as the next destination in your route TIP to create complex routes with multiple destinations or scheduled stops you can use the trip planner to plan schedule and save a trip Planning a trip page 5 1 From the map select Where To 2 Search for a location Finding and saving locations page 6 3 Select a location 4 Select Go 5 Select an option To add the location as the next destinati...

Страница 9: ...cation after the selected location select To remove the location select Editing and saving your active route If a route is active you can use the trip planner to edit and save your route as a trip 1 Select Apps Trip Planner My Active Route 2 Edit your route using any of the trip planner features The route recalculates each time you make a change 3 Select Save to save your route as a trip which you...

Страница 10: ...evice calculates a route it avoids these areas and roads unless no other reasonable route is available Avoiding a road 1 Select Settings Navigation Custom Avoidances 2 Select Add Avoid Road 3 Select the starting point of the section of road to avoid and select Next 4 Select the ending point of the road section and select Next 5 Select Done Avoiding an area 1 Select Settings Navigation Custom Avoid...

Страница 11: ...ation from the quick search list on the right side of the screen The quick search list provides a list of recently found locations in the selected category Select a subcategory if necessary and select a destination Navigating to points of interest within a venue You can create a route to a point of interest POI within a larger venue such as a store in a shopping centre or a specific terminal in an...

Страница 12: ...y Clearing the list of history locations Select Where To History Clear Yes Finding your last parking spot When you disconnect the device from vehicle power while the device is on your current location is saved as a parking spot Select Apps Last Spot Viewing current location information You can use the Where Am I page to view information about your current location This feature is helpful if you ne...

Страница 13: ...p page 10 Volume adjusts the master audio volume Brightness adjusts the screen brightness Phone displays a list of recent phone calls from your connected phone and displays in call options while a phone call is active Using in call options page 14 Traffic displays traffic conditions along your route or in your area Viewing upcoming traffic page 10 Weather displays weather conditions for your area ...

Страница 14: ...raffic map Searching for traffic incidents 1 From the main menu select Apps Traffic 2 Select Incidents 3 Select an item in the list 4 If there is more than one incident use the arrows to view additional incidents Customising the map Customising the map layers You can customise which data appears on the map such as icons for points of interest and road conditions 1 Select Settings Map Vehicle Map L...

Страница 15: ...and commands The voice command menu provides voice prompts and a list of available commands Setting the wake up phrase The wake up phrase is a word or phrase you can say to activate voice command The default wake up phrase is Voice Command TIP you can reduce the chance of accidental voice command activation by using a strong wake up phrase 1 Select Apps Voice Command Wake Up Phrase 2 Enter a new w...

Страница 16: ...r phone open the Smartphone Link app optional If you are pairing with an Apple device a security code appears on the Garmin DriveLuxe screen 10If necessary enter the security code on your phone within 30 seconds Bluetooth Feature status icons Status icons appear in the Bluetooth settings next to each paired phone Select Settings Bluetooth A grey icon indicates the feature is disabled or disconnect...

Страница 17: ...one Link is available for some smartphones Go to www garmin com smartphonelink or see the application store for your phone for compatibility and availability information Download Smartphone Link from the application store on your supported phone See your phone owner s manual for information on downloading and installing applications Sending a Location from Your Phone to Your Device Smartphone Link...

Страница 18: ...ars Unread notifications appear black and previously read notifications appear grey 2 Select an option To view a notification select the notification description To listen to a notification select The device reads the notification using text to speech technology This feature is not available for all languages Hands free Calling NOTE while most phones are supported and can be used it cannot be guar...

Страница 19: ...martphone Link While you are travelling with your device weather alerts may appear on the map You can also view a map of weather alerts near your current location or near a selected town 1 Select Apps Weather 2 If necessary select a city 3 Select Weather Alerts Checking road conditions Before you can use this feature you must purchase Advanced Weather service using Smartphone Link 1 Select Apps We...

Страница 20: ...uidance Lines shows or hides guidance lines and allows you to adjust the position of the guidance lines babyCam settings The babyCam settings allow you to manage paired Garmin babyCam cameras and camera settings This menu appears on your navigation device only when the device is connected to a wireless camera receiver cable See the owner s manual for your camera for detailed information about pair...

Страница 21: ...Restore Device information Specifications Operating temperature range From 20 to 55 C from 4 to 131 F Charging temperature range From 0 to 45 C from 32 to 113 F Power input Vehicle power using the included vehicle power cable AC power using an optional accessory for home and office use only Battery type Rechargeable lithium ion Power cables Your device can be powered in various ways Vehicle power ...

Страница 22: ... vehicle is turned on and is supplying power to the power outlet Verify that the interior temperature of the vehicle is within the charging temperature range indicated in the specifications Verify that the fuse is not broken in the vehicle power socket My battery does not stay charged for very long Decrease the screen brightness Display settings page 16 Shorten the display timeout Display settings...

Страница 23: ... into a port on your computer A picture of your device connected to a computer appears on the device screen Depending on your computer operating system the device appears as either a portable device a removable drive or a removable volume Transferring data from your computer 1 Connect the device to your computer Connecting the Device to Your Computer page 19 Depending on your computer operating sy...

Страница 24: ...See also product support history 8 home calling 14 editing location 3 going 3 phone number 14 I icons status bar 2 ID number 17 J junctions finding 8 K keyboard language 17 layout 17 L language keyboard 17 voice 17 latitude and longitude 8 locations 8 15 calling 14 current 8 history 8 saving 8 searching for 6 8 simulated 16 venues 7 M map layers customising 10 map view 2 D 10 3 D 10 maps 3 9 10 15...

Страница 25: ...15 incidents 10 map 10 receiver 10 searching for delays 10 traffic cameras viewing 15 travel history 17 trip information 10 resetting 10 viewing 10 trip log viewing 10 trip planner 5 editing a trip 5 shaping points 5 troubleshooting 18 U unit ID 17 up ahead 9 customising 9 updating maps 1 software 1 USB disconnecting 19 V vehicle power cable 1 venues 7 voice command 11 activating 11 navigating wit...

Страница 26: ...support garmin com GUID 4C5BA470 9339 4338 8F9F 7BADD5444C36 v5 May 2020 ...

Отзывы: