background image

Getting Started

 WARNING

See the 

Important Safety and Product Information

 guide in the 

product box for product warnings and other important 

information.

• Update the maps and software on your device (

Map and 

Software Updates

, page 19

).

• Mount the device in your vehicle and connect it to power 

(

Mounting and Powering the Garmin Device in Your Vehicle

page 1

).

• Acquire GPS signals (

Acquiring GPS Signals

, page 1

).

• Adjust the volume (

Adjusting the Volume

, page 2

) and 

display brightness (

Adjusting the Screen Brightness

page 2

).

• Set up a vehicle profile for your camper (

Adding a Vehicle 

Profile

, page 2

).

• Navigate to your destination (

Starting a Route

, page 8

).

Garmin

®

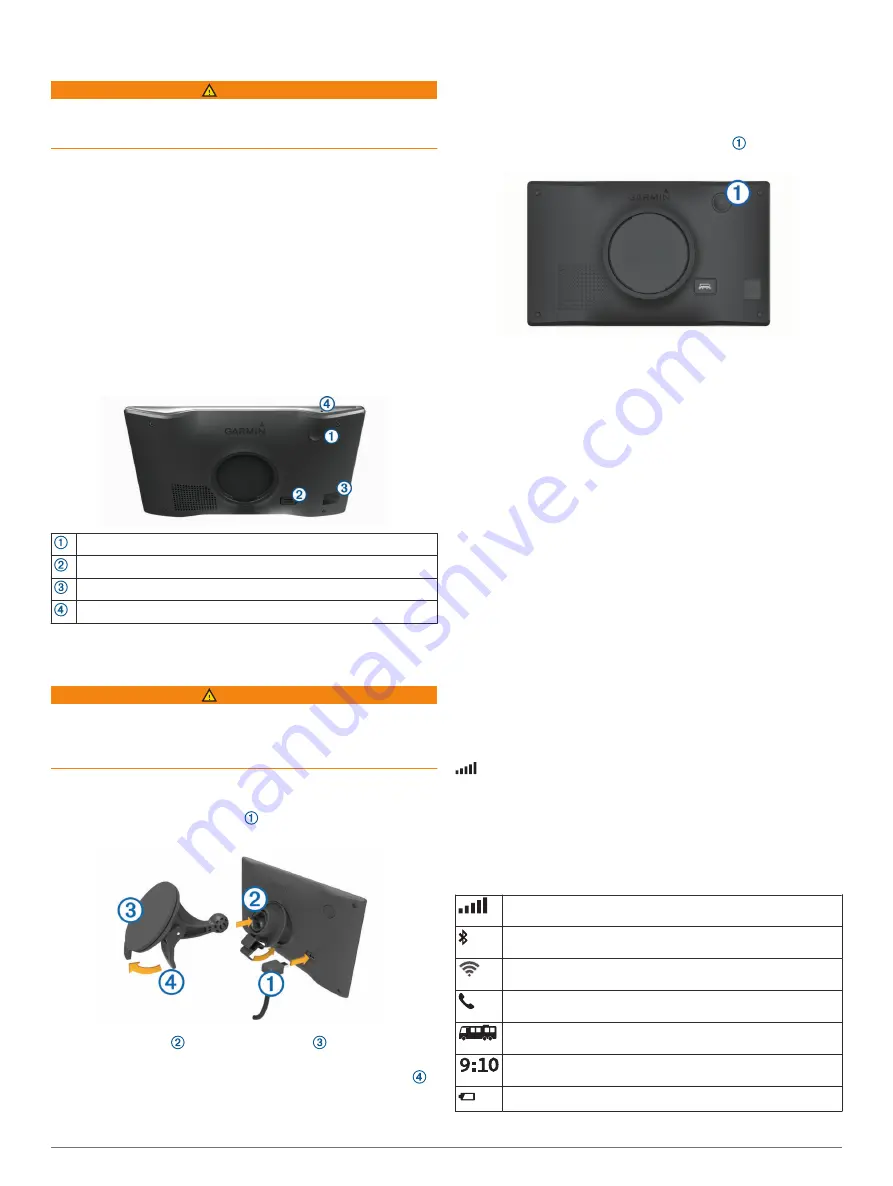
 Device Overview

Power key

USB power and data port

Map and data memory card slot

Microphone for Voice Command or hands-free calling

Mounting and Powering the Garmin Device 

in Your Vehicle

 WARNING

This product contains a lithium-ion battery. To prevent the 

possibility of personal injury or product damage caused by 

battery exposure to extreme heat, store the device out of direct 

sunlight.

Before you use your device on battery power, you should charge 

it.

1

Plug the vehicle power cable   into the USB port on the 

device.

2

Press the mount   onto the suction cup   until it snaps into 

place.

3

Press the suction cup to the windshield, and flip the lever 

back toward the windshield.

4

Fit the tab on the top of the mount into the slot on the back of 

the device.

5

Press the bottom of the mount into the device until it clicks.

6

Plug the other end of the vehicle power cable into a power 

outlet in your vehicle.

Turning the Device On or Off

• To turn the device on, press the power key  , or connect the 

device to power.

• To put the device in power saving mode, press the power key 

while the device is on.
While in power saving mode, the screen is off and the device 

uses very little power, but it can wake instantly for use.

TIP: 

You can charge your device faster by putting it in power 

saving mode while charging the battery.

• To turn off the device completely, hold the power key until a 

prompt appears on the screen, and select 

Off

.

The prompt appears after five seconds. If you release the 

power key before the prompt appears, the device enters 

power saving mode.

Acquiring GPS Signals

When you turn on your navigation device, the GPS receiver 

must collect satellite data and establish the current location. The 

time required to acquire satellite signals varies based on several 

factors, including how far you are from the location where you 

last used your navigation device, whether you have a clear view 

of the sky, and how long it has been since you last used your 

navigation device. The first time you turn on your navigation 

device, it may take several minutes to acquire satellite signals.

1

Turn on the device.

2

Wait while the device locates satellites.

3

If necessary, go to an open area, away from tall buildings and 

trees.

 in the status bar indicates the satellite signal strength. When 

at least half the bars are filled, the device is ready for navigation.

Status Bar Icons

The status bar is located at the top of the main menu. The status 

bar icons display information about features on the device. You 

can select some icons to change settings or view additional 

information.

GPS signal status. Hold to view GPS accuracy and acquired 
satellite information (

Viewing GPS Signal Status

, page 22

).

Bluetooth

®

 technology status. Select to view the Bluetooth 

settings (

Wireless Network Settings

, page 18

).

Wi-fi signal strength. Select to change the wi-fi settings 
(

Wireless Network Settings

, page 18

).

Connected to hands-free calling. Select to place a phone call 
(

Hands-Free Calling

, page 14

).

Active vehicle profile. Select to view the vehicle profile settings 
(

Editing a Vehicle Profile

, page 2

).

Current time. Select to set the time (

Setting the Time

page 19

).

Battery charge level.

Getting Started

1

Содержание Avtex TOURER TWO

Страница 1: ...CAMPER780 RV780 TOURERTWO Owner sManual...

Страница 2: ...ay not be used without the express permission of Garmin ACSI is a trademark of Auto Camper Service International Holding B V Android is a trademark of Google Inc Apple iPhone and Mac are trademarks of...

Страница 3: ...a Route 8 Routes 8 Starting a Route 8 Starting a Route by Using the Map 8 Going Home 8 Your Route on the Map 8 Active Lane Guidance 8 Viewing Turns and Directions 8 Viewing the Entire Route on the Ma...

Страница 4: ...affic Settings 18 Units and Time Settings 19 Setting the Time 19 Language and Keyboard Settings 19 Device and Privacy Settings 19 Restoring Settings 19 Device Information 19 Viewing E label Regulatory...

Страница 5: ...ry little power but it can wake instantly for use TIP You can charge your device faster by putting it in power saving mode while charging the battery To turn off the device completely hold the power k...

Страница 6: ...me To add a motorhome pulling a trailer select Motorhome with Trailer To add a truck with an attached camper select Truck Camper To add a truck with an attached camper pulling a trailer select Truck C...

Страница 7: ...e device plays a tone and displays a message when you approach a steep hill State and country borders The device plays a tone and displays a message when you approach the border of a state or country...

Страница 8: ...6 Finding a Location Using the Search Bar You can use the search bar to search for locations by entering a category brand name address or city name 1 Select Where To 2 Select Search in the search bar...

Страница 9: ...ecessary and select a destination Finding Campgrounds Select Where To All Campgrounds Finding Campgrounds with Amenities You can search for RV parks and campgrounds based on the amenities available 1...

Страница 10: ...dvisor ratings appear automatically in the search results list for applicable points of interest You can also search for nearby TripAdvisor points of interest and sort by distance or popularity Findin...

Страница 11: ...s for the selected service appears with the nearest locations at the top 3 Select a location 4 Select an option To navigate to the location select Go To view the phone number and other location detail...

Страница 12: ...h 3 If necessary select to filter the displayed points of interest by category Location markers or a blue dot appear on the map 4 Select an option Select a location marker Select a point such as a str...

Страница 13: ...location and edit the order of destinations in your route select Add to Active Route The device re calculates the route to include the added location and guides you to the destinations in order Shapi...

Страница 14: ...g through an environmental zone select Always Ask To always avoid environmental zones select Avoid To always allow environmental zones select Allow 3 Select Save Custom Avoidances Custom avoidances al...

Страница 15: ...om the map select Up Ahead While you are traveling the map tool shows the next location along your road or route in each of the three categories While you are not traveling the map tool shows the thre...

Страница 16: ...eather information Live traffic data Sends real time traffic data to your device such as traffic incidents and delays construction zones and road closings Traffic page 14 Weather information Sends rea...

Страница 17: ...n remains active on your phone To view a notification select View To listen to the notification select View Play The device reads the notification using text to speech technology This feature is not a...

Страница 18: ...u can use this feature if you want to disconnect the Bluetooth connection and remain on the call or if you need privacy To use the dial pad select Keypad TIP You can use this feature to use automated...

Страница 19: ...xt on the device 6 Enter the code 7 Select Done Enabling Traffic You can enable or disable traffic data 1 Select Settings Traffic 2 Select the Traffic check box Adding a Subscription You can purchase...

Страница 20: ...19 2 Select to search the owner s manual optional Viewing the Weather Forecast Before you can use this feature your device must be receiving weather data You can connect your device to the Garmin Driv...

Страница 21: ...vehicle profile on the device must match the selected vehicle profile for the trip Changing Routing Options for a Trip page 17 If it does not match the device prompts you to change the vehicle profil...

Страница 22: ...on GPS Simulator 2 From the main menu select View Map 3 Tap the map twice to select an area The address of the location appears at the bottom of the screen 4 Select the location description 5 Select S...

Страница 23: ...a settings category 3 Select Restore Device Information Viewing E label Regulatory and Compliance Information 1 From the settings menu swipe to the bottom of the menu 2 Select Device Regulatory Speci...

Страница 24: ...st map and software updates for your device 1 If you do not have the Garmin Express application installed on your computer go to garmin com express and follow the on screen instructions to install it...

Страница 25: ...and the fuse 3 Insert a new fast blow fuse that has the same current such as 1 A or 2 A 4 Place the silver tip in the end piece 5 Push in the end piece and rotate it clockwise to lock it back into the...

Страница 26: ...ansfer mode select Continue A picture of your device connected to a computer appears on the device screen Depending on your computer operating system the device appears as either a portable device a r...

Страница 27: ...ng 6 K keyboard language 19 layout 19 L language keyboard 19 voice 19 latitude and longitude 6 location 7 locations 4 17 calling 14 current 7 recently found 7 saving 7 searching for 4 6 simulated 18 v...

Страница 28: ...eras viewing 17 travel history 19 trip information 11 resetting 12 viewing 11 trip log viewing 12 trip planner 16 17 editing a trip 17 shaping points 17 TripAdvisor 6 troubleshooting 21 turn list 8 U...

Страница 29: ......

Страница 30: ...support garmin com March 2019 190 02504 00_0A...

Отзывы: