background image


LOCATION OF HEATER 


The unit is designed for outdoor installation and shall not be placed in a totally 
enclosed  area  such  as  shed  or  garage.  This  will  cause  recirculation  of  cold 

discharge  air  back  into  the  evaporator  coil  and  will  greatly  reduce  heating 

capacity  and  efficiency  of  the  unit.  This  may  void  the  compressor  warranty 

since it is over working the compressor. 
 

If the unit is installed at the edge of a roofline, make sure the roof 

has  a  rain  gutter  to  prevent  water  from  the  roof  pouring  into  the 
heater. 


The heater should be located as close to the existing pool pump and filter to 
minimize water-piping length to reduce pool water head loss. 


Your heater features an up-flow fan for quite operation. Air is pulled through 

the evaporator coil and discharges through the top of the grill. 

At least 4 feet 

clearance  should  be  allowed  above  the  unit  for  unrestricted  air 

discharge

.  The  unit  must  not  be  installed  under  a  porch  or  any  kind  of 

overhang this will also cause cold air recirculation.  
 

All sides of the heater should have at least 12 inches of clearance to 

allow  enough  air  to  flow  through  the  evaporator  coil  for  optimal 

heating.

 Restricting one side of the evaporation coil is permitted, however it 

will cause a decrease in efficiency. 


The  unit  should  be  mounted  on  a  flat  surface,  preferably  on  a  concrete  or 
fabricated pad. The surface should have a slight grade so condensation will 

drain  off  the  pad.  The  unit  should  be  completely  isolated  from  the  building 

foundation  or  wall;  this  will  prevent  the  possibility  of  vibration  sound 
transmitting into the building.  

INSTALLATION 

Initial Installation Programming  

Upon initial powering up of the unit, “

LANGUAGE SELECT

” will appear on the 

display. Select your desired language using the up and down arrows and then 

press “MODE”, select °F/°C in the “

TEMP SCALE

” selection. This install menu 

will  be  on  the  display  for  30  Seconds  then  the  display  will  change  to  the 
Operation Menu. From the Operation Menu you can adjust the set point. If the 

30 seconds finished and you still need to adjust Language or Temp Scale, cut 

the  power  off  to  the  board  and  turn  back  on.  The  board  will  display  the 
“LANGUAGE SELECT” screen again for another 30 seconds. The factory settings    

are English and ˚F. 

Содержание 5005001B

Страница 1: ...Swimming Pool Heat Pump Install Operation Manual 5005001B Version 5 5 For fastest service please be sure to complete the information below and call 239 567 0009 Serial ___________________ Install Date...

Страница 2: ...Valve Automation 9 o Plumbing Sequence 9 Heat Pump Features 10 Heat Pump Operation 11 o Control On Off 11 o Pool Spa Modes 12 o Changing Set Point Temperature 12 o Heater Running Time 13 o Keypad Loc...

Страница 3: ...Schedule service on line at www Gulfstreamheatpump com Service can also be obtained by calling us at 239 567 0009 or 954 318 6900 When asking for help or service please provide a detailed description...

Страница 4: ...in use The pool cover should be used if the night temperature is 15 F 8 C less than the desired pool temperature This will keep evaporation the greatest source of heat loss to a minimum greatly reduc...

Страница 5: ...2 to 3 days Total Alkalinity 80 to 120 PPM 1 time every 2 to 3 weeks Total Dissolved Solids Below 2400 PPM 1 time per month Calcium Hardness 200 to 300 PPM 1 time per month The location of the chemica...

Страница 6: ...he heater should have at least 12 inches of clearance to allow enough air to flow through the evaporator coil for optimal heating Restricting one side of the evaporation coil is permitted however it w...

Страница 7: ...ight corner of the board See Diagram FS1 Whitwires from the Water Pessure Diagram FS1 Sub Menu Access To access the programming sub menu remote t stat solar heat cool calibration load defaults etc pre...

Страница 8: ...es the desired set point The new sensor must be attached to the board on the spades where the current WTS is attached Enabling the Solar Control Press and hold the UP and the DOWN arrows till the serv...

Страница 9: ...to Spa This can also be activated by a network communicating switch via an App on your mobile device Additional wiring required Call service more additional wiring and details of this feature Diagram...

Страница 10: ...ic low temperature defrosts remote control capabilities even heat motorized valve operation and solar control ULTRA QUIET The unit is equipped with a low RPM fan motor in combination with a deep drawn...

Страница 11: ...eature is after paired with SOLAR CONTROL Additional wiring required The board can be set to run and monitor your pool solar system There is no need to have a second and separate control system page 8...

Страница 12: ...perature on the bottom line The Standard mode displays are POOL HEAT SPA HEAT POWER OFF POOL COOL POOL HEAT COOL POOL SOLAR HEAT will also be available if enabled in the service menu Addition programm...

Страница 13: ...in whatever mode it was in when the lockout occurred Any button push while in LOCKED will cause the display to show LOCKED for 5 seconds To unlock the Keypad press and hold the MODE button for 6 secon...

Страница 14: ...8 2 F Illustration 2 By pressing the MODE button once your pool temp set point has been set you will see POOL SOLAR HEAT SETPOINT on display as in illustration 3 P O O L S O L A R H E A T S E T P O I...

Страница 15: ...en reads POOL TEMPERATURE SETPOINT 3 Use the UP or DOWN arrow until desired temperature is on display 4 While still in the POOL TEMPERATURE SETPOINT screen press the MODE button to set the DEADBAND Th...

Страница 16: ...assure proper condensation drainage Your heat pump s cabinet is made from a maintenance free rust free plastic that is UV resistant It will last for years and any dirt or dust may be wiped away with a...

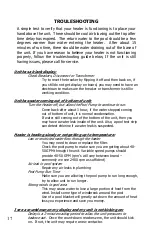
Страница 17: ...it is normal condensation If water still coming out of the bottom of the unit then you may have a water leak inside of the unit Also a pool test strip can detect chlorine if a water leak is suspected...

Страница 18: ...s activated Call For service Unit Displays Max Water Temperature Check to make sure you do not have a secondary source of heat feeding hot water into the unit If no secondary source of heat call for s...

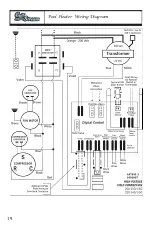
Страница 19: ...19 Pool Heater Wiring Diagram...

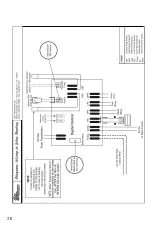
Страница 20: ...20...

Страница 21: ...21 Notes...

Страница 22: ...ne at www Gulfstreamheatpump com Service can also be obtained by calling us at 239 567 0009 or 954 318 6900 When calling for help or service please provide a detailed description of the problem your h...

Отзывы: