


22
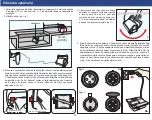
12 cm
(4 inch)
3.6m/11.8ft
1
1a
2
b
3a
3b
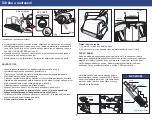
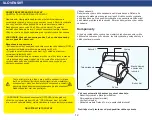
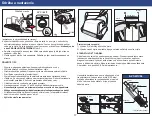
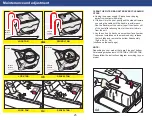
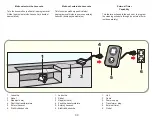
Operating the pool cleaner
3
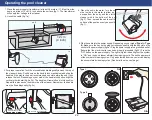
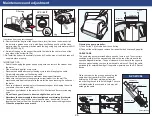
1. Place the power supply (transformer) at least 3.6 meters / 11.8 feet from the
pool and at least 12 cm / 4 Inch above the surface (fig.1). The transformer
will supply low voltage to the cleaner.
2. Uncoil the cable.(fig.1a)
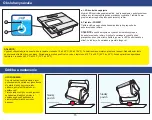
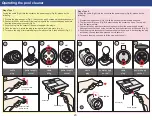
3. For proper operation, lock the moveable handle diagonally across the top of
the cleaner‘s body. Push down on the handle lock mechanism and slide the
handle all the way to the end (recommended one slot before the end), then
release the lock. Depending on your model, the handle lock button might be
vertical or horizontal (fig.2a, 2b). The handle will remain fixed in this position.
Repeat this process on the other side of the cleaner. Remember, the handle
must be fixed diagonally (fig.2c)
unit
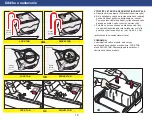
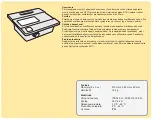
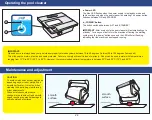
4. Place the unit in the water. Turn the unit
side to side in the water to allow air to
escape from the body and then let the
cleaner sink to the bottom of the pool
(fig.3). Then, spread the cable over the
surface of the pool as evenly as possible
(fig.1).
5. Plug the cable into the power supply. Depending on your model (
Type I
or
Type
II
), make sure the key on the plug corresponds exactly with the key slot on the
socket of the power supply (fig.3a). Plug the power supply into a grounded outlet.
Ensure that the electric outlet has been properly grounded (fig.3b). Press the
“ON” button on the power supply. The light will glow indicating that the system
is “ ON “ and the pool cleaner will start the cleaning cycle. The unit keeps record
of the number of cleaning cycles. Only an authorized service center can display
the accumulated cleaning cycles. (See details on the next page)
Type l
Type ll
Handle lock vertical
Handle lock horizontal
2
a
2
c


