05
1. Insert the plug into a grounded power socket.
2. Carefully pull the fryer out of the air fryer.
3. Place the food materials on the grill.
Note:
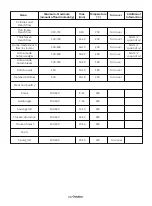
Do not overfill or exceed the amount shown in the table below (see "Settings" in this chapter) as
this may affect the final frying quality.
4. Slide the fryer back to the air fryer. Do not use the fryer until the grill is placed.
The fryer must be properly pushed into the product, otherwise the product will not work.
Note:
Do not touch the fryer within a short time after use as it is very hot. You can only hold the handle to move
the fryer.
5. Adjust the temperature control knob to the desired temperature. See "Settings" in the chapter to determine
the appropriate temperature
6. Determine the time required to cook the food materials (see Settings in this chapter).
7. To turn on the product, adjust the timer knob to the desired cooking time .
If the product is cold-started, the cooking time should be increased by 5 minutes.
Note:
You may preheat the product without adding food materials if necessary. At this point, turn the timer
knob to 5 minutes or above and wait for the heating indicator lamp to turn off (about 5 minutes later). Turn the
timer knob to the desired cooking time.
a. At this point, the heating indicator lamp will be on.
b. The timer will count down from the set cooking time.
c. In the process of hot air frying, the heating indicator lamp will be on and off from time to time. This means
that the heating components are turned on and off constantly to maintain the set temperature.
d. Excess oil from the food materials will be collected at the bottom of the fryer.
8. Some food materials are required to be turned over in the cooking process (see "Settings" in this chapter).
To turn the food materials over, hold the handle and pull the fryer out of the product, and then turn them
over. Slide the fryer back to the air fryer.
Tips:
If you set the timer to half the cooking time, the timer will ring when you need to turn the food materials over.
However, this means that you must set the timer again for the remaining cooking time after turning over.
Tips:
If you set the timer to all cooking time, the timer will not ring before the set cooking time is completed.
You can pull out the frying tray in the cooking process at any time to check whether the food cooking degree is
satisfied. The power supply will be automatically turned off when you pull out the fryer and it will be
automatically turned off when you pushing the fryer. (In this case, the timer is always counting down).
9. The timer rings, indicating that the set cooking time has been reached. Pull the fryer out of the product and
place it on a heat-resistant surface.
Note:
You can also manually turn off the product. To do so, turn the temperature control knob to 0.
10. Check whether the food materials have been cooked.
If the food materials are still required to be cooked, simply slide the fryer back to the product and set the timer
to a few minutes again.
11. To remove small food materials (such as French fries),
do not turn the fryer upside down without removing the grill, which will cause excess oil collected at the bottom
of the fryer to leak onto the food materials.
After frying by hot air, the fryer and the food materials are still very hot. Depending on the type of food materials
in the air fryer, steam may be ejected from frying tray.
12. Remove all the food materials from the fryer with a clip and place them in a bowl or plate.
Tip:
Remove bulky or fragile food materials from the fryer with a clip.
13. After one batch of food materials is cooked, the air fryer can start cooking the next batch of food
materials at any time.
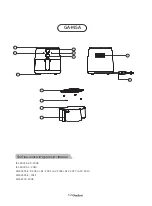
Frying by hot air (GA-M5A)

