background image

p. 74

Configuring G-SPEED Studio R  

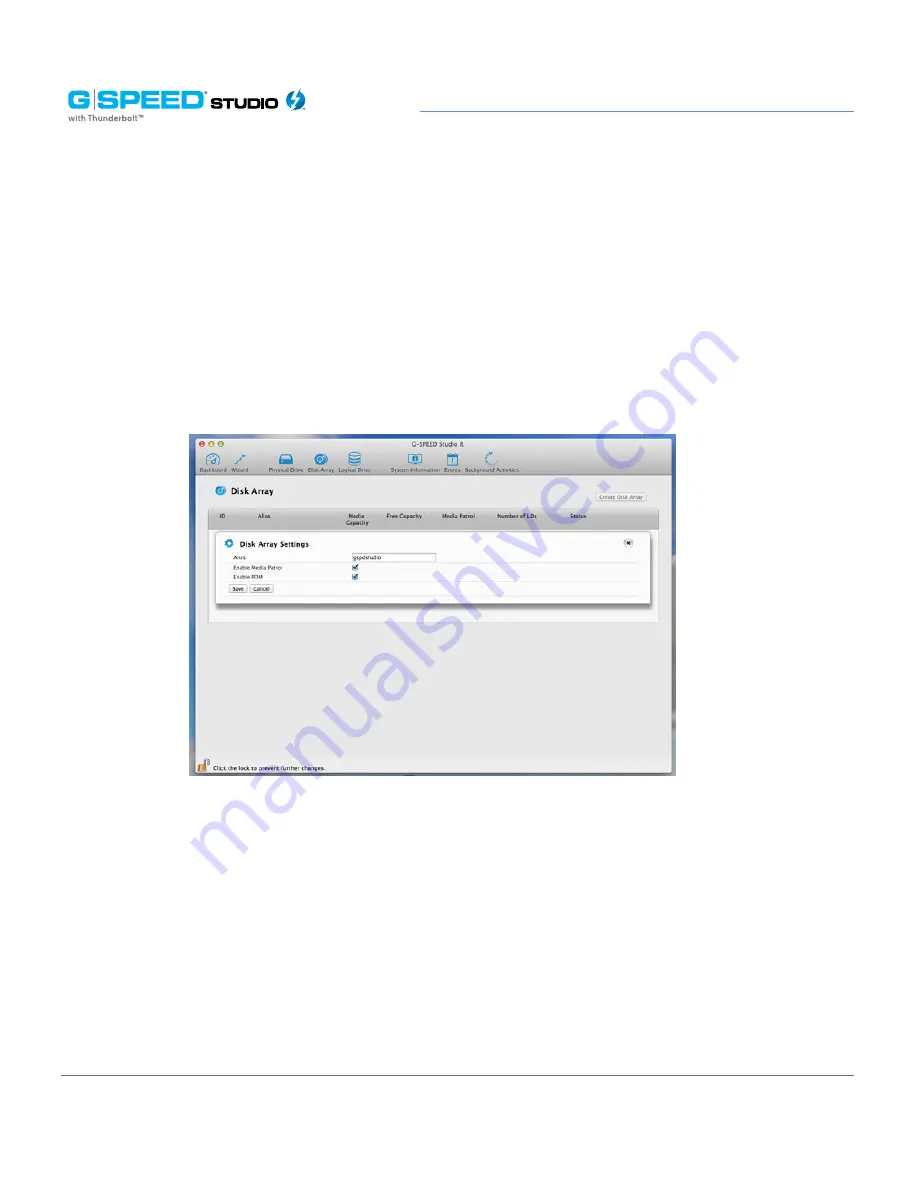
3. Make the following setting changes as required: 
 

• Enter change, or delete the alias in the Alias field. An alias must be a maximum  


  of 32 characters  (letters, numbers and spaces between characters). 


• 

Enable Media Patrol 

– Check to enable or uncheck to disable on this array. 


• 

Enable PDM

 – Check to enable or uncheck to disable on this array. 

4. Click the 

Save

 button.

Locating a Disk Array

This feature causes the drive carrier LEDs to flash for one minute to assist you in locating 
the physical drives that make up a given disk array. To locate a disk array: 

1. Perform one of the following actions: 
 

• From the Dashboard window, click the 

Disk Array

 link. 


• From the Storage menu, choose 

Disk Array

.

Содержание G Speed studio

Страница 1: ...g technology com High Performance 4 Bay Thunderbolt 2 RAID Solutions for HD 2K 4K Production PRODUCT MANUAL ...

Страница 2: ...ings 35 Saving a Service Report 36 Updating Firmware 36 Managing Enclosures 37 Viewing the Enclosure Information 37 Viewing Temperature Sensor Information 38 Locating an Enclosure 39 Managing the RAID Enclosure 39 Viewing Controller Information 39 Viewing Controller Statistics 41 Changing Controller Settings 41 Changing Buzzer Settings 42 Managing Background Activities 43 Viewing Current Backgroun...

Страница 3: ...ogical Drive Check Tables 82 Creating a Logical Drive Manually 82 Formatting Your Logical Drive 84 Locating a Logical Drive 84 Deleting a Logical Drive 85 Initializing a Logical Drive 85 Pausing and Resuming an Initialization 86 Stopping an Initialization 86 Redundancy Check on a Logical Drive 87 Pausing and Resuming a Redundancy Check 8 Stopping a Redundancy Check 87 Migrating a Logical Drive 88 ...

Страница 4: ...Safety and General Use Safety Precautions p 5 Backup Your Data p 6 ...

Страница 5: ...quids To reduce the risk of damage do not expose this drive to rain or moisture Do not use it in damp or wet conditions Never place objects containing liquids on the drive as they may spill into its openings Ventilation Place the device in a vented area The drive should never be placed near or over a radiator or heat source Temperature Do not expose this drive to temperatures outside the range of ...

Страница 6: ...logy drive is the sole responsibility of the user Make Two Backups To help prevent the loss of your data we highly recommend keeping TWO copies of your data in separate storage locations When configured in RAID 1 5 or protected modes G SPEED Studio R will safeguard your data from individual hard drive failure However if any file system corruption occurs the data contained on G SPEED Studio R may b...

Страница 7: ...About Your G SPEED Studio R Introduction p 8 What s in the Box p 9 System Requirements p 9 Overview of the Drive p 10 ...

Страница 8: ...reams capable of data transfer rates over 1300 MB s This opens up incredible time saving and multi stream possibilities for content creation professionals who use bandwidth intensive 2K and 4K media formats With two bidirectional ports a user can easily daisy chain up to six high speed Thunderbolt peripheral devices including external disk drives video capture devices and external displays Thunder...

Страница 9: ...t Guide If any items are missing please contact G Technology at www g technology com contact contact_support Download the latest G SPEED Studio R manual and utilities at www g technology com support gspeed_studio_r System Requirements G SPEED Studio R supports the following operating systems Mac OS 10 9 2 or higher The solution is set up at the factory for use with Mac OS X systems and is formatte...

Страница 10: ...gurations For an explanation of these RAID levels please refer to RAID Levels Explained If you wish to change the RAID mode please refer to Change the RAID Mode Temperature Fan Warning red LED light Smart Cooling Fans Alarm Mute Button Thunderbolt Port On Off Switch Drive Lock Hatch 4 Removable Disk Drives Drive Module Power Activity LED Power LED AC Input Kensington Slot ...

Страница 11: ...Using Your Drive Drive Activity LED p 12 Warning LED and Alarms p 13 Disconnect the Drive p 14 ...

Страница 12: ... Drive Activity LED Under normal operation each G SPEED Studio R drive module has an LED that glows blue indicating a connection to the RAID controller The LED will flash when the drive is being accessed Drive module power activity LED ...

Страница 13: ...EED Studio R as shown below In addition to the audible alarm the LED located on the front G SPEED Studio R will illuminate red If there is an issue with G SPEED Studio R drive module the LED on the module will glow red indicating a drive or RAID issue Please launch the G SPEED Studio R Utility to determine if any user action is required or contact our support team for further troubleshooting Alarm...

Страница 14: ...unting the drive from your computer 1 Before powering down and disconnecting the drive unmount the system by simply dragging the G SPEED Studio R icon to the trash located in the system dock Keyboard shortcut Select the drive icon and press Command E 2 It is safe to remove the drive from your system when the drive icon is no longer present on your desktop 3 To power off G SPEED Studio R simply unp...

Страница 15: ...r Statistics 41 Changing Controller Settings 41 Changing Buzzer Settings 42 Managing Background Activities 43 Viewing Current Background Activities 43 Viewing Scheduled Background Activities 44 Adding a Scheduled Background Activity 44 Changing Background Activity Schedule 45 Enabling or Disabling a Scheduled Background Activity 47 Deleting a Scheduled Background Activity 47 Media Patrol 48 Changi...

Страница 16: ...ing Logical Drive Check Tables 82 Creating a Logical Drive Manually 82 Formatting Your Logical Drive 84 Locating a Logical Drive 84 Deleting a Logical Drive 85 Initializing a Logical Drive 85 Pausing and Resuming an Initialization 86 Stopping an Initialization 86 Redundancy Check on a Logical Drive 87 Pausing and Resuming a Redundancy Check 87 Stopping a Redundancy Check 87 Migrating a Logical Dri...

Страница 17: ...echnology com support Please visit the site to check for updates as well as helpful tips and tricks Recommended Installation When you first setup G SPEED Studio R you will want to install the G Technology Assistant on your computer along with the G SPEED Studio R Utility To install the G Technology Assistant follow the simple onscreen instructions Once you have successfully completed the installat...

Страница 18: ...tility is necessary if you plan to change the enclosure s default RAID configuration RAID 5 or if you will swap out any of the pre installed hard drives The G SPEED Studio R Software utility installation package is available on the G Technology website and can be easily downloaded Follow the instructions below to easily install the G SPEED Studio R utility 1 Visit www g technology com support to d...

Страница 19: ... The version number of the dmg file and pkg file will change as it is updated The version number used in this example is for illustration purposes The introduction window explains that software will be installed on the Mac You can review the software license agreement Once ready click the Continue button to proceed ...

Страница 20: ...ment will appear Please read the statement and click Continue to proceed 5 Click Agree if you agree to the terms of the license To read the license click Read License Choose Disagree if you do not agree with the terms This will terminate the installation procedure ...

Страница 21: ... Studio R Utility is now available to help manage your G SPEED Studio R Use this tool if you need to modify the array configuration retrieve system information or update the enclosure firmware The utility tool is also useful for monitoring the storage system status as well as troubleshooting For more information on using the G SPEED Studio R including instructions on how to use the Wizard menu or ...

Страница 22: ...uter powers up G SPEED Studio R automatically powers up HDD Spin Down Your G SPEED Studio R includes a power saving feature that spins down the hard disk drives if the enclosure is idle for 30 minutes This feature can be enabled or disabled and the amount of idle time can be adjusted in the G SPEED Studio R Utility Click on the Controller link in the Dashboard then click the Settings button to cha...

Страница 23: ...ving the power cord and re inserting the power cord Daisy Chaining Multiple G SPEED Studio R Units Up to six G SPEED Studio R or Thunderbolt enabled devices can be connected to each other and to your Mac in a sequential Thunderbolt connection To daisy chain multiple Thunderbolt devices to your G SPEED Studio R follow these steps 1 Use a Thunderbolt cable to connect one of the Thunderbolt ports on ...

Страница 24: ...p 24 Configuring G SPEED Studio R Thunderbolt daisy chain connections HDMI ...

Страница 25: ...PEED Studio R Utility go to the View menu choose the unit you want to see Note that G SPEED Studio R units are listed in the order in which they are recognized Manage the EnclosureWith G SPEED Studio R Utility This section contains the following topics 1 Accessing the G SPEED Studio R Utility 2 G SPEED Studio R Utility Overview 3 Managing System 4 Managing the RAID Controller 5 Managing Background...

Страница 26: ... computer before you can use it See Installing G SPEED Studio R Utility Accessing the G SPEED Studio R Utility Accessing the G SPEED Studio R Utility includes Opening and closing G SPEED Studio Utility Unlocking the UI Opening To open the G SPEED Studio R Utility double click the G SPEED Studio R Utility icon in the Applications folder The G Technology Utility window will open and display the Dash...

Страница 27: ...o choose to place an alias into the dock Closing There are two ways to close the G SPEED Studio R Utility G SPEED Studio Utility icon 12 Click the G SPEED Studio R Utility drop down menu and choose Quit G SPEED Studio R Utility 13 Press Command Q ...

Страница 28: ... on your G SPEED Studio R To unlock the UI 1 At the lower left of the G SPEED Studio R Utility window click the closed lock icon The G SPEED Studio R Utility password dialog box will open Type your computer password into the Password field then click the OK button The lock icon will change to open You can now add and delete logical drives make setting changes run background activities and update y...

Страница 29: ...rences Services Hide Quit View Show Hide Toolbar Customize Toolbar Devices G SPEED Studio R units Dashboard Show the Dashboard Storage Wizard Disk Array List Logical Drive List Spare Drive List Admin System Information Events Background Activities System Updates Performance Monitor Restore Factory Defaults Window Minimize Zoom Close Window Bring All to Front G SPEED Studio R unit Help Links to Onl...

Страница 30: ...s Events Displays the Event logs Background Activity Display or run background tasks The above Icons are the default icons You can add additional icons such as Top View Back View and Component List Customizing the Toolbar You can customize the toolbar by adding or removing icons To add remove toolbar icons 1 From the G SPEED Studio R Utility window click the View menu and choose Customize Toolbar ...

Страница 31: ...ons of this chapter See Viewing Controller Information Viewing the Enclosure Information and Changing Buzzer Settings for more information Physical Drive Menu Click on the Physical Drive icon in the toolbar to display the Physical Drive menu This is the same menu obtained by clicking the Physical Drive menu button at the top of the G SPEED Studio R Utility window or by clicking the Physical Drive ...

Страница 32: ...to the chosen disk array will not be highlighted Back View Add Back View to the Toolbar by going to the View pulldown menu and selcting Customize Toolbar Click and drag Back View to the toolbar and press Done Then press Back View to see a virtual view of the back of your G SPEED Studio R Move the cursor over the power supply unit PSU or system fan to display component status information Device Bac...

Страница 33: ...he drive modules to view the status and identify the assigned disk array Managing System Information Enclosure management includes Viewing System Information Making System Settings Clearing Statistics Restoring Factory Default Settings Saving a Service Report Updating Firmware ...

Страница 34: ...ias Model WWN Worldwide Number Vendor Serial number Revision number System date and time Firmware version Adjustable under Making System Settings below Making System Settings To make enclosure settings 1 Click the System Information icon 2 Click the Settings button 3 Make changes as required Enter an alias or change the existing alias in the field provided 4 Click the Save button ...

Страница 35: ...ult Settings To restore all settings to their factory default values From the Admin drop down menu in the menu bar at the top of your desktop choose Restore Factory Default 1 In the Restore Factory Default settings screen check the boxes beside the settings you want to reset to default value Background activity settings Controller settings Physical drive settings System settings 2 Click the Submit...

Страница 36: ...n A technical support representative might ask you to email this file for system analysis Updating Firmware For optimal controller and system hardware performance it is a good idea to keep your G SPEED Studio R firmware up to date Download the latest firmware from the G Technology website at www g technology com support gspeed_studio_r and place the img file on your Mac Note that after the update ...

Страница 37: ...ss will take several seconds When complete you will be prompted to restart your Mac Restart your Mac and continue using your G SPEED Studio R Managing Enclosures Enclosure management includes the following functions Viewing System Information Viewing Temperature Sensor Information Locating an Enclosure Viewing the Enclosure Information Enclosure management includes the following functions Click th...

Страница 38: ... of Physical Drive Slots Max Number of Temperature Sensors Max Number of Voltage Sensors Click the X icon to close the information panel ViewingTemperature Sensor Information To view the status of the temperature sensor 1 Click the Dashboard icon then click the Temperature link 2 Scroll down until you see Temperature Sensors Temperature Sensors information includes ID Status Normal Warning or Crit...

Страница 39: ...te function to identify an enclosure Managing the RAID Controller RAID controller management includes Viewing Controller Information Viewing Controller Statistics Changing Controller Settings Changing Buzzer Settings Viewing Controller Information To view controller information you can access the Controller info page from the Dashboard panel under System Status You can also select the Component Li...

Страница 40: ... Number BIOS Version Single Image Build Date To view advanced information click the Advanced Information tab Advanced controller information includes Memory Type19 Flash Type NVRAM Type Preferred Cache Line Size Coercion SMART Write Back Cache Flush Interval Enclosure Polling Interval Forced Read Ahead Cache Adjustable under Changing Controller Settings Click the X icon to close the information pa...

Страница 41: ... I O Requests Read I O Requests Statistics Start Date and Time Changing Controller Settings To change controller settings 1 From the Dashboard select Controller 2 Mouse over the controller then click the Settings button You may make any of the following settings changes Enter change or delete the alias in the Alias field SMART Log Check the box to enable or uncheck to disable SMART Polling Interva...

Страница 42: ... High Medium Low Off Enable HDD Park Ahead Level 1 HDD Park Ahead Interval 10 1440 Enable HDD Low Rotation Speed Level 2 HDD Low Rotation Speed Interaval 10 1440 Enable HDD Idle Spin Down Level 3 HDD Idle Spin Down Interval 10 1440 3 Click the Save button 4 Click the X icon to close the settings panel Changing Buzzer Settings To change buzzer settings 1 From the Dashboard icon select Controller 2 ...

Страница 43: ...cal drives disk arrays logical drives and other components You can run a background activity immediately or schedule it to run at a later time Scheduling options are described below Setting options for each activity are listed after the scheduling options These settings determine how the background activity affects I O performance Viewing Current Background Activities To view a list of background ...

Страница 44: ...appear 3 Click the Add Schedule button 4 Make schedule settings as desired Choose the option for the activity you want Media Patrol Redundancy Check Spare Check Choose a StartTime from the drop down menus The menus have a 24 hour clock Choose a Recurrence Pattern option daily weekly or monthly For the Daily option enter an interval in the Every field For the Weekly option enter an interval in the ...

Страница 45: ...es for which logical drives should run the redundancy check Check at least one logical drive Click the Save button To return to currently running background activities click the Background Activities button Changing Background Activity Schedule To change an existing scheduled background activity 1 Click on the Background Activities icon 2 Click the Scheduler button The list of scheduled background...

Страница 46: ... months should apply Choose a Start From date from the drop down menus Choose an End On option No end date or perpetual End after a specific number of activity actions Run until a specified date from the drop down menus For Redundancy Check choose Auto Fix option Attempts to repair the problem when it finds an error Check to enable Pause on Error option The process stops when it finds a non repair...

Страница 47: ...d activities will appear 3 Mouse over the background activity then click the Settings button 4 Uncheck the Enable This Schedule box to disable this particular schedule Check the box to enable it 5 Click the Save button To return to currently running background activities click the Background Activities button Deleting a Scheduled Background Activity To delete a scheduled background activity 1 Clic...

Страница 48: ...nging Media Patrol Settings To change Media Patrol settings 1 Click on the Background Activities icon 2 Click the Settings button 3 Check the Enable Media Patrol box to enable the feature uncheck the box to disable it This setting enables or disables Media Patrol for all physical drives 4 Click the Confirm button 5 Click the X icon to close the background activities panel Redundancy Check Redundan...

Страница 49: ...gh Allocates more system resources to Redundancy Check and fewer to data read write operations 4 Click the Confirm button 5 Click the X icon to close the background activities panel Initialization Initialization is normally done to logical drives after they are created from a disk array Initialization sets all data bits in the logical drive to zero This action is useful because there may be residu...

Страница 50: ...re actually using redundant data to rebuild the lost or inaccessible data on one physical drive When a physical drive in a disk array fails and a spare drive of adequate capacity is available the disk array begins to rebuild automatically using the spare drive If there is no spare drive of adequate capacity but the Auto Rebuild function is ENABLED the disk array will begin to rebuild automatically...

Страница 51: ... data read write operations High More system resources are allocated to the rebuild and fewer for data read write operations 4 Check the Enable Auto Rebuild box to enable Auto Rebuild This will initiate a rebuild when you swap out the failed drive with a new one 5 Click the Confirm button 6 Click the X icon to close the background activities panel Migration The term Migration means that you are do...

Страница 52: ...and data read write operations High More system resources are available for migration fewer for data read write operations 4 Click the Confirm button 5 Click the X icon to close the background activities panel PDM Predictive Data Migration PDM is the migration of data from the suspect disk drive to a spare drive PDM is similar to rebuilding a disk array but unlike in rebuilding PDM automatically c...

Страница 53: ...s High More system resources are available to PDM fewer for data read write operations Highlight the current values in the block threshold fields and input new values The reassigned block threshold range is 1 to 512 blocks Error block threshold range is 1 to 2048 blocks 4 Click the Confirm button 5 Click the X icon to close the background activities panel Transition Transition is the process of re...

Страница 54: ... More system resources are available for Transition and fewer for data read write operations 4 Click the Confirm button 5 Click the X icon to close the background activities panel Synchronization Synchronization is automatically applied to logical drives when they are created Synchronization recalculates redundancy data to ensure that the working data on the physical drives is properly in sync Mou...

Страница 55: ...ead write operations High More system resources are available to Synchronization and fewer for data read write operations 4 Click the Confirm button 5 Click the X icon to close the background activities panel Managing Physical Drives Physical drive management includes Viewing a List of Physical Drives Viewing Physical Drive Information Viewing Physical Drive Statistics Viewing Physical Drive SMART...

Страница 56: ... Capacity In terabytes Viewing Physical Drive Information To view physical drive information 1 Click the Physical Drive icon 2 Mouse over the physical drive you want then click the View button Physical drive information includes Physical Drive ID ID number of the physical drive Location Enclosure number and slot number Alias If assigned Physical Capacity Total capacity in TB Configurable Capacity ...

Страница 57: ...ache Enabled or disabled Read Look Ahead Cache Enabled or disabled SMART Feature Set Yes or No SMART Self Test Yes or No SMART Error Logging Yes or No Command Queuing Support TCQ or NCQ Command Queuing Enabled or disabled Queue Depth Number of commands Power Saving Level Supported by this drive Medium Error Threshold Drive Temperature Drive Reference Temperature Adjustable under Viewing Physical D...

Страница 58: ...es Data Transferred Read Data Transferred Write Data Transferred Errors Number of errors Non Read Write Errors Read Errors Write Errors I O Request Number of requests Non Read Write Request Number of requests Read I O Request Number of requests Write I O Request Number of requests Statistics Start Time Time and date Statistics Collection Time Time and date To clear physical drive statistics see Cl...

Страница 59: ...g on the drive SMART Status Enabled or disabled SMART Health Status OK is normal Adjustable under Changing Controller Settings 4 Click the X icon to close the settings panel Locating a Physical Drive This feature causes the drive carrier LEDs to blink for one minute to help you locate the physical drive To locate a physical drive 1 Click the Physical Drive icon 2 Mouse over the physical drive you ...

Страница 60: ...Click the Physical Drive icon 2 Click the Global Physical Drive Settings button 3 Check the following boxes to enable functionality uncheck them to disable Enable Write Cache Enable Read Look Ahead Cache Enable Command Queuing 4 Click the Save button 5 Click the X icon to close the settings panel Changing Individual Physical Drive Settings Drive power status LEDs blink Blue ...

Страница 61: ...ll use these to make disk arrays PassThru drives are visible to your computer and are configured as individual drives They cannot be used to make a disk array 4 Click the Save button 5 Click the X icon to close the settings panel Changing Physical Drive SMART Log Settings To change physical drive SMART log settings 1 Click the Physical Drive icon 2 Mouse over the physical drive you want then click...

Страница 62: ...on by replacing the physical drive and conducting a rebuild operation etc Then clear the PFA condition To clear a Stale or a PFA condition 1 Click the Physical Drive icon 2 Mouse over the physical drive you want then click the Clear button Click the the Confirm button If the physical drive has both a Stale condition and a PFA condition your first click will remove the Stale condition Click the Cle...

Страница 63: ...aking Disk Array Settings To run Media Patrol on your physical drives 1 Click the Background Activities icon The list of background activities will appear 2 Mouse over Media Patrol then click the Start button To pause or resume a Media Patrol 1 Click on the Background Activities icon The list of background activities will appear 2 Mouse over Media Patrol then click the Pause or Resume button To st...

Страница 64: ... Disk Array and Logical Drive Problems Viewing a List of Disk Arrays To view a list of disk arrays do one of the following actions 1 From the Dashboard window click the Disk Array link 2 The list of disk arrays will appear Each disk array lists 1 ID DA0 DA1 etc 2 Alias If assigned 3 Status Normal Degraded or Incomplete Physical Drive missing icon 4 Capacity Data capacity of the array 5 Free Capaci...

Страница 65: ...pacity including used and unused capacity of the physical drives Configurable Capacity Data capacity of the array Free Capacity Unconfigured or unused capacity on the physical drives Max Contiguous Free Capacity The largest single chunk of unused capacity on the physical drives Number of Physical Drives The number of physical drives in this array Number of Logical Drives The number of logical driv...

Страница 66: ...k them The physical drives ID numbers will appear in the field below the diagram 5 When you have finished your settings and choices click the Submit button The new array will appear in the list If you are done creating disk arrays click the Finish button To create additional disk arrays click the Create More button After you create a disk array create a logical drive on it See Creating a Logical D...

Страница 67: ...EED Studio R Utility includes a Wizard to help you set up a disk array logical drives and spare drives To open the Wizard click the Storage menu and choose Wizard The Wizard dialog box will open and offer three configuration methods Wizard dialog box Choose the best method for your needs as per the following table Method User options Suggested for users who are Automatic None New to data storage E...

Страница 68: ...uration dialog box will appear Automatic Configuration dialog box 1 Do one of the following actions If you agree with the proposed configuration click the Submit button The Wizard will create your disk array and logical drive The Wizard can also create a spare drive If you do NOT agree with the proposed configuration click the Cancel button to return to the original Automatic Configuration menu ...

Страница 69: ...bination of Data Redundancy The array remains available if a physical drive fails Media Capacity The greatest possible amount of data capacity Drive Performance The highest possible read write speed Spare Drive Check box to create a hot spare drive R6 and R8 only Number of Logical Drives Enter a number of logical drives to create Application Type Choose how the storage will be used 4 In the Number...

Страница 70: ...with information about the disk arrays logical drives and spare drives you are about to create See example below The Summary dialog box 7 Perform one of the following actions If you accept these parameters click the Submit button The Wizard will create your disk array and logical drives If you have an R6 or R8 the Wizard will also create a spare drive If you do NOT accept these parameters click th...

Страница 71: ...atrol Uncheck to disable on this array For more information see Media Patrol PDM Uncheck to disable on this array For more information see PDM 2 In the Select Physical Drives diagram click the desired drives to add them to your array Drive carriers turn blue when you click them The physical drives ID numbers appear in the field below the diagram 3 Click the Next button to continue The Create Logic...

Страница 72: ... right If any capacity remains you will have the option to create an additional logical drive 3 Click the Next button to continue The Create Spare Drive screen will display Task 3 Spare Drive Creation To create your spare drive 1 For each of the following items accept the default or change the following settings as required Check the Revertible box if you want a revertible spare drive A revertible...

Страница 73: ...mat box checked under Task 2 Logical Drive Creation your logical drives will be formatted automatically If you unchecked the Format box you must format your logical drives manually When the G Technology Utility finishes the partition and format operation new removable drive icons each representing one logical drive will appear on your desktop When you see these icons your new logical drive s will ...

Страница 74: ...to enable or uncheck to disable on this array Enable PDM Check to enable or uncheck to disable on this array 4 Click the Save button Locating a Disk Array This feature causes the drive carrier LEDs to flash for one minute to assist you in locating the physical drives that make up a given disk array To locate a disk array 1 Perform one of the following actions From the Dashboard window click the Di...

Страница 75: ...nning the Locate function to identify a disk array Deleting a Disk Array To delete a disk array 1 Perform one of the following actions From the Dashboard window click the Disk Array link From the Storage menu choose Disk Array 2 Mouse over the disk array you want then click the Delete button 3 In the Confirmation box type the word CONFIRM in the field provided then click the Confirm button Drive p...

Страница 76: ...mation box type the word CONFIRM in the field provided then click the Confirm button The disk array status will change to Transport Ready 4 Remove the physical drives and install them in their new location See Replacing a Physical Drive for more information Rebuilding a Disk Array When you rebuild a disk array you actually rebuild data on one physical drive from redundant data maintained on other ...

Страница 77: ...umber 4 From the Target Physical Drive drop down menu choose a Target physical drive 5 In the Confirmation box type the word CONFIRM in the field provided then click the Confirm button While the disk array is rebuilding The disk array will show a green check icon and a Rebuilding status Logical drives under the disk array will continue to show a yellow icon and a Critical Rebuilding status If the ...

Страница 78: ...button 3 Click the Confirm button Also see Making Rebuild Settings Managing Logical Drives Logical drive management includes Viewing a List of Logical Drives Viewing Logical Drive Information Viewing Logical Drive Statistics Making Logical Drive Settings Viewing Logical Drive Check Tables Creating a Logical Drive Manually Formatting Your Logical Drives Locating a Logical Drive Deleting a Logical D...

Страница 79: ... drive was created Cache Policy Read and write cache settings Array ID ID number of the disk array where this logical drive was created Viewing Logical Drive Information To view logical drive information 1 Do one of the following actions Click the Logical Drive icon From the Storage menu choose Logical Drive The list of logical drives will appear 2 Mouse over the logical drive you want then click ...

Страница 80: ...ller ID Not applicable Tolerable Number of Dead Drives Per Axle Number of physical drives that can fail without the logical drive going offline Synchronized A new logical drive shows No until synchronizing is completed See Synchronization Parity Pace Pertains to some RAID levels WWN Worldwide Number a unique identifier assigned to this logical drive RAID 5 and 6 Algorithm Pertains to RAID 5 and 6 ...

Страница 81: ... Click the Logical Drive icon From the Storage menu choose Logical Drive The list of logical drives will appear 2 Mouse over the logical drive you want then click the Settings button 3 Make setting changes as required Enter change or delete the alias in the Alias field Aliases must have a maximum of 32 characters letters numbers and spaces between characters Choose a Read cache Policy Read Cache R...

Страница 82: ...nconsistent Block Inconsistent blocks for this logical drive meaning that mirror data for RAID levels 1 1E and 10 and or parity data for RAID levels 5 and 6 may contain errors Inconsistencies are identified by the Redundancy Check The Check Table lists Table Type Read Check Write Check or Inconsistent Block Start Logical Block Address The LBA of the first block for this entry Count The number of e...

Страница 83: ... available for an additional logical drive Choose a Stripe size 64KB 128KB 256KB 512KB and 1MB are available Choose a Sector size 512KB 1KB 2KB and 4KB are available Choose a Read cache Policy Read Cache Read Ahead and No Cache are available Choose a Write cache Policy Write Back and Write Through Thru are available TheWrite Cache is always set toWriteThru when the Read Cache is set to NoCache If ...

Страница 84: ...esktop right When you see the icon your logical drive will be ready to use Locating a Logical Drive This feature causes the drive carrier LEDs to flash for one minute to assist you in locating the physical drives that make up a logical drive To locate a logical drive 1 Click the Logical Drive icon The list of logical drives will appear 2 Mouse over the logical drive you want then click the Locate ...

Страница 85: ...the Logical Drive icon From the Storage menu choose Logical Drive The list of logical drives will appear 2 Mouse over the disk array you want then click the Delete button 3 In the Confirmation box type the word CONFIRM in the field provided then click the Confirm button Initializing a Logical Drive Initialization is normally done to logical drives after they are created from a disk array ...

Страница 86: ...he Hex field or use the default 00000000 value 5 Click the Confirm button 6 In the Confirmation box type the word CONFIRM in the field provided then click the Confirm button Pausing and Resuming an Initialization To pause or resume Initialization 1 Click on the Background Activities icon The list of background activities will appear 2 Mouse over Initialization then click the Pause or Resume button...

Страница 87: ... left of the logical drives on which to run Redundancy Check 4 Check the option you want Auto Fix Attempts to repair the problem when it finds an error Pause on Error The process stops when it finds a non repairable error 5 Click the Confirm button Pausing and Resuming a Redundancy Check To pause or resume a Redundancy Check 1 Click on the Background Activities icon The list of background activiti...

Страница 88: ... 2 Mouse over Migrate then click the Start button 3 In the Select Disk Array drop down menu choose the source disk array 4 In the Select Physical Drives diagram click the drives you wish to add to your array The ID numbers of the chosen drives will appear in the field below the diagram 5 Click the Next button 6 Check the box next to the logical drive you want to modify 7 From the drop down menu ch...

Страница 89: ...oose a Source Physical Drive The Source Physical Drive is the drive suspected of possible failure Source Physical Drives are identified by their disk array and sequence numbers in the disk array 4 Choose a Target Physical Drive The Target Physical Drive is the replacement drive Target Physical Drives are identified by their physical drive ID number 5 Click the Confirm button Pausing and Resuming P...

Страница 90: ...rive Spare Drive information will display including ID Spare0 Spare1 etc Status Normal Rebuilding or Failed Missing icon Configurable Capacity Usable capacity of the spare drive Physical Drive ID ID number of the physical drive chosen for this spare Revertible Yes or No Spare Type Global or Dedicated Dedicated to Array ID number of the disk array to which the spare is dedicated Viewing Spare Drive...

Страница 91: ...city of the spare drive Spare Check Status Not Checked or Healthy Media Patrol Enabled or Not Enabled Dedicated to Array ID number of the disk array to which the spare is dedicated Adjustable under Making Spare Drive Settings For Spare Check see Running Spare Check 3 Click the X icon to close the information panel Creating a Spare Drive Manually This feature creates a spare drive only You can also...

Страница 92: ...r spare The drive carrier will turn blue when you click this The physical drive s ID number will appear in the field below the diagram 5 Click the Submit button to continue If you are done creating spare drives click the Finish button To create another spare drive click the Create More button Changing Spare Drive Settings For more information on settings options see Spare Drives To change spare dr...

Страница 93: ... to see Spare Check Status Deleting a Spare Drive This action requires administrator or superuser privileges To delete a spare drive 1 From the Dashboard window click the Spare Drive link The list of spare drives will appear 2 Mouse over the spare drive you want then click the Delete button 3 In the Confirmation box type the word confirm in the field provided then click the Confirm button Running ...

Страница 94: ... array 4 Choose a Target Physical Drive The Target Physical Drive is the drive that replaces the revertible spare Target Physical Drives are identified by their physical drive ID number 5 Click the Confirm button Pausing and Resuming aTransition To pause or resume a Transition 1 Click on the Background Activities icon The list of background activities will appear 2 Mouse over Transition then click...

Страница 95: ... if there is no specific reason to customize the settings G Technology s default format settings are recommended G SPEED Studio R Software With Default Settings Wizard Automatic or Express When you create your logical drives using the Wizard s Automatic or Express options your logical drives are always formatted automatically When the G SPEED Studio R Utility finishes its format operation new remo...

Страница 96: ...you must create your logical drives using the Wizard s Advanced option or create your logical drives manually and you must un check the Format box See Creating a Disk Array and Logical Drive With the Wizard and Creating a Logical Drive Manually To format your logical drives using the G SPEED Studio R Utility with your own settings 1 In the Logical Drive list mouse over the logical drive you want t...

Страница 97: ... Utility application see the online help or the computer s user manual To format your logical drives using the computer s Disk Utility you must create your logical drives using the Wizard s Advanced option or create your logical drives manually and you must un check the Format box See Creating a Disk Array and Logical Drive With the Wizard and Creating a Logical Drive Manually To format your logic...

Страница 98: ...pare drive is a physical drive that you designate to automatically replace the failed physical drive in a disk array See Creating a Spare Drive Manually G Technology s general recommendation is to acquire at least one spare drive and configure the spare s as a global revertible spare drive s Options There are several options you can specify for a spare drive System Options Revertible A revertible ...

Страница 99: ...return to its original status To run the Transition function the spare drive must be revertible In addition you must specify an unconfigured physical drive of the same or larger capacity and the same media type as the revertible spare drive Running aTransition The Transition feature enables you to specify permanent spare drives for your G SPEED Studio R unit Transition is the process of replacing ...

Страница 100: ...ysical drive of equal or greater capacity G SPEED Studio R automatically transitions moves the data from the revertible spare to the new physical drive The new physical drive becomes part of the array and the revertible spare drive returns to its original spare status Transition happens manually when you specify an unconfigured physical drive as a transition target for data from the revertible spa...

Страница 101: ...Maintenance for Your Drive Replace a Failed Disk Drive p 102 InitializeDriveforMac p 104 Restore the Drive Icon p 107 ReformatWith Partitions p 109 ...

Страница 102: ...ents occur the alarm will become audible To mute the audible alarm you can press the Alarm Mute button on the back of the enclosure see image or you can launch the G SPEED Studio R Utility In the utility under the controller settings there is a Buzzer section you can use to mute the alarm This same area can be used to test the alarm by simply clicking on Sound Note About Drive Failure If your G SP...

Страница 103: ...ll show all of the drives and next to its name the status will indicate Dead 4 Right click on the failed drive and select Locate WARNING Make absolutely sure that you remove the correct drive as indicated in the steps below REMOVING THE WRONG DRIVE CAN RESULT IN LOSS OF THE ARRAY AND ALL CONTENT STORED ON YOUR G SPEED STUDIO R ...

Страница 104: ...e drive has spun up the G SPEED Studio R Utility will indicate that the array is rebuilding Rebuild time is approximately two hours per terabyte Once the rebuild is complete G SPEED Studio R will be back to normal protecting your valuable data with optimal efficiency NOTE Replacement and or extra G SPEED Studio R disk modules are available for purchase online at www g technology com products g spe...

Страница 105: ...tions Select Mac OS Extended on the Format menu and enter G SPEED Studio R for the name 4 Click the Erase button in the lower right corner of the window A dialog box will appear asking if you want to erase the G SPEED Studio R partition WARNING THIS NEXT STEP WILL ERASE ALL DATA ON YOUR DRIVE 5 Click on the Erase button to continue A progress bar in the lower right corner of the window will show y...

Страница 106: ...Time Machine dialog box Click the Don t Use button if you do not want to your G SPEED Studio R as a Time Machine backup target 7 Quit Disk Utility After reinitializing the drive the custom icon for G SPEED Studio R will be erased You can optionally restore this icon with the steps on the following page ...

Страница 107: ... will make your drive s appearance on the computer desktop look more attractive and intuitive 1 To get the G SPEED Studio R icon package go to www g technology com support and navigate to your product There will be a link to download the drive icon 2 Once downloaded double click the ZIP file to open Next double click the DMG file to open the G Technology Icons package 3 Click to select the drive i...

Страница 108: ...n its Get Info window below left 5 Select the default icon in the Get Info window below left 6 Press Command V to paste the G SPEED Studio R custom icon into the Get Info window below right 7 The icon for your G SPEED Studio R will now be restored and you can close the Get Info window Your drive is fully ready for use ...

Страница 109: ... space can be used for different purposes For instance you might segment user data from backup data set up a multi boot environment with different operating systems or create a dedicated capture scratch disk for programs such as Final Cut Pro The following steps will guide you through the simple process of partitioning your drive In this example we will partition a 24TB G SPEED Studio R connected ...

Страница 110: ...icon not the G Technology drive icon by clicking it in the left column 3 Click on the Partition button in the main window 4 Select the number of partitions you would like from the Volume Scheme menu Below we have selected 2 Partitions to create two partitions ...

Страница 111: ...on Mac OSX it is recommended to use Mac OS Extended or Mac OS Extended Journaled In the Size field type in a size for the partition Alternately you can drag the bar between each partition to quickly change partition sizes 6 Repeat this process for each partition you have created 7 Click the Apply button in the lower right corner of the window A dialog box will appear asking if you want to erase th...

Страница 112: ...e partitions will be displayed in the Disk Utility s left panel 10 Quit Disk Utility After reinitializing the drive the custom icon for the G Technology drive will have been erased You can optionally restore this icon to each partition with the steps on this page 11 The multiple partitions of your G Technology drive will be displayed on the desktop Your drive is now set up with two or more partiti...

Страница 113: ...Appendix RAID Levels Explained p 114 ...

Страница 114: ...can be accessed as an individual volume Usable storage capacity is 100 of total available storage Disadvantage No fault tolerance failure of one drive in the array results in complete data loss Usable storage space is 50 of total available capacity Usable storage space is 50 of total available capacity Usable storage capacity equals total capacity of all drives in the array less the capacity of on...

Страница 115: ...Support Warranty Technical Support p 116 Limited Warranty p 117 Copyright p 119 ...

Страница 116: ...t If you encounter any difficulties while installing or using your G SPEED Studio R please contact G Technology Technical Support at www g technology com contact contact_support Helpful information for support When contacting Technical Support it s best to be in front of your computer and have the following information available Your G SPEED Studio R serial number on bottom of unit Operating Syste...

Страница 117: ...riod will be measured from the date of sale from HGST to the authorized distributor What does this limited warranty not cover The limited warranty does not cover damage resulting from commercial use misuse accident modification or alteration to hardware or software tampering unsuitable physical or operating environment beyond product specifications improper maintenance or failure caused by a produ...

Страница 118: ...arrier at HGST s shipping point You are responsible for importation of the replaced product if applicable HGST will not return the original drive to consumers therefore the consumer is responsible for moving data to another media before returning Data recovery is not covered under this warranty and is not part of the warranty returns process HGST warrants that replaced products are covered for the...

Страница 119: ...er countries All other trademarks are the property of their respective owners Information regarding products services and offerings may be superseded by subsequent documents and are subject to change without notice For the latest information and specifications regarding G TECHNOLOGY Inc and any of its offerings or services please contact your local G TECHNOLOGY office or the corporate headquarters...

Отзывы: