


28
If we preview the toolpath, we quickly see there is a problem. Note that the skirt does not outline the whole
object, and the first layer is a tiny fraction of what it should be.
You can correct this by manually playing with the model’s rotation in Simplify until you get the first layer to cover
the whole object like it should. This can be a bit tedious, however.
Another option is to import the STL file into a CAD program, and constrain it to one of the ordinal planes, then re-
export the STL. If you have access to a CAD program that can do this, this is typically easier and faster.
Model has Internal Geometry
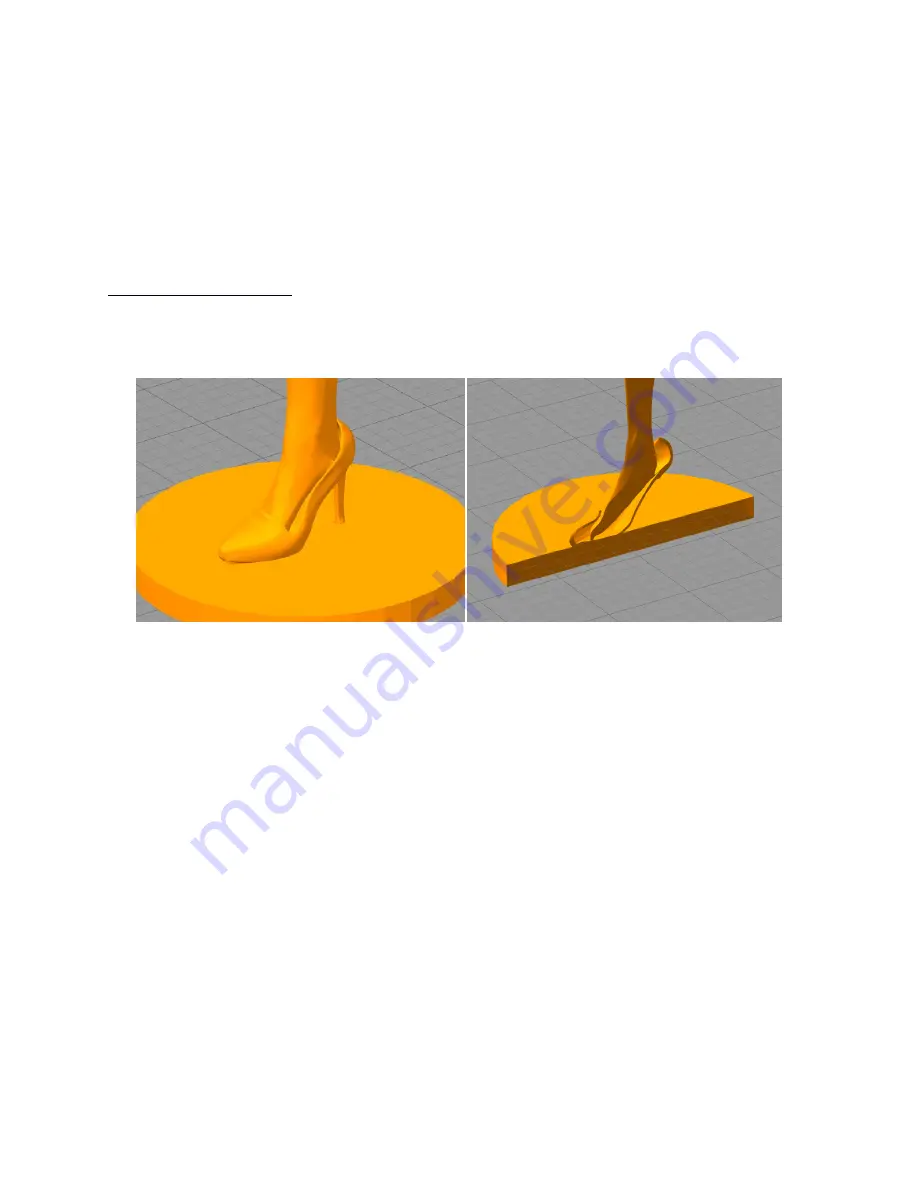
Sometimes when inexperienced people make STL files by combining multiple files into one, they end up with
internal geometry (faces inside the model). This can cause Simplify to become confused about what the outside of
the model actually looks like. Here’s an example of what that can look like.
Here we’re using Simplify’s cross section tool to look inside the STL. What we see is that the creator of this file
most likely took an off-the-shelf model of a shoe, and a model of a leg, and simply put them together. There is a
lot of internal geometry, like the toes on the foot and the fact that the shoe is hollow, that simply does not need to
be there.
Unfortunately there’s usually not a whole lot you can do about a model like this. Passing it through netfabb might
improve the situation, but it’s unlikely to completely fix it. Sometimes these sorts of things print fine even with
errors, and sometimes they don’t. If you decide to give it a try, preview the toolpath carefully before printing!
Overhangs and Support
While it is ideal to minimize overhangs when you orient your parts for printing, Simplify3D has the capability to
automatically detect overhangs, and generate a temporary scaffolding (commonly called “support structure”) to
provide a surface on which to print these features. After the print is complete, this scaffolding is broken away by
hand.
Support structure can be turned on by checking the “generate support” check box in the process settings dialog
window (support structure is on by default in most material settings).
Содержание F306 Generation I
Страница 7: ...7 4 General Info Hardware 4 1 Machine Overview Figure 5 Front View Figure 6 Side View...
Страница 8: ...8 Figure 7 Axes Layout Figure 8 Control Board Detail...
Страница 9: ...9 Figure 9 Print Head Detail Figure 10 Extruder Cold End Detail...
Страница 18: ...18 Figure 20 Filament Fed Across Hobbed Gear Figure 21 Disengaging the Idler Bar Springs...
Страница 57: ...57 In general you should be able to get within 1 of the correct flow rate with 3 trials...


