4. INSTALLATION
34
4.2
Display Unit
Mounting considerations
The display unit can be installed on a desktop,
or flush mounted in a console. When choos-
ing a location keep the following in mind:
• Locate the unit away from the air from air
conditioners.
• The operating temperature range is 5°F to
131°F.
• Locate the unit away from devices that emit
active gas.
• The mounting location must be well venti-
lated.
• Select a location where vibration and shock
are minimal.
• Select a location out of direct sunlight. Pro-
longed exposure to direct sunlight can
cause LCD blackout.
• A magnetic compass will be affected if the
display unit is placed too close to the com-
pass. Observe the compass safe distances
in the safety instructions to prevent distur-
bance to the compass.
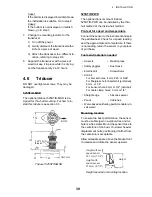
Desktop mounting
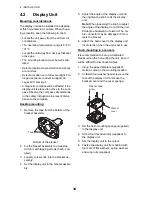
1. Remove the tape from the bottom of the
bracket assembly.
Bottom of the bracket
2. Fix the bracket assembly to a desktop
with four self-tapping screws (5x25, sup-
plied).
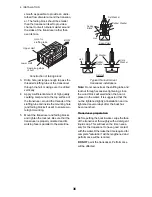
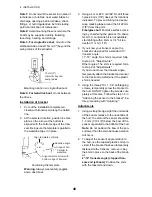
3. Loosely screw knob into the bracket as-
sembly.
4. Set the display unit to the bracket assem-
bly.
5. Adjust the angle of the display unit and
then tighten the knob to fix the display
unit.
Note:
When loosening the knob to adjust
the angle of the display, do not tilt the unit
90-degree backward or forward. The ca-
ble connector may be damaged if it con-
tacts the bracket.
6. Attach the hard cover to the display unit
for protection when the unit is not in use.
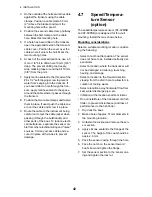
Flush mounting in a console
It is recommended to set up a dedicated
breaker when flush mounting the unit, since it
will be difficult to disconnect cables.
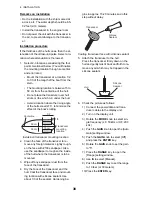
1. Using the paper template (supplied),
make a cutout in the mounting location.
2. Unfasten four washer head screws on the
rear of the display unit to remove the
bracket cover and the cover sponge.
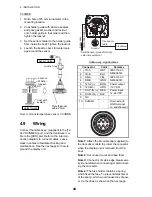
3. Set the flush mounting sponge (supplied)
to the display unit.
4. Screw four threaded rods (supplied) to
the display unit.
5. Set the display unit to the cutout.
6. Fasten the display unit from behind with
four sets of flat washers, spring washers
and wing nuts (supplied).
Tape
Washer head
screw
Bracket
cover
Содержание FCV-627
Страница 1: ...FISH FINDER FCV 627 OPERATOR S MANUAL www furuno com B R I L L GAIN ...
Страница 62: ...D 1 ...
Страница 63: ...D 2 ...


