background image

8

EN

If your TV has no scart input jack but has an 
S-VIDEO input jack, 

1)

Follow the steps 

1)

 to 

3)

 above. 

2)

Connect the S-VIDEO OUT jack on this unit to the 
S-VIDEO input jack on your TV.

3)

Connect the analog AUDIO OUT jacks of this unit to 
the analog audio input jacks of your TV.

4)

Plug in the TV and this unit.

Note:

The S-VIDEO connection only supplies video (picture) 
in the DVD mode. Therefore, video channel setting is 
necessary for watching videotapes. For more details, 
refer to page 9.

If your TV has no VIDEO input jacks, 

1)

Follow the steps 

1)

 to 

3)

 and 

5)

 right under “Connecting 

to a TV.”

2)

Video channel setting is necessary. Refer to page 9.

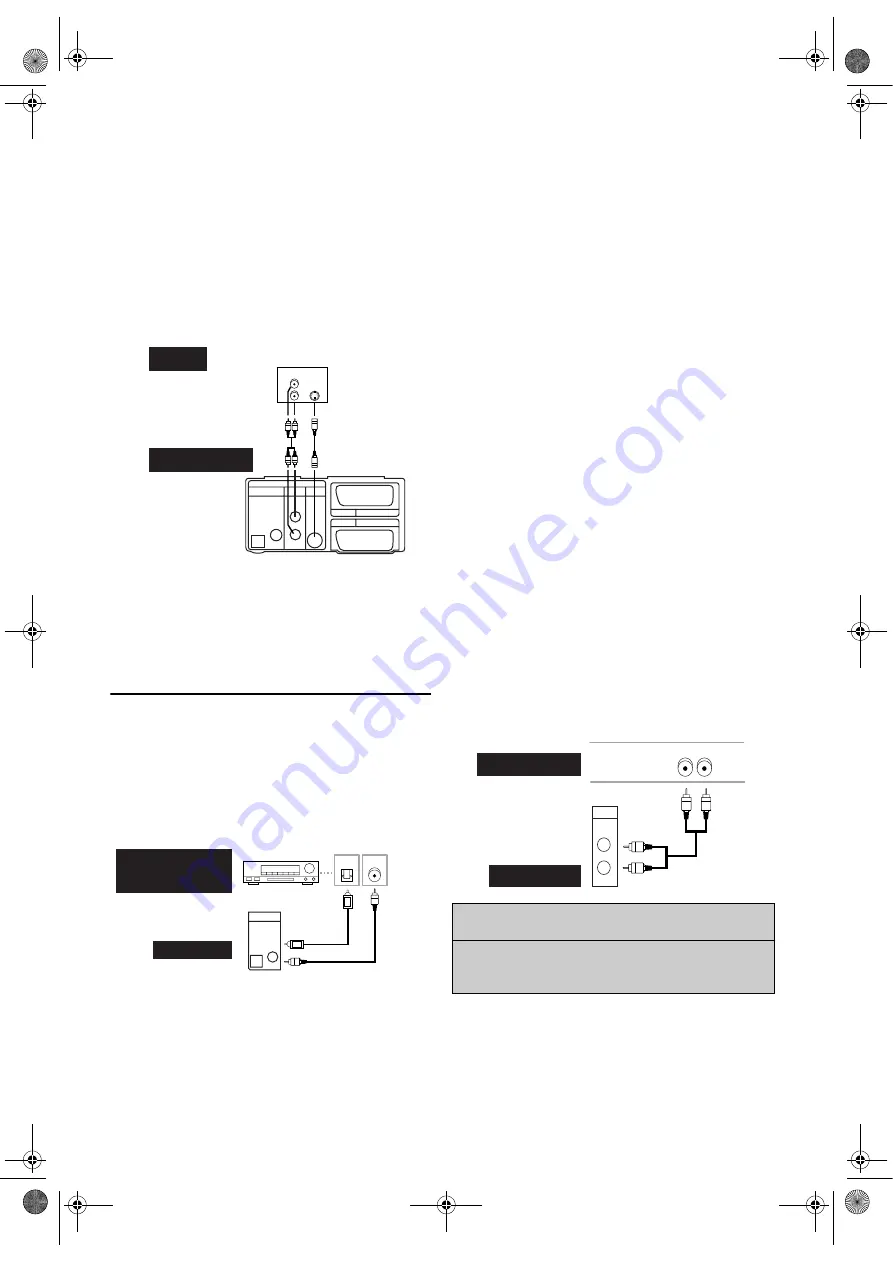
For Better Sound (for DVD Features)

These 2 connections are optional for better sound.

1)

For clear digital sound quality, use the DIGITAL AUDIO 
OUT (either OPTICAL or COAXIAL) jack for the 
connection to your digital audio system.

•If the audio format of the digital output does not match 

the capabilities of your receiver, the receiver will produce 
a strong, distorted sound or no sound at all.

Hints for connecting to a Dolby Digital 
decoder, DTS decoder or MPEG decoder

• By connecting this unit to a Multi-channel Dolby Digital 

decoder, you can enjoy high-quality 5.1ch Dolby Digital 
surround sound as heard in the movie theaters.

• When this unit is connected to a DTS decoder, you can 

enjoy 5.1 channel surround system which reproduces the 
original sound as truthfully as possible. 5.1 channel 
surround system is developed by the Digital Theater 
System, Inc.

• A digital component with a built-in MPEG 2, Dolby 

Digital

TM

, or DTS decoder allows you to enjoy the 

surround sound while producing the effecting of being in a 
movie theater or a concert hall.

• If output is Dolby Digital encoded audio, connect to a 

Dolby Digital decoder, and set “DOLBY DIGITAL” to 
“ON” in the AUDIO menu. (Refer to page 23.)

• If output is DTS encoded audio, connect to a DTS 

decoder, and set “DTS” to “ON” in the AUDIO menu. 
(Refer to page 23.)

• If output is MPEG encoded audio, connect to a MPEG 

decoder, and set “MPEG” to “ON” in the AUDIO menu. 
(Refer to page 23.)

Hints for connecting to an MD deck or DAT 
deck

• The audio source on a disc in a Dolby Digital 5.1 channel 

surround format cannot be recorded as digital sound by an 
MD or DAT deck.

• Unless connected to a Dolby Digital decoder, set “DOLBY 

DIGITAL”  to “OFF” in the AUDIO menu. Playing a 
DVD using incorrect settings may generate noise 
distortion, and damage the speakers. (Refer to page 23.)

• Set  “DOLBY DIGITAL”,  “DTS”, and “MPEG” to 

“OFF” in the AUDIO menu for connecting to an MD 
deck or DAT deck. (Refer to page 23.)

2)

For dynamic sound effects, use the analog AUDIO OUT 
jacks for the connection to your audio system.

VCR

AV2 (DECODER)

DVD/VCR

AV1 (TV)

L

R

DVD

OPTICAL COAXIAL

DIGITAL

AUDIO OUT

ANALOG

AUDIO OUT

S-VIDEO

OUT

L

R

S-VIDEO

IN

AUDIO

IN

TV

DVD / VCR

S-Video cable
(not supplied)

(Back of the unit)

COAXIAL

OPTICAL

or

Digital Audio

Input jacks

Optical

cable

(not supplied)

Coaxial
cable
(not supplied)

DVD / VCR

Dolby Digital decoder,
DTS decoder or
MPEG decoder etc.

OPTICALCOAXIAL

DIGITAL

AUDIO OUT

“DTS” and “DTS Digital Out” are trademarks of 

Digital Theater Systems, Inc. 
Manufactured under license from Dolby 

Laboratories. “Dolby” and the double-D symbol 

are trademarks of Dolby Laboratories.

R

L

AUDIO SYSTEM

DVD/VCR

Audio

L

R

ANALOG

AUDIO OUT

Audio cables

(not supplied)

FUN_ H97L2BD(EN).fm  Page 8  Tuesday, July 27, 2004  6:06 PM

Содержание DBVR-5500

Страница 1: ...5 Auto Return 16 Quick Find 16 Index Search 16 Time Search 16 Copying a Video Tape 17 Status Display 17 DVD Operation 18 Basic Playback 18 Disc Menus 18 Title Menu 18 Calling up a Menu Screen During P...

Страница 2: ...sh objects of any kind into the DVD VCR through the cabinet slots or openings as they could touch electrically live parts or short circuit parts resulting in a fire or electric shock 6 Never spill liq...

Страница 3: ...BROWN LIVE Important As the colours of the wires in the mains lead of this appliance may not correspond with the coloured markings identifying the terminals in your plug proceed as follows The wire w...

Страница 4: ...onal computers On the following disc the sound MAY NOT be heard Super Audio CD Note Only the sound recorded on the normal CD layer can be delivered The sound recorded on the high density Super Audio C...

Страница 5: ...ng playback Press and hold this button for 1 5 seconds or more to search backward through the disc 15 CHANNEL VCR To change TV channels To adjust the tracking manually during playback 16 Remote Sensor...

Страница 6: ...To search forward through the disc DVD To fast forward the tape VCR 24 PLAY To begin playback 25 DVD Press this button before using the remote control for DVD features 26 PAUSE To pause playback To a...

Страница 7: ...conforms to RGB input signal the Euro AV scart connection ensures you the best picture and audio quality However if your TV does not conform to RGB input signal the S VIDEO OUT and analog AUDIO OUT co...

Страница 8: ...ws you to enjoy the surround sound while producing the effecting of being in a movie theater or a concert hall If output is Dolby Digital encoded audio connect to a Dolby Digital decoder and set DOLBY...

Страница 9: ...ng will be necessary if your DVD VCR is connected to the TV via the coaxial cable Use the remote control for this procedure 1 Press VCR 2 Insert a pre recorded tape into the DVD VCR The DVD VCR will s...

Страница 10: ...ature if you intend to use some of the pre tuned channels Use the Manual channel presetting function to tune in the additional channels you require Manual Channel Preset Each channel is tuned manually...

Страница 11: ...s VCR then MENU 2 Press K or L to select INITIAL then press B 3 Press K or L to select CH TUNING then press B 4 Press K or L to select MANUAL then press B 5 Press K or L to select POSITION then press...

Страница 12: ...he DVD VCR Just press PLAY on the DVD VCR Power will automatically turn on and playback will start Direct Button Operation Using the buttons on the remote control Press FUNCTION to turn on and then pr...

Страница 13: ...Function You can record in continuation from previous programme on a pre recorded tape 1 Insert a pre recorded tape Press PLAY to start playback 2 Press PAUSE at the desired point on the tape 3 Press...

Страница 14: ...4 Press B until the desired mode NORMAL SOFT or SHARP is indicated on the TV screen 5 Press MENU to exit Note Once you select the Picture Select mode it stays in effect even after you turn off the DV...

Страница 15: ...Programme 1 is now completed To set another timer programme repeat steps 3 to 10 11 Press MENU to exit 12 Press T SET to activate a timer recording The VCR goes into timer standby mode To Stop a Timer...

Страница 16: ...ould be greater than 1 minute for SP recording and 2 minutes for LP recording Use the remote control for this procedure 1 Press VCR then SEARCH MODE 2 Press K L repeatedly until the number of programm...

Страница 17: ...owners violate copyright laws and may not record clearly Status Display To check the Counter or Clock Channel number press DISPLAY Each time you press DISPLAY TV screen will change as illustrated When...

Страница 18: ...ay appear on the TV screen 3 If disc menu is available on the disc audio languages subtitle options chapters for the title and other options will appear for selection 4 Press Arrow s B K L to select a...

Страница 19: ...peed For DVDs and Video CDs fast forward or reverse search speed is different depending on the disc For DVDs approximate speed is 1 x2 2 x8 3 x50 and 4 x100 For Video CDs approximate speed is 1 x2 2 x...

Страница 20: ...edly during playback to select one among STEREO L CH and R CH STEREO both right and left channels are active stereo L CH only left channel is active R CH only right channel is active Note If the Virtu...

Страница 21: ...CH MODE repeatedly until the Marker Setup screen appears and s or B to choose the desired marker then press ENTER Note Opening the disc tray turning off the power or selecting AC at step 2 and press E...

Страница 22: ...random selections press REPEAT repeatedly until TRACK appears during playback If you like to repeat the entire random selections press REPEAT repeatedly until ALL appears during playback On Screen In...

Страница 23: ...Setting Choose the appropriate audio settings for your equipment It only affects during the playback of DVDs 1 Press SETUP in Stop mode 2 Press s or B to select CUSTOM then press ENTER CUSTOM mode scr...

Страница 24: ...repeatedlly to select PAL or AUTO The default setting is AUTO Parental Control Parental Control limits the DVD viewing that exceeds your settings The password is required to change the PARENTAL LEVEL...

Страница 25: ...yalam 5958 Maltese 5966 Maori 5955 Marathi 5964 Moldavian 5961 Mongolian 5960 Nauru 6047 Nepali 6051 Norwegian NOR 6061 O R Occitan 6149 Oriya 6164 Oromo Afan 6159 Panjabi 6247 Pashto Pushto 6265 Pers...

Страница 26: ...on its surface No return to start up screen when disc is removed Reset the unit by turning it off and on again This unit does not respond to the remote control Aim the remote control directly at the s...

Страница 27: ...s When a disc becomes dirty clean it with a cleaning cloth Wipe the disc from the centre out Do not wipe in a circular motion Do not use solvents such as benzine thinner commercially available cleaner...

Страница 28: ...Low Voltage Directive 73 23 EEC CE Marking 93 68 EEC We declare that the following product DVD VCR Model DBVR 5500 Trade Name Funai is in compliance with following Regulations EN 55013 2001 EN55020 20...

Отзывы: