5
1
(h)
ASE 130
8
33
9
ASE 130
8
41
11
ASE 130
8
49
12
(h)
6
5
7
3
4
2
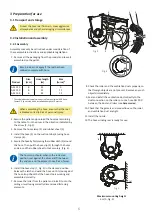
Fig. 4
Fig. 5
Fig. 3
3 Preparation for use
3.1 Transport and storage
Protect the hose reel from rain, snow
aggressive
atmospheres and other damaging circuimstances.
3.2
Installation and assembly
3.2.1 Assembly
Assembly may only be carried out under consideration of
these assembly instructions and applicable regulations.
1. Remove all the packaging from the product and leave it
assembled on the pallet.
Item 2-6 does not apply if the reel has been
ordered complete with hose.
When assembling the hose, ensure that the reel
is blocked correctly. Risk of personal injury.
2. Secure the pallet and pre-load the hose reel according
to the table. Turn the drum in the direction indicated by
the arrow (1, Fig. 3).
3. Remove the hose clamp (2) and rubber sheet (3).
4. Install the hose (5) on the suction tube (4) using hose
clamps (6).
5.
Secure the hose by first placing the rubber cloth (3)
around
the hose. Then pull the hose clip (2) through the holes
and around the rubber sheet to lock securely (Fig. 4)
.
The hose stop should, when in the retracted
position, rest against the drum and fit between
the end cap and the adjacent hose. Risk of wear.
6. Install the hose stop (7, Fig. 3) in the desired position.
Release the latch and wind the hose until it stops against
the hose stop.Check that the hose stop is working and
assembled correctly.
7. Remove the roller from the pallet and install it onto the
ceiling or wall using correctly dimensioned fastening
elements.
Dim.
Hose length
Bias
Product
(mm)
(m)
(turns)*
*
The calculations only apply when using Fumex original AGX hose,
Fumex 3.2 kg nozzle and an installation height of 6 metres.
8. Check the roller and the ventilation ducts properly, so
that foreign objects are not present. Remove any such
objects immediately.
9. Seal and install the ventilation ducts directly to the
duct connection on the roller, or use a hose ASL 200
between the duct and roller (see
Accessories
).
10. Check that the gaskets and connections on the roller
and ventilation duct are tight
.
11. Install the nozzle.
12.
The hose winding reel is ready for use.
Maximum mounting height
- 6 m (h, Fig. 5).
Содержание ASE 130
Страница 1: ...MANUAL A18W35_MASE 130_F_EN...


