background image

Chapter 7 Rack2-Viewer Window Operations

294 | 

Rack2-Filer User's Guide

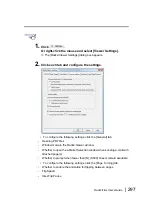
• Automatically correct the document orientation before running 

OCR

Choose whether or not to automatically correct the orientation of a 
document before running OCR. This setting is only possible for Chinese, 
Korean, and Japanese versions. The document is always automatically 
corrected in the English version.

• Automatically rotate landscape pages to portrait (text 

orientation is ignored)

Choose whether or not to automatically rotate landscape pages to 
portrait.
For this function, the ratio of the height and width of the page is the sole 
determinant of whether the orientation of the page is landscape or 
portrait. The page contents are ignored.
If "Allow automatic image rotation" is selected in ScanSnap, it may 
cause unpredictable results.

• When inserting pages from password protected and 

printing-restricted PDF files, attach source files instead of 
showing actual contents

If this checkbox is selected, the actual document is not displayed but a
PDF icon is shown below the page. Clicking on the PDF icon starts
Adobe Acrobat. If the "When inserting pages from password protected 
and printing-restricted PDF files, attach source files instead of showing 
actual contents" checkbox is not selected, when importing a password-
protected PDF file, a password input window will appear.
Inputting the password imports and displays the contents of the PDF file
with Rack2-Viewer.
To import password-protected PDF files, Adobe Acrobat or Adobe
Reader must be installed. However, print-restricted PDF files cannot be 
imported.To import print-restricted PDF files, remove the print restriction 
using Adobe Acrobat and import files.

Pages can be rotated 90 degrees after being imported. 
For details on rotating a page 90 degrees, refer to "7.7 
Rotating a Page 90 Degrees" (Page 173).

Содержание PFU Rack2-Filer

Страница 1: ... for Cloud Mobile Link NEW NEW Creating a Photo Album Page 339 Photo Album Function Added No part of a Rack2 Binder with embedded Viewer exe file produced by the Rack2 Filer export function may be reproduced unless for personal use or distributed in any form via a network without permission ...

Страница 2: ......

Страница 3: ...her registered trademarks or trade names of Adobe Systems Incorporated in the United States and or other countries Pentium is a trademark or registered trademark of Intel Corporation in the United Sates and other countries ScanSnap the ScanSnap logo and Rack2 Filer are registered trademarks or trademarks of PFU LIMITED in Japan ABBYYTM FineReaderTM Engine 2011 ABBYY OCR by ABBYY ABBYY and FineRead...

Страница 4: ...Preface 4 Rack2 Filer User s Guide Screenshots reprinted with permission from Microsoft Corporation This product utilizes PFU s EasyFlip viewer technology PFU LIMITED 2011 ...

Страница 5: ... methods for the windows of Rack2 Filer Rack2 Filer window Rack2 Viewer window Rack2 WorkArea window Chapter 5 Using the ScanSnap with Rack2 Filer This chapter describes how to enable the use of the ScanSnap with Rack2 Filer These steps only need to be performed once Chapter 6 Rack2 Filer Window Operations This chapter describes the operations for the Rack2 Filer window Chapter 7 Rack2 Viewer Wind...

Страница 6: ...ration of Rack2 Filer and appropriate responses Read Chapter 1 Chapter 11 to understand the operations of this application Also read Chapter 12 and Chapter 13 as necessary Windows and images from Windows Vista is used for the description of operations in this manual Symbols used in this manual The following symbols are used in this manual Symbols Descriptions This symbol indicates points that requ...

Страница 7: ...ndows Vista Home Basic Windows Vista Home Basic operating system 32 bit and 64 bit version Windows Vista Home Premium Windows Vista Home Premium operating system 32 bit and 64 bit version Windows Vista Business Windows Vista Business operating system 32 bit and 64 bit version Windows Vista Enterprise Windows Vista Enterprise operating system 32 bit and 64 bit version Windows Vista Ultimate Windows...

Страница 8: ... Vista if there is no need to distinguish between them Windows Vista Home Basic Windows Vista Home Premium Windows Vista Business Windows Vista Enterprise Windows Vista Ultimate The following operating systems are called Windows 7 if there is no need to distinguish between them Windows 7 Starter Windows 7 Home Premium Windows 7 Professional Windows 7 Enterprise Windows 7 Ultimate All the above sys...

Страница 9: ...cky notes highlights stamps and hyperlinks Adobe Acrobat is called Adobe Acrobat in this manual Adobe Reader is called Adobe Reader in this manual Microsoft Office is called Microsoft Office in this manual Microsoft Word is called Microsoft Word in this manual Microsoft Excel is called Microsoft Excel in this manual Microsoft PowerPoint is called Microsoft PowerPoint in this manual Microsoft NET F...

Страница 10: ...ler Help Rack2 Viewer Help and WorkArea Help in addition to this manual Instructions for all Rack2 Viewer Window operations Instructions for all Rack2 WorkArea Window User s Guide This Manual PDF Instructions for Rack2 Filer operations HTML help WorkArea Help HTML help Rack2 Viewer Help HTML help Rack2 Filer Help Getting Started Binder PDF Instructions for installation and basic operations Instruc...

Страница 11: ...out the operations of Rack2 Filer The Rack2 Filer User s Guide is provided in PDF format You can read the Rack2 Filer User s Guide in PDF format by following one of the steps below Select Start All Programs Rack2 Filer User s Guide Start Rack2 Filer and select Help User s Guide Open the UsersGuide pdf under the Rack2 Filer Docs ENU of the setup CD ROM Adobe Acrobat or Adobe Reader is necessary to ...

Страница 12: ... Help is opened when the Help button in Rack2 Viewer window is clicked Also an explanation of the dialog box appears when you click the Help button in the dialog box WorkArea Help Read this Help to learn about the operations of Rack2 Filer in the Rack2 WorkArea window and when you have questions about the operations of the Rack2 WorkArea window Help is opened when the Help button in Rack2 WorkArea...

Страница 13: ...Rack2 Filer Rack2 Viewer Window 31 1 6 The Window Structure of Rack2 Filer Rack2 WorkArea Window 35 1 7 Basic Operation Workflow 38 Chapter 2 Operating Environment 39 2 1 Operating Environment 40 Hardware environment 40 Software environment 41 Scanner environment 41 Software required for using a cloud service mobile device 42 Other notes 42 2 2 Limitations on Operations on Shared Data in the Netwo...

Страница 14: ...iler window 60 4 2 Opening Closing the Rack2 Viewer Window 61 Opening the Rack2 Viewer window 61 Closing the Rack2 Viewer Window 61 4 3 Launching Closing the Rack2 WorkArea Window 62 Launching the Rack2 WorkArea window 62 Closing the Rack2 WorkArea window 64 Chapter 5 Using the ScanSnap with Rack2 Filer 65 5 1 Using S1100 S1300 S1500 with Rack2 Filer 66 Specifying the application in ScanSnap Manag...

Страница 15: ...ing the Cabinet Display Mode 101 6 12 Changing the Background Style of a Cabinet 103 6 13 Creating a Binder 105 6 14 Creating a Card Binder 106 6 15 Changing Binder Settings 109 6 16 Adding an Image Imported from ScanSnap to a Binder Spine 112 6 17 Adding an Image to a Binder Spine 115 6 18 Deleting a Binder 117 6 19 Moving a Binder 119 Moving a binder using drag and drop 119 Moving a binder using...

Страница 16: ...to the WorkArea 148 6 31 Setting the Rack2 Filer Options 149 LibRoot Folders tab settings 150 ScanSnap Rack2 tab settings 152 6 32 Data Backup 154 6 33 Moving Data to Another Computer 155 Chapter 7 Rack2 Viewer Window Operations 157 7 1 Scanning Documents Using an Image Scanner fi Series Scanner 158 7 2 Scanning Documents Using the ScanSnap 161 7 3 Importing Source Files 163 7 4 Flipping the Pages...

Страница 17: ... on a specified region of a page 202 Run OCR on a specified sheet 203 Run OCR when inserting files 204 Run OCR via the ScanSnap S1100 S1300 S1500 marked keyword function 206 Run OCR on all pages of a binder 207 7 20 Searching for a Page 208 Setting a search string 209 Searching for a page 211 Highlighting search results 212 7 21 Printing a Page 215 Printing a page 215 Printing in 2 page spread mod...

Страница 18: ...g multiple sheets to the clipboard 245 Moving to the WorkArea 247 7 31 Copying Sheets 248 Copying a single sheet to the clipboard 248 Copying multiple sheets to the clipboard 250 Copying a single sheet to the WorkArea 251 Copying multiple sheets to the WorkArea 251 7 32 Pasting Sheets 252 7 33 Specifying Multiple Sheets 253 7 34 Allocating Sheets into One Page 258 Allocating two pages into one pag...

Страница 19: ...rds 286 7 49 Deleting Cards 287 7 50 Saving Cards 288 7 51 Printing Cards 289 7 52 Sending Cards as e Mail 290 7 53 Configuring Viewer Settings 291 Chapter 8 Exporting to a Cloud Service Mobile Device 301 8 1 Selecting Data to Be Exported 302 Selecting a binder and exporting it 302 Exporting a page 303 Exporting a stack 304 8 2 Exporting to Cloud Service 306 Exporting to Evernote 306 Exporting to ...

Страница 20: ... photo binder 346 Importing a photo and document 347 Editing a page 351 9 3 Exporting photos or documents from a photo binder 363 Selecting a photo or document and saving it 363 Selecting multiple photos or documents and saving them 364 9 4 Notes for Using Photo Binder 366 Operations that require caution 366 Operations that cannot be performed 368 Chapter 10 Other Functions 371 10 1 Sending Data f...

Страница 21: ...s Window 391 11 3 Adding a Backup Schema 393 11 4 Running a Backup Schema 397 11 5 Opening the Restore Window 399 11 6 Restoring the Data in LibRoot Folder 401 11 7 Restoring a Specified Binder 402 11 8 Viewing a Restored Binder 406 11 9 Viewing the Logfile Settings Window 407 Chapter 12 Troubleshooting 409 Chapter 13 Messages 419 13 1 Rack2 Filer Window Messages 420 13 2 Rack2 Viewer Window Messa...

Страница 22: ...Contents 22 Rack2 Filer User s Guide ...

Страница 23: ...s Guide 23 Chapter 1 Introduction to Rack2 Filer This chapter describes features of Rack2 Filer how the data is managed in Rack2 Filer the layout of windows in Rack2 Filer and the basic operation workflow of Rack2 Filer ...

Страница 24: ...from a bookshelf and allows you to turn pages and add sticky notes directly and naturally Easy to search for information You can effectively and efficiently find specific files based on search conditions such as the Title or Sticky Note contents No space is needed for keeping paper work Since the software allows you to scan files and documents as source files for management and sorting no space is...

Страница 25: ...LibRoot folders In one LibRoot folder you can create up to 6 libraries In one library you can create up to 20 cabinets In one cabinet you can create up to 21 binders In total up to 2 520 6 x 20 x 21 binders can be managed per LibRoot folder in Rack2 Filer Up to 1 000 pages can be managed in a Binder The relationship between the three terms is illustrated as follows Manage the files in this product...

Страница 26: ... from their organization The following is an example Do not directly edit the data rename or move the file or the folder stored in a LibRoot folder using other applications The data may not be shown correctly in Rack2 Filer Library Name Admin Dept Personnel Accounting Job Rules System Recruitment Development Dept Dept 1 Dept 2 Dept 5 Specs Plan Project Binder Name Cabinet Name LibRoot Folder Name ...

Страница 27: ...ow Rack2 WorkArea window This is used as a temporary storage area when moving sheets between the binders The following operations can be performed Insert files Change the page order Delete pages To open the Rack2 WorkArea window on the Rack2 Filer or Rack2 Viewer window click the WorkArea button For versions later than Rack2 Filer version 3 0 the following function uses a WorkArea for the same pur...

Страница 28: ...ow Page 29 1 5 The Window Structure of Rack2 Filer Rack2 Viewer Window Page 31 1 6 The Window Structure of Rack2 Filer Rack2 WorkArea Window Page 35 Double click the program icon created the desktop or run the program from Start menu Rack2 Filer Window Double click the binder you want to read Rack2 Viewer Window Rack2 WorkArea Window plan Communication Report Catalog2 Catalog1 Click the WorkArea b...

Страница 29: ...ton Button description New Binder button Used to create a new binder Operate Binder button Used to perform the following operations Binder Settings Move Binder Delete Binder Duplicate Binder Copy Pages to WorkArea Move Pages to WorkArea Import Binder Export Binder Folder View Libraries and cabinets which manage binders appear here Binder View Binders managed in cabinets appear here ...

Страница 30: ...ibrary Setup Cabinet Setup Change Cabinet Background Style Rearrange LibRoot Folders Libraries Cabinets Options Help button Used to open the following Rack2 Filer User s Guide PDF Topic Search Rack2 Filer Help License Agreement About Rack2 Filer Version Information In addition online update can be performed Exit button Used to exit the Rack2 Filer window WorkArea button Used to open the Rack2 Work...

Страница 31: ...n Width button Displays one page at a time page width mode The button is displayed in 2 page spread mode The button changes to after the button is clicked and the window mode is changed to the page width mode Page Range Input Field Shows the number of pages as current page total pages Directly inputting a page number is also possible Page range input field will be highlighted in green for the sele...

Страница 32: ...lection mode of photos documents and comments The button changes to after the button is clicked and the selection mode is enabled Displayed for a photo binder Sticky button Used to add sticky notes to pages Highlight button Used to add highlights to pages Stamp button Used to add stamps to pages Divider button Used to insert divider sheets to classify pages in a binder Contents button Used to inse...

Страница 33: ...ct multiple sheets Copy button Used to copy the selected sheet s to the clipboard Move button Used to cut the selected sheet s and move it to the clipboard Paste button Used to paste the sheet s or page s copied or moved to the clipboard to the front of the currently displayed page Delete button Used to delete the selected sheet s Edit Source button Used to edit the inserted source file Cancel but...

Страница 34: ...age When this button is clicked on a page in which the page display is rotated the previous page is displayed This is displayed in page width mode or when the page has been rotated right or left 90 degrees Down arrow button Used to show the lower part of the currently shown page When this button is clicked on a page in which the page display is rotated the next page is displayed This is displayed ...

Страница 35: ... Window The following is a description of the structure of the Rack2 WorkArea window Rack2 WorkArea window button Button description Rack2 Filer button Used to switch to the Rack2 Filer window Stack button Used to perform the following operations Get File Save As Print Send As e Mail ...

Страница 36: ...ted pages into a single stack Split All button Used to split stack into single pages Detach button Used to detach current page from stack View button Used to perform the following operations Sort Stacks By Thumbnail Size Show ScanSnap Mark View Stack Pages Reload Help button Used to open the WorkArea Help pages Close button Used to close the Rack2 WorkArea window Previous Page button Used to displ...

Страница 37: ...specified page has been expanded Annotations button Used to display the annotations This is displayed when a specified page has been expanded Close button Used to close the specified page display This is displayed when a specified page has been expanded Rack2 WorkArea window button Button description ...

Страница 38: ...anner fi Series scanner or ScanSnap For more details refer to Chapter 7 Rack2 Viewer Window Operations Page 157 The Rack2 Viewer window appears 7 Click Flip through pages of the binder 6 6 Drag on an area to zoom Parts of a page can be zoomed Select a cabinet in which to create a binder from the tree A binder is created The Binder Settings dialog box appears The PDF file is created by using the Ra...

Страница 39: ...Rack2 Filer User s Guide 39 Chapter 2 Operating Environment This chapter describes the operating environment of Rack2 Filer and limitations in network sharing and WorkArea ...

Страница 40: ...s XP Windows Vista Windows 7 CPU Pentium III 600 MHz or more Pentium 4 1 8 GHz or more Memory 256 MB or more 512 MB or more is recommended 512 MB or more 1 GB or more is recommended For 32 bit version 1 GB or more For 64 bit version 2 GB or more Disk volume System drive 10 MB or more disk space When using color data it is necessary to specify approximately 400 MB or more disk space and virtual mem...

Страница 41: ...ce Chatter SugarSync iPad iPhone iPod touch Scanner environment 1 This also includes ScanSnap S1500M In this manual S1500 refers to S1500 and S1500M Item Requirements Operating system Windows 2000 Professional 1 Windows XP 1 Windows Vista Windows 7 NET Framework NET Framework 3 0 or 3 5 Required for using Google Docs Salesforce Chatter and iPad iPhone iPod touch Item Requirements Scanner Image Sca...

Страница 42: ...tion installed on the mobile device in order to export Rack2 Filer data to it Download ScanSnap Connect Application for mobile devices from an application store such as the App Store Other notes This product does not support the use of Unicode If Unicode characters are used they may not be displayed correctly or the product may not work properly If Windows System Restore is performed and a problem...

Страница 43: ...se a Windows server A Windows server is an environment where the OS installed is one of the following and is operating as a file server Windows Server 2008 Windows Server 2003 Windows 2000 Server Windows 7 Professional Windows 7 Enterprise Windows 7 Ultimate Windows Vista Ultimate Windows Vista Enterprise Windows Vista Business Windows XP Professional Windows 2000 Professional Specify the LibRoot ...

Страница 44: ...der Setting up the library Setting up the cabinet Changing the background style of a cabinet Changing binder settings Deleting the binder Moving copying duplicating the binder Moving copying the sheet s to the WorkArea Exporting the binder Arranging binders When you attempt to open a binder that has already been opened by another user the message The selected binder is in use Do you want to open t...

Страница 45: ...on WorkArea are listed below 1 Card size data only approximately 91mm x 55mm Binder type Moving data from the binder to WorkArea Moving data from WorkArea to the binder Normal binder Available Available Card binder Not available Available 1 Photo binder Available Available ...

Страница 46: ...Chapter 2 Operating Environment 46 Rack2 Filer User s Guide ...

Страница 47: ...ler User s Guide 47 Chapter 3 Installation and Uninstallation This chapter describes the following operations Installation of Rack2 Filer Uninstallation of Rack2 Filer Upgrading Rack2 Filer Updating Rack2 Filer ...

Страница 48: ...d then install Rack2 Viewer Rack2 Viewer window Install Rack2 Filer before Rack2 Viewer 1 Insert the setup CD ROM into the CD ROM drive D The Rack2 Filer setup main window appears 2 Click the Install Product button D The installation wizard appears Close all applications before installation A user must login with Administrators privileges or with computer administrator privileges Insert ...

Страница 49: ...e terminated To install Rack2 Filer you must accept the terms of the license agreement D The Information window appears once you click the Yes button 5 Confirm the content of Information and click the Next button The Information contains content not included in the manual such as important notices for installation and reference information Make sure to confirm it D The Choose Destination Location ...

Страница 50: ...k the Next button D The Start Copying Files window appears 7 Confirm the installation content and click the Next button D Rack2 Filer is installed The Rack2 Viewer installation window appears 8 Click the Next button D The License Agreement window appears To change the installation directory click the Browse button The Choose Folder dialog box appears Choose the installation folder using this dialo...

Страница 51: ...he manual such as important notices for installation and reference information Make sure to confirm it DThe Choose Destination Location window appears 11 Confirm the installation directory and click the Next button In most cases you do not need to change the installation directory Click the Next button DThe Start Copying Files window appears 12 Confirm the installation content and click the Next b...

Страница 52: ...f only installing the Rack2 Viewer window use the following steps 1 Insert the setup CD ROM into the CD ROM drive 2 Double click Setup exe in the View folder under the Rack2 Filer folder 3 The installation window appears Follow the prompts of the installation windows For more information refer to 8 Click the Next button on Page 50 ...

Страница 53: ...k Control Panel D The control panel is displayed 2 Click Uninstall a program D The Uninstall or change a program dialog box appears 3 Select Rack2 Filer from the list of installed programs If Rack2 Folder Monitor Software is already installed first uninstall Rack2 Folder Monitor Software and then uninstall Rack2 Filer For the procedure to uninstall Rack2 Folder Monitor Software refer to Uninstalli...

Страница 54: ...onfirm file deletion appears 5 Click the OK button D Rack2 Filer is uninstalled 6 Click the OK button D The Rack2 Viewer is uninstalled The window showing that uninstallation is complete appears when finished 7 Choose to restart your computer right away or later and click the Finish button D Uninstallation is complete ...

Страница 55: ...rst uninstall the previous version of Rack2 Folder Monitor Software and then upgrade For the procedure to uninstall Rack2 Folder Monitor Software refer to Uninstalling Rack2 Folder Monitor Software Page 380 To upgrade Rack2 Folder Monitor Software first upgrade Rack2 Filer and then install the latest version of Rack2 Folder Monitor Software Previous settings information will be preserved Close all...

Страница 56: ...dows Start menu select All Programs Rack2 Filer Online Update Or in the Rack2 Filer window click and select Online Update D If a new update is available an update confirmation message will appear In order to update Rack2 Filer an operating environment where the internet is available is required A user must login with Administrators privileges or with computer administrator privileges The maintenan...

Страница 57: ...downloaded and started Install the update according to the instructions displayed on the screen Exit all running programs before installing the update If the latest maintenance program is already applied The latest version of the program is already installed There is no need to update message appears ...

Страница 58: ...Chapter 3 Installation and Uninstallation 58 Rack2 Filer User s Guide ...

Страница 59: ...Rack2 Filer User s Guide 59 Chapter 4 Launching Closing Rack2 Filer This chapter describes how to launch and close windows for Rack2 Filer Rack2 Filer window Rack2 Viewer window Rack2 WorkArea window ...

Страница 60: ...cribes how to launch and close the Rack2 Filer window Launching the Rack2 Filer window 1 Double click the program icon on the desktop Closing the Rack2 Filer window 1 Click in the Rack2 Filer window When launching from the Start menu click the Start button point to All Programs and then click Rack2 Filer Rack2 Filer in this order ...

Страница 61: ...ndow double click the binder you want to view You can also right click on the spine of the binder and select Open Binder D The binder can be viewed right after the Rack2 Viewer window is opened Closing the Rack2 Viewer Window 1 Click in the Rack2 Viewer window After having edited or added a page a message confirming whether to update the binder or not is displayed To update click the Yes button ...

Страница 62: ...62 Rack2 Filer User s Guide 4 3 Launching Closing the Rack2 WorkArea Window This section describes how to launch and close the Rack2 WorkArea window Launching the Rack2 WorkArea window 1 Click in the Rack2 Filer window or Rack2 Viewer window ...

Страница 63: ...ct Multi Sheet Selection Then right click to select Move Move Pages x xx to WorkArea Right click and point to Cut Move and select Sheet to WorkArea Right click and point to Cut Move and select Divider Section to WorkArea Right click to select Multi Sheet Selection Then right click to select Copy Copy Pages x xx to WorkArea Right click and point to Copy and select Page to WorkArea Right click and p...

Страница 64: ...Chapter 4 Launching Closing Rack2 Filer 64 Rack2 Filer User s Guide Closing the Rack2 WorkArea window 1 Click in the Rack2 WorkArea window ...

Страница 65: ...nSnap documents can be imported to a binder simply by pressing the scan button on the ScanSnap The ScanSnap must be purchased separately from Rack2 Filer A data storage destination from ScanSnap can be specified For more details refer to ScanSnap Rack2 tab settings Page 152 The following ScanSnap models can be used with Rack2 Filer Support services are no longer available for the following scanner...

Страница 66: ...ng the Quick Menu Documents scanned with S1100 S1300 S1500 have the following features when using with Rack2 Filer A section outlined with a highlight pen can be cut in the WorkArea A section marked with a highlight pen can be considered as a keyword and automatically extracted when performing a search For details about settings refer to the ScanSnap S1100 S1300 S1500 Help or Run OCR via the ScanS...

Страница 67: ...he Save tab Color high compression in the Color mode setting on the Scanning tab If scanning with S1100 S1300 S1500 the following setting is recommended On the Scanning tab select the Option button Then on the Read mode option dialog box that appears uncheck the Allow automatic image rotation checkbox It is recommended that you right click the ScanSnap Manager icon on the taskbar and uncheck Show ...

Страница 68: ...canSnap Manager icon on the taskbar Or right click the ScanSnap Manager icon on the taskbar and select Scan Button Settings 2 If selected clear the Use Quick Menu checkbox 3 Click the Detail button When the operating system is Windows 7 clicking on the taskbar displays the ScanSnap Manager icon ...

Страница 69: ...Rack2 Filer User s Guide 69 4 On the Application tab select Rack2 Filer for Application ...

Страница 70: ... Rack2 Filer by using the ScanSnap S1100 S1300 S1500 Quick Menu For more details about scanning with ScanSnap S1100 S1300 S1500 refer to ScanSnap Operator s Guide provided with ScanSnap S1100 S1300 S1500 1 Double click the ScanSnap Manager icon on the taskbar Or right click the ScanSnap Manager icon on the taskbar and select Scan Button Settings When the operating system is Windows 7 clicking on t...

Страница 71: ...documents onto the ScanSnap S1100 S1300 S1500 and then press the scan button D Scanning starts When scanning is completed the Quick Menu appears 4 Select Scan to Rack2 Filer from the Quick Menu When using ScanSnap S1100 press the scan button after scanning is complete to display the Quick Menu ...

Страница 72: ...aves scanned data into the WorkArea of Rack2 Filer Request confirmation each time checkbox A confirmation window appears when saving the data in the WorkArea OK button Saves the data in the WorkArea Cancel button Cancels saving the data Binder currently selected in the Rack2 Filer window Saves the scanned data into the binder selected in the Rack2 Filer window Binder selection dialog for individua...

Страница 73: ...d data is saved to the specified binder Clicking the Cancel button cancels saving the data For a LibRoot folder that is not shown in the Rack2 Filer window Hidden is displayed before the LibRoot Alias For a card binder CARD is displayed before the title For a photo binder Photo is displayed before the title ...

Страница 74: ...er User s Guide 7 Click the OK button D The ScanSnap Rack2 window is closed and the screen returns to the Quick Menu 8 Click Scan to Rack2 Filer D A PDF file is created from the scanned data and the file is saved to the storage destination specified in Step 6 ...

Страница 75: ...nSnap Manager This section describes how to enable the use of ScanSnap S300 S510 S500 by specifying the application in ScanSnap Manager The following settings in the ScanSnap Manager Scan and Save Settings window will be disabled Rename file after scanning Color high compression in the Color mode setting on the Scanning tab If scanning with S300 S510 S500 the following setting is recommended On th...

Страница 76: ...ler 76 Rack2 Filer User s Guide It is recommended that you right click the ScanSnap Manager icon on the taskbar and uncheck Show scanning results When the operating system is Windows 7 clicking on the taskbar displays the ScanSnap Manager icon ...

Страница 77: ...Button Settings For ScanSnap S300 or ScanSnap S510 first right click the ScanSnap Manager icon on the taskbar If there is a check mark on the left side of the Use Quick Menu select Use Quick Menu again to clear the check Perform operations without the check mark on the left side of the Use Quick Menu ...

Страница 78: ... Click the OK button D The ScanSnap can now be used with Rack2 Filer Using the Quick Menu This section describes how to enable the use of ScanSnap S300 S510 with Rack2 Filer by using the ScanSnap Quick Menu For more details about scanning with ScanSnap S300 S510 refer to ScanSnap S300 Operator s Guide or ScanSnap S510 Operator s Guide ...

Страница 79: ... starts When scanning is completed the ScanSnap Quick Menu appears 3 Place the mouse pointer on Scan to Rack2 Filer in the Actions List on the left side of the ScanSnap Quick Menu D A description of the selected action is displayed on the right side of the window 4 To change the settings in Scan to Rack2 Filer place the mouse pointer on to display the Settings button and click the button If the se...

Страница 80: ...rea Saves scanned data into the WorkArea of Rack2 Filer Request confirmation each time checkbox A confirmation window appears when saving the data in the WorkArea OK button Saves the data in the WorkArea Cancel button Cancels saving the data Binder currently selected in the Rack2 Filer window Saves the scanned data into the binder selected in the Rack2 Filer window ...

Страница 81: ...he data storage destination binder and click the OK button The scanned data is saved to the specified binder Clicking the Cancel button cancels saving the data For a LibRoot folder that is not shown in the Rack2 Filer window Hidden is displayed before the LibRoot Alias For a card binder CARD is displayed before the title For a photo binder Photo is displayed before the title ...

Страница 82: ...ler User s Guide 5 Click the OK button D The ScanSnap Rack2 window is closed and the screen returns to the Quick Menu 6 Click Scan to Rack2 Filer D A PDF file is created from the scanned data and the file is saved to the location that was specified in Step 4 ...

Страница 83: ...Rack2 Filer User s Guide 83 Chapter 6 Rack2 Filer Window Operations This chapter describes operations using the Rack2 Filer window ...

Страница 84: ... a network folder as a LibRoot folder Rack2 Filer data can be shared between multiple users However operations are restricted for data that is being accessed by another user For details refer to 2 2 Limitations on Operations on Shared Data in the Network Page 43 When a folder in the local computer is specified as a LibRoot folder the folder must be in the local hard disk drive or external hard dis...

Страница 85: ... is closed and the LibRoot path shown in the input field 4 To show the contents of the LibRoot folder on the Rack2 Filer window select Show contents of the LibRoot 5 Specify the LibRoot Alias in LibRoot Alias within 30 characters If Show contents of the LibRoot is selected in Step 4 the LibRoot Alias specified here is shown on the Rack2 Filer window Select Show contents of the LibRoot for at least...

Страница 86: ...Chapter 6 Rack2 Filer Window Operations 86 Rack2 Filer User s Guide 6 Click the OK button D The LibRoot folder is set ...

Страница 87: ...ew 1 Click and select Rearrange LibRoot Folders Or right click on the LibRoot tree and select Rearrange LibRoot Folders D The Rearrange LibRoot Folders dialog box appears 2 Select a LibRoot folder to be rearranged in LibRoot 3 Use the Up and Down buttons to change the display order 4 Click the OK button D The LibRoot folders are rearranged ...

Страница 88: ...e a library to manage cabinets Up to six libraries can be created for one LibRoot folder 1 Click and select Libraries Or right click on the LibRoot folder tree and select New Library D The Library Setup dialog box appears 2 Enter a new library name within 40 characters 3 Click the Add New Library button D A library is created ...

Страница 89: ...brary 1 Select a library that you want rename from the directory tree 2 Click and select Libraries Or right click on the library tree and select Rename Library D The Library Setup dialog box appears with the name of the selected library 3 Enter a new name for the library within 40 characters ...

Страница 90: ...Chapter 6 Rack2 Filer Window Operations 90 Rack2 Filer User s Guide 4 Click the Rename Library button D The library name is changed ...

Страница 91: ...ting a Library This section explains how to delete a library 1 Select a library that you want to delete from the directory tree A library containing cabinets cannot be deleted Delete the cabinets in the library before deleting the library ...

Страница 92: ...dialog box appears with the name of the selected library 3 Click the Delete Library button D A message dialog box appears 4 Click the OK button D The library is deleted A library can also be deleted by right clicking on the library tree and selecting Delete Library In this case the message in Step 4 appears right away ...

Страница 93: ...lect the library click and select Rearrange Libraries Or right click on the library tree and select Rearrange Libraries D The Rearrange Libraries dialog box appears 2 Select a library to be rearranged in Library 3 The order of the libraries can be rearranged using the Up and Down buttons 4 Click the OK button D The libraries are rearranged ...

Страница 94: ...anage binders Up to 20 cabinets in a library can be created 1 Select a library in which you want to create a cabinet from the directory tree D The content of the selected library appears 2 Click and select Cabinets Or right click on the library tree and select New Cabinet D The Cabinet Setup dialog box appears 3 Enter a cabinet name within 32 characters p ...

Страница 95: ...Rack2 Filer User s Guide 95 4 Click the Add New Cabinet button D The cabinet is created ...

Страница 96: ...abinet 1 Select a cabinet that you want to rename from the directory tree D The content of the selected cabinet appears 2 Click and select Cabinets Or right click on the cabinet tree and select Rename Cabinet D The Cabinet Setup dialog box appears with the name of the selected cabinet 3 Enter a new name for the cabinet within 32 characters ...

Страница 97: ...Rack2 Filer User s Guide 97 4 Click the Rename Cabinet button D The cabinet is renamed ...

Страница 98: ...Guide 6 9 Deleting a Cabinet This section explains how to delete a cabinet from a library 1 Select a cabinet that you want to delete from the directory tree A cabinet containing binders cannot be deleted Delete the cabinet after deleting all binders in the cabinet ...

Страница 99: ...me of the selected cabinet 3 Click the Delete Cabinet button D A message dialog box appears 4 Click the OK button D The cabinet is deleted from the library The cabinet can also be deleted by right clicking on the cabinet tree and selecting Delete Cabinet In this case the message in Step 4 appears right away ...

Страница 100: ... displayed in folder view 1 Select the cabinet click and select Rearrange Cabinets Or right click on the cabinet tree and select Rearrange Cabinets D The Rearrange Cabinets dialog box appears 2 Select a cabinet to be rearranged in Cabinet 3 The order can be changed using the Up and Down buttons 4 Click the OK button D Cabinets are rearranged ...

Страница 101: ...he cabinet display mode can be switched between 1 Shelf View and 3 Shelf View The switching buttons are as follows For 1 Shelf View For 3 Shelf View 1 Click or D Pressing the button will toggle the setting back and forth between 1 Shelf View and 3 Shelf View 1 Shelf View ...

Страница 102: ...2 Filer Window Operations 102 Rack2 Filer User s Guide 3 Shelf View The cabinet display mode can also be switched by right clicking within the cabinet except on the binders and selecting 1 Shelf View or 3 Shelf View ...

Страница 103: ...nt of the selected cabinet appears 2 Click and select Change Cabinet Background Style You can also perform the following Select a cabinet from the cabinet tree and right click then select Change Background Style Right click in an empty space in a cabinet and select Change Cabinet Background Style D The Cabinet Background Style Settings dialog box appears 3 Select the style of the cabinet backgroun...

Страница 104: ...Chapter 6 Rack2 Filer Window Operations 104 Rack2 Filer User s Guide D The cabinet background style is changed ...

Страница 105: ...to create a binder from the cabinet tree D The content of the selected cabinet appears 2 Click You can also right click in the empty cabinet and select New Binder D The Binder Settings dialog box appears 3 Check and make any changes to the settings To edit a binder refer to the steps in 6 15 Changing Binder Settings Page 109 4 Click the OK button D A binder is created in the cabinet ...

Страница 106: ...ness cards Up to eight business cards per page can be stored 1 Click and create a new binder You can also right click in the empty cabinet and select New Binder D The Binder Settings dialog box appears 2 Select Card as Binder Type and configure other settings To edit a binder refer to the steps in 6 15 Changing Binder Settings Page 109 3 Click the OK button ...

Страница 107: ... when inserting data from a scanner Retaining source files Sending data from other applications Adding data using Rack2 Folder Monitor Software Outputting pages to Microsoft Word Excel PowerPoint WorkArea functions However by using the drag and drop function the card data imported to the WorkArea can be move to a card binder Rack2 Viewer A card binder can be exported as only Rack2 Binder rk2 or Ra...

Страница 108: ... For a card binder imported card data will be added sequentially from the left and top in the target page If the front is filled up of card data cards will be added to the back When the maximum number of cards per page is set to 4 and the left line of the back is filled up a new card sheet is added so that cards can continue to be inserted Up to eight cards can be stored in one page by moving the ...

Страница 109: ...r 1 Select the cabinet containing the binder to be edited from the cabinet tree D The content of the selected cabinet appears 2 Select the binder to edit 3 Click and select Binder Settings You can also right click on the spine of the binder and select Binder Settings D The Binder Settings dialog box appears ...

Страница 110: ...Chapter 6 Rack2 Filer Window Operations 110 Rack2 Filer User s Guide 4 Set the details ...

Страница 111: ...n be used as a binder spine To avoid obstruction of the binder spine image you can choose to hide the binder title and reference codes For details refer to 6 16 Adding an Image Imported from ScanSnap to a Binder Spine Page 112 If using a scanner other than ScanSnap models described above save the scanned image as a file and use it as the binder spine image For details refer to 6 17 Adding an Image...

Страница 112: ...nder for which the spine is to be changed An image can be scanned and added to a binder scan using the following scanners Support services are no longer available for the following scanner models fi 5110EOX2 fi 5110EOX If using a scanner other than ScanSnap models described above save the scanned image as a file and then use it as the binder spine image For details refer to 6 17 Adding an Image to...

Страница 113: ...odes and set any other required items 4 Click the Scan Spine Image button D A message appears The title and reference codes can be hidden so that they do not interfere with the spine image Even if the title and reference codes are set to be hidden when searching a binder they can be specified as a search condition Click the Help button in the dialog box to refer to the Rack2 Filer Help pages for t...

Страница 114: ...ialog box Preview 6 Click the OK button D The imported image is set as the binder spine A file image imported from ScanSnap Organizer can also be used as a binder spine To import a file image from ScanSnap Organizer specify the file to be imported from ScanSnap Organizer and select Scan to Rack2 Filer For more details about ScanSnap Organizer operations refer to the ScanSnap Organizer manuals ...

Страница 115: ...ettings D The Binder Settings dialog box appears 3 Select the Add image to binder spine checkbox D The setting items for adding an image to a binder appears 4 In Position select the location for applying the image file The following file formats are supported bmp jpg png pdf PDF files exported from Rack2 Filer or imported using the ScanSnap An image file imported from a scanner can be used as a bi...

Страница 116: ...e is displayed on the Binder Settings dialog box Preview 7 Click the OK button D The selected file image is added to the binder spine The title and reference codes can be hidden so that they do not interfere with the spine image Select Hide the binder title and Hide the reference codes in the Binder Settings dialog box Even if the title and reference codes are set to be hidden when searching a bin...

Страница 117: ...cabinet from which to delete a binder from the directory tree D The content of the selected cabinet appears 2 Select the binder s to delete When deleting a binder the pages in the binder are deleted at the same time To select multiple binders drag the binders you want to select in a group within the binder viewer or click the mouse while pressing the Ctrl key or Shift key ...

Страница 118: ...ions 118 Rack2 Filer User s Guide 3 Click and select Delete Binder You can also right click on the spine of the binder and select Delete Binder D A message dialog box appears 4 Click the OK button D The binder is deleted from the cabinet ...

Страница 119: ...he cabinet containing binders to be moved from the directory tree D The content of the selected cabinet appears 2 Drag the binder s to be moved and drop it into the destination cabinet on the tree D The binder is moved to the specified cabinet To select multiple binders drag the binders you want to select in a group within the binder viewer or click the mouse while pressing the Ctrl key or Shift k...

Страница 120: ...tory tree D The content of the selected cabinet appears 2 Select the binder to move 3 Click and select Move Binder You can also right click on the spine of the binder and select Move Binder D The Move Binder dialog box appears To select multiple binders drag the binders you want to select in a group within the binder viewer or click the mouse while pressing the Ctrl key or Shift key ...

Страница 121: ...t to move the binder to 5 Click the OK button D The binder is moved to the specified cabinet If too many binders have been selected and they cannot fit in the destination cabinet the Could not move selected binder as maximum capacity of destination cabinet has already been reached message appears ...

Страница 122: ...Chapter 6 Rack2 Filer Window Operations 122 Rack2 Filer User s Guide To rearrange binders in a cabinet drag and drop the binder to the new location ...

Страница 123: ...Multiple binders can be copied at the same time Copying a binder using drag and drop 1 Select the cabinet containing binders to be copied from the directory tree D The content of the selected cabinet appears 2 Drag the binders to be copied with the Ctrl key held down and drop them into the copy destination arbitrary place in the cabinet or other cabinet on the directory tree ...

Страница 124: ...he binders are copied to the specified location To select multiple binders drag the binders you want to select in a group within the binder viewer or click the mouse while pressing the Ctrl key or Shift key Drop the binders onto the copy location while holding down the key ...

Страница 125: ...of the selected cabinet appears 2 Select the binder to copy 3 Click and select Duplicate Binder You can also right click on the spine of the binder and select Duplicate Binder D The Duplicate Binder dialog box appears To select multiple binders drag the binders you want to select in a group within the binder viewer or click the mouse while pressing the Ctrl key or Shift key ...

Страница 126: ... to select a cabinet to copy the binder to 5 Click the OK button D The binder is copied to the specified cabinet If too many binders have been selected and they cannot fit in the destination cabinet the Could not duplicate selected binder as maximum capacity of destination cabinet has already been reached message appears ...

Страница 127: ...Rack2 Filer User s Guide 127 To rearrange binders in a cabinet drag and drop the binder to the new location ...

Страница 128: ... Binder Order and then select Sort by Last Access D The binders in the cabinet are sorted by last access from the left side of the top shelf Last access is updated when the binder is opened If a binder that has never been opened last access is the date of creation When Sort by Last Access in Binder Order is selected the binders are automatically sorted by last access in the following cases When th...

Страница 129: ... Select the cabinet containing binders that you want to run OCR on from the directory tree D The content of the selected cabinet appears 2 Select a binder to run OCR on 3 Right click on the spine of the binder and select Run OCR on Binder D The Extracting Text dialog box appears and key text blocks are created If key text blocks exist on a page they will be overwritten ...

Страница 130: ...ated to the binder Binder location and binder folder name Current number of sheets and maximum number of sheets possible for the binder File size Binder version Last access 1 Select the cabinet containing binders that you want to check information for from the directory tree D The content of the selected cabinet appears 2 Select a binder whose information you want to check ...

Страница 131: ...on the spine of the binder and select About This Binder D The About This Binder dialog box appears displaying information for the binder Click the Help button in the dialog box to refer to the Rack2 Filer Help pages for the details of each item ...

Страница 132: ...indow 1 Select a binder to export 2 Click and select Export Binder You can also right click on the spine of the binder and select Export Binder D The Export Binder dialog box appears A card binder can be exported as only Rack2 Binder rk2 or Rack2 Binder with embedded Viewer exe rk2 can be selected for Save as type only when using Rack2 Filer version 4 0 or later When using earlier version of Rack2...

Страница 133: ... have Rack2 Filer installed on it When a file is double clicked the Rack2 Viewer window read only mode appears If Data File pdf ini Source File is selected for Save as type the output file can be displayed using Adobe Acrobat Acrobat Reader or Adobe Reader However the following information cannot be displayed Contents page Divider sheet Annotations No part of a Rack2 Binder with embedded Viewer ex...

Страница 134: ...t Import Binder D The Import Binder dialog box appears the name of the dialog box may vary depending on the operating system When you import a card binder that was saved in the Data File pdf ini format on the Rack2 Viewer window it is imported as a normal binder When importing exported binder files in Data File pdf ini source files format the associated ini file must be in the same location folder...

Страница 135: ...elect the binder file set to import only pdf or rk2 files as shown and click the Open button The name of the button may vary depending on the operating system D The file set is converted back to binder format and added to the cabinet ...

Страница 136: ...in a binder refer to 6 27 Displaying Search Results in a Binder Page 140 The following binders or pages cannot be searched for Password protected binders Password protected PDF file whose contents are not displayed Print restricted PDF file whose contents are not displayed Source files Pages with source files can be searched for The searching function can be used for the following Binder title Ref...

Страница 137: ...nder checkbox and specify the conditions for searching the binders The binders satisfying all the conditions will be searched if one or more conditions are specified In the following example binders whose titles contain Report are searched from among all LibRoot folders Click More Options to display a dialog box in which more detailed search conditions can be specified ...

Страница 138: ...tions mark the keyword with double quotations and enter a backslash before the double quotation For example for keywords AAA and BBB AAA BBB On the Multi Binder Search dialog box if the View pages containing search results in a new binder checkbox is selected the search results are displayed together in a search results binder For details on how to display the search results as a binder refer to 6...

Страница 139: ...s satisfying the specified conditions are displayed in a cabinet Clicking closes the search results display Selecting the search results binder shows the following information on the title bar of the Rack2 Filer window LibRoot folder name Library name Cabinet name ...

Страница 140: ...r the pages containing search results can be referred to without opening each binder again Furthermore the search results binder can be moved or copied duplicated to a cabinet and used as a normal binder This section describes the procedure for displaying search results together in a new binder For details on how to display the search results in the cabinet refer to 6 26 Searching for a Binder Pag...

Страница 141: ...e dialog box to refer to the Rack2 Filer Help pages for the details of each item The binders satisfying all the conditions will be searched if one or more conditions are specified In the following example binders whose titles contain Report are searched from among all LibRoot folders Click More Options to display a dialog box in which more detailed search conditions can be specified ...

Страница 142: ... is exceeded the search results binder is divided into separate binders You can specify multiple binders to be searched Enter a blank space after each keyword If multiple keywords are specified pages containing all input keywords are searched If a blank space is included in a keyword mark the keyword with double quotations If a keyword includes double quotations mark the keyword with double quotat...

Страница 143: ...he results Placing the mouse pointer on a page shows the following information LibRoot name Library name Cabinet name Binder name Page number of the displayed page Clicking displays the Search dialog box with the search string entered as String to Find The search string is specified in the Multi Binder Search dialog box Clicking the Find Next button searches for a page with the search string ...

Страница 144: ...e search results display If is clicked the search results binder will no longer be displayed The search results binder can be moved or copied duplicated to a cabinet and used as a regular binder For details on how to move a binder refer to 6 19 Moving a Binder Page 119 For details on how to duplicate a binder refer to 6 20 Copying Duplicating a Binder Page 123 ...

Страница 145: ...e of the binder and select Search D The Single Binder Search dialog box appears The searching function can be used for the following Characters on the annotation such as sticky notes hyperlinks and stamps Characters on divider sheets Created Input key text blocks Contents Strings in comments that are set for the photos or documents For details refer to 6 22 Running OCR on a Binder to Create Key Te...

Страница 146: ...ace after each keyword If multiple keywords are specified pages containing all input keywords are searched If a blank space is included in a keyword mark the keyword with double quotations If a keyword includes double quotations mark the keyword with double quotations and enter a backslash before the double quotation For example for keywords AAA and BBB AAA BBB Click Multi Binder Search to search ...

Страница 147: ...er whose sheets are to be moved to the WorkArea 2 Click and select Move Pages to WorkArea Or Right click on the spine of a binder and select Move Pages to WorkArea D The content of binder is moved The content of card binders and password protected binders cannot be moved The moved sheets are added to the end of the arrangement of stacks in the WorkArea ...

Страница 148: ...rea 1 Select the binder whose sheets are to be moved to the WorkArea 2 Click and select Copy Pages to WorkArea Or Right click on the spine of a binder and select Copy Pages to WorkArea D The content of binder is copied Card binder and password protected binder sheets cannot be copied The copied sheets are added to the end of the arrangement of stacks in the WorkArea ...

Страница 149: ...d By default the folder specified at installation is set ScanSnap Rack2 tab The destination where ScanSnap including ScanSnap Organizer should send data to can be specified Data can be stored in either of the following destinations WorkArea The binder currently specified in the Rack2 Filer window A binder selected in the Binder Selection dialog box Even if Rack2 Filer is not open data can be impor...

Страница 150: ...ears 2 On the LibRoot Folders tab configure the settings To add or edit a LibRoot folder click the Browse button and specify a folder Up to three LibRoot folders can be specified The character string specified in LibRoot Alias is shown on the Rack2 Filer window Selecting Show contents of the LibRoot shows the contents of the LibRoot folder on the Rack2 Filer window ...

Страница 151: ...Do not specify a removable disk as the LibRoot folder Do not specify a LibRoot folder and WorkArea folder with the same path name Also do not specify either a LibRoot folder or WorkArea folder as a parent folder Example LibRoot folder is C Temp1 WorkArea folder is C Temp1 WorkArea LibRoot folder is C Temp1 DocumentRoot WorkArea folder is C Temp1 For details about how to change the WorkArea folder ...

Страница 152: ... Options D The Rack2 Filer Options dialog box appears 2 On the ScanSnap Rack2 tab specify the data storage destination If WorkArea is selected for ScanSnap data save location and the Request confirmation each time checkbox is selected a message will be displayed to confirm whether to add the scanned data to WorkArea ...

Страница 153: ...Rack2 Filer User s Guide 153 3 Click the OK button D The data is stored to the specified destination ...

Страница 154: ...opy from the tool bar D The folder is copied 4 Open the backup destination folder and select Organize Paste from the tool bar D The folder is pasted and data is backed up This section describes how to backup data in units of LibRoot folders For backing up data other than for the case described in this section use Rack2 Filer Backup Restore Tool When using Rack2 Filer Backup Restore Tool backup can...

Страница 155: ...e LibRoot folder data storage folder to be moved 3 Start explorer and copy the folder checked in Step 2 to the target computer 4 Click in the target computer and select Options D The Rack2 Filer Options dialog box appears 5 Specify the copied LibRoot folder in Library Root Folders and click the OK button D The data is moved Copy the entire LibRoot folder at once when copying The Rack2 Filer will n...

Страница 156: ...Chapter 6 Rack2 Filer Window Operations 156 Rack2 Filer User s Guide ...

Страница 157: ...operations that can be performed using the Rack2 Viewer window The marks used in this chapter Indicates a function that is available when pages are displayed in 2 page spread mode Indicates a function that is available when pages are displayed in page width mode Operation in 2 Page Spread Mode ...

Страница 158: ... to a binder 1 Insert the document into the scanner 2 Open a page of the binder on which to scan the document 3 Click in the Rack2 Viewer window Or right click on a page and select Insert Pages From Scanner D The document is scanned and added into the binder If both an Image Scanner fi Series scanner and ScanSnap are connected to this product turn off the ScanSnap when scanning pages using the Ima...

Страница 159: ...o 7 53 Configuring Viewer Settings Page 291 or click and refer to the Rack2 Viewer Help pages Scanning can be continued after the current batch has finished Insert the next sheet or batch in the scanner then click the Yes button on the Continue to read the next page message The new pages will be added with the previously scanned sheets Before using an ADF Automatic Document Feeder scanner that is ...

Страница 160: ...s will be added to the back When the maximum number of cards per page is set to 4 and the left line of the back is filled up a new card sheet is added so that cards can continue to be inserted When scanning cards by flatbed scan scan settings can be set on the Card Binder tab in the Rack2 Viewer Settings dialog box When scanning cards with ADF the scan size of TWAIN driver will be changed to Card ...

Страница 161: ...ayed as the front window on screen press the scan button on the ScanSnap device D The sheet is scanned and added into the binder When scanning documents using the ScanSnap it is necessary to use Rack2 Filer with the ScanSnap For details about how to enable the use of the ScanSnap with Rack2 Filer refer to Chapter 5 Using the ScanSnap with Rack2 Filer Page 65 Operation in 2 Page Spread Mode When us...

Страница 162: ...the maximum number of cards per page either 4 or 8 This can be set in the Card Binder tab of the Rack2 Viewer Settings dialog box For a card binder scanned card data will be added sequentially from the left and top in the target page If the front is filled up of card data cards will be added to the back When the maximum number of cards per page is set to 4 and the left line of the back is filled u...

Страница 163: ...an the document and click in the Rack2 Viewer window Or right click on a page and select Insert Pages From File D The Insert From File dialog box appears 2 Specify the files to import and click the Open button You can specify multiple files by holding down the Shift or Ctrl key while clicking on files D The files are added to the binder Operation in 2 Page Spread Mode ...

Страница 164: ...iewer Window Operations 164 Rack2 Filer User s Guide It may take quite some time to import a file with many pages or a high resolution color image file Source files are not created for image files when they are imported ...

Страница 165: ...cted To check this setting 1 Click the Settings button to open the Rack2 Viewer Settings dialog box 2 Select the Page Insertion tab to view the When inserting pages from password protected and printing restricted PDF files attach source files instead of showing actual contents checkbox When this checkbox is selected The actual document is not displayed but a PDF icon is shown below the page Draggi...

Страница 166: ...e print protection setting and try again For Rack2 Filer the image formats supported are BMP Windows and OS 2 bitmap PCX Zsoft format single page JPG JPEG JPEG format TIF TIFF TIFF format Including multiple pages Excluding ZIP compression format WMF Windows metafile PSD Photoshop 3 0 format PNG Portable Network Graphics format TGA Truevision TARGA format PCD Photo CD format FPX FlashPix format PDF...

Страница 167: ...he print function of an associated application depending on the file a File_name has been changed Do you want to save it message appears If this message appears click the No button When the Automatically insert divider sheet when inserting files checkbox is selected the tab of the divider sheet may not show the full file name Hover the mouse pointer over a tag to display a tooltip of the file name...

Страница 168: ...rted data will be added sequentially from the left and top in the target page If the front is filled up of card data cards will be added to the back When the maximum number of cards per page is set to 4 and the left line of the back is filled up a new card sheet is added so that cards can continue to be inserted For a card binder source file will not be inserted For a card binder the divider sheet...

Страница 169: ...ile containing macros may not be inserted properly In such cases copy the file delete the macros and insert it again When a Microsoft Excel file xls contains a mix of differently sized multi page sheets with both the portrait and landscape orientations specified the page orientations may not be correctly recognized When the Color Data setting in the Page Insertion tab of the Rack2 Viewer Settings ...

Страница 170: ... when the pointer turns to Operation in 2 Page Spread Mode To flip the pages the following operations can be used Pressing or Pressing the left arrow or right arrow keys up arrow or down arrow when the page display is rotated 90 degrees Rotating wheel mouse Roll down to flip to next page roll up to flip to previous page Inputting a page number in the page range input field jumps to the specified p...

Страница 171: ...uously Or right click on the page and then select Display Mode Cycle Pages Forward Operation in 2 Page Spread Mode Click or click on the page if you want to stop Flip Continuously After the last page has been flipped this function will bring you back to the first page and start again from the beginning The speed and interval at which pages will be flipped can be set For details refer to 7 53 Confi...

Страница 172: ...s section describes how to turn a page upside down 1 Right click on the page and select Manipulations Turn Page Upside Down Operation in 2 Page Spread Mode If you click to save the changes or save this change when you close the Rack2 Viewer window pages will be displayed upside down from the next startup ...

Страница 173: ...90 degrees to the right or left 1 Right click on the page and select Manipulations Right Rotated or Left Rotated Operation in 2 Page Spread Mode If you click to save the changes or save this change when you close the Rack2 Viewer window pages will be rotated 90 degrees and displayed from the next startup ...

Страница 174: ... This section describes how to exchange opposite pages 1 Right click on the page and select Manipulations Exchange Opposite Pages Operation in 2 Page Spread Mode To save the changes click or save when closing the Rack2 Viewer window The new setting will be used to display pages from the next startup ...

Страница 175: ...eskew the contents of a page This function is only available when the selected page is image data 1 Right click on the page and select Manipulations Deskew Page Contents If the page contents are repeatedly deskewed the size and color of the image may change Operation in 2 Page Spread Mode ...

Страница 176: ... s Guide 7 10 Changing Page Window Mode This section describes how to change the page window mode and rotate a page Changing the page window mode There are two window modes 2 page spread mode and page width mode 2 page spread mode Two pages are displayed at once ...

Страница 177: ...Rack2 Filer User s Guide 177 Page width mode One page is displayed at a time ...

Страница 178: ...ge Width to display in page width mode Click to display in 2 page spread mode Or double click on the page when the mouse pointer has turned to Alternatively right click on the page and select 2 Page Spread Mode to display in 2 page spread mode In page width mode the Rack2 Viewer window displays only the upper or lower part of the page For details of how to display the rest of the page refer to 7 1...

Страница 179: ...splay Mode Right Rotated To rotate a page display 90 degrees to the left click Or right click on the page and select Display Mode Left Rotated The contents page is not displayed in page width mode In page width mode only the following functions are available Right Rotated Mode Left Rotated Mode Page Top Page Bottom Previous Page Top Next Page Top Edit Key Text Blocks OCR Key Text Blocks Delete Key...

Страница 180: ...ges Roll down to flip to next page roll up to flip to previous page The contents page is displayed as a blank page after page display rotation When a page display is rotated it is possible to flip to the next previous page However it is not possible to flip to another specified sheet in the binder or a divider sheet by clicking its tab Only the following functions are available while the page disp...

Страница 181: ...rrow key on the keyboard or click To display the bottom of the page press the down arrow key on the keyboard or click To display the previous page press the left arrow key on the keyboard or click To display the next page press the right arrow key on the keyboard or click Modifying the display region of the page vertically can also be realized by dragging the mouse on the page ...

Страница 182: ...ack2 Filer User s Guide 7 12 Zooming a Selected Area This section describes how to zoom a selected area of the page 1 Drag the mouse on the page to select the zoom area Data with a low pixel count may not be zoomable Operation in 2 Page Spread Mode ...

Страница 183: ...cified D The area selected by dragging the mouse is zoomed You can cancel zooming by performing one of the operations below Right click or double click on the page Flip to another page When the page is zoomed you can move the display area across the page by dragging the mouse ...

Страница 184: ... specified file directly The file can no longer be treated as unread and disappears from the unread files page If you wish the Unread Files page to be displayed for a given binder you must select Unread Files Page Show in the General tab of that binder s Binder Settings dialog box in the Rack2 Filer window The state of the Unread Files list is updated when the binder is closed irrespective of whet...

Страница 185: ...quently referenced 1 Open a page on which to add a sticky note 2 Click Or right click on the page and select Add Sticky Note D The mouse pointer changes to while the sticky note can be added 3 Click the location where you want to add a sticky note D A sticky note is added and text can be input in the sticky note Operation in 2 Page Spread Mode ...

Страница 186: ...udes from a page if you click the part of the sticky note outside the page while displaying other pages it will move to the other page When the binder is edited and the Page Turning of the binder is reversed the protruding part of the sticky note will be displayed in the center of the binder If this occurs move the sticky note to the proper place You can change the position of a sticky note by dra...

Страница 187: ...light 2 Click Or right click on the page and select Add Highlight D The mouse pointer changes to while a highlight can be added 3 Set the region to add a highlight by dragging the mouse No highlights can be added across more than one page No highlights can protrude from a page If the number of pixels is low the annotation position may be changed Operation in 2 Page Spread Mode ...

Страница 188: ...ion is specified D A highlight is added Up to ten annotations in total can be added per page You can change the position of a highlight by dragging it Highlight areas can be resized by clicking on it and dragging a corner A highlight can be edited or deleted For more details click and refer to the Rack2 Viewer Help pages ...

Страница 189: ... Hyperlink D The mouse pointer changes to while a hyperlink can be added 3 Set the region in which to add a hyperlink by dragging the mouse No hyperlinks can be set across more than one page No hyperlinks can be set to protrude from a page If the font size of the hyperlink is made bigger depending on the frame size set text may not be displayed If the number of pixels is low the annotation positio...

Страница 190: ...the character string to be used for the link text and click the Change Target button D The Link Setting dialog box appears For details about each item click the Help button in the Configure Hyperlink dialog box and refer to the Rack2 Viewer Help pages Font for the character string to be used for hyperlink text can be set by clicking the Change Font button in the Configure Hyperlink dialog box ...

Страница 191: ...yperlink is set String input in Text can be specified as a search condition for searching binders Up to ten annotations in total can be added per page You can change the frame size of a hyperlink by dragging its four corners after right clicking on the hyperlink to display the frame A hyperlink can be edited or deleted For more details click and refer to the Rack2 Viewer Help pages ...

Страница 192: ...to affix a stamp 2 Click Or right click on the page and select Add Stamp D The mouse pointer changes to while the stamp can be affixed No stamps can be affixed across more than one page No stamps can be affixed to protrude from a page This function cannot be used in read only mode If the number of pixels is low the annotation position may be changed Operation in 2 Page Spread Mode ...

Страница 193: ... Guide 193 3 Click the location where you want to affix a stamp D The Select a Stamp dialog box appears 4 On the Select a Stamp dialog box select a stamp and click OK D Stamp is affixed to the location clicked in Step 3 ...

Страница 194: ...osition of a stamp can be changed by dragging it Stamps can be resized by clicking on it and dragging a corner A frame can be resized but the enclosed text is kept the same size Also a frame cannot be made smaller than enclosed text A stamp can be edited or deleted For more details click and refer to the Rack2 Viewer Help pages ...

Страница 195: ...s hidden displayed via the binder settings For details refer to 6 15 Changing Binder Settings Page 109 1 Go to the binder page for which contents information is to be added or modified 2 Click Or right click on the page and then select Manipulations Edit Page s Contents Entry D The Contents Entry dialog box appears 3 Set the desired contents information Operation in 2 Page Spread Mode ...

Страница 196: ... set for this page the existing information will be shown in the dialog box The entered text appears in the Entry Title column in contents pages The text is limited to maximum of 50 characters This text can be specified as a search condition for searching binders For more details click the Help button in the Contents Entry dialog box and refer to the Rack2 Viewer Help pages ...

Страница 197: ... on the contents page jumps you to that page The order of contents can be changed on the contents page For more details refer to 7 28 Rearranging the Order of Sheets in Units of Contents Page 234 Contents entries can be edited or deleted For more details click and refer to the Rack2 Viewer Help pages ...

Страница 198: ...e ways to create key text blocks Run OCR on a specified region of a page Run OCR on a specified sheet Run OCR when inserting files Automatically extract via the ScanSnap S1100 S1300 S1500 marked keyword function Run OCR on all pages of a binder After running OCR searching for a page with a search string becomes available ...

Страница 199: ...nts Documents written in languages other than the specified language Documents including texts written in Italic characters Documents containing characters with superscripts subscripts and complicated mathematical expressions Documents with characters on an unevenly colored background e g Shaded characters Documents with many decorated characters e g Decorated characters embossed outlined Document...

Страница 200: ...DF files created from data imported to Rack2 Filer and saved with a different name or attached to an e mail When Convert to Searchable PDF or Searchable PDF OCRs during scan in the File option tab is not selected in the ScanSnap Manager setup dialog box and creating key text blocks during import Rack2 Filer creates key text blocks Therefore ScanSnap settings are not required when using with Rack2 ...

Страница 201: ...lock using the Key Text Block dialog box For information on how to open the Key Text Block dialog box refer to Setting a search string Page 209 The string order in the created key text block may differ from the string order displayed on the actual page Edit the created key text block to match the order ...

Страница 202: ...n which OCR is to be run 2 Right click on the page and select Manipulations OCR Key Text Block D The mouse pointer changes to 3 Use the mouse to specify the region on the page on which to run OCR D The key text blocks in the specified region are created Operation in 2 Page Spread Mode When specifying the region on which to run OCR do not start from any highlighted text ...

Страница 203: ...un OCR on Pages x xx x represents the first page specified xx represents the last page specified D A message appears The information for pages for which key text blocks have already been created is updated overwritten Operation in 2 Page Spread Mode Even you want to move only one sheet select the sheet with the multi sheet selection procedure For details about selecting multiple sheets refer to 7 ...

Страница 204: ...ks are created for the character strings of the selected sheets Run OCR when inserting files Key text blocks can be automatically created when scanning or inserting files 1 Click Or right click the mouse and select Viewer Settings D The Rack2 Viewer Settings dialog box appears Operation in 2 Page Spread Mode ...

Страница 205: ...After setting this key text blocks will be automatically created when the following operations are performed Scan Insert a file Scan to the WorkArea Insert a file to the WorkArea Insert a file using Rack2 Folder Monitor Software Insert data from other applications The text recognition rates achieved will be different for the create during import and create after import cases ...

Страница 206: ...red If a password is set to a PDF file scanned with ScanSnap keyword information may not be saved To save keyword information clear the When inserting pages from password protected and printing restricted PDF files attach source files instead of showing actual contents checkbox in the Page Insertion tab of the Rack2 Viewer Settings dialog box For more details about the marked keyword function refe...

Страница 207: ...nning OCR on a Binder to Create Key Text Blocks Page 129 The keywords are extracted with the marked keyword function while importing the document from ScanSnap When creating a key text block by specifying the range of a page after importing data from the ScanSnap the key text block is displayed after the keyword is extracted with the marked keyword function When creating a key text block for a spe...

Страница 208: ...documents To search for a page the types of strings to search for which are listed above should first be set for each page Only pages with a search string set in advance can be searched for To set key text blocks create key text blocks by OCR or type in the Key Text Block dialog box By specifying the search condition string pages including the string will be searched When pages are displayed after...

Страница 209: ...racting text refer to 7 19 Creating Key Text Blocks by OCR Page 198 and 6 22 Running OCR on a Binder to Create Key Text Blocks Page 129 This section explains how to type strings to the Key Text Block dialog box 1 Open the page on which the string will be typed 2 Right click on the page and select Manipulations Edit Key Text Block D The Key Text Block dialog box appears Operation in 2 Page Spread M...

Страница 210: ...Chapter 7 Rack2 Viewer Window Operations 210 Rack2 Filer User s Guide 3 Type the string and click the OK button D The string to search for is set 4 Repeat Steps 1 to 3 on other pages if necessary ...

Страница 211: ...peration in 2 Page Spread Mode You can specify multiple binders to be searched Enter a blank space after each keyword If multiple keywords are specified pages containing all input keywords are searched If a blank space is included in a keyword mark the keyword with double quotations If a keyword includes double quotations mark the keyword with double quotations and enter a backslash before the dou...

Страница 212: ...s button the previous page satisfying the search condition is displayed Highlighting search results A searched string can be highlighted This function makes it easy to find a target string in the Rack2 Viewer window Pages can be searched for using the Rack2 Filer window For details refer to 6 28 Searching for a Page Page 145 When Highlight search results is selected and the searched string is not ...

Страница 213: ...eated using one of the following methods Running OCR on a specified sheet Running OCR when inserting files Running OCR on all pages of a binder Search results may not be highlighted on sheets imported by Rack2 Filer that is not the latest version To highlight search results run OCR on the sheets again For details about the procedure for running OCR refer to 7 19 Creating Key Text Blocks by OCR Pag...

Страница 214: ...et by right clicking on the page and selecting Highlight Search Results Highlights for search strings are available only for normal binders When a search string is added or edited on the Key Text Block dialog box after running OCR the added or edited strings are not highlighted Strings extracted with the following methods are not highlighted Running OCR on a specified region of a page Running OCR ...

Страница 215: ... page page contents page Printing a page 1 Click Or right click on the page and select Print Mail Export Print D The Print dialog box appears The following information cannot be printed Divider sheet Unread files page Password protected print restricted page Highlights for search strings ...

Страница 216: ...ton in the Print dialog box and check Fit to printable range of the printer in the Print Options dialog box To print in the original paper size click the Options button in the Print dialog box and uncheck Fit to printable range of the printer in the Print Options dialog box To skip printing blank pages on the Print dialog box click the Options button then on the Print Options dialog box select the...

Страница 217: ...d select Print Mail Export Print Current Spread D The Print dialog box appears 2 Specify the printer and click the OK button Printing a contents page Print a contents page 1 Right click the mouse on a contents page and select Print Contents Page D The Print Contents Page dialog box appears In the following cases printing in 2 page spread mode is not possible for a contents page when the left and r...

Страница 218: ...apter 7 Rack2 Viewer Window Operations 218 Rack2 Filer User s Guide 2 Select the print range and click the OK button D The Print dialog box appears 3 Specify the printer to be used and click the OK button ...

Страница 219: ...er s Guide 219 7 22 Overwriting a Binder This section describes how to overwrite the changes to a binder 1 Click Or right click on a page and select Print Mail Export Save Binder D The binder changes are overwritten ...

Страница 220: ... as a new file Data saved as a new file can be converted to a binder file by importing the data to Rack2 Filer and managed using Rack2 Filer For details refer to 6 25 Importing a Binder Page 134 When all the pages in a card binder are saved in the Data File pdf ini format on the Rack2 Viewer window the pages are saved as a normal binder To import the pages as a card binder select the Rack2 Binder ...

Страница 221: ...ck2 Filer User s Guide 221 1 Click Or right click on the page and select Print Mail Export Export Binder D The Save as dialog box appears 2 Specify the folder and file name and then click the Save button ...

Страница 222: ...ave as type Contents pages Divider sheets Annotations Key text blocks Unread files page The above items cannot be displayed using Adobe Acrobat or Adobe Reader However they can be displayed if you associate PDF files with the Rack2 Viewer window by selecting Rack2 Viewer under the General tab in the Rack2 Viewer Settings dialog box When the Rack2 Viewer window is associated with PDF files you can ...

Страница 223: ...xport Sheet D The Save as dialog box appears Data saved as a new file can be converted to a binder file by importing the data to Rack2 Filer and managed using Rack2 Filer For details refer to 6 25 Importing a Binder Page 134 When the sheets in a card binder are saved in the Data File pdf ini format on the Rack2 Viewer window the pages are saved as a normal binder To import the sheets as a card bin...

Страница 224: ...Chapter 7 Rack2 Viewer Window Operations 224 Rack2 Filer User s Guide 3 Specify the save location folder and file name and then click the Save button ...

Страница 225: ...ver they can be displayed if you associate PDF files with the Rack2 Viewer window by selecting Rack2 Viewer under the General tab in the Rack2 Viewer Settings dialog box When the Rack2 Viewer window is associated with PDF files you can start the Rack2 Viewer window for viewing simply by double clicking the PDF files For more details refer to 7 53 Configuring Viewer Settings Page 291 or click and r...

Страница 226: ...to be saved as a new file Refer to 7 33 Specifying Multiple Sheets Page 253 for help 2 Right click on the page and select Export Pages x xx x represents the first page specified xx represents the last page specified D The Save as dialog box appears 3 Specify the save location folder and file name and then click the Save button ...

Страница 227: ...wever they can be displayed if you associate PDF files with the Rack2 Viewer window by selecting Rack2 Viewer under the General tab in the Rack2 Viewer Settings dialog box When the Rack2 Viewer window is associated with PDF files you can start the Rack2 Viewer window for viewing simply by double clicking the PDF files For more details refer to 7 53 Configuring Viewer Settings Page 291 or click and...

Страница 228: ...d select Insert Divider Sheet D The Divider Sheet dialog box appears 3 Check and make any changes to the settings The following settings of the divider sheets can be changed Tab text Divider color Tab size Tab position For details of the option settings click the Help button in the dialog box and refer to the Rack2 Viewer Help pages If there are two or more sheets with source files in a row a divi...

Страница 229: ...n a divider sheet can be specified as a search target when searching a binder Divider sheets can be inserted whether or not the binder contains any sheets As many divider sheets as required can be inserted Divider sheets can be edited or deleted For more details click and refer to the Rack2 Viewer Help pages Divider sheets can be automatically inserted after inserting files or inserting data from ...

Страница 230: ... can be displayed using thumbnails zoomed out images 1 Right click on a divider sheet and select Thumbnails D The thumbnails appear in the divider sheet Thumbnail view is a temporary display function Therefore the thumbnails will disappear after other pages are displayed or the Rack2 Viewer window is closed The processing speed may be slow if many pages are included ...

Страница 231: ...Rack2 Filer User s Guide 231 You can change the sort order of the sheets by altering the display order of the thumbnails For details refer to 7 27 Rearranging the Order of Sheets Page 232 ...

Страница 232: ...laying Thumbnails Page 230 2 Select the thumbnails of the sheets whose order you want to change The order of sheets can be changed in the following units Sheet 2 pages Contents Chapter Item In this section procedures for changing the order of a sheet 2 pages are described For details about how to change the order of the contents refer to 7 28 Rearranging the Order of Sheets in Units of Contents Pa...

Страница 233: ...mbnails to the destination sheet D The display order of the thumbnails is changed and so is the order of the sheets To save the changes click or save when closing the Rack2 Viewer window The new setting will be used to display pages from the next startup ...

Страница 234: ...of sheets in units of contents 1 Open the contents page 2 Drag and drop the items whose order you wish to change If the contents order is changed the order of the actual document is also changed For details on creating a contents page refer to 7 18 Editing the Contents List Page 195 When the contents display order is changed if the pages to moved are an odd number a blank page is added ...

Страница 235: ...procedure 1 On the contents page right click on the contents item to be moved and select Cut Contents 2 Right click on the desired place on the contents page and select Paste Contents If a chapter contents are moved all contents and sheets of that chapter are moved To undo the contents change perform one of the following operations press the keyboard ESC key right click the mouse and select Cancel...

Страница 236: ...Chapter 7 Rack2 Viewer Window Operations 236 Rack2 Filer User s Guide 3 Click the OK button D The contents display order and actual sheet order are changed ...

Страница 237: ...a sheet is imported with the Copying original files checkbox selected in Retain source files by under the Page Insertion tab the source file that is imported at the same time is also deleted When a sheet is imported with the Linking to original files checkbox selected in Retain source files by under the Page Insertion tab the source file that is imported at the same time is not deleted When only s...

Страница 238: ...ssage appears 3 Click the OK button D The sheet is deleted Deleting multiple sheets 1 Select the sheets to be deleted Refer to 7 33 Specifying Multiple Sheets Page 253 for help 2 Click in the Rack2 Viewer window Or right click on the sheet and select Delete Pages x xx x represents the first page specified xx represents the last page specified D A confirm deletion message appears ...

Страница 239: ...Rack2 Filer User s Guide 239 3 Click the OK button D The sheets are deleted It is possible to delete whole divider sections Right click on a page and select Delete Divider Section ...

Страница 240: ...e all at once Front pages are odd numbered pages and back pages are even numbered pages 1 Specify the range of deletion for one side according to the procedure for specifying multiple sheets For details on the procedure for specifying multiple sheets refer to 7 33 Specifying Multiple Sheets Page 253 When both sides of a sheet contain the same source file s the sheet cannot be deleted ...

Страница 241: ...ge x xx x represents the first page specified xx represents the last page specified D A confirm deletion message appears When pages to be deleted include a page with the same source file on both sides the following message appears 3 Click the OK button D All the front pages or back pages in the specified range are deleted ...

Страница 242: ...g the selected sheet and drop it onto a binder spine or a binder page on the Rack2 Viewer window D The sheet is moved to the specified binder Even if only some of the sheets with the same source file are selected all sheets with that source file will be cut Even you want to move only one sheet select the sheet with the multi sheet selection procedure For details about selecting multiple sheets ref...

Страница 243: ...et and move it to the clipboard 1 Open the sheet to be moved to the clipboard 2 Click in the Rack2 Viewer window Or right click on the sheet and select Cut Move Sheet to Clipboard D A confirm cut message appears 3 Click the OK button D The sheet is cut and moved to the clipboard ...

Страница 244: ...tails refer to 7 32 Pasting Sheets Page 252 If the sheets with source files are included in the specified sheets a message will be displayed to confirm whether to Export Image Data and Source File or Export only Image Data If the specified sheet contains a source file all other sheets with this source file will be moved to the clipboard It is possible to move whole divider sections to the clipboar...

Страница 245: ...he clipboard Refer to 7 33 Specifying Multiple Sheets Page 253 for help 2 Click in the Rack2 Viewer window Or right click on the sheet and select Move Cut Move Pages x xx x represents the first page specified xx represents the last page specified D A confirm cut message appears 3 Click the OK button D The sheets are cut and moved to the clipboard ...

Страница 246: ...refer to 7 32 Pasting Sheets Page 252 If the sheets with source files are included in the specified sheets a message will be displayed to confirm whether to Export Image Data and Source File or Export only Image Data If only some of the specified sheets contain source files all other sheets with this source file will be moved to the clipboard It is possible to move whole divider sections to the cl...

Страница 247: ...t the sheet with the multi sheet selection procedure For details about selecting multiple sheets refer to 7 33 Specifying Multiple Sheets Page 253 Sheets can also be moved by right clicking on the Rack2 Viewer window and selecting Cut Move Sheet to WorkArea If moving whole divider sections select Cut Move Divider Section to WorkArea When only some of the sheets with the same source file are select...

Страница 248: ...pying Sheets Copy sheet s to the clipboard or WorkArea Copying a single sheet to the clipboard 1 Open the sheet to be copied to the clipboard 2 Click in the Rack2 Viewer window Or right click on the sheet and select Copy Sheet to Clipboard D The sheet is copied to the clipboard ...

Страница 249: ...the 7 32 Pasting Sheets Page 252 If the sheets with source files are included in the specified sheets a message will be displayed to confirm whether to Export Image Data and Source File or Export only Image Data If only some of the specified sheets contain source files only the image data will be copied source files will not be copied It is possible to copy whole divider section Right click on a p...

Страница 250: ...copied to the clipboard If there is already a sheet on the clipboard a message will be displayed to confirm whether to overwrite the existing sheet The sheet copied to the clipboard can be pasted in front of other pages For details refer to the 7 32 Pasting Sheets Page 252 If the sheets with source files are included in the specified sheets a message will be displayed to confirm whether to Export ...

Страница 251: ... Copying multiple sheets to the WorkArea 1 Select the sheets to be copied to the WorkArea Specifying multiple sheets is not required when copying whole divider sections Refer to 7 33 Specifying Multiple Sheets Page 253 for help 2 Right click on the Rack2 Viewer window and select Copy Copy Pages x xx to WorkArea x represents the first page specified xx represents the last page specified D The sheet...

Страница 252: ...s moved or copied to the clipboard in front of the currently displayed page 1 Open a page to which you want to paste a sheet s 2 Click Or right click on the page and then select Paste from Clipboard D The sheet s in the clipboard are pasted Sheets in the clipboard or copied sheets cannot be pasted between pages with the same source file ...

Страница 253: ...pecifying Multiple Sheets The following operations are available when you specify multiple sheets Cut Copy Move to the WorkArea Copy to the WorkArea Run OCR to create key text blocks Delete Export Output to Office Allocate 2 pages into 1 ...

Страница 254: ... Move to the WorkArea Moving to the WorkArea Page 247 Copy to the WorkArea Copying a single sheet to the WorkArea Page 251 Copying multiple sheets to the WorkArea Page 251 Run OCR to create key text blocks 7 19 Creating Key Text Blocks by OCR Page 198 Delete 7 29 Deleting Sheets Page 237 Export 7 24 Saving Sheets as a New File Page 223 Output to Office 7 41 Outputting Pages to Microsoft Word Excel...

Страница 255: ...n the page and then select Multi Sheet Selection D The sheet is specified The specified page is shown in green 3 Flip one by one to the last sheet among the sheets to be deleted D Only flipped pages of the sheet are specified To cancel Multi Sheet Selection click Or right click on the sheet and select Cancel ...

Страница 256: ...ide 4 Click Or right click on the sheet and select Delete Pages x xx x represents the start page of the specified sheet xx represents the end page of the specified sheet D A message dialog box appears 5 Click the OK button D The sheets specified in Step 3 are deleted ...

Страница 257: ...o the same source file are processed Only images Only the sheet images are processed 1 When deleting only one side of a sheet the operation is not processed 2 When the front and back pages of a sheet contain different source files the operation is processed with the source files deleted When all the sheets contain source files When only some sheets contain source files Cut Move Selectable Both Cop...

Страница 258: ... allows you to view them easily The following explains the procedure for allocating two pages into one page for sheets that contain multiple pages and the page display after allocation has occurred Allocating two pages into one page 1 Specify the range of pages for allocating two pages into one according to the procedure for specifying multiple sheets For details on the procedure for specifying mu...

Страница 259: ...ote that an allocated page can only be returned to the original two page form by right clicking on the sheet and selecting Undo immediately after allocation If Undo is not selected immediately after allocation the allocated page cannot be returned to its original two page form and it is necessary to import the original file again or edit the original file source file ...

Страница 260: ...e When a divider sheet is included A divider sheet is not allocated When the divider sheet is included pages are divided on the previous or next page to the divider sheet and output 1 2 3 4 4 1 2 A blank page is inserted Front Front Back Back 3 Front Back Front Back 1 2 Divider sheet Divider sheet Front Back Divider sheet Front Back 1 2 Front Divider sheet Front Back Back A blank page is inserted ...

Страница 261: ...PDF file The relevant page is not allocated 1 2 1 2 Front Back Back A blank page is inserted Front Password protected or print restricted PDF file Front Back Back Front Back A B Front Back Not allocated A B Front Password protected or print restricted PDF file A blank page is inserted ...

Страница 262: ...e formats selected on the Page Insertion tab of the Rack2 Viewer Settings dialog box these source files will be deleted and a message appears to confirm whether to continue the operation For sheets pages with annotation The annotation is deleted For sheets pages run by OCR Key text blocks created by OCR are stored Note that if key text blocks created by OCR for two pages exceed the limit 30 000 ch...

Страница 263: ...on the upper half will be used When the content entry type of pages is different e g Chapter and Item Chapter content entry type will be used 1 2 A B 1 2 a b a b Content N A Content Chapter 2 Content Chapter 2 Content Item a Content Chapter b Content Chapter b Content Chapter A Content Chapter B A B Content Chapter A The set content descripton is used The content descripton on the upper half is us...

Страница 264: ...ed with ScanSnap When one of the pages to be allocated is a page scanned with ScanSnap and the other page is not the allocated page is not regarded as scanned with ScanSnap Functions for outputting pages to Microsoft Word Excel PowerPoint and cropping of marked sections are not available for the page 1 2 1 2 Page scanned with ScanSnap Front Back Front Back Others Others A blank page is inserted ...

Страница 265: ...he page and select Copy Page to Clipboard D The page is copied to the clipboard If there is already a page on the clipboard a message will be displayed to confirm whether to overwrite the existing page The page copied to the clipboard can be overwritten on another page or added in front of other pages If only some of the specified pages contain source files only the image data will be copied the s...

Страница 266: ...perations 266 Rack2 Filer User s Guide Copying pages to the WorkArea 1 Open the page to be copied to the WorkArea 2 Right click on the Rack2 Viewer window and select Copy Page to WorkArea D The selected page is copied to the WorkArea ...

Страница 267: ... Or right click on the page and then select Paste from Clipboard D A message appears 3 To overwrite click the Overwrite button to add a page click the Add button D The page on the clipboard is pasted and the original page is overwritten or a new page is added before the destination page Copied pages cannot be pasted to pages that contain source files A page can only be pasted to an existing sheet ...

Страница 268: ...ion describes how to delete the content of a selected page In this case erased pages become blank 1 Open a page to be emptied 2 Right click on the page and select Manipulations Blank Page Contents D The content of the selected page is emptied and the page becomes blank Pages containing source files cannot be emptied ...

Страница 269: ...ht click on the page and select Delete Page D The selected page is deleted Only pages on one side can be deleted For more details refer to Deleting sheets on one side all at once Page 240 If the next page after the deleted page is one with a source file the subsequent pages are not moved forward When there are over sized pages that have been split in the same divider sheet sheets may not be displa...

Страница 270: ...h another blank page will be added to maintain the two pages per sheet rule 1 Open the page in front of which the blank page is to be added 2 Right click on the page and select Insert Blank Page D The blank page is added in front of the selected page The blank page cannot be added between multiple pages with source files When there are over sized pages that have been split in the same divider shee...

Страница 271: ...on the page and select Print Mail Export Send As e Mail D The Send As e Mail dialog box appears 2 Specify the page range to send as e mail 3 Click the OK button D The e Mailer Selection dialog box appears For details of the option settings click the Help button in the dialog box and refer to the Rack2 Viewer Help pages ...

Страница 272: ...ialog box of the e mailer selected in Step 4 is launched and the specified files are attached to e mail If selecting the Also attach any source files checkbox in Step 2 the source file s will be attached For details of the option settings click the Help button in the dialog box and refer to the Rack2 Viewer Help pages ...

Страница 273: ...ed in the Topic field of the send e mail window when you use standard e mail software If printing multiple pages from a binder that include pages from a password protected or print restricted PDF only standard pages will be printed The source PDF file will also not be printed ...

Страница 274: ...ollowing requirements are met pages can be output to Microsoft Word Excel PowerPoint Pages are scanned using the ScanSnap Pages are saved with Rack2 Filer version 4 0 or later However when the ScanSnap setting Generate one PDF file per x page s is ON inserted pages may not be output to Microsoft Word Excel PowerPoint because the pages are not be recognized as scanned with ScanSnap Card binders can...

Страница 275: ...o 7 2 Scanning Documents Using the ScanSnap Page 161 To use this function the following settings must be specified in ScanSnap Image quality Best Color mode Color Multiple sheets can be specified If multiple sheets are specified they are combined into a single document when converted If any pages of the specified sheets are not inserted from ScanSnap the sheets cannot be output in Microsoft Word E...

Страница 276: ...ting such pages right click on a page point to the Output to Office menu and select Rotate for OCR If the page does not need to be rotated un select Rotate for OCR When multiple pages are selected and the mouse is right clicked Rotate for OCR will not be displayed For pages output to Microsoft Word Excel PowerPoint pages scanned with ScanSnap the ScanSnap icon can be displayed on the lower part of...

Страница 277: ...f characters and simple diagrams Not suitable for conversion to Word Documents created by using complex page layout comprised of diagrams tables and letters such as a brochure magazine and newspaper Not suitable for conversion to Excel Documents containing tables without borders complex tables with to many borders convoluted tables containing sub tables diagrams graphs and charts photographs and o...

Страница 278: ...uments containing handwritten characters Text including small characters smaller than 10 points Skewed documents Documents in languages other than the specified language Documents containing characters written in an unevenly colored or patterned background Characters to which effects such as Shadow Outline and Shading are applied Documents of complex layout and documents including unreadable chara...

Страница 279: ...of the Rack2 Viewer Settings dialog box For details refer to the 7 53 Configuring Viewer Settings Page 291 The image files cannot be edited The Rack2 Viewer window page will be updated when the file is saved by overwriting the file using the application associated with it When the source file has been modified and saved the annotations on pages to which the source file belongs will be deleted When...

Страница 280: ... the application icon on the page Or right click on the page and select Manipulations Edit Source File D The application associated with the file is started and the first page of the file appears 3 Edit the file content and save it D The source file is modified Close the associated application ...

Страница 281: ...on tab of the Rack2 Viewer Settings dialog box For details refer to the 7 53 Configuring Viewer Settings Page 291 When a sheet with a source file is deleted the following cases may occur depending on the settings in the Rack2 Viewer Settings dialog box when the sheet is imported When a sheet is imported with the Copying original files checkbox selected in Retain source files by under the Page Inse...

Страница 282: ...ations 282 Rack2 Filer User s Guide 7 44 Creating a Card Sheet This section describes how to create a new blank sheet to save cards 1 Right click on a page to create a new card sheet 2 Select Insert Blank Sheet D A card sheet is created ...

Страница 283: ...a card upside down 1 Right click on a card and select Turn Card Upside Down To revert to the original orientation right click on the card again and select Turn Card Upside Down If you save this change when you close the Rack2 Viewer window cards will be displayed upside down from the next startup ...

Страница 284: ...o Card Clipboard D The card is cut and moved to the clipboard If a card already exists on the clipboard a message will be displayed to confirm whether to rewrite the existing card The card copied to the clipboard can be pasted in front of another card or on another card sheet A card can be moved by dragging and dropping it A card can be moved to another card sheet by dragging the card off the card...

Страница 285: ...ht click on the card and select Copy to Card Clipboard D The card is copied to the clipboard If a card already exists on the clipboard a message will be displayed to confirm whether to rewrite the existing card The card sheet copied to the clipboard can be pasted in front of another card or on another card sheet ...

Страница 286: ...rds This section describes how to paste a card copied to the clipboard to the currently displayed the card sheet 1 Open the card sheet to which you want to paste the copied card 2 Right click on the card and and then select Paste Card from Clipboard D The card on the clipboard is pasted ...

Страница 287: ...er User s Guide 287 7 49 Deleting Cards This section describes how to delete cards 1 Right click on a card and select Delete Card D A confirm deletion message appears 2 Click the OK button D The card is deleted ...

Страница 288: ...ction describes how to save selected cards as a PDF or TIFF file These PDF files can be displayed using Adobe Acrobat or Adobe Reader 1 Right click on a card and select Save Card As D The Save as dialog box appears 2 After selecting a file type PDF or TIFF click Save Annotations will not be saved ...

Страница 289: ...be printed and click Or right click on the card and select Print Card D The Print dialog box appears 2 Specify the printer and printing range and click the OK button Annotations will not be printed The printed size may be different from the cards shown in the Rack2 Viewer window due to the resolution of the card ...

Страница 290: ...tached 1 Right click on the card and select Send Card As e Mail D The e Mailer Selection dialog box appears 2 Set the details For details of the option settings click the Help button in the dialog box and refer to the Rack2 Viewer Help pages 3 Click the OK button D The dialog box of the e mailer selected in Step 2 is launched and the specified files are attached to e mail ...

Страница 291: ... whether to display the operation buttons the buttons on the left and bottom in the Rack2 Viewer window Choose whether or not to show the binder rings of the binder Opening the e Mailer Selection window when sending e mail with attached page s Choose whether to show the e Mailer Selection window when you are sending mail with attached page s Prompting when fewer than N 0 500 sheets remain availabl...

Страница 292: ... they are being inserted If dividing into two pages whether to correct skewed data can also be set Depending on applications A3 or B4 sized files may be imported upside down It is recommended to set to correct skewed data Automatically insert divider sheet when inserting files Choose whether or not to automatically add a divider sheet to the first page when inserting files Automatically insert div...

Страница 293: ...g OCR to create key text blocks for inserted pages Choose whether or not to automatically run OCR to create key text blocks in the following situations Scan Insert a file Scan to WorkArea Insert a file to WorkArea Insert a file using Rack2 Folder Monitor Software Insert data from other applications If using the ScanSnap S1100 S1300 S1500 marked keyword function according to whether or not the Auto...

Страница 294: ...inserting pages from password protected and printing restricted PDF files attach source files instead of showing actual contents If this checkbox is selected the actual document is not displayed but a PDF icon is shown below the page Clicking on the PDF icon starts Adobe Acrobat If the When inserting pages from password protected and printing restricted PDF files attach source files instead of sho...

Страница 295: ...er input Choose whether to judge correct for skewed input data contained in an image that has been scanned For card binder this function is disabled Automatically correcting for upside down scanner input Choose whether to turn the image 180 degrees when data contained in an image that has been inserted from a scanner has been judged to be upside down ScanSnap These functions are supported for Scan...

Страница 296: ...ple LibRoot folder is C Temp1 WorkArea folder is C Temp1 WorkArea LibRoot folder is C Temp1 DocumentRoot WorkArea folder is C Temp1 For details about how to change the LibRoot folder refer to 6 31 Setting the Rack2 Filer Options Page 149 If an empty folder is specified as a new WorkArea data storage folder the previously used data can be copied and used Whether or not to copy the data can be selec...

Страница 297: ...ollowing settings click the General tab Opening PDF files Window mode in the Rack2 Viewer window Whether to open the e Mailer Selection window when sending e mail with attached page s Whether to prompt when fewer than N 0 500 sheets remain available To configure the following settings click the Page Turning tab Whether to enable the animation for flipping between pages Flip Speed Inter Flip Pause ...

Страница 298: ...ted pages Whether to automatically correct the document orientation before running OCR Whether to automatically rotate landscape pages to portrait When inserting pages from password protected and print restricted PDF files attach source files instead of showing actual contents To configure the following settings click the Scanner Insertion tab Which scanner to use when scanning Whether to show the...

Страница 299: ...lick the OK button D The Rack2 Viewer Settings dialog box is closed and the viewer settings are set When Flatbed Scanner Input is set as Free Multi Card a card may not be extracted correctly depending on the type such as color design ...

Страница 300: ...Chapter 7 Rack2 Viewer Window Operations 300 Rack2 Filer User s Guide ...

Страница 301: ...lled Mobile and Mobile device in this manual When exporting data to a cloud service the following services are supported Exporting to Cloud Service Evernote Google Docs Salesforce Chatter SugarSync For the applications required to use this function refer to Software required for using a cloud service mobile device Page 42 To save data to Evernote and a mobile device presets are required For detail...

Страница 302: ...ng it All pages in the binder selected in the Rack2 Filer window are saved as a PDF file 1 In the Rack2 Filer window select the binder to be exported to cloud service mobile 2 Click or right click on the binder spine and select the menus as follows To export to Evernote Export to Evernote To export to Google Docs Export to Google Docs TM To export to Salesforce Chatter Export to Salesforce Chatter...

Страница 303: ...window open the page to be exported to cloud service mobile 2 Right click on the page and select the menus as follows To export to Evernote Export to Evernote To export to Google Docs Export to Google Docs TM To export to Salesforce Chatter Export to Salesforce Chatter To export to SugarSync Export to SugarSync To export to mobile Export to iPad iPhone iPod touch 3 A dialog box related to the sele...

Страница 304: ...lect multiple stacks click on the stacks while holding down the Shift key or Ctrl key 2 Click or right click on a stack and select the menus as follows To export to Evernote Export to Evernote To export to Google Docs Export to Google Docs TM To export to Salesforce Chatter Export to Salesforce Chatter To export to SugarSync Export to SugarSync To export to mobile Export to iPad iPhone iPod touch ...

Страница 305: ... Filer User s Guide 305 3 A dialog box related to the selected storage destination appears For the subsequent operations refer to 8 2 Exporting to Cloud Service Page 306 and 8 3 Exporting to Mobile Page 321 ...

Страница 306: ...ct the data to be exported using one of the following procedures 1 Selecting a binder and exporting it 2 Exporting a page 3 Exporting a stack For details on each procedure refer to 8 1 Selecting Data to Be Exported Page 302 1 Configure the settings in the Export to Evernote Options dialog box When the data is selected by either of the procedure 1 or 3 the following window appears To use this funct...

Страница 307: ...ected by the procedure 2 the following window appears 2 Click the OK button D PDF file creation starts When the data is selected by the procedure 1 the following window appears When the data is selected by the procedure 2 the following window appears ...

Страница 308: ...ler User s Guide When the data is selected by the procedure 3 the following window appears D When PDF file creation is completed Evernote for Windows starts and the data is exported Synchronization upload is performed according to the settings of Evernote for Windows ...

Страница 309: ...he following procedures 1 Selecting a binder and exporting it 2 Exporting a page 3 Exporting a stack For details on each procedure refer to 8 1 Selecting Data to Be Exported Page 302 1 Configure the settings in the Export to Google Docs TM Options dialog box When the data is selected by either of the procedure 1 or 3 the following window appears This function is not available in a proxy environmen...

Страница 310: ...lowing window appears If the computer is shared selecting the Save user account information checkbox enables other users to log in to Google Docs because your account information will be filled in from the next time For this reason it is recommended that you do not select the Save user account information check box on this dialog box ...

Страница 311: ...n D PDF file creation starts When the data is selected by the procedure 1 the following window appears When the data is selected by the procedure 2 the following window appears When the data is selected by the procedure 3 the following window appears ...

Страница 312: ... Rack2 Filer User s Guide D When PDF file creation is completed exporting starts and the following window appears D When data exporting is completed the following window appears To check the exported PDF files start the Web browser and log in to Google Docs ...

Страница 313: ...s PDF files Select the data to be exported using one of the following procedures 1 Selecting a binder and exporting it 2 Exporting a page 3 Exporting a stack For details on each procedure refer to 8 1 Selecting Data to Be Exported Page 302 This function is not available in a proxy environment that requires authentication upon connecting to the Internet ...

Страница 314: ...2 Filer User s Guide 1 Configure the settings in the Export to Salesforce Chatter Options dialog box When the data is selected by either of the procedure 1 or 3 the following window appears When the data is selected by the procedure 2 the following window appears ...

Страница 315: ...data is selected by the procedure 2 the following window appears When the data is selected by the procedure 3 the following window appears If the computer is shared selecting the Save user account information check box enables other users to log in to Salesforce Chatter For this reason do not select the Save user account information check box on this dialog box ...

Страница 316: ...DF file creation is completed the Export to Salesforce Chatter dialog box appears 3 Click the Change button D The Export to Salesforce Chatter Posting dialog box appears 4 Specify the post destination and method and click the OK button D Returns to the Export to Saleforce Chatter dialog box ...

Страница 317: ...ted the following window appears Exporting to SugarSync When SugarSync Manager for Windows is installed you can export the selected data to SugarSync as PDF files Select the data to be exported using one of the following procedures To check the posted PDF files start the Web browser and log in to Salesforce or use the dedicated application ...

Страница 318: ...ge 3 Exporting a stack For details on each procedure refer to 8 1 Selecting Data to Be Exported Page 302 1 Configure the settings in the Export to SugarSync Options dialog box When the data is selected by either of the procedure 1 or 3 the following window appears When the data is selected by the procedure 2 the following window appears ...

Страница 319: ...ocedure 1 the following window appears When the data is selected by the procedure 2 the following window appears When the data is selected by the procedure 3 the following window appears By clearing the Show preview checkbox the Export to SugarSync dialog box is not displayed and the file is exported to SugarSync ...

Страница 320: ... D After the processes complete the following window appears and the file is exported to SugarSync By default the following SugarSync folder is set as the destination folder From the next time the folder previously used will be displayed For Windows 7 Windows Vista Drive name e g C Users User name Documents Magic Briefcase Rack2 For Windows XP Drive name e g C Documents and Settings User name My D...

Страница 321: ... store such as the App Store iOS 4 2 1 or later of the operating system is required for running ScanSnap Connect Application for mobile devices For more details about the features of this function that are available on the mobile device and their usage refer to ScanSnap Connect Application User s Guide This section describes the settings required to export data to a mobile device and the operation...

Страница 322: ... Start up Rack2 Mobile Link when you log on checkbox is selected on this dialog box Rack2 Mobile Link automatically starts up at next logon When settings are configured on this window at the Rack2 Mobile Link initial startup the window does not appear from the next time data is exported to mobile To show this window again right click on the Rack2 Mobile Link icon on the taskbar and select Settings...

Страница 323: ...may connect a mobile device to it As the password is saved in the mobile device an unrelated user who has connected the mobile device to the computer can perform the same operation unless the password in the computer is changed For this reason it is recommended to perform either of the following operations Change the password each time after sending data Select the Wait until the Send button is cl...

Страница 324: ...menu Rack2 Mobile Link icons When Rack2 Mobile Link is running the Rack2 Mobile Link icon appears on the taskbar The icon indicates the communication status between the computer and mobile device The communication status icons are described in the following list The first time Rack2 Mobile Link is started a firewall block warning may appear If the warning appears check the content of the message a...

Страница 325: ...dows 7 clicking on the taskbar displays the Rack2 Mobile Link icon To always display the Rack2 Mobile Link icon on the taskbar drag and drop the Rack2 Mobile Link icon onto the taskbar When the connection between the computer and mobile device changes it is notified by pop up balloon Item Function Open The Rack2 Mobile Link Export to Mobile dialog box appears If the status of the icon is Rejected ...

Страница 326: ...n a port The Rack2 Mobile Link icon remains Rejected If the status does not change to Waiting check the status of the network This item can only be selected when the status of the Rack2 Mobile Link icon is Rejected and the Rack2 Mobile Link Basic dialog box is not shown In other cases this item is disabled A port is opened when the icon whose status is Rejected is double clicked Help Shows the Rac...

Страница 327: ...orted For the procedure to select data refer to 8 1 Selecting Data to Be Exported Page 302 D The Export to iPad iPhone iPod touch Options dialog box appears 4 Configure the settings in the Export to iPad iPhone iPod touch Options dialog box and click the OK button If Port number in the Rack2 Mobile Link Basic dialog box described in the procedure 3 of Presets Page 321 is changed connection to a mo...

Страница 328: ... 1 or 3 described in 8 1 Selecting Data to Be Exported Page 302 the following window appears When the data is selected by the procedure 2 describe in 8 1 Selecting Data to Be Exported Page 302 the following window appears D When PDF file creation is completed the Rack2 Mobile Link dialog box appears and the file sending process starts ...

Страница 329: ...button on the Rack2 Mobile Link dialog box starts the file sending process For a sending error caused by a communication disconnection when the mobile device reconnects to the computer an unsent file will be automatically sent If a sending error occurs click Some files were not sent Error File List to show the Rack2 Mobile Link Error File List dialog box You can check the mobile device and file na...

Страница 330: ...ot shown the available PDF files are automatically sent to the mobile device that is connected to the computer These items are disabled before a file is sent when a file is being sent or when sending a file fails Click the Stop button to cancel the send process to a mobile device and enable the Close button ...

Страница 331: ... LAN D If there is more than one wireless router confirm that the computer and the mobile device are connected to the same wireless router Check the wireless LAN network settings and make sure to connect to the same network as the mobile device Is network connection for Rack2 Mobile Link blocked by security software settings D Check your security software firewall settings For configuring settings...

Страница 332: ... 1 Select the Start menu Control Panel System and Security Windows Firewall The Windows Firewall window appears 2 In the left pane select Allow a program or feature through Windows Firewall The Allowed Programs window appears 3 Click Change settings 4 Select the Rack2 Mobile Link checkbox in the Allowed programs and features list 5 Click the OK button When you clicked the Block button in Windows V...

Страница 333: ...firewall block warning will be displayed again the next time the program is started If anti virus software shows a warning message refer to the anti virus software manual The name of the program which is allowed in a warning message is either Rack2 Mobile Link or ScantoMobileTrans Is ScanSnap Connect Application installed in the mobile device that you are connecting the computer with D Install Sca...

Страница 334: ... 65535 Port number mobile device Check the port number specified in the mobile device For details refer to ScanSnap Connect Application User s Guide Is Rack2 Mobile Link running in the computer D Check if the Rack2 Mobile Link icon is displayed on the taskbar of the computer If not perform the following to start up Rack2 Mobile Link 1 Select the Start menu All Programs Rack2 Filer Rack2 Mobile Lin...

Страница 335: ...n be disconnected and then disconnect from the mobile device Then log back in to the previous user account and connect the mobile device Does the Rack2 Mobile Link dialog box appear D When the mobile device is connected the Rack2 Mobile Link Basic dialog box does not appear When the mobile device is connected Perform the following 1 Disconnect the connection from the mobile device 2 Close the Rack...

Страница 336: ...er is installed on a computer where ScanSnap has been installed the following Scan to Mobile settings for ScanSnap are carried over Start up Scan to Mobile when you log on Wait until the Send button is clicked Password Port number Notes for uninstalling If you uninstall either Rack2 Filer or ScanSnap Manager ScanSnap Organizer from a computer where both of these products have been installed the co...

Страница 337: ...r are installed Scan to Mobile for ScanSnap is started The displayed dialog box or icon for each operation is as follows When you select the Windows Start menu All Programs Rack2 Filer Rack2 Mobile Link the Scan to Mobile Basic dialog box for ScanSnap appears the first time Rack2 Mobile Link is started When you log on to the computer where Start up Rack2 Mobile Link when you log on on the Rack2 Mo...

Страница 338: ...Chapter 8 Exporting to a Cloud Service Mobile Device 338 Rack2 Filer User s Guide ...

Страница 339: ...oto Album This chapter describes how to create a photo album with photos and documents such as brochures imported to Rack2 Filer and how to use a photo album Click the Help button to refer to the Help pages for the details of each item in the dialog box ...

Страница 340: ...e 9 1 Introduction to Photo Album Function The photo album function is used to import photos and documents to a photo binder and create an album in Rack2 Filer This section describes the features of the photo album function and workflow of creating a photo album ...

Страница 341: ...nSnap Page 348 You can keep record of memories by adding comments to photos and documents D Editing a comment Page 358 Other features are You can freely arrange the location and size of photos and documents on the page D Changing the display size position of a photo document Page 358 You can change the background color of a page D Changing the background color of a page Page 355 You can export the...

Страница 342: ... 2 In the Binder Settings dialog box select Photo as Binder Type and specify the binder title To change the label type click the Label Type button to select the label type and then click the OK button When the OK button is clicked the note on scanning photos with a scanner appears 1 Create a photo binder 1 Select 2 Specify 3 Click ...

Страница 343: ...to ScanSnap and press the scan button When scanning is completed the scanned photo or brochure is displayed in the binder 2 Scan a photo or paper document such as a brochure with ScanSnap Double click CEM UKFG CEM UKFG Before scanning photos or documents refer to the notes in Importing a photo and document Page 347 ...

Страница 344: ... Guide 1 Display the photo binder in the Rack2 Viewer window 2 Select a source file such as digital camera data on the computer and drag and drop it onto the page When importing is completed the source file is displayed in the binder 3 Import a source file ...

Страница 345: ...nge the background color of the page D Changing the background color of a page Page 355 Enter a comment D Entering Adding a comment Page 358 Change the font of the entered comment D Changing the font type size and color of a comment Page 359 Change the display size and position of the photos D Changing the display size position of a photo document Page 358 Rearrange the photos D Moving photos or d...

Страница 346: ...bes how to create a binder to import photos and documents 1 Select the cabinet in which you want to create a binder from the directory tree D The content of the selected cabinet appears 2 Click You can also right click in an empty space in a cabinet and select New Binder D The Binder Settings dialog box appears 3 Select Photo as Binder Type and configure other settings For more details refer to 6 ...

Страница 347: ... If a photo or thin bent or torn document is directly set in the ScanSnap and scanned the photo or document may be damaged and normal scanning may not be possible It is recommended that you use a Carrier Sheet for scanning such documents For details on scanning with the Carrier Sheet refer to the Operator s Guide provided with the ScanSnap Note that the Carrier Sheet is not available for ScanSnap ...

Страница 348: ...th Rack2 Filer Page 65 When you scan a landscape format photo place it horizontally Photos are displayed in the direction they were scanned It is recommended to align the direction of each photo according to the photographed image s orientation portrait or landscape when scanning multiple photos at one time When characters are printed on the back side of a photo the back side of the photo may also...

Страница 349: ...ent such as a brochure to a photo binder you can edit the binder pages by adding comments to the photo and document and changing the display size and position of the photo and document To create a photo album refer to Editing a page Page 351 Setting a default layout before importing photos or documents eliminates the need to change the layout after importing them For details about setting a defaul...

Страница 350: ...xplorer WorkArea Help Importing files to the WorkArea using Get File menu After importing a source file to a photo binder you can edit the binder pages by adding comments to the photo and document and changing the display size and position of the photo and document To create a photo album refer to Editing a page Page 351 The following file formats are supported BMP Windows and OS 2 bitmap PCX Zsof...

Страница 351: ...files associated with applications with printing functions are also supported Editing a page This section explains how to edit a page of a photo binder in the Rack2 Viewer window Moving photos or documents in the same binder This section explains how to move photos or documents in the same binder by dragging and dropping them Movement by dragging and dropping is only available in the same binder 1...

Страница 352: ...and comments is switched to 2 Right click on a photo or document to be moved and select Move Photo or Document to Clipboard DA message appears 3 Click the OK button DThe photo or document is cut and moved to the clipboard 4 Display the destination binder in the Rack2 Viewer window 5 Right click on the page and select Paste Photo or Document from Clipboard DThe photo or document is pasted from the ...

Страница 353: ... Right click on a photo or document to be moved and select Move Photo or Document to WorkArea DA message appears 3 Click the OK button DThe photo or document is cut and moved to the WorkArea 4 Display the destination binder in the Rack2 Viewer window 5 Display the WorkArea DThe photo or document has been moved 6 In the WorkArea select the photo or document to be moved and drop it onto the destinat...

Страница 354: ...e set for them are also moved When photos or documents are moved their borders and comments are also carried over However the following information is changed according to the layout settings of the destination binder or page The number of photos or documents that can be allocated on a page and whether to contain comments Position and size of photos or documents Position and size of comments If th...

Страница 355: ...elect Manipulations Background Color DThe Set Color dialog box appears You can set a default layout before importing photos or documents Setting a default layout before importing photos or documents eliminates the need to change the layout after importing them For details about setting a default layout refer to Setting a default layout Page 355 You can also change the layout of more than one sheet...

Страница 356: ...importing them You can set a default background color with the following procedure 1 Right click on a page of the binder for which you want to set a default background color and select Default Layout Settings DThe Layout Settings Default Value dialog box appears 2 Select the Page settings tab and click the Background Color button DThe Color dialog box appears 3 Select a background color and click ...

Страница 357: ... for which to change the background color using the multi sheet selection procedure For details about the multi sheet selection procedure refer to 7 33 Specifying Multiple Sheets Page 253 2 Right click on the sheet and select Background Color X XX DThe Color dialog box appears 3 Select a background color and click the OK button You can also display the Color dialog box by doing the following steps...

Страница 358: ...or and width Then click the OK button Editing a comment To perform the following operations switch the selection mode of photos documents and comments to by clicking or right clicking on the page and selecting Photo Document Selection Mode Entering Adding a comment 1 Right click on a photo or document and select Edit comment You can also right click on a comment and select Edit DComment entry beco...

Страница 359: ...ry mode Right click on a comment and select Align Top Align Center or Align Bottom Changing the display size position of a comment Check that the comment field is not in entry mode Select a comment and change the display size or move by dragging and dropping it Changing the background color of a comment 1 After checking that the comment field is not in entry mode right click on a comment and selec...

Страница 360: ... how to copy the photo or document currently displayed in the Rack2 Viewer window There are two ways to copy a photo or document Copying a photo or document to the clipboard Copying a photo or document to the WorkArea Copying a photo or document to the clipboard 1 Click Or right click on the page and select Photo Document Selection Mode DThe selection mode of photos documents and comments is switc...

Страница 361: ...nts is switched to 2 Right click on the photo or document to be copied and select Copy Photo or Document to WorkArea DA message appears Photos and documents cannot be copied by selecting them and clicking If there is already a photo or document on the clipboard a message will be displayed to confirm whether to overwrite the existing one To paste the copied photo or document right click on the page...

Страница 362: ...g information is changed according to the layout settings of binder or page where photos or documents are pasted or the layout settings of the destination binder or page The number of photos or documents that can be allocated on a page and whether to contain comments Position and size of photos or documents Position and size of comments If there is not enough space to allocate photos or documents ...

Страница 363: ...EG or PDF file 1 Click in the Rack2 Viewer window Or right click on the page and select Photo Document Selection Mode D The selection mode of photos documents and comments is switched to When you specify the JPEG file format to save a photo or document the imported data is converted to JPEG 24bit Color and saved When you specify the PDF file format to save a photo or document the imported data is ...

Страница 364: ...file PDF format Multiple photos or documents are saved as a single PDF file 1 In the Rack2 Viewer window open a page that contains a photo or document to be saved 2 Right click on the page and select Print Mail Export Export Photo or Document D The Save Photo or Document dialog box appears 3 Select the pages and the file type of the photos or documents to be saved and click the OK button To save t...

Страница 365: ...dialog box displayed differs according to the selected file type JPEG 24bit Color The Browse For Folder dialog box appears PDF The Save as dialog box appears 4 Specify the storage location and file name and click the OK or Save button ...

Страница 366: ...File pdf ini format the pages are saved as a normal binder and photos and documents cannot be edited When importing a binder that was saved in the Data File pdf ini format it is imported as a normal binder A photo binder that was saved in the Rack2 Binder rk2 format can be imported as a photo binder D 7 23 Saving All Pages in a Binder as a New File Page 220 When the selected sheets are saved in th...

Страница 367: ... pasted into card binders D 7 32 Pasting Sheets Page 252 Editing a page When a page is copied into the WorkArea data is copied in units of photos or documents Comments are carried over 2 D Copying pages to the WorkArea Page 266 Pages can be pasted into photo binders and normal binders 1 Pages cannot be pasted into card binders D 7 36 Pasting Pages Page 267 1 When sheets or pages are moved or paste...

Страница 368: ...egion of a page Page 202 D Run OCR on a specified sheet Page 203 Operations that cannot be performed Although they can be performed for a normal binder the following operations cannot be used for a photo binder Importing data Scanning photos or documents using an Image Scanner fi Series Scanner Importing data using the print menu of another application Rack2 Folder Monitor Software automatic file ...

Страница 369: ...ring import Highlighting search results Editing a sheet Deleting sheets on one side Using a source file Importing a source file Using an Unread Files page Displaying an Unread Files page Using ScanSnap data Outputting Pages to Microsoft Word Excel PowerPoint ...

Страница 370: ...Chapter 9 Creating a Photo Album 370 Rack2 Filer User s Guide ...

Страница 371: ...Rack2 Filer User s Guide 371 Chapter 10 Other Functions This chapter describes other functions of Rack2 Filer ...

Страница 372: ... other applications This operation is similar to that of printing using Rack2 Filer 1 Start another application such as Word and select Print from the menu D The Print dialog box appears 2 Specify Raku2 ImageWriter as the printer name and click the Properties button D The Raku2 ImageWriter Advanced Document Properties dialog box appears ...

Страница 373: ...applications Orientation Choose portrait or landscape printing The option may not be available for some applications Color Set the print color to black white or color The option may not be available for some applications Resolution Choose the resolution The option may not be available for some applications MetaFile Spooling Choose OFF normally ...

Страница 374: ...he OK button D The Binder Selection dialog box appears 6 Select the binder to which the data is to be sent and click the OK button The display order of the Binder List in the Binder Selection dialog box may be different from that of the binders in the cabinet This can cause problems if multiple binders share the same name ...

Страница 375: ...ed to the specified binder For a LibRoot folder that is not shown in the Rack2 Filer window Hidden is displayed before the LibRoot Alias For a card binder CARD is displayed before the title For a photo binder Photo is displayed before the title ...

Страница 376: ...on you can set a folder and the files copied or moved to the folder can be added to the binder automatically To insert files using Rack2 Folder Monitor Software it is necessary to install Rack2 Folder Monitor Software from the setup CD ROM The following are the instructions for the installation uninstallation configuration and use of Rack2 Folder Monitor Software This function is only for users wi...

Страница 377: ...oftware 1 Insert the setup CD ROM into the CD ROM drive D The Rack2 Filer setup main window appears 2 Click the Install Rack2 Folder Monitor Software button D The installation wizard appears 3 Click the Next button D The Show product license window appears Insert ...

Страница 378: ...ed To install Rack2 Folder Monitor Software you must accept the terms of the product license agreement D The Show README window appears once you click the Yes button 5 Confirm the content of README and click the Next button README contains content not included in the manual such as important notices for installation and reference information Make sure to confirm the content D The Install Option wi...

Страница 379: ...button D The Start Copying Files window appears 7 Click the Next button D Rack2 Folder Monitor Software is installed The InstallShield Wizard Completed window appears upon completion of installation 8 Click the Finish button The installation directory is set as the Rack2 Filer folder ...

Страница 380: ...e from the list of installed programs 4 Click the Uninstall button D The message to confirm file deletion appears 5 Click the OK button D Rack2 Folder Monitor Software is uninstalled The window showing that uninstallation is complete appears when finished 6 Click the Finish button D Uninstallation of Rack2 Folder Monitor Software is complete Configuring Rack2 Folder Monitor Software 1 Double click...

Страница 381: ... Guide 381 When the operating system is Windows 7 clicking on the taskbar displays the Rack2 Folder Monitor Software program icon D The Rack2 Folder Monitor Software Setting Dialog window appears 2 Configure the settings ...

Страница 382: ... the list Insert new pages at Used to set whether to insert new pages before or after current sheets in the binder Check folder every Used to specify the monitored interval within the range of 0 360 minutes The default setting is 0 Default folder for drag and drop D D Used to select the default folder for the drag and drop function when the files are dropped on the desktop icon of Rack2 Folder Mon...

Страница 383: ...eated shows the date the file was inserted Set the storage period for the stored file The storage period can be set to 0 999 days The storage period is 30 days by default If 0 is set the file cannot be deleted Settings that have been added or changed will not become valid immediately even if they are reflected to the list of settings Click the OK button and close the configuration window to enable...

Страница 384: ...red file The storage period can be set to 0 999 days The storage period is 30 days by default If 0 is set the file cannot be deleted Notify of the Rack2 Folder Monitor Software status using pop up balloon Select this to notify the state of Rack2 Folder Monitor Software by a pop up balloon Do not notify of the Rack2 Folder Monitor Software status using pop up balloon Select this to not notify the s...

Страница 385: ...to the target binder If successfully inserted a file copy will be moved to the Success folder If unsuccessful a file copy will be moved to the Fail folder When files are dropped on the icon they are copied to the monitored folder and inserted into the target binder To configure settings for the monitored folder and target binder to where files are dropped refer to Configuring Rack2 Folder Monitor ...

Страница 386: ...m will wait until the user closes the Target Binder before importing the document Rack2 Folder Monitor Software locks the Target Binder until it has finished importing its documents preventing other users from opening the binder When importing password protected or print restricted PDF files select the When inserting pages from password protected and printing restricted PDF files attach source fil...

Страница 387: ...ears Entering the password and clicking the OK button imports the file However when the password input dialog box is displayed Rack2 Folder Monitor Software cannot import files Therefore password protection is not recommended Clicking the Cancel button cancels the import process and places the file in the Fail folder ...

Страница 388: ...Chapter 10 Other Functions 388 Rack2 Filer User s Guide ...

Страница 389: ...ets and binders and to restore binders from the backed up data The data in the WorkArea can also be backed up and restored Only users who have installed Rack2 Filer can use Rack2 Filer Backup Restore Tool Data backup restoration should not be performed while the Rack2 Filer application is running After exiting Rack2 Filer backup restore data Do not launch Rack2 Filer during backup restoration ...

Страница 390: ... and close Rack2 Filer Backup Restore Tool Launching Rack2 Filer Backup Restore Tool 1 On the Start menu point to All Programs and then select Rack2 Filer Backup Restore Tool D Rack2 Filer Backup Restore Tool is started Closing Rack2 Filer Backup Restore Tool 1 Click the x button in the upper right corner of the window D Rack2 Filer Backup Restore Tool is closed ...

Страница 391: ...ings Window This section describes how to open the backup settings window The backup target and backup destination can be set in the backup settings window 1 On the Rack2 Filer Backup Restore Tool dialog box click the Backup tab D The following window appears ...

Страница 392: ...en the Backup Items Selection window This cannot be selected if WorkArea is selected for the LibRoot folder to be backed up Backup To Shows the folder path to be stored backed up data Click Browse and select the backup destination New Schema button Used to add new backup settings Apply Changes button Used to edit existing backup settings Delete Schema button Used to delete backup schema according ...

Страница 393: ...arget and backup destination 1 On the Rack2 Filer Backup Restore Tool dialog box click the Backup tab D The menu on the Backup tab appears 2 Select the LibRoot folder in which the data to be backed up is stored for Target LibRoot 3 Click the Backup Targets Select button D The Backup Item Selection dialog box appears ...

Страница 394: ...braries in the list When selecting the desired library checkbox all cabinets in that library will be backed up Cabinet List Shows all cabinets in the library selected from the library list Select All Used to select all checkboxes in the cabinet list Deselect All Used to deselect all checkboxes in the cabinet list OK button Used to save the settings and close the window Cancel button Used to close ...

Страница 395: ...ce check Backup all Libraries and Cabinets In this case all the data in the LibRoot folder can also be restored from the backed up data When restoring a binder in the selected library or cabinet restoration is performed in units of binders 5 Click the OK button D The Backup Item Selection dialog box will be closed ...

Страница 396: ...nits of LibRoot folders libraries or cabinets If Backup all Libraries and Cabinets is checked libraries and cabinets added after the setup are also backed up Checking states in Library List are as follows Checked Regardless of timing before or after selecting the library all cabinets will be backed up Unchecked Only cabinets checked in Cabinet List will be backed up After setup added cabinets will...

Страница 397: ... tab click the Backup Now button D The Confirm Backup dialog box appears 2 Click the Yes button Item Description Yes button Starts backup processing No button Returns to the backup setting window Shutdown the computer after the backup finishes checkbox If checked computer will be shutdown after the backup finishes ...

Страница 398: ...ed Backup Schema Now button to run backup Do not open the Backup To folder while backup is in progress Only the libraries and cabinets specified in the backup selection window are saved to the Backup To folder If Backup To folder includes libraries and cabinets that are not specified in the backup selection window they will be deleted The amount of free space available in the drive to be used for ...

Страница 399: ...window 1 On the Rack2 Filer Backup Restore Tool dialog box click the Restore tab D The menu on the Restore tab appears Item Description Restore From Shows the restore folder path of a selected row The data in the folder displayed is used for restoration Click Browse and change the target data for restoration ...

Страница 400: ...ts of all libraries are to be restored Restore To Shown when the Restore all Libraries checkbox is selected Click Browse and specify the target folder path for saving the restoration data Select Binder to Restore Now button Used to open the Select Backup Restore Data window Item Description Restoration can be performed in units of binders or LibRoot folders all libraries ...

Страница 401: ...2 Filer Backup Restore Tool dialog box click the Backup tab 2 Select Restore all Libraries and Cabinets and specify the folder to which data should be restored in Restore To 3 Click the Select Backup Restore Data button D A confirmation message for starting the restoration process appears 4 Click the OK button D Data is restored to the folder specified in Restore To ...

Страница 402: ...User s Guide 11 7 Restoring a Specified Binder This section describes how to restore a specified backed up binder 1 On the Rack2 Filer Backup Restore Tool dialog box Restore tab select a backup target from the list D The folder path is displayed in Restore From ...

Страница 403: ...alog box appears Item Description Select a backed up binder Backed up libraries cabinets and binders are shown in tree structure Restore to the following cabinet Shows the current configuration of Rack2 Filer Restore Now button Used to restore a file Close button Used to close the Select Backup Item Restore window ...

Страница 404: ...d Backup Tree under Select a backed up binder has the library and cabinet name at the time of being backed up Binders for which backup failed are not shown For data which has not been changed a LibRoot folder if the WorkArea restore process is performed all backup data of the WorkArea folder sub folders is replaced ...

Страница 405: ...ser s Guide 405 4 Select the cabinet as restore destination 5 Click the Restore Now button D A confirmation message appears 6 Click the Yes button D The data is restored The binder name displayed cannot be selected ...

Страница 406: ...label text of the restored binder is shown as R The label text of a restored binder will be shown as R The original label text cannot be restored After restoring the backed up binder if the original binder is no longer required it can be removed manually Automatic removal of redundant binders is NOT a supported feature After restoration the label text R can be changed into another name ...

Страница 407: ...s Guide 407 11 9 Viewing the Logfile Settings Window This section describes how to view the logfile settings window 1 Click the Rack2 Filer Backup Restore Tool dialog box Other tab D The log file settings screen appears ...

Страница 408: ...e Folder Used to select the folder to be stored logfiles Click Browse to select the folder in the Browse For Folder dialog box Logfiles include the backed up and restored results The meaning of Success Fail and Skip in the logfiles is as follows Success The number of files to be backed up and restored Fail The number of failed files for backup restoration Skip The number of non target files which ...

Страница 409: ...Rack2 Filer User s Guide 409 Chapter 12 Troubleshooting This chapter gives solutions to problems that arise during the use of Rack2 Filer ...

Страница 410: ...ct the Printer Port window select Use the following port and select LPT1 recommended printer port or Raku2Port from the port list 5 Click the Next button 6 Click the Have Disk button in the Add Printer Wizard window and select the file in the folder where Rack2 Viewer is installed C Program Files PFU Rack2 For Windows XP or Windows 2000 RkImageWriter ForWin2000Xp RkImageWriter2k inf For Windows Vi...

Страница 411: ...down Page 172 and correct the affected pages According to the document the scan direction may not be corrected properly In this case display the Scanner Insertion tab in the Rack2 Viewer Settings dialog box of the Rack2 Viewer Window and clear Automatically correct for upside down scanner input Problem When scanning a photo with the ScanSnap the back side of the photo is also scanned D If there is...

Страница 412: ...o 4 Select the saved photo and use Scan to Picture Folder in Actions to save it as a JPEG file Be sure to save it as a JPEG file because if you convert the photo into a PDF file the border will appear again when importing the converted data to Rack2 Filer 5 Import the converted JPEG file to Rack2 Filer Problem The image characters on imported files are blurred or look smudged D Set Page Resolution...

Страница 413: ... is set to Convert to B W in the Rack2 Viewer Settings dialog box D In the Rack2 Viewer Settings dialog box the settings of Color Data and Page Resolution in the Page Insertion tab are valid only for image conversion and file import for files other than PDF files that are created using ScanSnap Problem When a file is imported the Raku2 ImageWriter is processing job Please wait until the job is com...

Страница 414: ... click the Close button after adjusting the margins and settings 5 Save and close the Excel file Problem When a Microsoft Word file doc is imported the positions of images differ from the original display D Change the settings of Microsoft Word using the following steps and import the file again 1 Open the Word file 2 Select Print from the File menu 3 Select Raku2 ImageWriter in the Name box of th...

Страница 415: ...dure described above import according to the following procedure 1 Open a PDF file in Adobe Acrobat or Adobe Reader 2 From the File menu select Print 3 In the Page Handling area on the print screen select Fit to Printable Area in Page Scaling and select the Choose Paper Source by PDF page size checkbox 4 Print and save the settings 5 From the File menu select Close Keep Adobe Acrobat or Adobe Read...

Страница 416: ...nfirm the folder again Problem When importing data from another application scanning with ScanSnap or for automatic file import the Program could not access LibRoot Folder Please review LibRoot Folder setting and check its attributes message appears D Check the status of the folder specified as the LibRoot folder e g whether it exists or its attributes You can check the path of the folder specifie...

Страница 417: ...cation used to edit the object is set to background mode Problem The PDF files saved using the export function cannot be opened in the Rack2 Viewer window D In the Rack2 Viewer window set Windows should open PDF files using the to Rack2 Viewer in the General tab of the Rack2 Viewer Settings dialog box If carrying out this setting in advance the Rack2 Viewer window starts up when you double click t...

Страница 418: ...layed on pages that can be output to Microsoft Word Excel PowerPoint From Output to Office Show ScanSnap Mark check that Show ScanSnap Mark is selected to show the ScanSnap mark If the mark is not displayed scan documents again using ScanSnap and save for Rack2 Filer version 4 0 or later If the pages cannot be output to Microsoft Word Excel PowerPoint even if the mark is displayed ABBYY FineReader...

Страница 419: ...Rack2 Filer User s Guide 419 Chapter 13 Messages This chapter describes the messages shown during the use of Rack2 Filer and how to deal with them ...

Страница 420: ... Filer therefore information that is not supported by the current version of Rack2 Filer may not be displayed and all functions may not be available To continue operation using the current version of Rack2 Filer click the OK button Cannot open because this binder was created with a newer version higher level of Rack2 Filer Solution Rack2 Viewer window cannot be started because the binder was creat...

Страница 421: ...f Rack2 Filer and uses functions that are not supported by your version of Rack2 Filer Check for available Update Packs and update the program Note If the message appears even after updating the program it is necessary to upgrade Rack2 Filer Paid Version Do you want to move the photo or document data saved in the photo binder to WorkArea When the data is moved the following information will be del...

Страница 422: ...ed To continue the process click the OK button Divider sheets Blank pages Key text blocks Annotations sticky notes highlight hyperlinks stamps Unable to import because of photo binder Solution Unable to import because of photo binder For photo binders only Rack2 Binder rk2 format can be imported Program encountered error during operation Try again Solution Try the following Close any unnecessary p...

Страница 423: ...nder does not have a page that can be exported The password protected print restricted pages cannot be exported to a cloud service or mobile device Select a binder that can be exported and try again Cannot add because the destination binder was created with a newer version higher level of Rack2 Filer Select another binder Solution The binder was created with a newer version higher level of Rack2 F...

Страница 424: ...etwork environment and status of the LibRoot folder existence attributes Solution Check the following and try again There is enough free space in the LibRoot folder or temporary folder Write privilege is set for the LibRoot folder a new file can be created in the LibRoot folder A connection is established when the LibRoot folder is on a network There is a cabinet press the F5 key to refresh the Ra...

Страница 425: ...ved to a binder the maximum number of pages allowed for the destination binder will be exceeded Reduce the number of pages to be moved or delete any unneeded pages from the destination binder and try again For xxx the maximum number of pages selected in Max Binder Size in the General tab of the Rack2 Filer Binder Settings dialog box is displayed Either of the following values is displayed dependin...

Страница 426: ...as created with a later version of Rack2 Filer therefore the binder will update and all functions may not be available Do you want to continue Solution When adding pages imported with a later version of Rack2 Filer to the current version of Rack2 Filer by copying and or transferring the current version binder where the pages are added is also updated to the later version Therefore all functions ma...

Страница 427: ...ution The binder was created with a newer version higher level of Rack2 Filer and uses functions that are not supported by your version of Rack2 Filer Check for available Update Packs and update the program Note If the message appears even after updating the program it is necessary to upgrade Rack2 Filer Paid Version Cannot select because this binder was created with a newer version higher level o...

Страница 428: ...on and add a destination page and then move the photos or documents The page to be deleted contains some source files that cannot be deleted Do you want to continue Solution When the front page or back page of sheets are deleted some pages are not deleted because the same source file exists in both the front page and back page To continue operation click the OK button Unable to export pages becaus...

Страница 429: ...pecified location Click OK after opening another page Solution Open another page and click the OK button Drag and drop the file anywhere other than the contents page or inside front cover of the Rack2 Viewer binder For bottom tab position tab size must be set to between 10 and 30 Solution Specify the length of divider sheets to between 10 and 30 of the length of the divider sheet itself Program fa...

Страница 430: ...pages Key text blocks Annotations sticky notes highlight hyperlinks stamps When photos or documents are moved information in the source photo binder is deleted Do you want to copy the photo or document data saved in the photo binder to WorkArea Note that the following information will not be copied Divider sheets Blank pages Key text blocks Annotations sticky notes highlight hyperlinks stamps Solu...

Страница 431: ...requested operation will also be applied to the source file and associated pages pages with the same source file To continue the operation click the OK button The selected binder is currently being used Wait for a while and try again Solution Wait for a while and try again The selected page s is associated with source file Requested operation cannot be processed on part of a source file To continu...

Страница 432: ... are allocated therefore the following information may be deleted Do you want to continue Annotation Source file Data scanned with ScanSnap Contents information Key text blocks Solution When two pages are allocated into one page for the sheet s the following information that is contained in the sheet s may be deleted To continue operation click the OK button Annotation Source file Data in which th...

Страница 433: ...ort it Solution When a card binder or photo binder is saved in the Data File pdf ini format it is converted and saved as a normal binder To import the exported binder files again and manage them with Rack2 Filer save them in the Rack2 Binder rk2 format or use the export function on the Rack2 Filer window and select the Rack2 Binder rk2 format to export them The page cannot be displayed because the...

Страница 434: ...rite privilege is set for the LibRoot folder a new file can be created in the LibRoot folder A connection is established when the LibRoot folder is on a network There is a cabinet press the F5 key to refresh the Rack2 Filer window Password protected or print restricted PDF files cannot be imported to the photo binder Solution Password protected or print restricted PDF files cannot be imported to t...

Страница 435: ...ctory and file are not write protected Solution Check the following and save the file again Check the amount of free space in the drive where the system drive or LibRoot folder exist and save the file again To check the amount of free space in a drive run Explorer and click Computer Right click the drive in the displayed window and select Properties Clicking the General tab displays the amount of ...

Страница 436: ...General tab is selected clear it Program encountered error while saving data file Check disk status space attributes connectivity and try again Solution Check the following and try saving the file again There is enough free space in the LibRoot folder or temporary folder Write priviledge is set for the LibRoot folder a new file can be created in the LibRoot folder A connection is established when ...

Страница 437: ... Restart the system and try again Solution Restart the system and try again Program could not move data file because the maximum number of pages xxx has been reached Reduce the number of pages and try again Solution If the pages of the selected pages are moved to a binder the maximum number of pages allowed for the destination binder will be exceeded Reduce the number of pages to be moved or delet...

Страница 438: ...uld not be changed because the maximum number of pages XXX has been reached Delete any unnecessary pages and try again Solution If the layout pattern is changed in the Layout Settings dialog box to a setting that allocates a small number of photos or documents on a page a new page may be added to allocate the imported photos or documents With this process the maximum number of pages may be reached...

Страница 439: ...her level of Rack2 Filer Solution Cannot search because the binder was created with a newer version higher level of Rack2 Filer and uses functions that are not supported by your version of Rack2 Filer Check for available Update Packs and update the program Note If the message appears even after updating the program it is necessary to upgrade Rack2 Filer Paid Version The page to be added was create...

Страница 440: ...ion failure Re install Rack2 Filer Unable to move pages in Page Width Mode or Rotate Mode Click OK after switching to 2 Page Spread Mode Solution Open the page in 2 page spread mode and click the OK button Move a page in 2 page spread mode Program failed to load necessary DLL Uninstall this program restart computer and install this program again Solution Rack2 Viewer may not be installed normally ...

Страница 441: ...er binder is importing files wait until the importing process is completed and try again If this error message appears even though no other binders are importing files Raku2 ImageWriter may have closed abnormally Restart the system If the error still remains there may have been a Rack2 Filer installation failure Re install Rack2 Filer ...

Страница 442: ...r of pages limit print the file and import on the Rack2 WorkArea window Unable to get the file because print operation was not performed If the related application is running exit the application Solution Try the following Close any related applications in operation and try again Directly open the file specify Raku2 ImageWriter in the application print function and import to the WorkArea When impo...

Страница 443: ...her binder Solution The binder was created with a newer version higher level of Rack2 Filer and uses functions that are not supported by your version of Rack2 Filer Check for available Update Packs and update the program Note If the message appears even after updating the program it is necessary to upgrade Rack2 Filer Paid Version Cannot process operation because this binder was created with a new...

Страница 444: ...d PDF file cannot be cut using the ScanSnap marked text crop function Specify different pages only pages imported with ScanSnap and try again Program could not perform the specified operation because the maximum number of thumbnails XXX thumbnails has been reached Reduce the number of thumbnails and try again Solution Delete any unnecessary stacks and try again If splitting the target stack causes...

Страница 445: ...d Blank pages if not printing blank pages Password protected print restricted pages Specify printable pages and try again Unable to export pages because the selected pages do not have valid pages Solution There is no page that can be exported in the selected pages The following pages cannot be exported to a cloud service or mobile device Contents pages Divider sheets Password protected print restr...

Страница 446: ...ap or pages insterted with a version of Rack2 Filer prior to V4 0L10 Solution Pages that can be used with Output to Office functions are those imported to Rack2 Filer version 4 0 or later using ScanSnap Detach pages that are not imported using ScanSnap and try again Clicking and selecting Show ScanSnap Mark displays the ScanSnap mark at the bottom of pages scanned with ScanSnap The selected binder...

Страница 447: ...d stack do not exist Solution The specified pages do not contain pages which can be printed Pages which cannot be printed are as follows Blank pages if not printing blank pages Password protected print restricted PDF file pages Specify pages which can be printed and try again Could not save as specified pages of the selected stack saved do not exist Solution Check whether the selected stack contai...

Страница 448: ...ot be printed Unable to export pages because all the pages of the selected stack are password protected or print restricted Solution The selected stack does not have a page that can be exported The password protected print restricted pages cannot be exported to a cloud service or mobile device Select a stack that can be exported and try again Could not send e mail as all pages of selected stack ar...

Страница 449: ... continue the process click the OK button Divider sheets Blank pages Key text blocks Annotations sticky notes highlight hyperlinks stamps When a stack is moved information in the source stack is deleted Cannot add because the destination binder was created with a newer version higher level of Rack2 Filer Select another binder Solution The binder was created with a newer version higher level of Rac...

Страница 450: ...ack make a copy of the page delete the source data and import it to a photo binder Program could not insert sheet s between pages containing source files Solution Insert into a a page that is not between pages containing source files Cannot send e mail because the maximum number of attachment files 10 files has been reached Solution There is a limit to the number of files that can be attached to a...

Страница 451: ...enough free space in the LibRoot folder or temporary folder Write privilege is set for the LibRoot folder a new file can be created in the LibRoot folder A connection is established if the LibRoot folder is on a network There is a cabinet press the F5 key to refresh the Rack2 Filer window Backup or restoration operation is being performed WorkArea cannot be started Solution Wait until the backup o...

Страница 452: ...the maximum number of pages xxx has been reached Reduce the number of pages and try again Solution If the pages of the selected thumbnails are moved to a binder the maximum number of pages allowed for the destination binder will be exceeded Reduce the number of pages to be moved or delete any unneeded pages from the destination binder and try again For xxx the maximum number of pages selected in M...

Страница 453: ...inder will update and all functions may not be available Do you want to continue Solution When adding pages imported with a later version of Rack2 Filer to the current version of Rack2 Filer by copying and or transferring the current version binder where the pages are added is also updated to the later version Therefore all functions may not be available To continue operation using the current ver...

Страница 454: ...aphics format TGA Truevision TARGA format PCD Photo CD format FPX FlashPix format PDF PDF files exported from Rack2 Filer or imported using the ScanSnap Other PDF files associated with applications with printing functions are also supported Specify the file in explorer and check if the print menu is displayed If the print menu is not displayed the file can be imported by opening the file with the ...

Страница 455: ...e status of the specified folder To check the WorkArea folder select Settings from the Edit menu to show the Rack2 Viewer Settings dialog box and then select the WorkArea tab Solution Check the following A WorkArea folder exists A new file can be created in the folder ...

Страница 456: ...Chapter 13 Messages 456 Rack2 Filer User s Guide ...

Страница 457: ...er from the last access 128 B binder changing settings 109 copying 123 creating 105 deleting 117 exporting 132 importing 134 moving 119 rearranging 122 searching 136 145 C cabinet creating 94 deleting 98 rearranging 100 renaming 96 switching the display mode 101 card copying 285 cutting 284 deleting 287 pasting 286 printing 289 saving as a PDF file 288 saving as a TIFF file 288 sending as e mail 2...

Страница 458: ...inder 130 copying binder 123 cards 285 pages 265 sheets 248 creating binder 105 cabinet 94 card binder 106 card sheet 282 library 88 Creating photo binder 346 Creating a photo binder 346 cutting sheets 242 D deleting back pages 240 binder 117 cabinet 98 cards 287 front pages 240 library 91 pages 269 sheets 237 source file 281 displaying thumbnails 230 E editing the contents list 195 environment ha...

Страница 459: ...rary creating 88 deleting 91 rearranging 93 renaming 89 LibRoot rearranging 87 restoring the data 401 setting 84 M messages Rack2 Filer window 420 Rack2 Viewer window 427 Rack2 WorkArea window 442 Mobile link 321 modifying a source file 279 modifying order of sheets 232 moving binder 119 data 155 O one by one flipping the pages 170 opening backup window 391 Rack2 Viewer window 61 restore window 39...

Страница 460: ... Viewer window 27 31 closing 61 messages 427 opening 61 window structure 31 Rack2 WorkArea window 27 35 closing 64 launching 62 messages 442 window structure 35 rearranging cabinets 100 rearranging libraries 93 renaming cabinet 96 library 89 rotating a page 90 degrees 173 rotating a page display 179 S Salesforce Chatter 313 saving all the pages in the binder as a new file 220 cards 288 sheets as a...

Страница 461: ... 253 SugarSync 317 switching the cabinet display mode 101 T troubleshooting 389 409 turning a card upside down 283 turning a page upside down 172 typing strings to the Key Text Block dialog box 209 U uninstalling Rack2 Filer 53 upgrading Rack2 Filer 55 V viewing a restored binder 406 viewing the logfile settings window 407 W window mode changing 176 window structure Rack2 Filer window 29 Rack2 Vie...

Страница 462: ...Index 462 Rack2 Filer User s Guide ...

Страница 463: ...r damages to third party copyrights or other rights arising from the use of any information in this manual No part of this manual may be reproduced in any form without the prior written permission of PFU LIMITED Rack2 Filer User s Guide P2WW 2613 01ENZ0 Issue date September 2011 Issued by PFU LIMITED ...

Отзывы: