background image

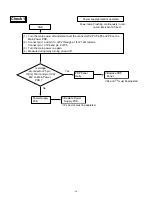
Check 1

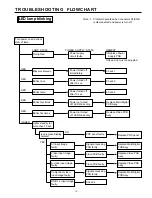
Start

(1) Turn the main power off and disconnect the connector P2,P3,P4,P5 and P6 on the

Main Power PCB.

(2) Connect pin 1 and pin 13 of P2 through a 1/4W, 1k

 resistor.

Connect pin 1 of P4 and pin 9 of P6 
Turn the main power on again.

(4)

(3)

Measure during relay turning on and off.

PDP Panel 

Power supply protector operated

Flashing continuously in red.
(at an interval of 0.5 sec)

∗ 

Replace PDP
Panel.

∗ 

Vs and 

V

d

must be adjusted.

Yes

Is voltage 

at connector P5 pin

10(Vs) 160V and pin 7(Vd)

65V on Main Power

PCB ?

faulty.

Power Supply

∗ 

Replace Power
Supply PCB.

∗ 

Vs and 

V

d

must be adjusted.

PCB.

No

Power lamp:

- 14 -

Содержание PDS4233W/E-H

Страница 1: ...PDS4233W E H PDS4234W E S Copy Prohibited FUJITSU GENERAL Proprietar y ...

Страница 2: ...ON 7 PART NAMES AND FUNCTIONS 8 VIDEO MODE ADJUSTMENT 10 RGB MODE ADJUSTMENT 11 TROUBLESHOOTING USING LED AND OSD 12 TROUBLESHOOTING FLOWCHART 13 VS AND Vd ADJUSTMENT 17 GENERAL CONNECTION DIAGRAM 18 19 DISASSEMBLY PROCEDURES PARTS LIST 31 TRANSPORTATION AND HANDLING RESTRICTIONS 32 1 ...

Страница 3: ...ible injury to the operator When transporting by car place the unit as shown in the figure Slots and openings in the cabinet are provided for ventilation These ensure reliable operation and protect the unit from overheating These openings must not be blocked or covered The openings should never be blocked by placing the unit on a bed sofa rug or similar surface The unit should not be placed in a b...

Страница 4: ...or parts with the same characteristics as the original parts Unauthorized substitutions may result in fire electric shock or other hazards Upon completion of any service of repairs ask the service technician to perform safety checks to determine that the unit is in proper operating condition Place the unit more than one foot away from heat sources such as radiators heat registers stoves and other ...

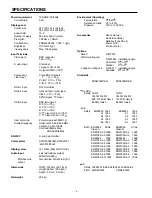
Страница 5: ...olor system NTSC PAL SECAM N PAL M PAL 4 43NTSC PAL60 Display colors 16 7 million 256 each for R G B 2 pin terminals one system Audio input 500mVrms 22k Effective max Level terminal 9W 9W L R 8 output Dimensions Width 103 5cm 40 7 inch Height 64 0cm 25 2 inch Depth 8 5 cm 3 3 inch Net weight 28 5kg Environment Operating Temperature 0 to 40 C Relative humidity 20 to 80 Pressure 720 to 1 100 hPa Acc...

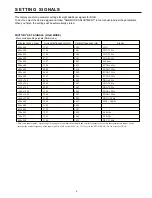
Страница 6: ...SXGA 60 Hz or less for UXGA 640 x 480 31 47 VGA 640 x 480 37 86 72 81 59 94 VGA 72 Hz 640 x 480 37 50 75 00 VGA 75 Hz 640 x 480 43 27 85 01 VGA 85 Hz 720 x 400 31 47 70 09 400 lines 800 x 600 37 88 60 32 SVGA 60 Hz 800 x 600 48 08 72 19 SVGA 72 Hz 800 x 600 46 88 75 00 SVGA 75 Hz 800 x 600 53 67 85 06 SVGA 85 Hz 1024 x 768 48 36 60 00 XGA 60 Hz 1024 x 768 56 48 70 07 XGA 70 Hz 1024 x 768 60 02 75 ...

Страница 7: ...odes images of reduced size are displayed on the screen using size reduction and interpolation Also note that on screen information is also displayed in reduced size Out of range appears if the display receives a signal whose characteristic does not fall within the display s permissible range You can check the input signals with Information on the OTHERS Menu screen The sync switch TTL ANALOG swit...

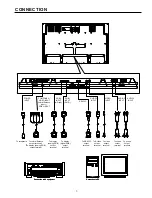
Страница 8: ...NPUT input RGB3 INPUT POWER INPUT RGB 2 INPUT mD sub RGB 1 INPUT DVI D VIDEO INPUT S VIDEO INPUT RS 232C AUDIO 2 INPUT AUDIO 1 INPUT To color difference output terminal o display analog RGB output terminal To receptacle To display analog RGB output terminal To display digital RGB output terminal To sound output terminal To RS 232C output terminal To S video output terminal To video output terminal...

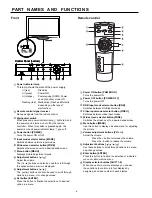
Страница 9: ... in a menu or to change values Set button ENTER Press this button to finalize the selection of a desired option in a menu Power ON button POWER ON Turns the power ON Power OFF button POWER OFF Turns the power OFF RGB input mode selector button RGB Switches between RGB input modes Video input mode selector button VIDEO Switches between video input modes Wide screen selector button WIDE Switches the...

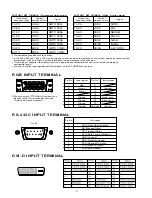
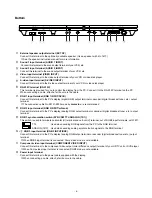
Страница 10: ...c output terminal The connection cable No 88741 8000 made by molex Inc is recommended RGB 2 input terminal RGB 2 INPUT mD sub Connect this terminal to the PC s display analog RGB output terminal or decoder digital broadcast tuner etc output terminal RGB 3 synchronization switch SYNC SW TTL ANALOG 75 This switch is used to terminate horizontal H terminal and vertical V terminal out of RGB3 input te...

Страница 11: ... 4 AUDIO Treble 6 to 6 Bass 6 to 6 Balance 10 to 10 FEATURES Adjustment Clamp Position 8 to 8 Only Comp Video Function 24 Frame model On Off 3D Y C On Off On Screen Menu OSD On Off OSD Rotate Normal 90 Deg 90 Deg English Deutsch Espanol Francais Italiano Portugues Ñ N Pycck Only E model Language Input Terminal Video Input S Video Input Auto NTSC PAL SECAM PAL 60 N PAL M PAL 4 43 NTSC Auto NTSC PAL...

Страница 12: ...anol Francais Italiano Portugues Ñ N Pycck Only E model Language Input Terminal Video Input S Video Input BNC Input RGB PC Decoder Comp video Mask Off 5 10 15 Others DPMS Time Off 1 min 15 min 45 min 60 min Background Black White Audio Input Input Priority Monitor No White Screen Off On Exhibition Mode Off On Installation Horizontal Vertical Key Lock Off On Information Mode Monitor No Freq Scan Mo...

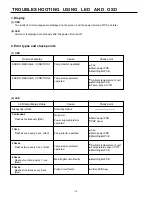
Страница 13: ...rature of unit Main Digital PCB Temp sensor IC757 1 OSD LED lamp display status Cause Check point Steady light Red Stand by status Continuous Flashes continuously Red No power Power supply protector operated Main power PCB PDP panel 1 time Flashes once every 4 sec Red Fan protector operated Fan Main power PCB Main Digital PCB 2 times Flashes twice every 5 sec Red Temperature protector operated Amb...

Страница 14: ...ff LED blinks only RED Replace Main Digital PCB Assy Blinks five times Power not turned off LED blinks only RED Replace Video PCB Assy Is on screen display normal All input image faulty Signal processing PDP panel faulty Video PCB faulty Video PCB faulty PCB faulty Signal processing PCB faulty Replace Main Digital PCB Assy Replace PDP panel Replace Main Digital PCB Assy Replace Video PCB Assy Repl...

Страница 15: ...n 9 of P6 Turn the main power on again 4 3 Measure during relay turning on and off PDP Panel Power supply protector operated Flashing continuously in red at an interval of 0 5 sec Replace PDP Panel Vs and Vd must be adjusted Yes Is voltage at connector P5 pin 10 Vs 160V and pin 7 Vd 65V on Main Power PCB faulty Power Supply Replace Power Supply PCB Vs and Vd must be adjusted PCB No Power lamp 14 ...

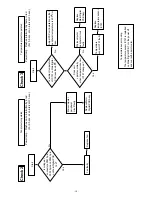
Страница 16: ...or 0 5 sec at an interval of 5 sec Check 3 Start Adjust PDP unit installation so that peripheral temperature is 40 0 C or less No Is ambient temperature of IC757 on Main Digital PCB less than 60 C Microcomputer peripheral circuit faulty Yes Replace Main Digital PCB Assy Fan faulty Replace fan Temperature sensor IC757 faulty Temperature sensor cooling The temperature sensor IC757 is installed on Ma...

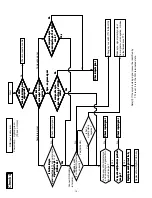
Страница 17: ... to pin 2 of RGB cable Is composite sync signal input to pin 13 of RGB cable Is horizontal sync signal input to pin RGB cable Check input signal Check input signal Check input signal Is input level within specified range Signal processing circuit faulty RGB input is abnormal Power lamp Lighted green 10 sec or more Check 4 Start Separate signal Composite signal No Yes Yes Yes Sync on green signal Y...

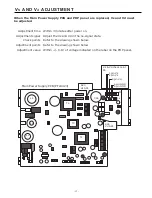
Страница 18: ...djust the Vs and Vd in the no signal state Check points Refer to the drawing shown below Adjustment points Refer to the drawing shown below Adjustment value Within 0 1V of voltage indicated on the label on the PDP panel Vs Vd check point P6 T4 T3 T2 L4 L2 L1 P5 P6 C56 RV3 Vs ADJ RV4 Vd ADJ 1 9 1 pin Vs 2 pin Vs 4 pin Vd 5 pin GND 6 pin GND Main Power Supply PCB PFW 423 17 ...

Страница 19: ... FANPRM4 GND 1 1 LVDS 20 CN201 F1 TWE31PB VF P1001 TX24 60P CN701 TX24 60P CN752 S5B PH SM3 TB L TYP SMT CN351 VH 10P L TYP CN2 PH 6P V TYP SMT TER1 J1 CN401 M SUB 15PIN CN352 S13B PH SM3 TB CN751 B8B PH SM3 TB Y TYP SMT SIGNAL PROCESSING P954 S3B PH SM3 PH 3 14V FANPRM3 GND 1 P953 S3B PH SM3 TB TX25 30P 12ST H1 CN702 CN1004 TX24 30R 6ST H1 BNC CN1001 BNC CN1002 SW1001 P6900 P6701 2 Pitch wire wit...

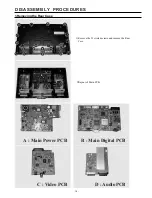
Страница 20: ... 19 DISASSEMBLY PROCEDURES A Main Power PCB B Main Digital PCB C Video PCB D Audio PCB 19 1 Removing the Rear Case 1 Remove the 22 circled screws and remove the Rear Case Layout of Main PCB ...

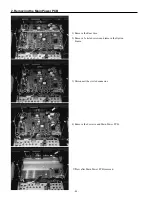
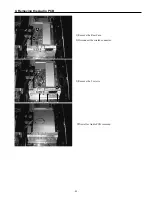
Страница 21: ...oving the Main Power PCB 1 Remove the Rear Case 2 Remove 2 circled screws and remove the Option Frame 3 Disconnect the circled connector 4 Remove the 4 screws and Main Power PCB View after Main Power PCB removed ...

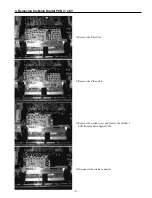
Страница 22: ...1 3 Removing the Main Digital PCB 1 of 2 1 Remove the Rear Case 2 Remove the Video Unit 3 Remove the circled screw and remove the Interface PCB from the Main Digital PCB 4 Disconnect the circled connector ...

Страница 23: ... the Main Digital PCB 2 of 2 5 Remove the Rear Panel 6 Remove the 4 screws at the shield bracket of the Main Digital PCB and remove the shield bracket 7 Remove the Main Digital PCB View after Main Digital PCB removed ...

Страница 24: ... 23 4 Removing the Audio PCB 1 Remove the Rear Case 2 Disconnect the circled connector 3 Remove the 5 screws View after Audio PCB removed ...

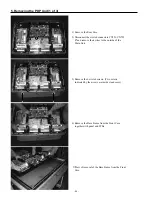
Страница 25: ...ctors CN751 CN752 P7and remove their wires to the outside of the Main Unit 3 Remove the 6 circled screws Two screws indicated by the arrows are inside stand cover 4 Remove the Base Frame from the Front Case together with panel and PCBs View of removal of the Base Frame from the Front Case ...

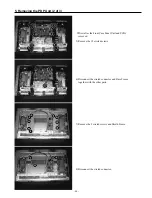
Страница 26: ...after the Front Case Panel Unit and PCBs removed 5 Remove the 12 circled screws 6 Disconnect the circled connector and Base Frame together with the other parts 7 Remove the 9 circled screws and Shield Frame 8 Disconnect the circled connector ...

Страница 27: ... 26 5 Removing the PDP Unit 3 of 3 View after only the PDP Unit removed Replace the parts which are already mounted correctly when the PDP Unit is replaced ...

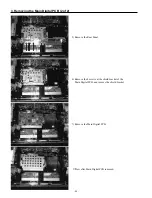
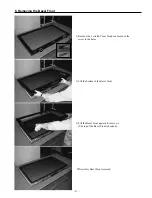
Страница 28: ...l Front 1 Remove the 2 circled Cover Stands and remove the screw in the holes 2 Lift the bottom of the Bezel Front 3 Lift the Bezel Front upward to remove it The top of the Bezel Front is hooked View after Bezel Front removed ...

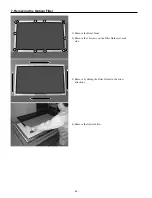
Страница 29: ...8 7 Removing the Optical Filter 1 Remove the Bezel Front 2 Remove the 14 screws on the Filter Holders at each side 3 Remove by sliding the Filter Holder in the arrow directions 4 Remove the Optical Filter ...

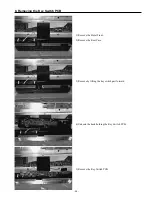
Страница 30: ... 29 8 Removing the Key Switch PCB 1 Remove the Bezel Front 2 Remove the Rear Case 3 Remove by tilting the key switch part forward 4 Unhook the hook holding the Key Switch PCB 3 Remove the Key Switch PCB ...

Страница 31: ...ng the Rear Case 1 Remove the 4 circled screws 2 Pull out the Video PCB Unit from the Plasmavision 3 Remove 5 screws from the Video PCB Unit Note Three kinds of screws are used on this Video Unit Be careful not to make any mistakes when reinstalling 4 Remove the Video PCB ...

Страница 32: ...9A 12PH 8900233009 Optical Filter 8112396004 8112397001 Audio PCB Assy 8112577007 Connection PCB Assy 8112583008 I O PCB Assy 8112585002 Key Switch PCB Assy 8112581004 LED PHOTO PCB Assy 8112579001 Main Digital PCB Assy 8112997003 Video PCB Assy 8112575003 Main Power PCB Assy 8112608008 PDP Unit 8112595001 Noise Filter 0400222729 Power Cord UL CSA 8111725003 8111725003 8111725003 VDE 8111726000 81...

Страница 33: ...ON AND HANDLING RESTRICTIONS Transportation Don t load the plasmavision on a truck as shown in the drawing Don t hold the surface of the optical filter Over 30 cm Drop Floor Bad loading Handling Never drop Never topple ...

Страница 34: ... 33 Don t stack the plasmavision over three units high Load the plasmavision as shown above Example of good transportation and handling Good loading 3 4 ...

Страница 35: ... 34 MEMO ...

Страница 36: ...January 2002 Printed in Japan 0202J1957 ...

Отзывы: