background image

Operation

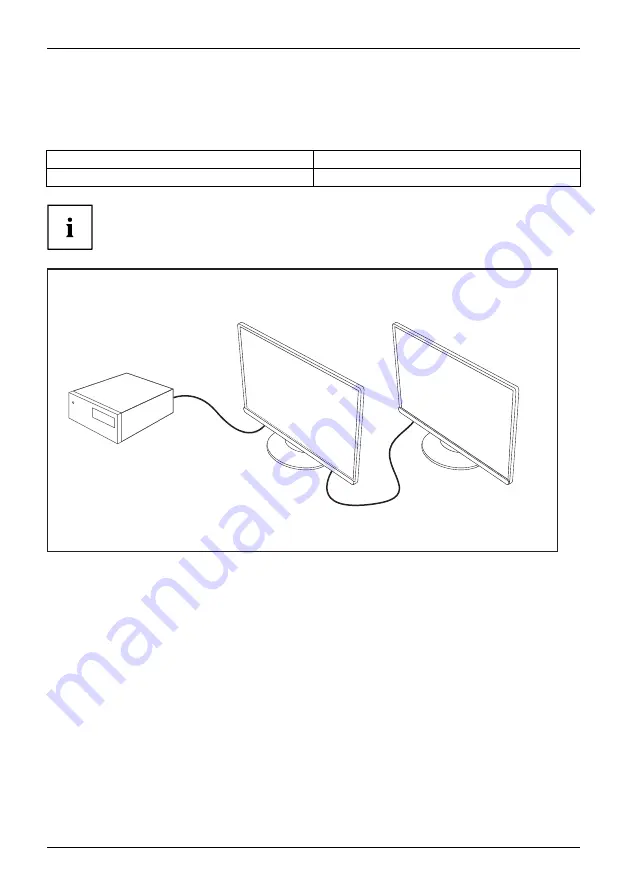
Using the Daisy Chain function

With the daisy chain function, you can connect up to two monitors in sequence to
a Displayport or USB-C output of your display adapter.

Screen resolution

Maximum

1920x1080 (FHD)

2 monitors

Before enabling the daisy chain function, ensure that your display adapter
DP 1.2 or the USB-C port supports "Displayport Alternate Mode". Otherwise,
your display adapter may no longer recognise the monitor.

DP1.2

Connect the display adapter to the "DP IN" port or to the USB-C port
(underside) on the

fi

rst monitor.

Connect the next monitor via the "DP OUT" port.

36

Fujitsu

Содержание P24-9 TE

Страница 1: ...Display Operating Manual FUJITSU Display P24 9 TE ...

Страница 2: ...ound on the Internet at http www fujitsu com fts You can find driver updates at http support ts fujitsu com download Should you have any technical questions please contact our Hotline Service Desk http support ts fujitsu com contact servicedesk Your sales partner Your sales office We hope you enjoy working with your new Fujitsu system ...

Страница 3: ......

Страница 4: ...jitsu Technology Solutions GmbH Mies van der Rohe Straße 8 80807 Munich Germany http www fujitsu com fts Copyright Fujitsu Technology Solutions GmbH 2018 All rights reserved Publication Date 04 2018 Order No A26361 K1646 Z320 1 7619 edition 1 ...

Страница 5: ... started 11 Operation 18 Driver installation 38 Notes on power management 39 Notes on USB Power Delivery USB PD 40 Notes on low blue light mode 41 Notes on ergonomic colour adjustment 42 Explanatory information about standard ISO 9241 307 43 Troubleshooting 44 Technical specification 46 ...

Страница 6: ...ft and Windows are trademarks or registered trademarks of the Microsoft Corporation in the United States and or other countries VESA is a registered trademark of Video Electronics Standards Association HDMI is a trademark or registered trademark of HDMI Licensing LLC in the United States of America and or other countries All other trademarks specified here are the property of their respective owne...

Страница 7: ...6 Connecting cables to the computer 17 Operation 18 Switching the device on and off 18 Notes on the ambient light sensor and presence sensor 19 Changing the monitor settings 20 Functions of the control panel and the OSD menu 21 Select OSD language 21 Setting screen display 22 Configuring the OSD menu 24 Advanced setting functions 26 Displaying information 27 Activate deactivate ECO operating mode ...

Страница 8: ...our adjustment 42 Explanatory information about standard ISO 9241 307 43 Troubleshooting 44 Technical specification 46 VESA DDC compatible VGA interface 47 Preset operating modes 47 Most frequent operating modes 47 Video TV operating modes via Displayport 48 SUB D port 48 HDMI port 49 Displayport socket 50 USB C port 51 4 Fujitsu ...

Страница 9: ...puts USB C Displayport and HDMI with HDCP power management for reducing power consumption when the computer is not in use Compliance with the recommendations according to the latest TCO requirements the monitor fulfills all GS Geprüfte Sicherheit Certified Security requirements This operating manual contains important information you require to start up and run your LCD monitor A display adapter g...

Страница 10: ...he device Indicates an activity that must be performed Indicates a result This font indicates data entered using the keyboard in a program dialogue or at the command line e g your password Name123 or a command used to start a program start exe This font indicates information that is displayed on the screen by a program e g Installation is complete This font indicates terms and texts used in a soft...

Страница 11: ...ains outlet are freely accessible The ON OFF switch does not disconnect the monitor from the mains voltage To completely disconnect from the mains voltage you must remove the mains plug from the mains socket The device is equipped with a power cable that complies with safety standards Use the supplied power cable only Lay the cables in such a way that they do not create a hazard danger of tripping...

Страница 12: ...e sound pressure from earphones and headphones can cause hearing loss Adjustment of the equalizer to maximum increases the earphones and headphones output voltage and therefore the sound pressure level Power supply unit To prevent the risk of fire the monitor must only be operated with the original power supply Delta ADP 180MB K 19 5V 9 23A The supplied AC DC power supply must only be connected to...

Страница 13: ...evice and unplug the power plug Do not clean any interior parts yourself leave this job to a service technician Do not use any cleaning agents that contain abrasives or may corrode plastic Ensure that no liquid enters the device The display surface of the device is sensitive to pressure and scratches Clean it only using a soft slightly moistened cloth The surface of the casing can be cleaned with ...

Страница 14: ... Desk or contact one of the following directly Germany Belgium Switzerland AfB gemeinnützige GmbH Heinz Nixdorf Ring 1 D 33106 Paderborn Tel 49 0 5251 414 90 10 Fax 49 0 5251 414 90 29 http www fujitsu com fts recycling RECUPEL Boulevard Reyers 80 B 1030 Brussels Tel 32 2 706 86 16 Fax 32 2 706 86 13 E mail info recupel be http www recupel be SWICO Schweizerischer Wirtschaftsverband der Informatio...

Страница 15: ...a flyer Quick Start Guide a flyer safety instructions Unpack all the individual parts Check the contents of the package for any visible damage caused during transport Check whether the delivery conforms to the details in the delivery note Should you discover that the delivery does not correspond to the delivery note notify your local sales outlet immediately Do not discard the original packing mat...

Страница 16: ...ent ventilation the air inlet and outlet openings of the device must be kept clear Setting up an ergonomic video workstation 1 Do not position the video workstation opposite a window 1 1 Position the monitor outside the reach of a light source 1 12 Fujitsu ...

Страница 17: ... for optimum viewing 1 The monitor should under no circumstances fall outside the permissible viewing space 2 Depending on the situation it may be advisable to use a swivel arm or similar accessory VESA FPMPMI which are available from specialist dealers For this purpose the monitor base must be removed beforehand as described in Chapter Removing monitor base Page 15 Fujitsu 13 ...

Страница 18: ...of the monitor can be adjusted by approximately 150 mm 1 Hold the monitor with both hands on the right and left edge of the casing and move it up or down 1 Adjusting the inclination The inclination of the monitor can be adjusted by 3 forwards and 35 backwards from its vertical position Hold the monitor with both hands on the left and right sides of the casing and move it to the desired angle 14 Fu...

Страница 19: ...evice from being scratched 1 1 1 1 Switch off the monitor and pull the power plug out of the power socket Lay the monitor on its face on a soft surface Disconnect all cables To release the stand remove the four screws 1 that hold the stand in the VESA mount Then lift the stand away upwards You can now mount a swivel arm or a similar accessory in accordance with VESA FPMPMI using a hole spacing of ...

Страница 20: ... two 20 pin DP connectors for connection to the monitor and to the computer Refer to the operating manual for the computer for information on the computer s ports and interfaces 1 2 9 10 8 7 6 5 11 12 3 4 1 Security slot for Security Lock 2 Power supply socket 3 AUDIO IN socket 4 AUDIO OUT socket 5 HDMI socket 6 Displayport IN socket 7 USB C upstream 8 D SUB socket VGA 9 Displayport OUT socket dai...

Страница 21: ... A lock Security Lock can be mounted in the security slot to protect the monitor against theft A Security Lock is not included with the monitor at delivery Connecting cables to the computer Information on the computer connections and interfaces is contained in the operating manual for your computer Connect the data cable to the active monitor port on the computer and secure the plug in connection ...

Страница 22: ...r changes as follows Power indicator Status blue Monitor and computer are switched on normal mode green Monitor and computer are switched on ECO mode orange Monitor is not receiving a video signal or is in power saving mode does not light up Monitor is switched off Switch the device on again with the ON OFF switch 1 18 Fujitsu ...

Страница 23: ...etected within the specified distance for 10 seconds After a further 30 seconds absence the background lighting is switched off In order to achieve the best possible results with the presence sensor observe the following Make certain that no objects are located in the immediate proximity of the presence sensor Recommendation Adjust your distance to the monitor in the OSD menu You will find more in...

Страница 24: ...ate deactivate ECO operating mode Selecting the input signal Select display mode colour temperature Adjust RGB channels Adjust volume Adjust brightness contrast Monitor switching on off Softkey icon Function Selecting the next menu item sub menu Selecting the previous menu item sub menu Opening the selected sub menu Going to the next setting Running a function Going to the previous setting Decreas...

Страница 25: ... menu of your device may differ in several ways from the functional scope described The softkey icons may deviate from those shown here Select OSD language When an OSD menu button is activated for the first time the language selection window will appear Press the button or the button to choose the desired language Press the button to confirm After selecting the OSD language for the first time you ...

Страница 26: ...the settings and return to the main menu Function Description Phase Eliminate picture disturbance With this function you fine tune your monitor to eliminate picture disturbance This setting only appears with an analogue video signal e g VGA Clock Set synchronisation With this function you adjust the picture width to eliminate vertical picture disturbances This setting only appears with an analogue...

Страница 27: ... Values above 50 produce a sharper picture Saturation Setting colour saturation You can use this function to reduce or increase the intensity of the colours This setting only applies for devices with YUV output e g BluRay players Hue Setting the colour tone This function can be used to shift the colour spectrum in order to compensate for a colour fault that may be present This setting only applies...

Страница 28: ...to Language English Press the button to call up the main menu Press the button twice and then to switch to the OSD submenu Press the button to mark a function in the submenu Press the or button to make the desired setting Press the button to save the settings and return to the main menu 24 Fujitsu ...

Страница 29: ...elect a value from 10 to 120 seconds If the set time expires without a setting being made the OSD menu is automatically hidden Where applicable settings that must be confirmed with the button are thereby lost Rotation Set the orientation of the OSD menu This function allows the orientation of the OSD menu to be rotated This makes it easier to read the OSD menu while the pivot function is being use...

Страница 30: ... down the monitor gradually while you are absent After 10 seconds of absence the brightness is reduced to a minimum After a further 30 seconds absence the display lighting is switched off This option only appears if your model has a presence sensor Proximity Setting the distance to the monitor With this function you can indicate your actual distance to the monitor and optimise detection by the pre...

Страница 31: ...ce This function allows data to be exchanged via the connection between the PC and the display Status LED Enable disable Status LED This function allows the power indicator on the monitor to be switched on or off Factory recall Activate the factory settings With this function all settings are reset to the factory settings Press the button to run the function Press the button to confirm or the butt...

Страница 32: ...ing mode After the ECO operating mode is switched off the brightness previously set by the user is restored Selecting the input signal INPUT VGA HDMI DisplayPort USB C Press the button to open the INPUT setting window Press the button to select the desired monitor port Press the button to confirm the selected monitor port or to close the window without making any changes In the following cases an ...

Страница 33: ... setting only appears on models that support the DICOM picture format sRGB Mode for applications in sRGB colour space Colour temperature and brightness according to the sRGB standard Low Blue Light Mode with reduced blue light emission Warm tints reduced brightness Office Mode for everyday office applications Colour temperature equals 6500 K ECO operating mode active Photo Mode for the display of ...

Страница 34: ...Operation The brightness set in Mode is stored under Office Photo Video and Custom 30 Fujitsu ...

Страница 35: ...ng any changes Function Description 5000 K 6500 K 7500 K Native Select the colour temperature The warmth of the screen colours is set using the colour temperature The colour temperature is measured in K Kelvin In the Native and Custom Color settings the full colour space of the LCD panel can be used RGB Adjust You can change the colour ratios of the primary colours red green blue as required using...

Страница 36: ...tting Press the button to save the settings and close the menu Function Description Volume Set the volume for playback with the integrated loudspeakers Mute Switch the loudspeakers off or on Input Change the audio input signal to another source This setting only appears when more than one audio input signal is present e g Displayport and AUDIO IN socket 32 Fujitsu ...

Страница 37: ...trast of the display With this function you modify the contrast of bright colour tones If the contrast is set too high bright surfaces can no longer be distinguished from very bright surfaces If the contrast is set too low the maximum brightness will not be achieved Black level Set the brightness of the display With this function you modify the contrast of dark colour tones ACR Enable disable dyna...

Страница 38: ... Auto level Adjust the signal level With this function you can automatically set the contrast Press the button to run the function This setting only appears with an analogue video signal e g VGA Locking the OSD menu The OSD menu can be locked to prevent accidental or unauthorised changes to the monitor settings Press the button and the ON OFF button at the same time and keep them pressed for appro...

Страница 39: ...DisplayView Can be downloaded here http www fujitsu com fts download Function overview OSD replacement for monitors equipped with DDC CI OSD direct access for quick changes Settings for power saving mode and security settings for the presence sensor only for models with presence sensor Automatic rotation of the screen contents Supports analogue and digital monitor ports Supports up to 4 monitors S...

Страница 40: ...Maximum 1920x1080 FHD 2 monitors Before enabling the daisy chain function ensure that your display adapter DP 1 2 or the USB C port supports Displayport Alternate Mode Otherwise your display adapter may no longer recognise the monitor DP1 2 Connect the display adapter to the DP IN port or to the USB C port underside on the first monitor Connect the next monitor via the DP OUT port 36 Fujitsu ...

Страница 41: ...ress the button twice and then to switch to the Advanced submenu Press the button to highlight the Daisy Chain function Press the button to apply the On setting Press the button to save the settings and return to the main menu As soon as the daisy chain function is enabled automatic identification of other signal sources e g HDMI is disabled Press the button to change the signal source manually Th...

Страница 42: ...isted Generic PnP Monitor to open the Properties window If more than one Generic PnP Monitor device is displayed check whether the correct device is selected To do this go to tab Details Property and set Hardware Ids Monitor FUSxxxx is displayed under Value Otherwise select the other Generic PnP Monitor device Click on Update Driver in tab Driver Click on Browse my computer for driver software Cli...

Страница 43: ...r supply indicator Lights up blue Lights up green Lights up orange Display Max brightness typ 175 cd m2 unlit Typical power consumption without USB and audio 21 W 18 W 0 5 W If the computer detects inactivity no input it sends an appropriate signal to the monitor to reduce the power consumption power saving mode The power indicator of the monitor changes colour to show the change in status ECO mod...

Страница 44: ...the AC adapter which are included in the delivery scope of the monitor Failure to do so could result in safety problems This monitor has been tested using systems developed by FUJITSU which require a power supply of max 60 W via USB PD For other systems which only accept USB PD chargers of their own brand due to special power supply guidelines the USB PD support provided by this monitor may be lim...

Страница 45: ...longer emit blue light as a conventional source of white light Further information can be found in Chapter Selecting the application mode Page 29 The viewing distance to the monitor should be approximately 50 cm Further information can be found in Chapter Setting up an ergonomic video workstation Page 12 When working continuously at a display screen it is recommended that you take a five minute br...

Страница 46: ...tinuous text and data entry When using several colours for characters and background and giving the primary colours full modulation you can obtain very suitable colour combinations see the following table Characters Background black white purple blue cyan green yellow red black white purple blue cyan green yellow red Colour combination very suitable Colour combination not suitable because colour h...

Страница 47: ...lated in the international standard ISO 9241 307 The LCD displays from Fujitsu comply to at least Class I Fujitsu guarantees displays that are free of pixel faults so that only subpixel faults may occur Examples A flat screen display with a resolution of 1280 x 1024 has 1280 x 1024 1310720 pixels Each pixel consists of three subpixels red green and blue making a total of about 3 9 million subpixel...

Страница 48: ...ge the display mode to 1920 x 1080 with 60 Hz The input signal horizontal frequency and refresh rate at the displayed input does not correspond to the technical data for the monitor Reboot the system after connecting to the monitor The VGA interface does not support Hot Plugging Adjust the video frequency range using the computer software see documentation for the computer or display adapter Set a...

Страница 49: ...creen display Page 22 Picture disturbances horizontal lines picture noise Run the function Auto adjust see Chapter Setting screen display Page 22 The screen becomes darker The background lighting has a limited lifetime If your monitor display should become too dark the background lighting will have to be replaced Contact our Service Desk Fujitsu 45 ...

Страница 50: ... without packaging 5 32 kg Storable display modes 45 Pixel error classes according to ISO 9241 307 Class I Electrical data Analog Positive 0 7 Vpp 75 Ω Video Digital Displayport HDMI USB C Synchronisation Separate Sync TTL positive or negative Horizontal frequency 30 kHz 82 kHz multi scanning Refresh rate 48 Hz 76 Hz Maximum pixel rate VGA 165 MHz Digital 165 MHz Power supply AC DC adapter switche...

Страница 51: ...ettings Preset operating modes The picture position and size have been set to optimum values at the factory for the operating modes listed above Depending on the display adapter used it may be necessary to adjust the picture position and size In this case you can change and save the settings see chapter Changing the monitor settings Page 20 For ergonomic reasons a screen resolution of 1920 x 1080 ...

Страница 52: ...4 3 16 9 720 x 576 p 50 Hz 4 3 16 9 1280 x 720 p 50 60 Hz 16 9 1920 x 1080 i 50 60 Hz 16 9 1920 x 1080 p 50 60 Hz 16 9 SUB D port 6 10 11 15 5 1 Pin Meaning 1 Video input red 2 Video input green 3 Video input blue 4 Ground 5 Ground 6 Video ground red 7 Video ground green 8 Video ground blue 9 5 V DDC 10 Sync ground 11 Ground 12 DDC Data 13 H sync 14 V sync 15 DDC Clock 48 Fujitsu ...

Страница 53: ...n Meaning 1 TMDS Data2 2 TMDS Data2 Shield 3 TMDS Data2 4 TMDS Data1 5 TMDS Data1 Shield 6 TMDS Data1 7 TMDS Data0 8 TMDS Data0 Shield 9 TMDS Data0 10 TMDS Clock 11 TMDS Clock Shield 12 TMDS Clock 13 CEC 14 N C 15 SCL 16 SDA 17 DDC CEC Ground 18 5 V Power 19 Hot plug detect Fujitsu 49 ...

Страница 54: ...positive 4 Lane 2 negative 5 Earth 6 Lane 2 positive 7 Lane 1 negative 8 Earth 9 Lane 1 positive 10 Lane 0 negative 11 Earth 12 Lane 0 positive 13 Connected to earth 14 Connected to earth 15 Auxiliary channel positive 16 Earth 17 Auxiliary channel negative 18 Hot Plug Detect 19 Return for Power 20 Power for connector 3 3 V 500 mA 50 Fujitsu ...

Страница 55: ...n 1 negative A8 Sideband use SBU A9 Bus power A10 SuperSpeed differential pair 4 RX negative A11 SuperSpeed differential pair 4 RX positive A12 Ground return B12 Ground return B11 SuperSpeed differential pair 2 RX positive B10 SuperSpeed differential pair 2 RX negative B9 Bus power B8 Sideband use SBU B7 Non SuperSpeed differential pair position 2 negative B6 Non SuperSpeed differential pair posit...

Отзывы: