


41
U s e r I n s t a l l a b l e F e a t u r e s
Floppy Disk Drive
Your Fujitsu LifeBook has a 3.5" floppy disk drive with
the ability to read and write information on removable
1.44MB and 720KB floppy disks.
LOADING A DISK
To load a disk into your disk drive, follow these easy
steps:
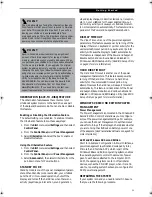
1. Position the disk so that its label is facing upwards
and the shutter side is pointing towards the drive.
(Figure 4-2)
2. Push the disk into the drive until the Eject button
pops out and you hear a click.
Figure 4-2 Loading a Floppy Disk
EJECTING A DISK
To eject a disk from the disk drive, follow these easy
steps:
1. Check that the Floppy Disk Drive Access indicator
is inactive.
2. Press the Eject button. This will push your disk
partially out of the drive.
3. Remove the disk.
Figure 4-3 Ejecting a Floppy Disk
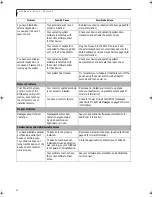
PREPARING A DISK FOR USE
Before you can use a new disk, it needs to be prepared
so your LifeBook knows where to store information. This
preparation is called formatting or initializing a disk. You
will need to format new disks, unless they are prefor-
matted. (Please refer to your operating system manual for
step-by-step instructions on formatting a disk.)
To prevent accidental erasure of the data stored on a
disk, slide the “write protect” tab until a small hole is
exposed. This sets the disk into a protected state where
nothing can be added or removed. If you want to add or
remove data on a protected disk, slide the “write
protect” tab to close the small hole. (Figure 4-4)
Figure 4-4 Floppy Disk Write Protect
P O I N T
When there is no disk in the drive, the Eject button is
flush with your LifeBook.
C A U T I O N
If you eject the disk while the Floppy Disk Drive Access
indicator is active, there is a risk of damaging the data
on the disk, the disk itself or even the disk drive.
Write Protected
Write Enabled
Floppy Disk
Label
C A U T I O N
Formatting a floppy disk that already contains data will
erase all of the information on the disk.
Eject Button
Write Protected
Write Enabled
Floppy Disk
A_Series.book Page 41 Monday, June 26, 2000 2:28 PM
Содержание LifeBook A-4170
Страница 8: ...L i f e B o o k A S e r i e s ...
Страница 9: ...1 1 Preface ...
Страница 10: ...2 L i f e B o o k A S e r i e s S e c t i o n 1 ...
Страница 12: ...4 L i f e B o o k A S e r i e s S e c t i o n 1 ...
Страница 13: ...5 2 Getting to Know Your LifeBook ...
Страница 14: ...6 L i f e B o o k A S e r i e s S e c t i o n 2 ...
Страница 34: ...26 L i f e B o o k A S e r i e s S e c t i o n 2 ...
Страница 35: ...27 3 Getting Started ...
Страница 36: ...28 L i f e B o o k A S e r i e s S e c t i o n 3 ...
Страница 45: ...37 4 User Installable Features ...
Страница 46: ...38 L i f e B o o k A S e r i e s S e c t i o n 4 ...
Страница 59: ...51 5 Troubleshooting ...
Страница 60: ...52 L i f e B o o k A S e r i e s S e c t i o n 5 ...
Страница 74: ...66 L i f e B o o k A S e r i e s S e c t i o n 5 ...
Страница 75: ...67 6 Care and Maintenance ...
Страница 76: ...68 L i f e B o o k A S e r i e s S e c t i o n 6 ...
Страница 80: ...72 L i f e B o o k A S e r i e s S e c t i o n 6 ...
Страница 81: ...73 7 Specifications ...
Страница 82: ...74 L i f e B o o k A S e r i e s S e c t i o n 7 ...
Страница 85: ...77 8 Glossary ...
Страница 86: ...78 L i f e B o o k A S e r i e s S e c t i o n 8 ...
Страница 92: ...84 L i f e B o o k A S e r i e s ...
Страница 96: ...88 L i f e B o o k A S e r i e s ...


