background image

70

 - Dépannage

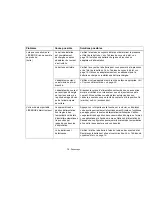
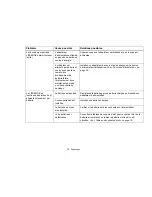
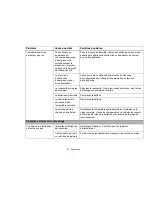
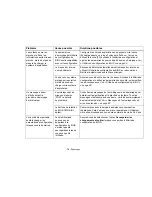
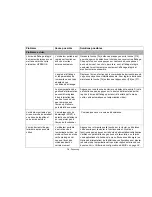
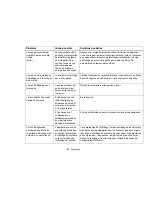
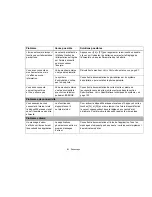
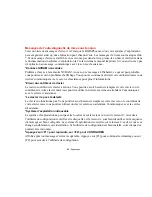
Problèmes spécifiques

Utilisation du tableau de dépannage 

Lorsque vous éprouvez des problèmes avec votre ordinateur portable LIFEBOOK, essayez de trouver les 
symptômes sous la colonne Problème du tableau suivant pour la fonction qui vous cause des problèmes. 
Vous trouverez une description des causes communes pour ce symptôme sous la colonne Cause possible ; 
le cas échéant, ce que vous pouvez faire pour corriger la situation se trouve sous la colonne Solutions 
possibles. Il est possible que certaines causes et solutions possibles ne s’appliquent pas à votre ordinateur.

Tableau de dépannage

Problème

Page

Problèmes audio . . . . . . . . . . . . . . . . . . . page 71

Problèmes de lecteur optique . . . . . . . . . page 71

Problèmes de disque dur  . . . . . . . . . . . . page 72

Problèmes de clavier ou de souris  . . . . . page 73

Problèmes de mémoire . . . . . . . . . . . . . . page 74

Problèmes de périphérique USB . . . . . . . page 74

Problème

Page

Problèmes d’alimentation
électrique  . . . . . . . . . . . . . . . . . . .  page 74

Problèmes d’arrêt et de
démarrage  . . . . . . . . . . . . . . . . . .  page 77

Problèmes vidéo . . . . . . . . . . . . . .  page 79

Problèmes de connectivité . . . . . .  page 81

Problèmes divers  . . . . . . . . . . . . .  page 81

Содержание FPCR46023

Страница 1: ... User s Guide Learn how to use your Fujitsu LIFEBOOK LH531 notebook Guide d utilisation Découvrez comment utiliser votre ordinateur portable Fujitsu LIFEBOOK LH531 ...

Страница 2: ...User s Guide Learn how to use your Fujitsu LIFEBOOK LH531 notebook ...

Страница 3: ... trademarks or trademarks of Adobe Systems Incorporated in the United States and or other countries Google is a registered trademark of Google Incorporated Norton and Norton Internet Security are trademarks or registered trademarks of Symantec Corp in the United States and other countries The DVD player found in some models of the LIFEBOOK notebook incorporates copyright protection technology that...

Страница 4: ...jitsu America Inc Address 1250 E Arques Avenue Sunnyvale CA 94085 Telephone 408 746 6000 Declares that product Base Model Configuration LIFEBOOK LH531 notebook Complies with Part 15 of the FCC Rules This device complies with Part 15 of the FCC rules Operations are subject to the following two conditions 1 This device may not cause harmful interference 2 This device must accept any interference rec...

Страница 5: ...r laundry tub in a wet basement or near a swimming pool Use only the power cord and batteries indicated in this manual Do not dispose of batteries in a fire They may explode Check with local codes for possible special disposal instructions SAVE THESE INSTRUCTIONS For Authorized Repair Technicians Only DANGER OF EXPLOSION IF LITHIUM CLOCK BATTERY IS INCORRECTLY REPLACED REPLACE ONLY WITH THE SAME O...

Страница 6: ...ironment by recycling old batteries at no cost to you RBRC has drop off points at tens of thousands of locations throughout the United States and Canada To find the location nearest you go to www RBRC org or call 1 800 822 8837 If there are no convenient RBRC locations near you you can also go to the EIA Consumer Education Initiative website http EIAE org and search for a convenient disposal locat...

Страница 7: ...OK Overview 10 Locating the Controls and Connectors 11 Top Components 11 Left Side Panel Components 14 Right Side Panel Components 16 Bottom Components 17 Status Indicator Panel 19 Power Status Indicator 19 Battery Level Indicator 20 Hard Drive Optical Drive Access Indicator 21 NumLk Indicator 21 CapsLock Indicator 21 ScrLk Indicator 21 ...

Страница 8: ...rces 33 Connecting the Power Adapters 33 Display Panel 34 Opening the Display Panel 34 Adjusting Display Panel Brightness 35 Using the Keyboard 35 Using the Power Options 35 Using the Windows Mobility Center 35 Closing the Display Panel 35 Starting Your LIFEBOOK Notebook 36 Power On 36 Boot Sequence 37 Hard Disk Drive Passwords 37 BIOS Setup Utility 38 Booting the System 38 Starting Windows the Fi...

Страница 9: ...Batteries 46 Replacing the Battery 48 Optical Drive 50 Media Player Software 51 Loading Media on Your Drive 51 Removing Media 54 Emergency Optical Drive Tray Release 54 Using the Media Player Software 54 Using Media Player on Battery Power 55 Secure Digital Cards 57 Installing Memory Stick and SD Cards 58 Removing A Memory Stick or SD Card 58 Memory Upgrade Module 59 Installing Memory Upgrade Modu...

Страница 10: ...r Factory Image 80 Creating Backup Images of Factory Image DAR and Discs 81 Recovering Your Factory Image 82 Backing Up a System Image 82 Managing Your Backup Images 84 Using the Recovery and Utility Tools 84 Recovering your Factory Image using Recovery and Utility 87 Automatically Downloading Driver Updates 89 Chapter 5 Care and Maintenance Caring for your LIFEBOOK Notebook 90 Cleaning your LIFEB...

Страница 11: ...mory 99 Video 99 Audio 100 Mass Storage Device Options 100 Features 101 Device Ports 101 Keyboard 102 Power 102 Dimensions and Weight 102 Environmental Requirements 103 Popular Accessories 103 Included Software 103 Learning About Your Software 104 Glossary Regulatory Glossary 104 Regulatory Information 120 ...

Страница 12: ...Deactivation Using the Wireless On Off Switch 128 Activating the WLAN Device 128 Configuration of the WLAN Device 128 Configuring the WLAN Using Windows 129 Connection to the network 129 Troubleshooting the WLAN 130 Troubleshooting Table 130 Using the Bluetooth Device 134 What is Bluetooth 134 Where to Find Information About Bluetooth 134 Appendix B Using Intel Wireless Display Using the Wireless ...

Страница 13: ... operating system pre installed This manual explains how to operate your LIFEBOOK notebook s hardware and built in system software Conventions Used in the Guide Keyboard and on screen keys appear in brackets Example Fn F1 ESC ENTER and CTRL Pages with additional information about a specific topic are cross referenced within the text For example See Installation Procedure on page 43 On screen menu ...

Страница 14: ...th the fastest possible solution Product name Product configuration number Product serial number Purchase date Conditions under which the problem occurred Any error messages that have occurred Type of device connected if any THE CAUTION ICON HIGHLIGHTS INFORMATION THAT IS IMPORTANT TO THE SAFE OPERATION OF YOUR COMPUTER OR TO THE INTEGRITY OF YOUR FILES PLEASE READ ALL CAUTION INFORMATION CAREFULL...

Страница 15: ...bsite at www shopfujitsu com Limited Warranty Your LIFEBOOK notebook is backed by a Fujitsu International Limited Warranty Check the service kit that came with your notebook for the Limited Warranty period and terms and conditions YOU MUST HAVE AN ACTIVE INTERNET CONNECTION TO USE THE ONLINE URL LINKS ...

Страница 16: ...rview This section describes the components of your Fujitsu LIFEBOOK LH531 notebook We strongly recommend that you read it before using your notebook even if you are already familiar with notebook computers Figure 1 Fujitsu LIFEBOOK LH531 notebook ...

Страница 17: ...el web camera allows you to take pictures of yourself to send over the internet For information on using the microphone and web cam see the documentation associated with the CyberLink YouCam application Display Panel Status Indicator Panel Touchpad Power Suspend Stereo Speaker Resume Button Digital Microphone Stereo Speaker Status Indicator Panel Web Camera MS SD Card Slot Pointing Device Headphon...

Страница 18: ...The built in dual speakers allow for stereo sound Keyboard A full size keyboard with dedicated Windows keys See Keyboard on page 22 Touchpad Pointing Device The Touchpad pointing device is a mouse like cursor control with a right button a left button and a cursor control pad See Touchpad Pointing Device on page 25 Wireless Device On Off Switch The wireless device on off switch is used to turn the ...

Страница 19: ...Jack on page 64 Headphone Line Out Jack The headphone line out jack allows you to connect headphones or external speakers See Headphone Line Out Jack on page 63 Digital Microphone The digital microphone is used in conjunction with the web camera For information on using the microphone and web cam see the documentation associated with the CyberLink YouCam application ...

Страница 20: ...components External Video Port The external video port allows you to connect an external monitor or LCD projector See External Video Port on page 66 USB 2 0 Port Air Vents USB 2 0 Port with Anytime USB Charge External Video Port HDMI Port DC Power Jack TO PROTECT YOUR NOTEBOOK FROM DAMAGE AND TO OPTIMIZE PERFORMANCE BE SURE TO KEEP ALL AIR VENTS UNOBSTRUCTED CLEAN AND CLEAR OF DEBRIS THIS MAY REQU...

Страница 21: ...w you to connect Universal Serial Bus devices USB 2 0 transfers data at up to 480 Mbps and is backward compatible with USB 1 1 devices which transfer data at up to 12 Mbps See Universal Serial Bus Ports on page 64 Note that of the two USB 2 0 ports on the left side of the system the one towards the right has Anytime USB Charge capability which allows you to charge a USB device whether or not the s...

Страница 22: ... drive USB 2 0 Port The USB 2 0 port allows you to connect Universal Serial Bus devices USB 2 0 transfers data at up to 480 Mbps and is backward compatible with USB 1 1 devices which transfer data at up to 12 Mbps See Universal Serial Bus Ports on page 64 LAN RJ 45 Jack The internal LAN RJ 45 jack is used for an internal wired 10 100 1000 Gigabit Ethernet LAN connection See Internal LAN RJ 45 Jack...

Страница 23: ...Your notebook comes with high speed Double Data Rate 3 Synchronous Dynamic RAM DDR3 SDRAM The memory upgrade compartment allows you to expand the system memory capacity of your notebook thus improving overall performance See Memory Upgrade Module on page 59 Under normal circumstances it should not be necessary to open this compartment Lithium ion Battery Bay Air Vents multiple locations Memory Upg...

Страница 24: ...on Battery on page 45 Air Vents The air vents allow air to circulate through the system to cool down the components TO PROTECT YOUR NOTEBOOK FROM DAMAGE AND TO OPTIMIZE SYSTEM PERFORMANCE BE SURE TO KEEP ALL AIR VENTS UNOBSTRUCTED CLEAN AND CLEAR OF DEBRIS THIS MAY REQUIRE PERIODIC CLEANING DEPENDING UPON THE ENVIRONMENT IN WHICH THE SYSTEM IS USED DO NOT OPERATE THE NOTEBOOK IN AREAS WHERE THE AI...

Страница 25: ...onents of your Fujitsu LIFEBOOK notebook The LEDs below each symbol tell you how each of those components is operating Power Status Indicator Blue solid AC adapter and battery are available and system is fully charged or AC adapter is plugged in but battery is not installed CapsLk ScrLk Battery Level Power Status Hard Drive Optical Drive Access NumLk ...

Страница 26: ... level is 12 or less Purple blinking There is a problem with the battery Off There is no AC Adapter connected and or the battery charge level is between 13 and 100 If the battery pack is installed while the power is turned off the battery level indicator will display the charge level for five seconds after it blinks orange If the AC adapter is not connected or the battery pack is not fully charged...

Страница 27: ...d drive is being accessed Note that flickering is normal NumLk Indicator The NumLk indicator glows when the integral keyboard is set in ten key numeric keypad mode CapsLock Indicator The CapsLock indicator glows when your keyboard is set to type in all capital letters ScrLk Indicator The ScrLk indicator states that your scroll lock is active ...

Страница 28: ...ion describes the following keys Numeric keypad Your notebook has an integrated numeric keypad which allows you to perform numeric mathematical and navigational functions The ability to toggle between the numerical keys and navigation keys is controlled through the NumLk key Fn Key Function Keys Numeric Keypad Application Key Cursor Keys Start Key surrounded by thick black line ...

Страница 29: ...umeric function key keys When NumLk is not active you can use the numeric keypad to navigate Del Ins left right up down Windows Keys Your LIFEBOOK notebook has two Windows keys consisting of a Start key and an Application key The Start key displays the Start menu This button functions the same as your onscreen Start menu button The Application key functions the same as your right mouse button and ...

Страница 30: ...8 Pressing F8 repeatedly while holding Fn will decrease the volume of your LIFEBOOK notebook Fn F9 Pressing F9 repeatedly while holding Fn will increase the volume of your LIFEBOOK notebook Fn F10 Pressing the Fn F10 keys allows you to change your selection of where to send your display video Each time you press the key combination you will step to the next choice as follows If you have an externa...

Страница 31: ...isplay panel The Touchpad is composed of a cursor control a left button and a right button The cursor control works the same way a mouse does and moves the cursor around the display It only requires light pressure with the tip of your finger The left and right buttons function the same as mouse buttons The actual functionality of the buttons may vary depending on the application that is being used...

Страница 32: ...BIOS SETTINGS See BIOS Setup Utility on page 38 Clicking means pushing and releasing a button To left click move the cursor to the item you wish to select press the left button once and then immediately release it To right click move the mouse cursor to the item you wish to select press the right button once and then immediately release it You also have the option to perform the clicking operation...

Страница 33: ... procedure does not function with the right button To double click move the cursor to the item you wish to select press the left button twice and immediately release it You can also perform the double click operation by tapping lightly on the Touchpad twice Figure 11 Double clicking with button Figure 12 Double clicking with Touchpad ...

Страница 34: ...e moving the item to its new location and then release it Dragging can also be done using the Touchpad First tap the Touchpad twice over the item you wish to move making sure to leave your finger on the pad after the final tap Next move the object to its new location by moving your finger across the Touchpad and then release your finger Figure 13 Dragging with button Figure 14 Dragging with Touchp...

Страница 35: ...ght or counter clockwise to scroll up or left See Figure 17 Zooming In Out To zoom in or out on a page using the touchpad simply place your finger on the left side of the pad and move it forward or backward to zoom in and out on the browser page See Figure 18 Enabling Disabling Gesture Functions 1 To enable or disable the gesturing functions go to Start Control Panel Hardware and Sound 2 Double cl...

Страница 36: ...roperties window will appear Select any of the ten tabs to modify the settings of your touchpad Figure 15 Scrolling up down with Touchpad Figure 16 Scrolling right left with Touchpad Figure 17 Continuous scrolling with Touchpad Figure 18 Zooming in out with Touchpad ...

Страница 37: ...Volume area Volume can be muted by pressing the F3 key while holding down the Fn key To restore audio repeat the Fn F3 procedure Volume can be controlled by many volume controls that are set within individual applications Certain external audio devices you might connect to your system may have hardware volume controls Each source discussed above puts an upper limit on the volume level that must th...

Страница 38: ...32 Chapter 2 Getting Started with Your LIFEBOOK Figure 19 Connecting the AC Adapter AC Adapter AC Cable DC In AC Adapter ...

Страница 39: ...al outlet Connecting the Optional Auto Airline Adapter 1 Plug the DC output cable into the DC power jack on your notebook 2 Plug the Auto Airline adapter into the cigarette lighter of an automobile with the ignition key in the On or Access OR 3 Plug the Auto Airline adapter into the DC power jack on an airplane seat Switching from AC Adapter Power or the Auto Airline Adapter to Battery Power 1 Be ...

Страница 40: ...it for easier viewing in bright environments and maintains top resolution through the use of active matrix technology Opening the Display Panel To open the display hold the base of the system with one hand and lift the display backwards with the other hand being careful not to touch the screen until it is at a comfortable viewing angle ...

Страница 41: ... depending upon your preference Note that the settings you make via this utility become permanent until you decide to change them again Using the Windows Mobility Center Click Start Control Panel In View by select one of the icon views Select Display then click Adjust brightness in the left pane At the bottom of the window drag the Screen brightness bar to the left or right depending upon your pre...

Страница 42: ...t will perform a Power On Self Test POST to check the internal parts and configuration for correct functionality If a fault is found your LIFEBOOK notebook will emit an audio warning and or an error message will be displayed See Power On Self Test Messages on page 79 Depending on the nature of the problem you may be able to continue by starting the operating system or by entering the BIOS setup ut...

Страница 43: ...tem s opening screen The boot sequence is executed when You turn on the power to your LIFEBOOK notebook You restart your notebook from the Windows Shut Down dialog box The software initiates a system restart Example When you install a new application Hard Disk Drive Passwords To provide additional security for your data you can assign passwords to your hard disk drive s This feature is managed in ...

Страница 44: ...OS Setup Utility with the current settings displayed 3 Press the RIGHT ARROW or LEFT ARROW key to scroll through the other setup menus to review or alter the current settings The Boot Menu can also be invoked by pressing the F12 key when the Fujitsu logo appears on the screen BIOS Guide A guide to your notebook s BIOS is available online Please visit our service and support website at http www com...

Страница 45: ...enter a name and description for your computer an Administrator password and a domain name Read the instructions on the screens carefully and fill in the information as directed Once you have finished with the setup it is very important that you install Click Me as detailed below Installing Click Me IF YOU REJECT THE TERMS OF THE LICENSE AGREEMENT YOU WILL BE ASKED TO REVIEW THE LICENSE AGREEMENT ...

Страница 46: ...r light If this should occur slide the Power Suspend Resume button momentarily to wake the system up Alternately while Click Me is installing slide your finger across the touchpad every few minutes to keep the system awake Registering your LIFEBOOK with Fujitsu You can register your notebook by going to our website at us fujitsu com computers You will need to be set up with an Internet Service Pro...

Страница 47: ...s active the Power Suspend Resume button can be used to manually put the notebook into Sleep mode Push the Power Suspend Resume button when the notebook is active but not actively accessing anything and immediately release the button Note that if you press the button continuously for four seconds or longer your notebook will turn off and active data may be lost If your notebook is suspended pushin...

Страница 48: ...om the Start menu select Control Panel Power Options 2 Select Choose what the power button does or Choose what closing the lid does then make your selection Do Nothing Sleep Hibernate or Shut Down IF RUNNING YOUR NOTEBOOK ON BATTERY POWER BE AWARE THAT THE BATTERY CONTINUES TO DISCHARGE WHILE YOUR NOTEBOOK IS IN SLEEP MODE THOUGH NOT AS FAST AS WHEN FULLY OPERATIONAL DISABLING THE POWER SUSPEND RE...

Страница 49: ...is off If you turn off the power while accessing a disk there is a risk of data loss To ensure that your notebook shuts down without error use the Windows shutdown procedure Using the correct procedure to shut down from Windows allows your notebook to complete its operations and turn off power in the proper sequence to avoid errors The proper sequence is Click the Start button and then move the mo...

Страница 50: ...activity When going into Sleep mode the computer also reduces the speed of any active Ethernet network links To wake the computer from Sleep mode press the Suspend Resume Button Energy saving benefits Fujitsu ENERGY STAR qualified mobile PCs use about half as much electricity as standard equipment saving half in utility costs But more than that ENERGY STAR also makes a difference for the environme...

Страница 51: ...f 35 C Extreme temperatures not only reduce charging efficiency but can also cause battery deterioration The Charging icon on the Status Indicator panel will flash when you try to charge a battery that is outside its operating temperature range See Status Indicator Panel on page 19 When using a high current device such as a Multi Format DVD Writer CD ROM drive optical drive or the hard drive using...

Страница 52: ...ing the battery See Power Management on page 41 for more information on Standby mode and shutdown procedure ACTUAL BATTERY LIFE WILL VARY BASED ON SCREEN BRIGHTNESS APPLICATIONS FEATURES POWER MANAGEMENT SETTINGS BATTERY CONDITION AND OTHER CUSTOMER PREFERENCES BLU RAY DRIVE MULTI FORMAT DVD WRITER OR HARD DRIVE USAGE MAY ALSO HAVE A SIGNIFICANT IMPACT ON BATTERY LIFE THE BATTERY CHARGING CAPACITY...

Страница 53: ...f the data that was not stored Once you provide power you can continue to use your notebook while an adapter is charging the battery Shorted Batteries The Status Indicator panel uses an LED below the battery outline of the Battery Level indicator to display the operating level available in that battery If this display shows a Shorted Battery it means the battery is damaged and must be replaced so ...

Страница 54: ...ery will pop out of the bay slightly allowing you to lift it out of the bay 5 Insert a new battery into the bay and press it down so that the latches click into place 6 Plug in the AC adapter and turn the power on Hot swapping Batteries To hot swap batteries in your battery bay follow these easy steps 1 Plug an AC Adapter into the system and connect it to a power outlet 2 Follow steps 3 and 4 in C...

Страница 55: ...49 Lithium ion Battery Figure 21 Battery latches Figure 22 Removing the battery Battery Release Latch Battery Release Latch ...

Страница 56: ...yer DVD RW Single Layer DVD RAM Ver 2 CD ROM CD R and CD RW discs This drive allows you to write to the following media formats DVD RAM Ver2 DVD R Single and Dual Layer DVD RW DVD R Single and Dual Layer DVD RW CD R and CD RW discs It also has the same functions as an ordinary CD DVD BD ROM drive Dual Layer Multi Format DVD Writer This drive allows you to access movies software and audio DVD CDs a...

Страница 57: ...BOOK NOTEBOOK IS SITTING ON A FLAT SURFACE USING A DRIVE WHEN THE SYSTEM IS NOT LEVEL MAY DAMAGE THE DRIVE OR PREVENT PROPER OPERATION PROLONGED USE OF THE OPTICAL DRIVE SUCH AS WATCHING A DVD MOVIE WILL SUBSTANTIALLY REDUCE YOUR BATTERY LIFE IF NO EXTERNAL POWER SOURCE IS ATTACHED YOU SHOULD PERIODICALLY CHECK THE FUJITSU WEBSITE AT US FUJITSU COM COMPUTERS FOR THE MOST CURRENT DRIVERS ALL LIFEBO...

Страница 58: ... until you hear a click IF YOU HAVE DISABLED THE AUTO INSERT NOTIFICATION FUNCTION YOU WILL HAVE TO START THE DRIVE EITHER BY USING MY COMPUTER OR FROM WITHIN WINDOWS EXPLORER SINCE YOUR NOTEBOOK WILL NOT AUTOMATICALLY RECOGNIZE THAT MEDIA HAS BEEN LOADED ...

Страница 59: ...53 Optical Drive Figure 24 Loading Ejecting Media a b c d ...

Страница 60: ... prompted to select what you want the system to do when discs are inserted e g start automatically or wait for a prompt Until you make a selection you will receive the same prompt whenever you insert a disc 3 Click OK to close the About DVD Player Performance dialog box and the movie will begin Emergency Optical Drive Tray Release If for some reason the eject button fails you can open the media tr...

Страница 61: ...ovie or the button to jump to the ending credits 4 To stop the movie click the button Exiting the Media Player 1 Click the located in the upper right corner of the title bar This will open a media player dialog box 2 Click Yes to stop and exit the movie or No to close the media player dialog box and return to the movie Using Media Player on Battery Power Since optical drives consume a lot of power...

Страница 62: ... is not required if you attached AC power without entering standby mode 6 Restart your media player locate and skip to the chapter of the movie you were last watching then continue watching your DVD movie IF YOU DO NOT STOP THE MEDIA PLAYER QUICKLY AND THE LIFEBOOK NOTEBOOK ATTEMPTS TO AUTO SUSPEND CRITICAL BATTERY LOW STATE THE LIFEBOOK NOTEBOOK WILL SHUT DOWN IMPROPERLY IF THIS OCCURS YOU MAY NE...

Страница 63: ...rce to retain data Memory Stick is a flash memory technology that allows you to record transfer and share digital content such as digital pictures movies music voice and computer data and applications Secure Digital SD Cards are very similar to Memory Sticks Like Memory Sticks SD Cards allow portable storage among a variety of devices such as cell phones Global Positioning Systems digital cameras ...

Страница 64: ...rd firmly into the slot until it is seated in the connector Removing A Memory Stick or SD Card To remove a Memory Stick or SD Card follow these easy steps Push the card in until it unlatches It will then eject from the slot for removal INSTALLING OR REMOVING A MEMORY STICK OR SD CARD DURING YOUR LIFEBOOK NOTEBOOK S SHUTDOWN OR BOOTUP PROCESS MAY DAMAGE THE CARD AND OR YOUR LIFEBOOK NOTEBOOK DO NOT...

Страница 65: ...mpartment Figure 28 Remove the cover 3 Remove the new memory upgrade module from the static guarded sleeve DO NOT REMOVE ANY SCREWS FROM THE MEMORY UPGRADE MODULE COMPARTMENT EXCEPT THE ONES SPECIFICALLY SHOWN IN THE DIRECTIONS FOR INSTALLING AND REMOVING THE MEMORY UPGRADE MODULE THE MEMORY UPGRADE MODULE CAN BE SEVERELY DAMAGED BY ELECTROSTATIC DISCHARGE ESD TO MINIMIZE RISK TO THE MODULE OBSERV...

Страница 66: ...ess the connector edge of the module firmly down and into the connector until it lodges under the retaining clip You ll hear a click when it is properly in place 6 Replace the cover and reinstall the screws Figure 27 Removing the Memory COver Screw Figure 28 Opening the Memory Compartment THE MEMORY UPGRADE MODULE IS NOT SOMETHING YOU ROUTINELY REMOVE FROM YOUR NOTEBOOK ONCE IT IS INSTALLED YOU SH...

Страница 67: ...ting it up and pulling it away from your notebook Figure 30 4 Store the memory upgrade module in a static guarded sleeve 5 Replace the cover and reinstall the screws Checking the Memory Capacity Once you have changed the system memory capacity by replacing the installed module with a larger one be sure to check that your notebook has recognized the change Figure 29 Installing memory module Figure ...

Страница 68: ...ze and what is displayed This is possible if your system is configured with an integrated Intel Graphics Media Accelerator which dynamically allocates system memory to accelerate graphics performance IF THE TOTAL MEMORY DISPLAYED IS INCORRECT CHECK THAT YOUR MEMORY UPGRADE MODULE IS PROPERLY INSTALLED IF THE MODULE IS PROPERLY INSTALLED AND THE CAPACITY IS STILL NOT CORRECTLY RECOGNIZED SEE TROUBL...

Страница 69: ...se steps Headphone Line Out Jack The headphone line out jack allows you to connect headphones or powered external speakers to your notebook Your headphones or speakers must be equipped with a 1 8 3 5 mm stereo mini plug In order to connect headphones or speakers follow these easy steps 1 Align the connector with the port opening on the front of the system 2 Push the connector into the port until i...

Страница 70: ...ards and or speakers There are four USB 2 0 ports on your notebook two on the left side and two on the right side USB 2 0 transfers data at up to 480 Mbps and is backward compatible with USB 1 1 devices which transfer data at up to 12 Mbps The USB 2 0 port on the left panel towards the front of the system has Anytime USB Charge capability meaning that even when your system is shut down this port c...

Страница 71: ...hree possible settings for this feature Disable Anytime USB Charge function Only enable Anytime USB Charge function with AC Adapter and Enable Anytime USB Charge function with AC Adapter or battery Note that if the setting is selected the function will eventually drain the battery if the AC Adapter is not plugged in Certain USB devices may require that a driver be installed in order for this featu...

Страница 72: ...r with the port opening 2 Push the connector into the port until it is seated Figure 33 Connecting an External Video Device PRESSING THE FN F10 KEYS ALLOWS YOU TO CHANGE YOUR SELECTION OF WHERE TO SEND YOUR DISPLAY VIDEO EACH TIME YOU PRESS THE KEY COMBINATION YOU WILL STEP TO THE NEXT CHOICE IF YOU ONLY HAVE AN EXTERNAL CRT CONNECTED THE ORDER IS INTERNAL EXTERNAL CRT SIMULTANEOUS DISPLAY INTERNA...

Страница 73: ... 1 Turn off your LIFEBOOK notebook 2 Make sure the AC adapter is plugged into your notebook and to an active AC power source 3 Make sure that any cards installed are seated properly You can also remove the card from the slot thus eliminating it as a possible cause of failure 4 Make sure that any devices connected to the external connectors are plugged in properly You can also disconnect such devic...

Страница 74: ...stomer support representative can provide you with the fastest possible solution Product name Product configuration number Product serial number Purchase date Conditions under which the problem occurred Any error messages that have occurred Type of device connected if any See the Configuration Label on the bottom of your notebook for configuration and serial numbers IF YOU KEEP NOTES ABOUT WHAT YO...

Страница 75: ...ssible Cause and what if anything you can do to correct the condition under Possible Solutions All possible causes or solutions may not apply to your notebook Troubleshooting Table Problem Page Audio Problems page 70 Optical Drive Problems page 70 Hard Drive Problems page 71 Keyboard or Mouse Problems page 71 Memory Problems page 72 USB Device Problems page 72 Problem Page Power Failures page 73 S...

Страница 76: ...system documentation for help Speakers have been muted using the Volume icon in the system tray Click on the Volume icon in the tool tray on the bottom right of the screen If Mute is checked click on it to uncheck it You can also use the Fn F3 key combination to toggle the volume on and off Optical Drive Problems LIFEBOOK notebook fails to recognize DVD CD RW CD ROM s The disc is not pushed down o...

Страница 77: ...nnot access your hard drive The wrong drive desig nator was used by an application when a bootable disc was used to start the notebook Verify drive designator used by application is in use by the operat ing system When the operating system is booted from a CD drive designations are automatically adjusted Security is set so your OS cannot be started without a password Verify your password and secur...

Страница 78: ...memory Your memory module is not properly installed Remove and re install your memory upgrade module See Memory Upgrade Module on page 59 You have a memory failure Check for Power On Self Test POST messages See Power On Self Test Messages on page 79 USB Device Problems You have installed a USB device but the notebook does not recognize the device or the device does not seem to work properly The de...

Страница 79: ...rged battery The power adapter AC or auto airline is not plugged in properly Verify that your adapter is connected correctly See Power Sources on page 33 The power adapter has no power from the AC outlet airplane seat jack or cigarette lighter Move the AC cord to a different outlet check for a line switch or tripped circuit breaker for the AC outlet If you are using an auto airline adapter in a ca...

Страница 80: ...erly installed Verify that the battery is properly connected by re installing it Your installed battery is faulty Verify the condition of the battery using the Status Indicator panel and replace or remove any shorted battery See Status Indicator Panel on page 19 The battery seems to discharge too quickly You re running an appli cation that uses a lot of power due to frequent hard drive or optical ...

Страница 81: ...s on screen or use the F2 key and enter the setup utility and adjust the source settings from the Boot menu See BIOS Setup Utility on page 38 Internal hard drive was not detected Use the BIOS setup utility or Primary Master submenu located within the Main menu to try to auto detect the internal hard drive You have a secured system requiring a password to load your operating system Make sure you ha...

Страница 82: ...hange the brightness level of the display Power management timeouts may be set for short intervals and you didn t see the display come on and go off Press a keyboard button or move the mouse to restore operation If that fails push the Power Suspend Resume button The display may be shut off by Standby mode Auto Suspend or Video Time out The notebook turned on with a series of beeps and the built in...

Страница 83: ... dark spots If the spots are tiny and few this is normal for a large LCD display This is normal do nothing If the spots are numer ous or large enough to interfere with your oper ation needs Display is faulty contact your support representative The application display uses only a portion of your screen and is surrounded by a dark frame You re running an appli cation that doesn t sup port the system...

Страница 84: ...s of the Specifications section See Specifications on page 98 Connectivity Problems You are attempting to con nect to the Internet but you do not appear to have power to the WLAN The wireless device functions have been turned off To activate the wireless LAN devices press the Fn and F5 keys at the same time When active the wireless LAN indicator in the status indicator panel will glow To turn the ...

Страница 85: ...oard not detected Keyboard not working You may have to replace your keyboard or keyboard controller but may be able to use an external keyboard until then Contact your support representative Operating system not found Operating system cannot be located on either drive A or drive C Enter the setup utility and see if both the fixed disk and drive A are properly identified and that the boot sequence ...

Страница 86: ...ure you will be able to restore it to its original state IN ORDER TO INSTALL APPLICATIONS AND DRIVERS MAKE COPIES OF FACTORY AND SYSTEM IMAGES AND BURN DRIVERS AND APPLICATION RESTORE DISCS APPLICATION MEDIA AND BOOTABLE DISCS YOU MUST HAVE AN INTERNAL OR EXTERNALLY CONNECTED WRITABLE DVD DRIVE IT IS EXTREMELY IMPORTANT THAT YOU COPY YOUR FACTORY IMAGE TO REMOVABLE MEDIA E G DVD DISCS FAILURE TO D...

Страница 87: ...ose which type of disc you want to burn Bootable Disc Drivers and Applications Restore Disc Application Disc or Recovery Disc 3 Select Recovery Disc then click Make DVD 4 Confirm that the box has 2 Note that in some cases the box may display a larger number for the factory image depending upon its size 5 The message Recovery Disc 1 will be created Enter your comments and number of media on the DVD...

Страница 88: ...there is a MyRecovery icon that allows you to make backups of your current system image either to another location on your hard drive or on removable media A system image is the configuration of your C drive at a particular point of time You may want to make system image backups occasionally in order to have points to which you can return without having to go all the way back to the Factory Image ...

Страница 89: ...kup image window appears in which you can either click Create the image on D drive or Select the drive if you want to save to an external hard disk drive 6 An image appears showing you graphically how the image will be stored Click the Next button 7 Click Execute to start the backup ...

Страница 90: ... Note that if you copy an image to an external hard drive both the original and the copy will appear in the Backup Images window with identical names dates and file sizes but with the different drive letter to distinguish them Before you select Make DVD be sure you have a recordable DVD drive connected and blank DVDs available Using the Recovery and Utility Tools The Recovery and Utility tools con...

Страница 91: ...e Recovery and Utility screen appears on the screen with three tabs Diagnostics Recovery and Utility Please note that Diagnostics tab is not supported on certain LIFEBOOK Stylistic models when running Recovery and Utility from the hard disk In order to restore the operating system please use the middle icon Restoring the Factory Image only C drive under the Recovery tab Running Recovery and Utilit...

Страница 92: ...ecovery You can use these tools to restore the Factory Image from the hidden partition restore backup image s you created or images stored on DVD discs and perform a full hard drive recovery Refer to instructions above for details on how to create Factory Image Recovery DVDs user backup DVDs and system image backup Utility tab The Utility tab contains three tools Hard Disk Data Delete Restore Reco...

Страница 93: ...Options window appears click on Recovery and Utility 10 Click the Recovery tab in the Recovery and Utility window then click Restoring the Factory Image full hard drive recovery icon 11 Click Execute 12 Read the precautions then select I Agree 13 Click Next then click Next to start the recovery process 14 1 Recovery Disc Check will be in bold and the rest will be grayed out Follow the instructions...

Страница 94: ...to hidden partition or Click Cancel to skip restoring Application disc s and continue with restore 20 If you select to insert Application Disc after copying of application disc s to hidden partition is completed the message will appear again Repeat inserting application disc s until all discs have been copied then click Cancel to continue with Restore 21 After clicking Cancel a confirmation messag...

Страница 95: ...ing items Check for updates now Allows for manual driver update search The first time it is used you are prompted to agree to a user agreement After you click the icon FDU automatically connects with the Fujitsu site to check for updates and downloads them While downloading the icon has a red bar through it indicating that it cannot be used while the download is in process When the update is compl...

Страница 96: ...ARGE STATIC ELECTRICITY BUILT UP IN YOUR BODY BE SURE TO POWER DOWN YOUR SYSTEM BEFORE ADDING OR REMOVING SYSTEM COMPONENTS EVEN IF THE SYSTEM IS IN HIBERNATE OR STANDBY STATES DATA COULD BE LOST OR MEMORY COULD BE DAMAGED IF POWER IS STILL AVAILABLE TO THE SYSTEM WHEN INSTALLING OR REMOVING A MEMORY MODULE HOLD IT BY THE EDGE SO AS NOT TO TOUCH ANY CONTACTS OR CHIPS BE CAREFUL NOT TO TOUCH ANY IN...

Страница 97: ... cushion If you accidentally spill liquid on your LIFEBOOK notebook 1 Turn it off 2 Position it so that the liquid can run out 3 Let it dry out for 24 hours or longer if needed 4 If your notebook will not boot after it has dried out call your support representative Do not use your Fujitsu LIFEBOOK notebook in a wet environment near a bathtub swimming pool Always use the AC adapter and batteries th...

Страница 98: ...al suede in all cases Cleaning guidelines using recommended off the shelf cleaners Computer exterior computer keyboard To clean the exterior and keyboard use one of the following off the shelf products Office Depot 154 616 Notebook Cleaning Kit Meridrew Enterprises Klear_Screen Wipes 3M CL563 Cleaner Wipes Note After cleaning with one of these products gently polish with a dry soft lint free cloth...

Страница 99: ...E LCD AND OR DAMAGE TO THE COMPUTER ALWAYS REFER TO THE CLEANER MANUFACTURER S GUIDELINES AND MATERIAL SAFETY DATA SHEETS FOR PROPER HANDLING AND USE OF THE PRODUCTS NEVER USE AMMONIA ACIDIC OR ALKALINE CLEANERS OR ORGANIC CHEMICALS SUCH AS PAINT THINNER ACETONE PROPYL OR ISOPROPYL ALCOHOL OR KEROSENE IT MAY DAMAGE SURFACE FINISHES AND THE COATING OF THE LCD SCREEN NEVER USE COMPRESSED AIR FOR CLE...

Страница 100: ...through a metal detector Have your notebook hand inspected by security personnel You can however put your notebook through a properly tuned X ray machine To avoid problems place your notebook close to the entrance of the machine and remove it as soon as possible or have your notebook hand inspected by security personnel Security officials may require you to turn your notebook on so make sure you h...

Страница 101: ... heat can shorten the life of your battery Do not leave a battery in storage for longer than 6 months without recharging it Increasing Battery Life Power your LIFEBOOK notebook through the AC or optional auto airline adapter whenever possible If your notebook is running on battery power all day connect it to the AC adapter overnight Keep brightness to the lowest level comfortable Turn off the Wire...

Страница 102: ...ver write on the label surface with a ballpoint pen or pencil Always use a felt pen If a disc is dirty use only a DVD CD cleaner or wipe it with a clean soft lint free cloth starting from the inner edge and wiping to the outer edge Caring for your Optical Drive Your optical drive is durable but you must treat it with care Please pay attention to the following points The drive rotates the compact d...

Страница 103: ...ation but you should pay attention to the following points To keep out dust and dirt store cards in their protective sleeves when they are not installed Avoid prolonged exposure to direct sunlight or excessive heat Keep the cards dry Do not flex or bend the cards and do not place heavy objects on top of them Do not force cards into the slot Avoid dropping cards or subjecting them to excessive vibr...

Страница 104: ... Label The configuration label located on the bottom of your notebook contains specific information regarding the options you ve chosen for your notebook Following is an example configuration label CP4xxxxxxxxxxx LH531 14 0WXGA i5 2410M W7Pro DL S MULTI 4GB 500G LAN WLAN BT No Part No FPC0xxxxxxxxxxxxx Hard Drive Configuration ID Part Number Processor Model Screen Size Memory Communications Media ...

Страница 105: ... GB x 2 Cache Memory Size of the on die L3 cache is dependent upon system processor Video Built in color flat panel TFT active matrix high definition LCD display with simultaneous display capability and LED backlight Video Color and Resolution 14 0 Wide XGA Internal 1366 x 768 pixel resolution 16M colors External Maximum 1920 x 1200 pixel resolution 16M colors Resolution is dependent upon what typ...

Страница 106: ...less stereo speakers Mass Storage Device Options Hard Drive Serial ATA 5400 rpm 2 5 The hard drive capacity and speed is dependent upon the system configuration Optical Drive Depending upon your system configuration one of the following optical drives may be installed Dual Layer Multi Format Blu ray Combo Drive Write 8x DVD R SL 8x DVD R SL 6x DVD R DL 6x DVD R DL 6x DVD RW 8x DVD RW 5x DVD RAM 24...

Страница 107: ...ing Device Touchpad pointing device Communications LAN Internal wired 10 100 Mbps Ethernet LAN Wireless LAN Integrated Atheros XSPAN 802 11bgn HB95 or Intel Advanced N 6205 802 11AGN Bluetooth Bluetooth V3 0 device for wireless personal area network communication Theft Prevention Lock Anti theft lock slot for use with security restraint systems Device Ports MS SD Card slot for one SD Card or Memor...

Страница 108: ...ey pitch 19 05 mm Key stroke 1 8 mm 0 2 mm Built in Touchpad pointing device with left and right buttons Spill resistant keyboard Built in palm rest USB compatible keyboard and or mouse support Power Battery Lithium ion battery rechargeable 6 cell 10 8V 4400 mAh AC Adapter Autosensing 100 240V AC supplying 19V DC 3 16A 60W to the LIFEBOOK includes an AC cable Power Management Conforms to ACPI Adva...

Страница 109: ...l information on Fujitsu accessories please visit our Web site at www shopfujitsu com or call 1 800 FUJITSU Included Software Depending on your pre installed operating system your notebook comes with software for playing audio and video files of various formats In addition there is file transfer software virus protection software and Power Management software The following list indicates the softw...

Страница 110: ...d print PDF files across all major computing platforms Roxio Creator Roxio Creator lets you burn CDs and organize edit and share digital photos music data or videos Norton Internet Security Your system includes a free 60 day trial version of Symantec s Norton Internet Security Internet Security is a suite of tools designed to protect your notebook from computer viruses hackers spyware and spam It ...

Страница 111: ...you quickly communicate and interact with individuals and groups Photo Gallery is a flexible application that lets you organize edit and share your photos Writer can be used to generate blog entries upload videos and photos to your blogs and publish your entries online Mail makes it easy for you to manage your email accounts Movie Maker makes great looking movies and slideshows from your videos an...

Страница 112: ...splays which has a transistor or similar device for every pixel on the screen Ad Hoc Mode Ad Hoc Mode refers to a wireless network architecture where wireless network connectivity between multiple computers is established without a central wireless network device typically known as Access Points Connectivity is accomplished using only client devices in a peer to peer fashion For details refer to o...

Страница 113: ...en you turn it on until it loads your installed operating system from disk Information from the BIOS is transferred to the installed operating system to provide it with information on the configuration and status of the hardware Bit An abbreviation for binary digit A single piece of information which is either a one 1 or a zero 0 bps An abbreviation for bits per second Used to describe data transf...

Страница 114: ...ct to heads crashing into the surface and destroying the data when there is a failure nor to wear from reading Channel Range of narrow band frequencies used by the WLAN device to transmit data IEEE802 11b g 11 channels 22 MHz wide channels CMOS RAM Complementary metal oxide semiconductor random access memory This is a technology for manufacturing random access memory which requires very low levels...

Страница 115: ...ocol A protocol used to automatically acquire parameters required for the communication such as IP address The sender of IP address is called a DHCP server and the receiver is called a DHCP client DIMM Dual in line memory module Disk A spinning platter of magnetic data storage media If the platter is very stiff it is a hard drive if it is highly flexible it is a floppy disk if it is a floppy disk ...

Страница 116: ...s application and operating system commands to external devices into the exact form required by a specific brand and model of device in order to produce the desired results from that particular equipment DVMT Dynamic Video Memory Technology A video memory architecture that increases the efficiency of the motherboard by using innovative memory utilization and direct AGP ECP Extended Capability Port...

Страница 117: ...y stiff I O Input Output Data entering and leaving your notebook in electronic form I O Port The connector and associated control circuits for data entering and leaving your notebook in electronic form IDE Intelligent Drive Electronics A type of control interface for a hard drive which is inside the hard drive unit IEEE802 11a Wireless LAN standard that supports a maximum data rate of 54 Mbps 802 ...

Страница 118: ... 160 10 240 could be an IP address Within an isolated network you can assign IP addresses at random as long as each one is unique However connecting a private network to the Internet requires using registered IP addresses called Internet addresses to avoid duplicates The four numbers in an IP address are used in different ways to identify a particular network and a host on that network Three regio...

Страница 119: ...images by controlling the orientation of crystals in a crystalline liquid Lithium ion Battery A type of rechargeable battery which has a high power time life for its size and is not subject to the memory effect as Nickel Cadmium batteries MAC Address Media Access Control Address A unique physical address of a network card For Ethernet the first three bytes are used as the vendor code controlled an...

Страница 120: ... terminal to a communication line Monaural A system using one channel to process sound from all sources MTU Maximum Transmission Unit The maximum data size that can be transferred at a time through the Internet or other networks You can set a smaller MTU size to obtain successful communication if you have difficulty transferring data due to the fact that the maximum size is too large Network key D...

Страница 121: ...at convert application commands including driver programs into the exact form required by a specific brand and model of microprocessor in order to produce the desired results from that particular equipment Partition A block of space on a hard drive which is set aside and made to appear to the operating system as if it were a separate disk and addressed by the operating system accordingly PCMCIA PC...

Страница 122: ...g a Point to Point Protocol PPP which is used for connection on the phone line Program An integrated set of coded commands to your computers telling your hardware what to do and how and when to do it Protocol Procedures and rules use to send and receive data between computers It is also a method of sending and receiving data and a process used to handle communication errors Conditions required for...

Страница 123: ...Access Memory Serial Port A connection to another device through which data is transferred one bit at a time on a single wire with any other wires only for control of the device not for transfer of data Shared key authentication 802 11 network authentication method in which the AP sends the client device a challenge text packet that the client must then encrypt with the correct WEP key and return ...

Страница 124: ...sumption and prolong the charge of your battery Status Indicator A display which reports the condition of some portion of your hardware On your LIFEBOOK notebook this is an LCD screen just above the keyboard Stereo audio A system using two channels to process sound from two different sources Subnet mask TCP IP network is controlled by being divided into multiple smaller networks subnets IP address...

Страница 125: ...r VRAM Video Random Access Memory A memory dedicated to video display data and control WFM Wired for Management is Intel s broad based initiative to reduce the total cost of ownership TCO of business computing without sacrificing power and flexibility Wi Fi Compatible Wi Fi Wireless Fidelity Identifies that the product has passed the interoperability test supplied by the WECA Wireless Ethernet Com...

Страница 126: ...interference will not occur in a particular installation If this equipment does cause harmful interference to radio or television reception which can be determined by turning the equipment off and on the user is encouraged to try to correct the interference by one or more of the following measures Reorient or relocate the receiving antenna Increase the separation between the equipment and receiver...

Страница 127: ... or In an explosive environment or In situations where the interference risk to other devices or services is perceived or identified as harmful In cases in which the policy regarding use of Wireless LAN devices in specific environments is not clear e g airports hospitals chemical oil gas industrial plants private buildings obtain authorization to use these devices prior to operating the equipment ...

Страница 128: ...idential installation This equipment generates uses and can radiate radio frequency energy If not installed and used in accordance with the instructions it may cause harmful interference to radio communications However there is no guarantee that interference will not occur in a particular installation If this equipment does cause harmful interference to radio or television reception which can be d...

Страница 129: ...n Modifications not expressly authorized by Fujitsu America may invalidate the user s right to operate this equipment Canadian Notice The device for the 5150 5250 MHz band is only for indoor usage to reduce the potential for harmful interference to co channel mobile satellite systems The maximum antenna gain of 6 dBi permitted for devices in the 5250 5350 MHz 5470 5725 MHz and 5725 5825 MHz bands ...

Страница 130: ...hed to the main board of the mobile computer The WLAN device operates in license free RF bands eliminating the need to procure an FCC operating license The WLAN operates in the 2 4GHz Industrial Scientific and Medical ISM RF band and the lower middle and upper bands of the 5GHz Unlicensed National Information Infrastructure UNII bands The WLAN device is capable of four operating modes IEEE802 11b ...

Страница 131: ...s Access Point s Connectivity is accomplished using only client devices in a peer to peer fashion That is why Ad Hoc networks are also known as peer to peer networks Ad Hoc networks are an easy and inexpensive method for establishing network connectivity between multiple computers Ad Hoc mode requires that the SSID service set identifier network authentication and encryption key settings are ident...

Страница 132: ...evices can communicate with each other or with a wired network Corporate wireless networks operate in infrastructure mode because they require access to the wired LAN in order to access computers devices and services such as file servers printers and databases Access Point Infrastructure Mode Network ADSL modem cable modem or similar Internet Wired LAN Access Point Wireless LAN An optional hub for...

Страница 133: ...N devices in IEEE802 11b g n modes Symptoms of interference include reduced throughput intermittent disconnects and many frame errors It is HIGHLY recommended that these interfering devices be powered off to ensure proper operation of the WLAN device Disconnecting the WLAN Device Disconnecting the WLAN device may be desired in certain circumstances to extend battery life or where certain environme...

Страница 134: ...en clicking Connect to a network Configuration of the WLAN Device The optional WLAN device can be configured to establish wireless network connectivity using the software that is built into Windows Support for most industry standard security solutions is contained in this software Pre defined parameters will be required for this procedure Please consult with your network administrator for these pa...

Страница 135: ...work 6 Enter the required information You may need to consult with your network administrator for some information 7 In the event you require assistance go to the Network and Sharing Center window Start Control Panel Network and Sharing Center and type in relevant keywords in the Search box Connecting to a Network After you have configured your computer you can connect to an active network by perf...

Страница 136: ... and WEP key values must be identical on each machine Access Point Infrastructure connection set the network name SSID and network key to the same values as those of the access point Set the Network Authentication value identically to that of the Access Point Please consult your network administrator for this value if necessary Weak received signal strength and or link quality Ad hoc connection Re...

Страница 137: ...r Access Point to a channel that does not overlap with the interfering device Wireless network authentication has failed Re check your Network Authentication Encryption and Security settings Incorrectly configured security settings such as an incorrectly typed WEP key a misconfigured LEAP username or an incorrectly chosen authentication method will cause the LAN device to associate but not authent...

Страница 138: ... overlapping channels 802 11n 2 4 GHz 3 non overlapping channels when Channel Bonding is not used 2 non overlapping channels when Channel Bonding is used Typical operating distances 802 11b 100 ft 30 m 11 Mbps 300 ft 91 m 1 Mbps 802 11g 100 ft 30 m 54 Mbps 300 ft 91 m 1 Mbps 802 11n Operating distance to be determined upon release of standard Security Encryption Types WEP TKIP AES WPA 1 0 WPA2 CCX...

Страница 139: ...ges shown above will increase or decrease depending on factors such as number of walls reflective material or interference from external RF sources Encryption with network key WEP is performed using the above number of bits however users can set 40 bits 104 bits after subtracting the fixed length of 24 bits Depending on practical environments the allowable number of computers to be connected may b...

Страница 140: ... Find Information About Bluetooth The Bluetooth module contains a robust Help user s guide to assist you in learning about operation of the Bluetooth device To access the Help file click Start All Programs and click on Bluetooth then select User s Guide For additional information about Bluetooth Technology visit the Bluetooth Web site at www bluetooth com TO ENABLE OR DISABLE EITHER THE WIRELESS L...

Страница 141: ...r antenna or transmitter Canadian Notice To prevent radio interference to the licensed service this device is intended to be operated indoors and away from windows to provide maximum shielding Equipment or its transmit antenna that is installed outdoors is subject to licensing Warranty Users are not authorized to modify this product Any modifications invalidate the warranty This equipment may not ...

Страница 142: ...plications from your hard drive home network or the Internet It s no longer necessary for friends and families to crowd around the PC to enjoy content stored or accessed there As its name implies Intel WiDi is a wireless technology Note however that it requires a third party display adapter in order to be used The display adapter is attached to the TV via HDMI preferred or composite A V cables FIR...

Страница 143: ...SYSTEM WITH AN INTEL WIRELESS LAN AND OPTIONAL INTEL WIDI TECHNOLOGY THE WIDI APPLICATION MAY OR MAY NOT BE PRE INSTALLED DEPENDING UPOON YOUR SYSTEM CONFIGURATION SYSTEMS WITH INTEL WIDI PRE INSTALLED WILL HAVE A WIDI ICON LOCATED ON THEIR DESKTOP IF THE ICON IS NOT PRESENT INTEL WIDI WILL BE INSTALLED AS SOON AS YOU RUN CLICKME THE INTEL WIDI TECHNOLOGY WILL ONLY WORK IN COMBINATION WITH AN INTE...

Страница 144: ...icator 20 lithium ion battery 45 low 47 problems 74 75 recharging 46 shorted 47 Standby mode 47 BIOS 38 Bluetooth 134 Built in Speakers 70 C Camera 11 CapsLock 21 CD ROM 70 71 Click Me 39 Clicking 26 Cold swapping 48 Configuration Label 98 Connecting the Power Adapters 33 Controls and Connectors 11 Conventions Used in the Guide 7 Cursor 25 Cursor Keys 23 D DC Power Jack 33 Device Ports 63 101 Digi...

Страница 145: ...1 problems 71 Headphone Jack 63 Hibernation Feature 42 Hot swapping 48 I Internal LAN 63 K Keyboard 12 22 cursor keys 23 function keys 23 numeric keypad 22 problems 71 Windows keys 23 L LAN RJ 45 Jack 16 Line In Jack 64 Line Out Jack 63 Lithium ion Battery 45 M Media Player battery power 55 care 96 Control Panel 55 loading 51 removing 54 Software 51 54 using 55 Memory capacity 61 compartment 17 60...

Страница 146: ...40 Restarting 43 Restoring Your Pre installed Software 80 RJ 45 63 S ScrLk 21 SD Card installing 58 removing 58 SDRAM 17 59 Secure Digital Card 58 Sleep Mode 41 Specifications 98 Audio 100 Chipset 99 Dimensions and Weight 102 Environmental Requirements 103 Keyboard 102 Mass Storage Device Options 100 Memory 99 Microprocessor 99 Power 102 Video 99 Status Indicator Panel 13 19 Stereo Speakers 13 Sup...

Страница 147: ... Wireless LAN activating 128 Ad Hoc Mode 125 Before Using the Wireless LAN 124 characteristics 124 configuring 128 connection to the network 129 deactivating 127 disconnecting 128 Infrastructure Mode 126 modes 125 Specifications 132 Troubleshooting 129 Wireless LAN Glossary 130 Wireless LAN On Off Switch 13 ...

Страница 148: ...Guide d utilisation Découvrez comment utiliser votre ordinateur portable Fujitsu LIFEBOOK LH531 ...

Страница 149: ... de la société Adobe Systems Incorporated aux États Unis et ou dans d autres pays Google est une marque déposée de Google Incorporated Norton et Norton Internet Security sont des marques de commerce ou des marques déposées de la société Symantec aux États Unis et dans d autres pays Le lecteur de DVD disponible sur certains modèles d ordinateurs portables LIFEBOOK comporte des technologies dont les...

Страница 150: ...ca Inc Adresse 1250 E Arques Avenue Sunnyvale CA 94085 Téléphone 408 746 6000 Déclare que le produit Configuration du modèle de base Ordinateur portable LIFEBOOK LH531 est conforme aux règles établies dans la Partie 15 des règles de la FCC Cet appareil est conforme aux exigences de la partie 15 des règles de la FCC L utilisation est soumise aux deux conditions suivantes 1 cet appareil ne doit pas ...

Страница 151: ...ou à côté d une piscine Utilisez uniquement le cordon d alimentation et les piles recommandés dans ce manuel Ne jetez pas les batteries dans le feu Elles risquent d exploser Vérifiez si la réglementation locale comporte des instructions spéciales d élimination CONSERVEZ CES INSTRUCTIONS Avis réservé à des réparateurs qualifiés DANGER D EXPLOSION SI LA BATTERIE AU LITHIUM HORLOGE EST INCORRECTEMENT...

Страница 152: ...s La RBRC dispose de dizaines de milliers de points de collecte aux États Unis et au Canada Pour trouver le lieu de collecte le plus proche de chez vous visitez www RBRC org ou appelez au 1 800 822 8837 Si aucun des lieux proposés par la RBRC ne vous convient vous pouvez en trouver un en visitant le site de la Consumer Education Initiative Initiative pour l éducation des consommateurs de l EIA à l...

Страница 153: ...néral 10 Emplacement des commandes et des connecteurs 11 Composants supérieurs 11 Composants sur le côté gauche de l ordinateur 14 Composants sur le côté droit de l ordinateur 16 Composants sous l ordinateur 17 Tableau de voyants d état 19 Voyant d état de l alimentation 19 Voyant de niveau de charge 20 Voyant d accès au disque dur lecteur optique 21 Voyant Verr num 21 Voyant Verr maj 21 ...

Страница 154: ...s adaptateurs d alimentation 33 Écran 34 Ouverture de l écran 34 Réglage de la luminosité de l écran 35 Utilisation du clavier 35 Utilisation des options d alimentation 35 À l aide du Centre de mobilité Windows 35 Fermeture de l écran 35 Démarrage de votre ordinateur portable LIFEBOOK 36 Mise sous tension 36 Procédure d amorçage 37 Mots de passe d accès au disque dur 37 Utilitaire de configuration...

Страница 155: ...dans votre lecteur 51 Retrait d un disque 54 Ouverture d urgence du plateau de chargement du lecteur optique 54 Utilisation des logiciels du lecteur multimédia 54 Utilisation du lecteur multimédia avec alimentation par batterie 55 Cartes Secure Digital 57 Installation d une carte Memory Stick ou SD 58 Retrait d une carte Memory Stick ouSD 58 Module de mémoire additionnelle 59 Installation des modu...

Страница 156: ...otre image d origine 86 Création d une image de système 86 Gestion de vos images de sauvegarde 88 Utilisation du disque de restauration et d utilitaires 88 Récupération de l image d origine avec Restauration et utilitaires 91 Téléchargement automatique des mises à jour de pilotes 93 Chapitre 5 Entretien Entretien de votre ordinateur portable LIFEBOOK 94 Nettoyage de votre ordinateur portable LIFEB...

Страница 157: ...itation 108 Accessoires préférés des utilisateurs 108 Logiciels fournis 108 Apprendre à utiliser vos logiciels 109 Glossaire et renseignements sur la réglementation Glossaire 126 Renseignements sur la réglementation 126 Annexe A Guide d utilisation de la carte de réseau local sans fil Avant d utiliser la carte réseau sans fil 130 Cartes réseau sans fil présentées dans ce document 130 Caractéristiq...

Страница 158: ...on de la carte de réseau local sans fil sous Windows 135 Connexion au réseau 135 Dépannage de la carte réseau sans fil 136 Tableau de dépannage 136 Utilisation de Bluetooth 140 Présentation de Bluetooth 140 Sources d informations supplémentaires sur Bluetooth 140 Annexe B Utilisation de l affichage Intel Wireless Display Utilisation de la technologie Wireless Display 142 Démarrer l application WiD...

Страница 159: ... Édition Familiale Supérieure pré installé Ce manuel présente le mode d emploi de l ordinateur portable LIFEBOOK et de ses logiciels intégrés Conventions utilisées dans ce guide Les touches du clavier et à l écran apparaissent entre crochets Exemple Fn F1 Échap Entrée et Ctrl Le texte contient plusieurs renvois vers des pages contenant des informations supplémentaires sur un sujet quelconque Exemp...

Страница 160: ...le plus rapidement possible Nom du produit Numéro de configuration du produit Numéro de série du produit Date d achat Conditions dans lesquelles le problème est survenu Texte des messages d erreur reçus Types de périphériques connectés si applicable L ICÔNE DE MISE EN GARDE MET EN ÉVIDENCE DES INFORMATIONS IMPORTANTES POUR L UTILISATION SÉCURITAIRE DE VOTRE ORDINATEUR OU POUR L INTÉGRITÉ DE VOS FI...

Страница 161: ... Garantie limitée Votre ordinateur portable LIFEBOOK est accompagné d une garantie limitée internationale de Fujitsu Pour connaître les conditions générales et la durée de votre garantie limitée consultez la pochette de service livrée avec votre ordinateur POUR UTILISER LES HYPERLIENS VOUS DEVEZ AVOIR UNE CONNEXION INTERNET ACTIVE ...

Страница 162: ...on décrit les composants de votre ordinateur portable Fujitsu LIFEBOOK LH531 Nous vous suggéronsde la lire avant de commencerà utiliser l ordinateur même si vous avezdéjàutilisédesordinateurs de ce type Figure 1 Ordinateur portable Fujitsu LIFEBOOK LH531 Aperçu général ...

Страница 163: ...Commutateur de dispositif Touchpad sans fil voyants d état Écran Figure 2 Ordinateur portable LIFEBOOK avec écran ouvert Composants supérieurs Voici une courte description des composants se trouvant sur le dessus de votre ordinateur LIFEBOOK Caméra Web La caméra web de 1 3 mégapixels vous permet de transmettre sur Internet des images de vous même Pour de plus amples informations concernant l utili...

Страница 164: ...e en stéréophonie Clavier Clavier complet avec plusieurs touches spéciales Windows Voir Clavier en page 22 Pavé tactile TouchPad Le dispositif de pointage Touchpad fonctionne comme une souris il comprend un bouton droit un bouton gauche ainsi qu un pavé de commande de curseur Voir Dispositif de pointage TouchPad en page 25 Commutateur Marche Arrêt du dispositif sans fil Ce commutateur permet d act...

Страница 165: ...se écouteurs sortie Cette prise permet de connecter des écouteurs ou des haut parleurs externes Voir Prise d écouteurs sortie de ligne en page 64 Microphone numérique Le microphone numérique en option est utilisé en association avec la caméra web Pour de plus amples informations concernant l utilisation du microphone et de la caméra web consultez la documentation accompagnant l application CyberLi...

Страница 166: ...secteur lequel permet d alimenter l ordinateur LIFEBOOK et de charger la batterie interne au lithium Grilles de ventilation Les grilles permettent à l air de circuler dans le système afin de refroidir les composants POUR PROTÉGER VOTRE ORDINATEUR DES DOMMAGES ET OPTIMISER SES PERFORMANCES GARDEZ TOUJOURS LES GRILLES DE VENTILATION DÉGAGÉES PROPRES ET SANS DÉBRIS IL EST POSSIBLE QUE VOUS DEVIEZ LES...

Страница 167: ... ou un récepteur AV audio vidéo Ports USB 2 0 Les ports USB 2 0 vous permettent de connecter des périphériques USB La norme USB 2 0 transfère des données à un débit théorique de 480 Mbit s Elle est rétrocompatible avec les périphériques USB 1 1 dont le débit atteint 12 Mbit s Voir Prise d écouteurs sortie de ligne en page 64 Remarque les deux ports USB 2 0 situés sur les côtés gauche et droit de l...

Страница 168: ...e 50 Bouton d ouverture du lecteur optique Ce bouton sert à ouvrir le compartiment du lecteur optique Port USB 2 0 Le port USB 2 0 vous permet de connecter des périphériques USB La norme USB 2 0 transfère des données à un débit théorique de 480 Mbit s Elle est rétrocompatible avec les périphériques USB 1 1 dont le débit atteint 12 Mbit s Voir Prise d écouteurs sortie de ligne en page 64 Prise de r...

Страница 169: ...s composants se trouvant sous votre ordinateur LIFEBOOK Compartiment de mémoire supplémentaire Votre ordinateur est équipé en usine d une mémoire vive synchrone dynamique de type 3 à double débit et à haute vitesse SDRAM DDR3 Le compartiment de mémoire permet d augmenter la capacité de mémoire système de votre ordinateur pour en améliorer les performances globales Voir Module de mémoire additionne...

Страница 170: ...um en page 45 Grilles de ventilation Les grilles permettent à l air de circuler dans le système afin de refroidir les composants POUR PROTÉGER VOTRE ORDINATEUR DES DOMMAGES ET OPTIMISER SES PERFORMANCES GARDEZ TOUJOURS LES GRILLES DE VENTILATION DÉGAGÉES PROPRES ET SANS DÉBRIS IL EST POSSIBLE QUE VOUS DEVIEZ LES NETTOYER PÉRIODIQUEMENT SELON L ENVIRONNEMENT DANS LEQUEL VOUS UTILISEZ L ORDINATEUR N...

Страница 171: ...yants d état contient des symboles correspondant à divers composants de votre ordinateur LIFEBOOK Fujitsu Les diodes électroluminescentes DEL sous chaque symbole vous renseignent sur le fonctionnement des composants correspondants Voyant d état de l alimentation Bleu continu L adaptateur secteur et la batterie sont disponibles et le système est entièrement chargé ou l adaptateur est branché mais l...

Страница 172: ...e est chargée à 12 ou moins Violet clignotant Problème de batterie Éteint L adaptateur secteur n est pas branché et ou la batterie est chargée entre 13 et 100 Lorsque la batterie est installée et que l ordinateur n est pas sous tension le voyant de charge de la pile indiquera le niveau de charge pendant cinq secondes après le clignotement orange Lorsque l adaptateur secteur n est pas branché ou qu...

Страница 173: ...tion Remarque Le clignotement est normal Voyant Verr num Le voyant Verr num s allume lorsque le clavier intégré est en mode de pavé numérique à dix touches Voyant Verr maj Le voyant Verr maj s allume lorsque le clavier est configuré pour inscrire les lettres en majuscules Voyant Verr défil Le voyant Verr défil indique si le verrouillage du défilement est actif ...

Страница 174: ...K comporte un clavier intégré à 86 touches dont des touches Windows et des touches de fonctions spéciales Cette section décrit les touches suivantes Pavé numérique Votre ordinateur comprend un pavé numérique vous permettant de saisir des nombres ainsi que d effectuer des opérations mathématiques et de navigation Pour basculer entre la fonction de navigation et la fonction numérique des touches du ...

Страница 175: ...u des divisions et d entrer des décimales à l aide des touches de fonction désignées du pavé numérique Lorsque la fonction Verr Num est désactivée vous pouvez vous servir du pavé numérique pour naviguer Début Insertion à gauche à droite vers le haut vers le bas Touches Windows Votre ordinateur portable LIFEBOOK comporte deux touches Windows soit une touche Démarrer et une touche Application La tou...

Страница 176: ... appuyez plusieurs fois sur F6 pour diminuer la luminosité de l écran Fn F7 Gardez la touche Fn enfoncée et appuyez plusieurs fois sur F7 pour augmenter la luminosité de l écran Fn F8 Gardez la touche Fn enfoncée et appuyez plusieurs fois sur F8 pour diminuer le volume de l ordinateur Fn F9 Gardez la touche Fn enfoncée et appuyez plusieurs fois sur F9 pour augmenter le volume Fn F10 Lorsque vous a...

Страница 177: ... du pointeur et de sélectionner des éléments affichés à l écran Le pavé tactile Touchpad est composé d une commande de curseur d un bouton gauche et d un bouton droit La commande de curseur fonctionne de la même façon qu une souris pour faire déplacer le curseur à l écran Elle fonctionne avec une légère pression du bout du doigt Les boutons gauche droit fonctionnent comme les boutons d une souris ...

Страница 178: ... le bouton droit Vous pouvez également cliquer en frappant une fois le pavé tactile avec délicatesse Figure 9 Cliquer à l aide du bouton Figure 10 Cliquer à l aide du pavé TouchPad UNE SOURIS EXTERNE PEUT ÊTRE BRANCHÉE À UN PORT USB DE L ORDINATEUR PORTABLE LIFEBOOK ET ÊTRE UTILISÉE EN MÊME TEMPS QUE LE PAVÉ TACTILE TOUCHPAD CEPENDANT SI VOUS DÉMARREZ VOTRE ORDINATEUR AVEC UNE SOURIS EXTERNE DÉJÀ ...

Страница 179: ...e ne fonctionne pas avec le bouton droit Pour effectuer un double clic placez le pointeur sur l objet voulu et appuyez rapidement deux fois sur le bouton gauche Vous pouvez également effectuer un double clic en tapant deux fois légèrement sur le Touchpad Figure 11 Double cliquer à l aide du bouton Figure 12 Double cliquer à l aide du pavé Touchpad ...

Страница 180: ...is relâchez Vous pouvez également glisser un élément avec le pavé tactile Touchpad Premièrement placez le curseur sur l élément que vous désirez déplacer et frappez légèrement le pavé tactile Touchpad à deux reprises en faisant attention de laisser le doigt sur le pavé après la dernière frappe Ensuite glissez votre doigt sur le pavé tactile jusqu à ce que l élément soit à l emplacement désiré et r...

Страница 181: ...dans le sens anti horaire pour la faire défiler vers le haut ou la gauche figure 17 Agrandissements rétrécissements Pour agrandir ou rétrécir une page à l aide du pavé tactile il suffit de mettre votre doigt sur le coté gauche du pavé et de le déplacer en avant ou en arrière figure 18 Activation désactivation des fonctions gestuelles 1 Pour activer ou désactiver les fonctions gestuelles allez à Dé...

Страница 182: ... apparaît alors Sélectionnez un onglet parmi les dix à disposition et vous pourrez modifier les paramètres du pavé tactile Figure 15 Défilement en haut bas à l aide du pavé tactile Figure 16 Défilement à droite à gauche à l aide du pavé tactile Figure 17 Défilement continu à l aide du pavé tactile Figure 18 Agrandissement rétrécissement à l aide du pavé tactile ...

Страница 183: ...rrez régler le volume ou passer en sourdine Gardez la touche Fn enfoncée et appuyez sur la touche F3 pour couper le son Pour rétablir le son appuyez de nouveau sur Fn F3 Le volume peut aussi être réglé avec les commandes de volume proposées par diverses applications Certainspériphériquesaudiopouvantêtreconnectés àvotresystèmesontdotésdecommandesdevolume Chaque commande de volume ci dessus impose u...

Страница 184: ...32 Chapitre 2 Première mise en marche de votre ordinateur portable LIFEBOOK Câble secteur Prise c c Adaptateur secteur Figure 19 Connexion de l adaptateur secteur ...

Страница 185: ...n de l adaptateur auto avion disponible en option 1 Branchez le câble de sortie c c sur la prise d alimentation c c de votre ordinateur portable 2 Branchez l adaptateur auto avion sur une prise d allume cigarette d un véhicule automobile et placez le contact d allumage sur la position Marche ou Accessoires OU 3 Branchez l adaptateur auto avion sur la prise d alimentation c c de votre siège d avion...

Страница 186: ...es environnements à forte luminosité Cet écran offre également une excellente résolution grâce à une technologie de matrice active Ouverture de l écran Pour ouvrir l écran tenez la base de l ordinateur dune main et inclinez légèrement l écran de l autre jusqu à obtenir une position confortable tout en faisant attention de ne pas toucher à la surface d affichage ...

Страница 187: ...e les paramètres que vous définissez avec cet utilitaire deviennent permanents jusqu à ce que vous les changiez à nouveau À l aide du Centre de mobilité Windows Cliquez sur Démarrer Panneau de configuration Dans Affichage par sélectionnez un des affichages par icônes Sélectionnez Écran puis cliquez sur Régler la luminosité dans le panneau de gauche En bas de la fenêtre faites glisser la barre Lumi...

Страница 188: ...tre ordinateur LIFEBOOK ce dernier exécute un auto test de mise sous tension pour vérifier les composants internes et la configuration Si une anomalie est découverte votre ordinateur LIFEBOOK émet un avertissement audio et affiche un message d erreur Voir Messages de l auto diagnostic de mise sous tension on page 82 Selon la nature du problème vous pourrez poursuivre le démarrage du système d expl...

Страница 189: ...mez votre ordinateur portable LIFEBOOK Vous redémarrez l ordinateur à partir de la boîte de dialogue Windows d arrêt du système Un logiciel lance un redémarrage du système Exemple Lorsque vous installez une nouvelle application Mots de passe d accès au disque dur Pour mieux sécuriser vos données vous pouvez créer des mots de passe contrôlant l accès au x disque s dur s Cette fonction est gérée par...

Страница 190: ...ouche F2 lorsque le logo Fujitsu apparaît à l écran Le menu principal de l utilitaire de configuration du BIOS s affichera avec les paramètres courants 3 Avec la TOUCHE FLÉCHÉE À DROITE ou la TOUCHE FLÉCHÉE À GAUCHE parcourez les autres menus de configuration et vérifiez modifiez les paramètres actuels Vous pouvez aussi invoquer le menu de la procédure d amorçage en appuyant sur la touche F12 lors...

Страница 191: ...cheront vous demandant de saisir un nom etune description pourvotreordinateur ainsiqu unmotdepassed administrateuretunnomdedomaine Lisezattentivementlesinstructionss affichant à l écran et remplissez les espaces à mesure que le système vous le demande Une fois la configuration initiale terminée il est très important que vous installiez ClickMe conformément à la procédure ci dessous Installation de...

Страница 192: ...ystème En outre durant l exécution de ClickMe vous pouvez glisser votre doigt sur le pavé tactile à intervalles de quelques minutes pour garder le système éveillé Enregistrement de votre LIFEBOOK chez Fujitsu Pour enregistrer votre ordinateur LIFEBOOK vous pouvez aller sur notre site Internet us fujitsu com computers Pour vous enregistrer en ligne vous devez avoir un compte valide auprès d un four...

Страница 193: ...ue Bouton d alimentation veille reprise Lorsque l ordinateur est allumé vous pouvez utiliser le bouton d alimentation veille reprise pour placer manuellement l ordinateur en mode sommeil Assurez vous alors que l ordinateur n est pas en train d accéder à des données puis enfoncez et relâchez immédiatement le bouton d alimentation veille reprise Veuillez prendre note que si vous enfoncez ce bouton p...

Страница 194: ...DÉSACTIVEZ LE BOUTON D ALIMENTATION VEILLE REPRISE VOUS NE POURREZ PLUS L UTILISER POUR METTRE L ORDINATEUR EN MODE SOMMEIL OU EN VEILLE PROLONGÉE ENREGISTREMENT SUR LE DISQUE LA FONCTION DE REPRISE DU BOUTON NE PEUT PAS ÊTRE DÉSACTIVÉE n SI VOTRE ORDINATEUR ACCÈDE ACTIVEMENT À DES INFORMATIONS AU MOMENT OÙ VOUS LE METTEZ EN MODE SOMMEIL OU EN MODE VEILLE PROLONGÉE LES MODIFICATIONS AUX FICHIERS O...

Страница 195: ...au de configuration vous permet de configurer certains paramètres de gestion de l alimentation Par exemple vous pouvez utiliser les Options d alimentation pour régler les valeurs de temporisation délai d inactivité afin d éteindre l écran et les disques durs selon que l ordinateur est alimenté par batterie ou par l un des adaptateurs Redémarrage du système Si votre système est allumé et que vous d...

Страница 196: ...ur de terminer les opérations en cours vous lui permettez aussi d exécuter les opérations de mise hors tension dans le bon ordre et vous évitez les risques d erreur La procédure appropriée est la suivante Cliquez sur le bouton Démarrer puis positionnez le curseur sur la petite flèche située en bas à droite du panneau de droite Cliquez sur le bouton Arrêter AVANT D ÉTEINDRE L ORDINATEUR ASSUREZ VOU...

Страница 197: ...vent accélérer la détérioration de la batterie Si vous tentez de charger une batterie sous une température ambiante dépassant les seuils de tolérance vous voyez clignoter l icône de charge en cours sur le tableau de voyants d état Voir Tableau de voyants d état on page 19 Lorsque vous utilisez des périphériques qui consomment beaucoup de courant comme un graveur de DVD multiformat un lecteur de CD...

Страница 198: ...en page 41 L AUTONOMIE RÉELLE DE LA BATTERIE PEUT VARIER SELON LA LUMINOSITÉ DE L ÉCRAN SELON LES APPLICATIONS LES FONCTIONS ET LES PARAMÈTRES DE GESTION DE L ALIMENTATION QUE VOUS UTILISEZ SELON L ÉTAT DE LA BATTERIE ET SELON D AUTRES PRÉFÉRENCES QUE VOUS POUVEZ CONFIGURER L UTILISATION DU LECTEUR BLU RAY DU GRAVEUR DE DVD MULTIFORMAT OU DU DISQUE DUR PEUT ÉGALEMENT AVOIR UN IMPACT SIGNIFICATIF S...

Страница 199: ... batterie épuisée il est impossible d en reprendre l utilisation avant d avoir connecté une source d alimentation valide provenant d un adaptateur ou d une batterie chargée Lorsque vous avez connecté une alimentation valide vous devez ensuite appuyer sur le bouton d alimentation veille reprise pour reprendre l utilisation de l ordinateur Lorsque l ordinateur est en mode veille de batterie épuisée ...

Страница 200: ...ez la ensuite de son compartiment 5 Insérez une nouvelle batterie et appuyez jusqu à ce que vous sentiez l enclenchement des loquets 6 Branchez l adaptateur secteur et allumez l ordinateur Remplacement sous tension Pour remplacer la batterie alors que le système est sous tension exécutez les opérations suivantes 1 Branchez l adaptateur secteur sur votre ordinateur puis sur une prise électrique sou...

Страница 201: ...Loquet de dégagement Loquet de dégagement de la batterie de la batterie 49 Batterie au lithium Figure 21 Loquets de la batterie Figure 22 Retrait de la batterie ...

Страница 202: ...le couche DVD R couche simple et double couche DVD R couche simple et double couche DVD RW couche simple DVD RW couche simple DVD RAM Ver 2 CD ROM CD R et CD RW Ce lecteur permet de graver des disques des formats suivants DVD RAM Ver2 DVD R couche simple et double couche DVD RW DVD R couche simple et double couche DVD RW CD R et CD RW Il offre également toutes les fonctions d un lecteur de CD DVD ...

Страница 203: ...ique 1 Appuyez et relâchez la touche d éjection située à l avant du lecteur optique afin d ouvrir le plateau de chargement Le plateau sortira légèrement du portable LIFEBOOK 2 Tirez doucement le plateau de chargement jusqu à ce qu un disque puisse y être déposé facilement VISITEZ RÉGULIÈREMENT LE SITE WEB DE FUJITSU À L ADRESSE US FUJITSU COM COMPUTERS POUR OBTENIR LES MISES À JOUR DE PILOTES LES ...

Страница 204: ...ué au centre du plateau 4 Fermez le plateau de chargement en le poussant doucement jusqu à ce que vous entendiez un clic SI VOUS AVEZ DÉSACTIVÉ LA FONCTION AVIS D INSERTION AUTOMATIQUE VOUS DEVREZ FAIRE DÉMARRER LE LECTEUR SOIT À PARTIR DU POSTE DE TRAVAIL SOIT AVEC L EXPLORATEUR WINDOWS CAR L ORDINATEUR PORTABLE NE RECONNAÎTRA PAS AUTOMATIQUEMENT QUE LE DISQUE A ÉTÉ CHARGÉ ...

Страница 205: ...a b c d 53 Lecteur optique Figure 24 Chargement éjection d un disque ...

Страница 206: ...nsérerez un film dans le tiroir du lecteur pour la première fois on vous invitera à choisir ce que vous aimeriez que le système fasse lorsque les disques sont insérés par exemple démarrer automatiquement ou attendre le message guide Ce même message s affichera chaque fois que vous insérerez un disque jusqu à ce que vous fassiez votre sélection 3 Cliquez sur OK pour fermer la boîte de dialogue À pr...

Страница 207: ... cliquez sur le bouton d écran 2 Pour faire reculer le film cliquez sur le bouton pour revenir jusqu à un point spécifique de votre choix ou cliquez sur le bouton pour revenir à l écran de bienvenue 3 Pour faire avancer le film cliquez sur le bouton pour avancer jusqu à un point spécifique de votre choix ou cliquez sur le bouton pour passer aux crédits de fermeture 4 Pour arrêter le film cliquez s...

Страница 208: ...gée par la batterie supplémentaire chargée à fond Si vous ne disposez pas d une batterie supplémentaire vous pouvez brancher un adaptateur secteur dès que vous voyez l indicateur de faible batterie 5 Pour reprendre l utilisation de l ordinateur appuyez à nouveau sur le bouton d alimentation veille reprise Cette opération n est pas nécessaire si vous avez connecté un adaptateur secteur sans utilise...

Страница 209: ...s données Les cartes Memory Stick permettent l enregistrement le transfert et le partage de contenus numériques tels que photos films sons voix données et applications Les cartes Secure Digital SD sont très similaires aux cartes Memory Stick Comme les Memory Stick les cartes SD permettent de stocker des informations et de les transférer sur des appareils portables très variés téléphones cellulaire...

Страница 210: ...t la carte dans la fente jusqu à ce qu elle soit logée dans le connecteur Retrait d une carte Memory Stick ouSD Pour retirer une carte Memory Stick ou SD procédez comme suit Enfoncez la carte jusqu à ce que vous sentiez un déclic La carte s éjecte ensuite de la fente pour que vous puissiez la retirer L INSERTION OU LE RETRAIT D UNE CARTE PENDANT QUE LE LIFEBOOK EST EN COURS DE DÉMARRAGE OU D ARRÊT...

Страница 211: ...tirez la vis du compartiment du module de mémoire additionnelle voir Figure 28 Retirez le couvercle N ENLEVEZ AUCUNE VIS DU COMPARTIMENT DU MODULE DE MÉMOIRE ADDITIONNELLE À L EXCEPTION DE CELLES SPÉCIFIQUEMENT INDIQUÉES DANS LES DIRECTIVES D INSTALLATION ET DE RETRAIT CORRESPONDANTES LE MODULE DE MÉMOIRE ADDITIONNELLE PEUT ÊTRE FORTEMENT ENDOMMAGÉ PAR UNE DÉCHARGE ÉLECTROSTATIQUE DES POUR MINIMIS...

Страница 212: ... 28 Ouverture du compartiment de mémoire 5 Insérez le module de mémoire additionnelle en oblique à 45 Poussez fermement le bord du connecteur du module vers le bas et appuyez sur le connecteur jusqu à ce qu il se loge sous la clé de serrage Vous entendrez un clic lorsque celui ci sera bien en place 6 Replacez le couvercle et les vis LE MODULE DE MÉMOIRE ADDITIONNELLE N EST PAS UN ÉLÉMENT QUE VOUS ...

Страница 213: ... les attaches latérales en les orientant vers les côtés pour les éloigner du module 3 En maintenant les ergots écartés retirez la barrette en la tirant vers à l extérieur de l ordinateur figure 30 4 Rangez le module de mémoire additionnelle dans une gaine protectrice antistatique 5 Replacez le couvercle et les vis Vérification de la capacité de mémoire Lorsque vous avez changé la capacité de mémoi...

Страница 214: ... et celle qui est affichée Cette situation peut découler du fait que votre système est configuré avec un contrôleur vidéo Intel Graphics Media Accelerator intégré qui alloue la mémoire système de manière dynamique afin d accélérer les performances graphiques SI LA MÉMOIRE TOTALE AFFICHÉE EST INCORRECTE VÉRIFIEZ SI LE MODULE DE MÉMOIRE ADDITIONNELLE EST BIEN INSTALLÉ SI LE MODULE EST BIEN INSTALLÉ ...

Страница 215: ...ernet 10 100 Gigabit Il est possible que vous deviez configurer votre ordinateur portable selon les particularités de votre réseau pour de plus amples informations sur la configuration de votre réseau veuillez consulter votre administrateur de réseau Pour brancher le câble de réseau local exécutez ces opérations 2 Poussez la fiche de connexion dans le port jusqu à ce qu elle s enclenche 3 Branchez...

Страница 216: ...our connecter un microphone exécutez ces opérations simples 1 Alignez le connecteur avec l ouverture du port 2 Poussez la fiche de connexion dans le port jusqu à ce qu elle s enclenche Ports USB Les ports Universal Serial Bus 2 0 USB vous permettent de connecter divers périphériques USB tels que des tablettes de jeu externes des dispositifs de pointage des claviers et ou des haut parleurs Votre LI...

Страница 217: ...t puis pousser le connecteur à l intérieur jusqu à ce qu il s y enclenche correctement Ports USB Figure 32 Connexion d un périphérique USB EN RAISON DES CHANGEMENTS CONTINUS APPORTÉS À LA TECHNOLOGIE ET AUX NORMES USB IL EST IMPOSSIBLE DE GARANTIR LA COMPATIBILITÉ DE TOUS LES DISPOSITIFS ET OU LECTEURS USB ...

Страница 218: ...ctiver la fonction de charge USB en tout temps Activer la fonction de charge USB en tout temps uniquement avec l adaptateur secteur connecté et Activer la fonction de charge USB en tout temps avec l adaptateur secteur ou la batterie Veuillez prendre note que si ce réglage est choisi la batterie risque de se vider de toute sa charge si l adaptateur secteur n est pas connecté Il est possible que cer...

Страница 219: ...rt jusqu à ce qu elle s enclenche Figure 33 Branchement d un périphérique vidéo externe 1 Alignez le connecteur avec l ouverture du port LORSQUE VOUS APPUYEZ SUR LES TOUCHES FN F10 VOUS POUVEZ CHANGER L EMPLACEMENT DE L AFFICHAGE VIDÉO CHAQUE FOIS QUE VOUS APPUYEZ SUR CES TOUCHES VOUS PASSEZ AU CHOIX SUIVANT SI VOUS N AVEZ QU UN ÉCRAN À TUBE CATHODIQUE L ORDRE SERA LE SUIVANT ÉCRAN INTERNE ÉCRAN C...

Страница 220: ...dre un processus de dépannage complexe 1 Arrêtez votre ordinateur portable LIFEBOOK 2 Assurez vous que l adaptateur secteur est connecté à votre ordinateur portable et à une source d alimentation secteur active 3 Assurez vous que les cartes éventuellement installées sur l ordinateur sont bien branchées Vous pouvez également enlever la carte de la fente pour vous assurer qu elle n est pas la raison...

Страница 221: ...r les informations suivantes à portée de main pour que notre préposé du service à la clientèle puisse vous venir en aide le plus rapidement possible Nom du produit Numéro de configuration du produit Numéro de série du produit Date d achat Conditions dans lesquelles le problème est survenu Texte des messages d erreur reçus Types de périphériques connectés si applicable Pour les numéros de série et ...

Страница 222: ...vez faire pour corriger la situation se trouve sous la colonne Solutions possibles Il est possible que certaines causes et solutions possibles ne s appliquent pas à votre ordinateur Tableau de dépannage Problème Page Problèmes audio page 71 Problèmes de lecteur optique page 71 Problèmes de disque dur page 72 Problèmes de clavier ou de souris page 73 Problèmes de mémoire page 74 Problèmes de périph...

Страница 223: ...ement d écouteurs désactive les hauts parleurs incorporés enlevez les écouteurs Un pilote est mal configuré Le pilote audio peut être installé ou réinstallé à l aide du CD de pilotes et d applications livré avec votre LIFEBOOK Consultez la documentation de votre application et de votre système d exploitation pour obtenir de l aide Les haut parleurs ont été bloqués en utilisant l icône Volume situé...

Страница 224: ...le même que celui utilisé par le système d exploitation Lorsque le système d exploitation démarre à partir d un DVD CD les identifications des lecteurs sont automatiquement ajustées Veuillez noter que l identification d une unité peut être changée avec l outil Gestion des disques situé dans Outils administratifs Gestion de l ordinateur Le voyant d accès au disque situé sur le Tableau de voyants d ...

Страница 225: ...il elle ne semble pas fonctionner Le logiciel de votre système d exploitation n est pas configuré avec le bon pilote pour ce périphérique Consultez la documentation du périphérique et du système d exploitation puis installez le pilote approprié Votre périphérique externe n est pas bien installé Réinstallez votre périphérique Voir Ports de périphériques on page 63 Vous avez connecté un clavier exte...

Страница 226: ... Ports de périphériques on page 63 Le périphérique a peut être été installé pendant qu une application était en exécution et votre ordinateur n a donc pas détecté son installation Fermez l application et redémarrez votre ordinateur portable Le pilote ne correspond pas à votre périphérique Consultez la documentation relative à votre logiciel et activez le bon pilote Problèmes d alimentation électri...

Страница 227: ...n d alimentation secteur dans une autre prise murale et vérifiez si un interrupteur ou un disjoncteur coupe le courant Si vous utilisez un adaptateur auto avion dans un véhicule assurez vous que la clé de contact est à la position On marche ou Acc accessoires Votre ordinateur portable LIFEBOOK s éteint tout seul Les paramètres de gestion d alimentation sont réglés à des temporisations délais d ina...

Страница 228: ...entation veille reprise Voir Sources d alimentation on page 33 Le LIFEBOOK ne fonctionne pas lorsqu il est alimenté uniquement par batterie La batterie est épuisée Remplacez la batterie par une batterie chargée ou branchez un adaptateur d alimentation Aucune batterie n est installée Installez une batterie chargée La batterie n est pas bien installée Vérifiez si la batterie est bien connectée en la...

Страница 229: ...ité Plus la luminosité est élevée plus l écran d affichage consomme de l énergie La batterie est très vieille Remplacez la batterie Les batteries ont été exposées à des températures élevées Remplacez la batterie La batterie est trop chaude ou trop froide Rétablissez la température opérationnelle de l ordinateur à la valeur normale L icône de chargement sur le tableau de voyants d état clignote lor...

Страница 230: ...amètres de sécurité puis modifiez les en conséquence Voir Utilitaire de configuration du BIOS on page 38 Un message d erreur s affiche durant la procédure d amorçage de l ordinateur L auto diagnostic de mise sous tension POST a détecté un problème Consultez les messages de l auto diagnostic de démarrage pour déterminer la signification et la gravité du problème Tous les messages n indiquent pas de...

Страница 231: ...u clavier ou déplacez la souris Si cela ne fonctionne pas appuyez sur le bouton d alimentation veille reprise L écran d affichage peut avoir été arrêté par le mode veille veille automatique ou temporisation vidéo L ordinateur portable s est mis en marche en émettant une série de tonalités et votre écran est vide L auto diagnostic de démarrage POST a détecté une défaillance qui ne permet pas à l éc...

Страница 232: ...un trombone est coincé entre l écran et le clavier Retirez tous les objets étrangers du clavier L écran affiche des zones claires ou sombres Si les zones sont de taille réduite et peu nombreuses cela est normal pour un écran ACL grand format Ne faites rien Si les zones sont nombreuses ou suffisamment grandes pour perturber vos besoins d exploitation L écran est défectueux communiquez avec le servi...

Страница 233: ...ble avec votre ordinateur portable LIFEBOOK Consultez la documentation de votre moniteur ainsi que les conseils concernant le moniteur externe dans la section Spécifications Voir Spécifications techniques du système on page 103 Problèmes de connectivité Vous essayez de vous connecter à Internet mais le dispositif de réseau local sans fil semble ne pas être alimenté Les fonctions du dispositif sans...

Страница 234: ...s pourriez avoir besoin de remplacer votre clavier ou le contrôleur de votre clavier mais vous pourriez utiliser un clavier externe en attendant Communiquez avec le service d assistance Le clavier n a pas été détecté Le clavier ne fonctionne pas Vous pourriez avoir besoin de remplacer votre clavier ou le contrôleur de votre clavier mais vous pourriez utiliser un clavier externe en attendant Commun...

Страница 235: ...muniquez avec le service d assistance Erreur de ventilateur le système s arrêtera dans 30 secondes Contactez le service de support technique Fujitsu Une erreur de ventilateur s est produite Communiquez avec votre représentant commercial Une erreur de ventilateur s est produite durant l amorçage Une erreur de ventilateur s est produite durant l amorçage Communiquez avec votre représentant commercia...

Страница 236: ...ORTANT DE COPIER VOTRE IMAGE D ORIGINE SUR DES SUPPORTS AMOVIBLES P EX DISQUES DVD DANS LE CAS CONTRAIRE VOUS RISQUEZ DE NE PAS POUVOIR RESTAURER L IMAGE À UNE DATE ULTÉRIEURE NOUS VOUS RECOMMANDONS D UTILISER DES DISQUES DE TYPE DVD R OU DVD R POUR VOS SAUVEGARDES MAIS LES SUPPORTS DE SAUVEGARDE D IMAGE SUIVANTS SONT AUSSI PRIS EN CHARGE POUR L IMAGE D ORIGINE LE DISQUE PRA LES DONNÉES D APPLICAT...

Страница 237: ... type de disque vous souhaitez graver disque d amorçage disque de pilotes et de restauration des applications disque d applications ou disque de restauration 3 Sélectionnez Disque de restauration et cliquez sur Make DVD 4 Assurez vous que la case indique le numéro 2 remarque selon la taille de l image il est possible que le chiffre de l image d origine indiqué soit supérieur 5 Vous voyez apparaîtr...

Страница 238: ...ur Sur votre bureau il existe une icône MyRecovery Ma restauration qui vous permet de faire des sauvegardes de votre image système actuelle sur un autre emplacement de votre disque dur ou sur un support externe Une image système est un enregistrement de la configuration de votre unité de disque C à un moment précis Il est conseillé de faire occasionnellement une copie de sécurité de l image systèm...

Страница 239: ...er l image sur l unité de disque D ou de Sélectionner une unité de disque pour le cas où vous préféreriez conserver l image sur un disque dur externe 6 Vous voyez apparaître une illustration graphique de la façon dont l image sera enregistrée Cliquez sur le bouton Suivant 7 Cliquez sur Exécuter pour démarrer l enregistrement de la copie de sauvegarde ...

Страница 240: ...pie 7 Veuillez prendre note que si vous copiez une image sur un disque dur externe l original et la copie sont tous deux affichés dans la fenêtre Images de sauvegarde avec le même nom la même date et la même taille de fichier mais avec une lettre d unité de disque différente Si vous choisissez Créer DVD assurez vous d avoir un graveur de DVD et des DVD vierges Utilisation du disque de restauration...

Страница 241: ...ue la fenêtre Options de restauration du système apparaît cliquez sur Restauration et Utilitaires 8 L écran Restauration et Utilitaires apparaît avec trois onglets Diagnostics Restauration et Utilitaires Veuillez noter que l onglet Diagnostics n est pas pris en charge par certains modèles LIFEBOOK Stylistic lorsque vous exécutez la fonction Restauration et Utilitaires à partir du disque dur Si vou...

Страница 242: ...égrale du disque dur Vous pouvez utiliser ces outils pour restaurer l image d origine à partir de la partition cachée pour restaurer une image de sauvegarde créée par vous ou des images enregistrées sur des DVD et pour restaurer complètement votre disque dur Si vous désirez savoir comment créer des DVD de restauration de l image d origine des DVD d image de système ou une copie interne de l image ...

Страница 243: ...tre mot de passe puis cliquez sur OK 9 Lorsque la fenêtre Options de restauration du système apparaît cliquez sur Restauration et Utilitaires 10 Cliquez sur l onglet de restauration dans la fenêtre Restauration et Utilitaire puis cliquez sur l icône Restaurer l image d origine restauration intégrale du disque dur 11 Cliquez sur Exécuter 12 Lisez l avis et cliquez sur J accepte 13 Cliquez sur Suiva...

Страница 244: ...la partition cachée ou Cliquer sur Annuler pour sauter la restauration du ou des disques d applications et poursuivre le processus de restauration 20 Si vous sélectionnez d insérer un disque d application le même message apparaîtra de nouveau chaque fois qu un disque d applications aura été copié dans la partition cachée Insérez au besoin de nouveaux disques d applications jusqu à ce que tous les ...

Страница 245: ... Vérifier les mises à jour maintenant Permet une recherche manuelle des mises à jour de pilotes La première fois que vous l utiliserez on vous demandera d accepter un contrat de licence Après avoir cliqué sur l icône l utilitaire FDU se connectera automatiquement au site Fujitsu pour vérifier les mises à jour et les télécharger Pendant le processus de téléchargement l icône affiche une barre rouge...

Страница 246: ...CORPS ASSUREZ VOUS DE METTRE VOTRE SYSTÈME HORS TENSION AVANT D AJOUTER OU DE RETIRER DES COMPOSANTS DU SYSTÈME MÊME SI LE SYSTÈME EST EN ÉTAT DE SOMMEIL OU DE VEILLE PROLONGÉE DES DONNÉES POURRAIENT ÊTRE PERDUES ET LA MÉMOIRE ENDOMMAGÉE SI LE COURANT QUI ALIMENTE LE SYSTÈME N EST PAS COUPÉ LORSQUE VOUS INSTALLEZ OU RETIREZ UN MODULE DE MÉMOIRE TENEZ LE PAR LE BORD DE FAÇON À NE TOUCHER AUCUN CONT...

Страница 247: ...s un petit espace fermé ou sur une surface molle comme un lit ou un coussin Si vous renversez par accident un liquide sur votre ordinateur portable LIFEBOOK 1 Éteignez le 2 Positionnez le de sorte que le liquide puisse sortir 3 Laissez le sécher pendant 24 heures ou plus si nécessaire 4 S il ne démarre pas une fois sec contactez le service d assistance N utilisez pas votre ordinateur portable LIFE...

Страница 248: ... lave vitre Avant de nettoyer ou de désinfecter l extérieur de votre ordinateur le clavier ou l écran ACL prenez garde à toujours éteindre le système à débrancher l adaptateur secteur et à retirer la batterie REMARQUE Dans tous les cas évitez de mouiller le revêtement de type peau retournée Suivez les procédures de nettoyage en utilisant des produits nettoyants recommandés disponibles dans le comm...

Страница 249: ...désinfectant hospitalier Rangement de votre ordinateur portable LIFEBOOK Si vous entreposez votre LIFEBOOK durant un mois ou plus éteignez le chargez complètement les batteries au lithium puis enlevez les SI VOUS N UTILISEZ PAS LES BONS PRODUITS L AFFICHAGE DE L ÉCRAN ACL OU L ORDINATEUR LUI MÊME PEUT EN ÊTRE ENDOMMAGÉ POUR SAVOIR COMMENT UTILISER ET MANIPULER CONVENABLEMENT LES PRODUITS NETTOYANT...

Страница 250: ...des problèmes de logiciel d exploitation pendant votre voyage vous pourriez en avoir besoin pour trouver la solution au problème ÉTEIGNEZ TOUJOURS VOTRE ORDINATEUR AVANT DE LE TRANSPORTER ET OU DE L EMBALLER APRÈS AVOIR ÉTEINT LE SYSTÈME ATTENDEZ QUE LE PANNEAU DE VOYANTS D ÉTAT INDIQUE BIEN LE STATUT HORS TENSION C EST À DIRE QU AUCUN VOYANT N EST ALLUMÉ IL EST POSSIBLE QUE L APPAREIL NE SE METTE...

Страница 251: ... pays de l Asie du Sud Chine Australie Nouvelle Zélande Il est recommandé de transporter votre ordinateur portable en cabine au lieu de l enregistrer comme bagage Ne faites jamais passer votre ordinateur portable au détecteur de métal Faites inspecter votre ordinateur portable manuellement par le personnel de sécurité Toutefois vous pouvez faire passer votre portable sur un appareil à rayon X synt...

Страница 252: ...nt plus de 6 mois sans la recharger Augmenter la durée de vie des batteries Alimentez votre ordinateur portable LIFEBOOK avec l adaptateur secteur ou l adaptateur d auto avion optionnel chaque fois que vous le pouvez Si votre ordinateur portable fonctionne sur l alimentation par batterie pendant toute une journée branchez le sur l adaptateur secteur durant la nuit Gardez la luminosité au niveau le...

Страница 253: ...Essuyez l humidité avec un chiffon doux propre et non pelucheux puis laissez le disque sécher à température ambiante N UTILISEZ PAS de sèche cheveux ou d autre appareil chauffant pour sécher les disques multimédia N écrivez jamais sur la surface de l étiquette avec un stylo à bille ou un crayon Utilisez toujours un crayon feutre Si un disque est sale utilisez seulement un nettoyant pour DVD CD ou ...

Страница 254: ...n prendre soin La documentation fournie avec votre carte vous donnera des renseignements spécifiques mais vous devriez aussi faire attention aux points suivants Pour les protéger de la poussière et de la saleté rangez vos cartes dans leurs étuis de protection lorsqu elles ne sont pas installées Évitez toute exposition prolongée aux rayons du soleil ou à une chaleur excessive Gardez les cartes au s...

Страница 255: ...on L étiquette de configuration qui est située sur le dessous de votre ordinateur portable comporte des informations spécifiques à propos des options que vous avez choisies pour votre ordinateur Voici un exemple d étiquette de configuration CP4xxxxxxxxxxx LH531 14 0WXGA i5 2410M W7Pro DL S MULTI 4GB 500G LAN WLAN BT No Part No FPC0xxxxxxxxxxxxx Disque dur Identifiant de configuration Numéro de piè...

Страница 256: ...moire totale 4 Go x 2 Mémoire cache La taille de la mémoire cache L3 intégrée dépend du processeur Vidéo Écran couleur plat TFT à cristaux liquides haute définition et à matrice active intégré avec possibilité d affichage simultané sur deux moniteurs et rétroéclairage par DEL Couleur et résolution Vidéo Écran large XGA de 14 po 35 6 cm Interne Résolution 1366 x 768 pixels 16 mln couleurs Externe R...

Страница 257: ...anaux Écouteurs Écouteurs stéréo sortie audio 3 5 mm 1 Vrms ou moins impédance min 32 ohms Microphone Prise d entrée de ligne microphone stéréo 3 5 mm 100 mV crête à crête ou moins impédance min de 10 Kohms Deux haut parleurs stéréo intégrés sans boîtier Options de mémoire de masse Disque dur Serial ATA 5400 r m 2 5 La capacité et la vitesse du disque dépendent de la configuration du système Lecte...

Страница 258: ...avé tactile Touchpad Communications LAN Carte de réseau local Ethernet 10 100 Mbit s filaire interne Carte réseau sans fil Carte Atheros XSPAN 802 11bgn HB95 F intégrée ou Intel Advanced N 6205 802 11AGN Bluetooth Bluetooth V3 0 pour communications personnelles sur réseau local sans fil Verrouillage antivol Fente pouvant être utilisée pour installer un dispositif antivol Ports de périphériques Fen...

Страница 259: ...Amplitude de frappe 1 8 mm 0 2 mm Dispositif de pointage intégré avec boutons droit et gauche Résistant aux éclaboussures Repose main intégré Prise en charge de clavier et souris compatible USB Alimentation Batterie Batterie rechargeable au lithium 6 accumulateurs 10 8 V 4400 mAh Adaptateur secteur Autodétection c a 100 240 V fournissant c c 19 V 3 16 A 60 W au portable LIFEBOOK y compris un câble...

Страница 260: ...jitsu ou obtenir des renseignements supplémentaires visitez le site www shopfujitsu com ou composez le 1 800 FUJITSU Logiciels fournis Selon votre système d exploitation préinstallé votre ordinateur est livré avec des logiciels inclus afin de vous permettre d écouter des fichiers audio et de visionner des fichiers vidéo de divers formats De même l ordinateur portable est fourni avec des logiciels ...

Страница 261: ...et d imprimer des fichiers PDF sur toutes les plateformes informatiques courantes Roxio Creator Roxio Creator vous permet de graver facilement des CD ainsi que d organiser d éditer et de partager des photos numériques de la musique des données ou des vidéos Norton Internet Security Votre système est préinstallé avec une version Norton Internet Security d essai de Symantec valable 60 jours La gamme...

Страница 262: ...ovie Maker et Silverlight Messenger vous permet de communiquer et d échanger rapidement avec des personnes ou des groupes Photo Gallery est une application souple d utilisation vous permettant d organiser de modifier et de partager vos photos Writer vous permet de publier des textes sur votre blog d y télécharger des vidéos et des photos et en général de publier des textes en ligne Mail vous perme...

Страница 263: ...lue pour alimenter votre portable LIFEBOOK Adaptateur secteur Appareil convertissant une tension c a provenant d une prise murale en un courant c c nécessaire à l alimentation de votre ordinateur portable LIFEBOOK Adresse IP Un identifiant pour un ordinateur ou un périphérique sur un réseau TCP IP Les réseaux qui utilisent le protocole TCP IP acheminent des messages en fonction de l adresse IP de ...

Страница 264: ...place de plus en plus le système basé sur les classes A B et C et est rattaché à l adoption de la norme IPv6 Adresse MAC Media Access Control Adresse de contrôle d accès au média Adresse physique unique d une carte réseau Pour Ethernet les trois premiers octets sont utilisés pour indiquer le code du vendeur contrôlé et attribué par l IEEE Les trois autres octets sont contrôlés par chaque fabricant...

Страница 265: ...authentification établie dans la norme 802 11 selon laquelle un client sans fil n est pas authentifié avant de pouvoir s associer Batterie au lithium Type de batterie rechargeable ayant une puissance et une durée de vie importantes compte tenu de sa taille et ne subissant pas l effet de mémoire qui caractérise les batteries au nickel cadmium BIOS Acronyme signifiant Basic Input Output System Progr...

Страница 266: ...roniques qui frappe l écran luminescent Une image est produite par la variation de la position et de l intensité du faisceau CD ROM Disque compact à mémoire morte Forme de stockage de données numériques lues optiquement par un faisceau laser plutôt que par une tête magnétique Généralement un CD ROM peut contenir environ 600 Mo de données et permet d éviter les problèmes d écrasement de la tête qui...

Страница 267: ...gnements sur la norme Wi Fi visitez le site Web de la WECA à www wirelessethernet com Configuration Éléments matériels et logiciels qui composent le système et en définissent son fonctionnement DES Décharge électrostatique Décharge électrostatique soudaine provenant d une charge statique qui s est accumulée lentement Exemple la décharge reçue d une poignée de porte ou les étincelles générées par u...

Страница 268: ...ion du mode bureau Norme qui permet aux applications de gestion d ordinateur d interroger et de configurer localement ou à distance des systèmes informatiques des composants matériels et logiciels ainsi que des périphériques DNS Domain Name System Système d adressage par domaines Fonction qui contrôle la correspondance entre l adresse IP et le nom attribué à l ordinateur Il est possible de communi...

Страница 269: ...onise le fonctionnement du système et établit l heure et la date IDE Intelligent Drive Electronics Interface IDE L interface IDE se caractérise par le fait que le contrôleur électronique du disque dur est intégré dans le même boîtier que ce dernier IEEE 802 11a Norme de réseau sans fil autorisant un débit maximum théorique de 54 Mbit s Les cartes de norme 802 11a fonctionnent dans les bandes de fr...

Страница 270: ...cteurs qui développe les normes de communication utilisant l infrarouge pour transmettre les données IRQ Interrupt Request Demande d interruption Il s agit d un signal envoyé par le matériel à l unité centrale indiquant qu il y a nécessité de traiter un évènement externe qui vient de se produire Ko Kilo octet Mille octets LAN Local Area Network Réseau local Interconnexion d ordinateurs et de périp...

Страница 271: ... microprocesseur auquel il est beaucoup plus rapide d accéder qu à la mémoire vive et utilisé de manière spéciale pour accélérer le débit global des données MHz Méga hertz MIDI Musical Instrument Digital Interface Interface numérique pour instruments de musique Protocole de communication standard pour l échange d informations entre un ordinateur et un instrument doté d une interface numérique nota...

Страница 272: ...nsférer des données à cause d une taille maximum MTU trop élevée vous pouvez définir une MTU inférieure pour que la communication aboutisse Nom de réseau ou SSID abréviation de Service Set Identifier La configuration d un réseau local sans fil fait appel à un regroupement pour éviter les interférences et le vol de données Ce regroupement est effectué avec le Nom de réseau SSID Pour améliorer la sé...

Страница 273: ...M Pilote Programme qui traduit les commandes envoyées par les applications et le système d exploitation aux périphériques externes dans la forme exacte exigée par une marque et un modèle particulier afin de produire les résultats voulus avec le matériel employé Pixel Le plus petit élément d affichage point de couleur à l écran Plus la densité de pixels est élevée plus l image est nette Point d acc...

Страница 274: ...exploitation ne sera pas chargé PPPoE Point to Point Protocol over Ethernet Littéralement Protocole Ethernet Point à Point Protocole Ethernet faisant appel au protocole point à point PPP et utilisé pour la connexion à une ligne téléphonique Programme Ensemble intégré de commandes codées indiquant à l ordinateur ce qui doit être fait ainsi que quand et comment le faire Protocole Ensemble de procédu...

Страница 275: ...ar transformation physique de la matière Les données stockées de cette façon ne peuvent pas être modifiées par l ordinateur et leur conservation n exige pas de source de courant SDRAM Mémoire vive dynamique synchrone C est un type de mémoire vive SSID Service Set Identifier Identificateur de services à 32 caractères ajouté à l entête des paquets transmis sur un réseau sans fil qui sert de mot de p...

Страница 276: ...otocole de Contrôle de Transmission Protocole Internet Protocole Internet standard le plus utilisé TFT Thin Film Transistor Abréviation de Thin Film Transistor Technologie d écrans plats qui utilise une mince matrice de transistors pour commander individuellement chaque pixel de l écran UL Underwriters Laboratories L Underwriters Laboratories est un organisme indépendant qui effectue les tests de ...

Страница 277: ...ACL situé juste au dessus du clavier VRAM Video Random Access Memory Mémoire vive vidéo Mémoire réservée aux données et au contrôle d affichage vidéo WFM Wired for Management Abréviation de Wired for Management Vaste programme d Intel visant à réduire les coûts globaux de l informatique de gestion sans sacrifier la puissance et la souplesse WLAN Wireless Local Area Network Réseau local sans fil In...

Страница 278: ...ux communications radio Il n est toutefois pas garanti qu aucune interférence ne sera observée dans un environnement particulier Si ce matériel cause des interférences nuisibles à la réception des ondes de radio ou de télévision ce qui peut être vérifié en le mettant hors tension puis sous tension l utilisateur devra tenter de les corriger en procédant comme suit Réorienter ou déplacer l antenne r...

Страница 279: ...ulaires La carte réseau sans fil peut être utilisée en toute sécurité car son fonctionnement est conforme aux recommandations et aux normes de sécurité en matière de radiofréquences L usage d une carte réseau sans fil peut être limité dans certaines situations ou certains environnements notamment à bord d un avion dans un lieu contenant des matières explosives dans des situations où le risque d in...

Страница 280: ...C sur les interférences Cet appareil a été testé et reconnu conforme aux limites établies pour le matériel numérique de classe B selon la Partie 15 des règlements de la FCC Ces limites sont conçues pour assurer une protection raisonnable contre les interférences nuisibles dans un environnement résidentiel Cet appareil génère utilise et peut émettre de l énergie radiofréquence S il n est pas instal...

Страница 281: ...ca peut annuler le droit de l utilisateur de se servir du matériel Avis pour le Canada Le matériel destiné à un usage sur la bande 5 150 5 250 MHz doit être utilisé uniquement à l intérieur afin de réduire les risques de brouillage nuisible causé aux systèmes mobiles par satellite fonctionnant sur un même canal Un gain d antenne de 6 dBi est autorisé pour le matériel utilisant les bandes 5 250 5 3...

Страница 282: ...teur portable Elle fonctionne dans les bandes RF pouvant être utilisées sans autorisation spéciale ce qui élimine le besoin d obtenir une licence de la FCC pour les radiocommunications Elle fonctionne dans la bande industrielle scientifique et médicale ISM de 2 4 GHz et dans les bandes UNII Unlicensed National Information Infrastructure inférieures intermédiaires et supérieures 5 GHz La carte rése...

Страница 283: ...ectivité est établie uniquement à l aide de périphériques clients dans une configuration égal à égal Les réseaux Ad hoc sont donc également connus sous le nom de réseaux d égal à égal Un réseau Ad hoc est une méthode aisée et peu coûteuse de relier plusieurs ordinateurs en réseau Le mode Ad hoc exige que les paramètres de nom de réseau SSID service set identifier d authentification réseau et de cl...

Страница 284: ... directement entre eux ou sur un réseau câblé Les réseaux sans fil d entreprise fonctionnent en mode Infrastructure car ils doivent se servir du réseau local sans fil pour accéder aux ordinateurs aux périphériques et aux services par exemple serveurs de fichier imprimantes et bases de données Réseau en mode point d accès Infrastructure Modem ADSL modem câble ou similaire Internet Réseau local câbl...

Страница 285: ... aux interférences incluent une réduction du débit des coupures intermittentes de connexion et un nombre important d erreurs de trames Il est FORTEMENT recommandé de mettre hors tension les appareils générant des interférences afin d assurer le bon fonctionnement de la carte réseau sans fil Désactivation de la carte réseau sans fil La désactivation de la carte réseau sans fil peut être souhaitable...

Страница 286: ...droit sur l icône Carte réseau sans fil dans la zone de notification en bas à droite de l écran 2 Choisir Se déconnecter d un réseau Activation de la carte réseau sans fil Pour activer la carte réseau sans fil il suffit d utiliser la même méthode que pour la désactivation en faisant un clic doit sur l icône de la carte de réseau sans fil puis en cliquant sur Connexion à un réseau Configuration de ...

Страница 287: ...réer un réseau Ad hoc 6 Entrez les informations requises Pour obtenir ces renseignements il est possible que vous deviez consulter votre administrateur de réseau 7 Dans l éventualité d un besoin d aide allez à la fenêtre du Centre de réseau et partage Démarrer Panneau de configuration Centre de réseau et partage et entrez les mots clés dans la boîte Recherche Se connecter à un réseau Après avoir c...

Страница 288: ...seau et les valeurs de la clé WEP doivent être identiques sur chaque ordinateur Connexion en mode point d accès Infrastructure attribuez aux ordinateurs le même SSID et la même clé WEP que ceux du point d accès Attribuez la même valeur d authentification réseau que celle du point d accès Consultez votre administrateur de réseau si cette valeur est requise Signal faible et ou mauvaise qualité de la...

Страница 289: ...nt compte du canal du périphérique nuisible Échec de l authentification de la carte réseau sans fil Vérifiez les paramètres d authentification réseau de chiffrement et de sécurité Si les paramètres de sécurité sont mal configurés en raison par exemple d une clé WEP comportant une faute de frappe d un nom d utilisateur LEAP incorrect ou d un mauvais choix de méthode d authentification la carte rése...

Страница 290: ... 802 11n 2 4 GHz 3 sans chevauchement si la liaison entre réseaux n est pas utilisée 2 sans chevauchement si la liaison entre réseaux est utilisée Portée nominale 802 11b 30 mètres 100 pi à 11 Mbit s 91 mètres 300 pi à 1 Mbit s 802 11g 30 mètres 100 pi à 54 Mbit s 91 mètres 300 pi à 1 Mbit s 802 11n distance à déterminer après publication de la norme Sécurité Types de chiffrement compatible avec W...

Страница 291: ...le nombre de murs réflectivité des matériaux ou interférences provenant d autres sources de radiofréquences Le chiffrement par clé de réseau WEP est effectué avec le nombre de bits indiqué ci dessus mais l utilisateur peut définir une clé de 40 ou 104 bits après avoir soustrait la longueur fixe de 24 bits Selon l environnement le nombre maximum d ordinateurs peut être inférieur ...

Страница 292: ...mmutateur de réseau local sans fil Bluetooth en position de marche 2 Allez à Démarrer Tous les Programmes Bluetooth 3 Dans le menu Bluetooth cliquez sur Options puis sur le bouton Bluetooth Radio Power Alimentation Radio Bluetooth 4 Cliquez sur OK Sources d informations supplémentaires sur Bluetooth Le module Bluetooth contient un guide de l utilisateur complet qui vous aidera à maîtriser son fonc...

Страница 293: ...d une antenne ou d un autre émetteur Avis pour le Canada Pour éviter que ce service fourni sous licence soit perturbé par des interférences radio ce matériel doit être utilisé à l intérieur et à distance des fenêtres Si l équipement ou l antenne de transmission est installé à l extérieur une licence peut être nécessaire Garantie Les utilisateurs ne sont pas autorisés à modifier ce produit Toute mo...

Страница 294: ...que dur sur votre réseau maison ou sur Internet Votre famille et vos amis n auront plus à se bousculer autour de l ordinateur pour profiter pleinement des images stockées Comme son nom l indique la technologie Intel WiDi fonctionne sans fil Veuillez cependant prendre note que pour utiliser cette fonction vous devez vous procurer un adaptateur d affichage produit par une autre entreprise L adaptate...

Страница 295: ...STÈMES AYANT LA FONCTION INTEL WIDI PRÉ INSTALLÉE AFFICHENT UN ICÔNE WIDI SUR LEUR BUREAU WINDOWS SI CETTE ICÔNE N EST PAS AFFICHÉE LA FONCTIONNALITÉ INTEL WIDI SERA INSTALLÉE DÈS QUE VOUS EXÉCUTEREZ LE LOGICIEL CLICKME LA FONCTIONNALITÉ INTEL WIDI NE PEUT FONCTIONNER QU AVEC UNE CARTE DE RÉSEAU LOCAL SANS FIL INTEL SEUL LE LECTEUR WINDOWS MEDIA PEUT ÊTRE UTILISÉ POUR LIRE DES DOCUMENTS AVEC WIDI ...

Страница 296: ...s informations détaillées sur l utilisation et le dépannage de la fonctionnalité WiDi cliquez sur l icône WiDi puis cliquez sur le bouton Aide dans le coin supérieur droit afin d ouvrir le fichier d aide d affichage sans fil ...

Страница 297: ...nergie 41 court circuitée 47 défectueuse 76 entretien 99 épuisée 76 faible 47 mode veille 47 niveau de charge 20 problèmes 76 77 recharge 46 remplacement 48 remplacement hors tension 48 remplacement sous tension 48 Batterie au lithium 45 BIOS guide 38 utilitaire de configuration 38 Bluetooth informations supplémentaires 140 Bouton d alimentation veille reprise 12 Bouton Soutien 13 C Câble de sorti...

Страница 298: ...il 13 Enregistrement 40 Entrée de ligne 64 Étiquette de configuration 103 F FDU 40 93 Fente de dispositif antivol 16 Fonction de veille prolongée 42 activation désactivation 43 G Garantie 9 Gestion de l alimentation 41 Gestion de l alimentation dans Windows 43 Glisser 28 Grilles de ventilation 18 H Haut parleurs incorporés 71 Haut parleurs stéréo 13 L Lecteur de DVD problèmes 71 72 Lecteur multimé...

Страница 299: ... 33 Prise d écouteurs 64 Prise de micro 64 Prise de réseau local RJ 45 16 R Redémarrage 43 Réglage du volume 31 Remplacement hors tension 48 Remplacement sous tension 48 Réseau local interne 63 Réseau local sans fil activation 134 avant d utiliser la carte réseau sans fil 130 caractéristiques 130 configuration 134 connexion au réseau 135 déconnexion 134 dépannage 135 désactivation 133 glossaire de...

Страница 300: ...mémoire de masse 105 puce 104 vidéo 104 T Tableau de voyants d état 13 19 Touche de fonction F10 24 F3 24 F4 24 F6 24 F7 24 F8 24 31 F9 24 31 Fn 24 Touches de curseur 23 Touches Windows 23 touche application 23 touches démarrer 23 U USB 16 64 74 problèmes 74 Utilitaire de mise à jour des pilotes Fujitsu Driver Update 40 93 V Verr défil 21 Verr maj 21 Verr num 21 ...

Отзывы: