background image

 |  Host interface cards  |

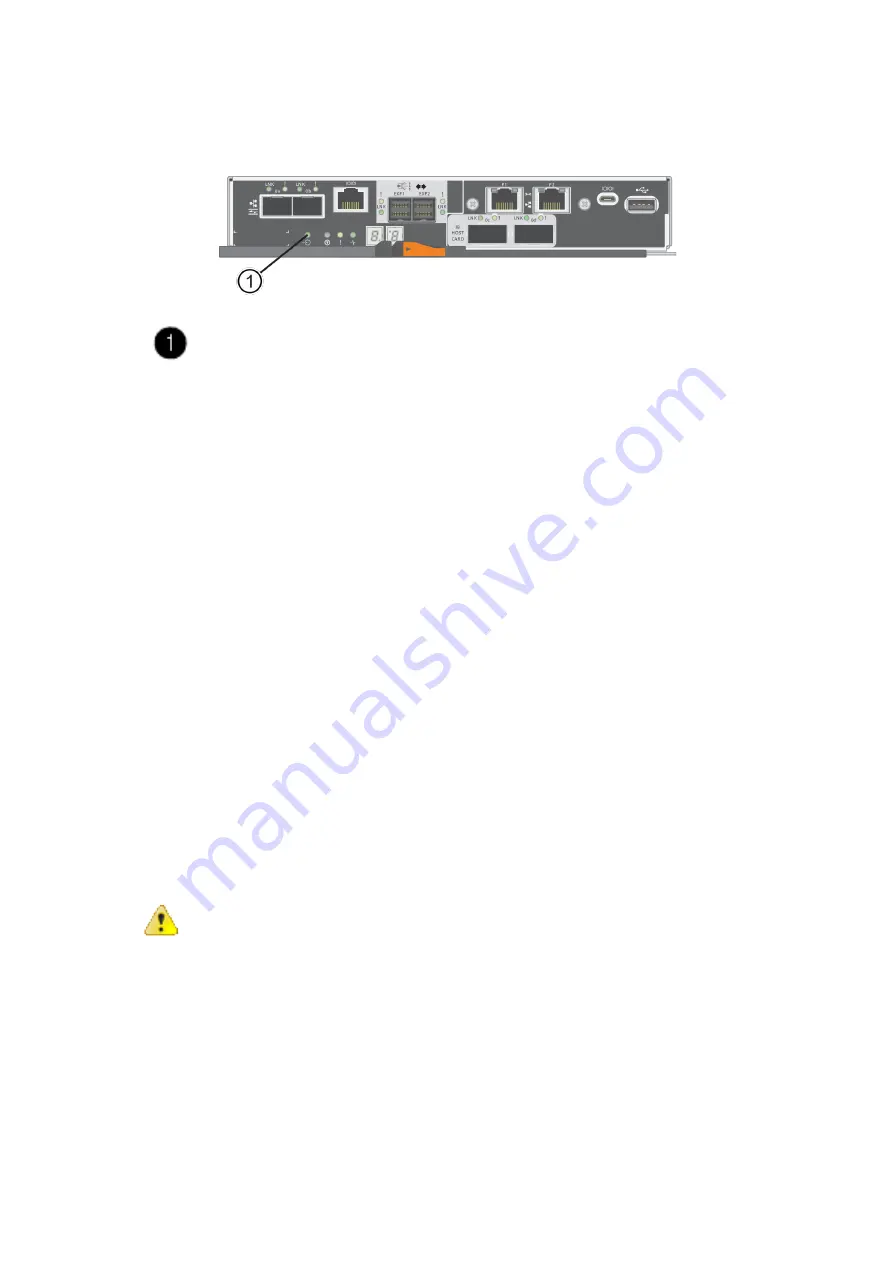
The green Cache Active LED on the back of each controller is on when cached data needs to be written to

the drives. You must wait for this LED to turn off.

 Cache Active LED

7.

From the Home page of SANtricity System Manager, select 

View Operations in Progress

. Wait for all

operations to complete before continuing with the next step.

8.

Power down the controller shelf.
a) Turn off both power switches on the controller shelf.
b) Wait for all LEDs on the controller shelf to turn off.

What to do next

Go to 

Add host interface card

.

Add host interface card

You add a host interface card (HIC) to increase the number of host ports in your storage array. If you are

adding HICs to a duplex configuration, repeat all steps to remove the second controller canister, install the

second HIC, and reinstall the second controller canister.

Remove controller canister

You remove the controller canister so you can add the new host interface card. When you remove a controller

canister, you must disconnect all cables. Then, you can slide the controller canister out of the controller shelf.

Before you begin

• You must have labels to identify each cable that is connected to the controller canister.
• You have an ESD wristband, or you have taken other antistatic precautions.

Procedure
1.

Label each cable that is attached to the controller canister.

2.

Disconnect all the cables from the controller canister.

Attention: 

 To prevent degraded performance, do not twist, fold, pinch, or step on the cables.

3.

Confirm that the Cache Active LED on the back of the controller is off.
The green Cache Active LED on the back of the controller is on when cached data needs to be written to the

drives. You must wait for this LED to turn off before removing the controller canister.

67

Содержание ETERNUS AB Series

Страница 1: ...A3CA08733 A110 01 FUJITSU Storage ETERNUS AB HB Series Maintaining FUJITSU Storage ETERNUS HB5000 Hardware ...

Страница 2: ...eplacing a power canister 30 Requirements for replacing a fan canister 30 Replace power supply 24 drive 31 Prepare to replace power supply 31 Remove failed power supply 32 Install new power supply 33 Complete power supply replacement 34 Replace power canister 60 drive 34 Prepare to replace power canister 34 Remove failed power canister 36 Install new power canister 36 Complete power canister repla...

Страница 3: ... host interface card 73 Upgrade host interface card 74 Prepare to upgrade host interface cards 74 Upgrade host interface card 76 Complete upgrading a host interface card upgrade 81 Replace host interface card 81 Place controller offline duplex 82 Replace host interface card 83 Place controller online duplex 89 Host port protocol 91 Overview and requirements 91 Host protocol overview 91 Requirement...

Страница 4: ...er 5 Bring the controller online Requirements for replacing a failed battery If you plan to replace a failed battery keep the following requirements in mind You must have installed SANtricity System Manager on a management station so you can use the storage array s command line interface CLI If this software has not yet been installed follow the instructions in the Linux express configuration Wind...

Страница 5: ...uotation marks For example file C Program Files CLI logs dbmdata zip This command does not automatically append a file extension to the saved file You must specify a file extension when entering the file name e Select Tools Verify and Execute 4 Collect support data for your storage array using SANtricity System Manager a Select Support Support Center Diagnostics b Select Collect Support Data c Cli...

Страница 6: ...on page 4 Step 1 Remove controller canister When you remove a controller canister you must disconnect all cables Then you can slide the controller canister out of the controller shelf Procedure 1 Put on an ESD wristband or take other antistatic precautions 2 Label each cable that is attached to the controller canister 3 Disconnect all of the cables from the controller canister Attention To prevent...

Страница 7: ...ention Always use two hands to support the weight of a controller canister If you are removing the controller canister from an HB5100 controller shelf a flap swings into place to block the empty bay helping to maintain air flow and cooling 8 Turn the controller canister over so that the removable cover faces up 9 Place the controller canister on a flat static free surface What to do next Go to Ste...

Страница 8: ... the cover off 2 Confirm that the green LED inside the controller between the battery and the DIMMs is off If this green LED is on the controller is still using battery power You must wait for this LED to go off before removing any components Internal Cache Active LED Battery 3 Locate the blue release latch for the battery 4 Unlatch the battery by pushing the release latch down and away from the c...

Страница 9: ...ntroller canister You have the replacement battery Procedure 1 Unpack the new battery and set it on a flat static free surface Important To comply with IATA safely regulations replacement batteries are shipped with a state of charge SoC of 30 percent or less When you reapply power keep in mind that write caching will not resume until the replacement battery is fully charged and it has completed it...

Страница 10: ...ply power Correct The battery s metal flange is completely inserted in the slot on the controller Incorrect The battery s metal flange is not inserted into the slot on the controller What to do next Go to Re install controller canister Re install controller canister Reinstall the controller canister into the controller shelf after installing the new battery Procedure 1 You reinstall the cover on t...

Страница 11: ... in place 5 Reconnect all the cables What to do next Go to Place controller offline duplex Place controller online duplex Place the controller online to confirm the storage array is working correctly Then you can collect support data and resume operations About this task Perform this task only if your storage array has two controllers 11 ...

Страница 12: ...t Place Online from the context menu and confirm that you want to perform the operation The system places the controller online To use script editor in the EMW a Open the Enterprise Management Window EMW in SANtricity System Manager on your local host b Select the storage array c Select Tools Execute Script d Type one of the following commands in the text box For controller A set controller a avai...

Страница 13: ...t Center Diagnostics b Select Collect Support Data c Click Collect The file is saved in the Downloads folder for your browser with the name support data 7z Results Your battery replacement is complete You can resume normal operations 13 ...

Страница 14: ...ent controller canister You can determine if you have a failed controller canister in two ways The Recovery Guru in SANtricity System Manager directs you to replace the controller canister The amber Attention LED on the controller canister is on indicating that the controller has a fault Attention LED Note The figure shows an example controller canister the host ports on your controller canister m...

Страница 15: ...ter contains a controller card a battery and an optional host interface card HIC When you replace a controller canister you must remove the battery and HIC if one is installed from the original controller canister and install them in the replacement controller canister Related concepts Controller overview on page 14 Requirements for replacing a controller on page 14 Prepare to replace controller d...

Страница 16: ... failed controller is the same as the FRU part number for the replacement controller Attention Possible loss of data access If the two part numbers are not the same do not attempt this procedure In addition if the failed controller canister includes a host interface card HIC you must install that HIC into the new controller canister The presence of mismatched controllers or HICs causes the new con...

Страница 17: ...cess SANtricity System Manager using the other controller To use script editor in the EMW a Open the Enterprise Management Window EMW in SANtricity System Manager on your local host b Select the storage array c Select Tools Execute Script d Type one of the following commands in the text box For controller A set controller a availability offline For controller B set controller b availability offlin...

Страница 18: ...Because you must remove the HIC from the failed controller canister you must remove any SFPs from the HIC ports However you can leave any SFPs installed in the baseboard host ports When you reconnect the cables you can move those SFPs to the new controller canister 5 Confirm that the Cache Active LED on the back of the controller is off 6 Squeeze the latch on the cam handle until it releases and t...

Страница 19: ... controller canister over so that the removable cover faces up 9 Place the controller canister on a flat static free surface What to do next Go to Remove battery Remove battery duplex Remove the battery so you can install the new controller Procedure 1 You remove the controller canister s cover by pressing down on the button and sliding the cover off 2 Confirm that the green LED inside the control...

Страница 20: ...er canister Battery release latch Battery 5 Lift up on the battery and slide it out of the controller canister What to do next Go to Step 3 Remove host interface card Remove host interface card duplex If the controller canister includes a host interface card HIC you must remove the HIC from the original controller canister so you can reuse it in the new controller canister 20 ...

Страница 21: ...faceplate 3 Using your fingers or a Phillips screwdriver loosen the three thumbscrews that secure the HIC to the controller card 4 Carefully detach the HIC from the controller card by lifting the card up and sliding it back Attention Be careful not to scratch or bump the components on the bottom of the HIC or on the top of the controller card Host interface card HIC Thumbscrews 5 Place the HIC on ...

Страница 22: ...ter so that the slot for the battery faces toward you 4 Insert the battery into the controller canister at a slight downward angle You must insert the metal flange at the front of the battery into the slot on the bottom of the controller canister and slide the top of the battery beneath the small alignment pin on the left side of the canister 5 Move the battery latch up to secure the battery When ...

Страница 23: ... an ESD wristband or you have taken other antistatic precautions Procedure 1 Using a 1 Phillips screwdriver remove the four screws that attach the blank faceplate to the replacement controller canister and remove the faceplate 2 Align the three thumbscrews on the HIC with the corresponding holes on the controller and align the connector on the bottom of the HIC with the HIC interface connector on ...

Страница 24: ...ach the HIC faceplate you removed from the original controller canister to the new controller canister with four screws What to do next Go to Install new controller canister duplex Install new controller canister duplex After installing the battery and the host interface card HIC if one was initially installed you can install the new controller canister into the controller shelf 24 ...

Страница 25: ... Move the cam handle to the left to lock the controller canister in place 5 Install the SFPs from the original controller in the host ports on the new controller and reconnect all the cables If you are using more than one host protocol be sure to install the SFPs in the correct host ports 6 If the original controller used DHCP for the IP address locate the MAC address on the label on the back of t...

Страница 26: ...display shows one of the following repeating sequences immediately remove the controller OE L0 blank mismatched controllers OE L6 blank unsupported HIC Attention Possible loss of data access If the controller you just installed shows one these codes and the other controller is reset for any reason the second controller also could lock down 3 When the controller is back online confirm that its stat...

Страница 27: ...Select Collect Support Data c Click Collect The file is saved in the Downloads folder for your browser with the name support data 7z Results Your controller replacement is complete You can resume normal operations 27 ...

Страница 28: ... shelf The following figure shows an example HB5100 controller shelf with two power supplies power fan canisters The DE224C drive shelves are identical but they include I O modules IOMs instead of controller canisters Controller shelf with two power supplies power fan canisters below the controller canisters The Replace power supply topics do not describe how to replace a failed power fan canister...

Страница 29: ...e a fan canister in the following shelves HB5200 controller shelves DE460C drive shelf The Replace fan canister topics do not describe how to replace a failed fan canister in a DE6600 drive tray which might be connected to the controller shelf The following figure shows a fan canister The following figure shows the back of a DE460C shelf with two fan canisters 29 ...

Страница 30: ... a power canister If you plan to replace a power canister keep the following requirements in mind You have a replacement power canister that is supported for your controller shelf or drive shelf model You have one power canister that is installed and running You have an ESD wristband or you have taken other antistatic precautions You can replace a power canister while your storage array is powered...

Страница 31: ...r fan canister in SANtricity System Manager Before you begin You have reviewed the details in the Recovery Guru to confirm that there is an issue with the power supply Select Recheck from the Recovery Guru to ensure no other items must be addressed first The amber Attention LED on the power supply must be on indicating that the power supply or its integrated fan has a fault Contact technical suppo...

Страница 32: ...t within margin there is a problem at the source end of the AC power cord Attention LED If it is solid amber the power supply or its integrated fan has a fault What to do next Go to Remove failed power supply Remove failed power supply You remove a failed power supply so you can replace it with a new one When you remove a power supply referred to in SANtricity System Manager as a power fan caniste...

Страница 33: ...n SANtricity System Manager as a power fan canister you slide the part into the shelf close the cam handle reconnect the power cord and reapply power Before you begin You have a replacement power supply that is supported for your controller shelf or drive shelf model You have unpacked the replacement power supply Procedure 1 Make sure that the on off switch of the new power supply is in the Off po...

Страница 34: ...protection 5 Collect support data for your storage array using SANtricity System Manager a Select Support Support Center Diagnostics b Select Collect Support Data c Click Collect The file is saved in the Downloads folder for your browser with the name support data 7z 6 Return the failed part to Fujitsu as described in the RMA instructions shipped with the kit Results Your power supply replacement ...

Страница 35: ...ower canister If a component has failed this icon is red c When you find the shelf with a red icon select Show back of shelf d Select either power canister or the red power icon e On the Power Supplies tab look at the statuses of the power canisters to determine which power canister must be replaced A component with a Failed status must be replaced Attention If the second power canister in the she...

Страница 36: ... the power canister from the mid plane 6 Use the cam handle to slide the power canister out of the shelf Attention When removing a power canister always use two hands to support its weight What to do next Go to Install new power canister Install new power canister You install a new power canister to replace the failed one When you install a power canister you slide the component into the shelf clo...

Страница 37: ...lacement is complete You can resume normal operations Replace fan canister 60 drive Each 60 drive controller shelf or drive shelf includes two fan canisters If a fan canister fails you must replace it as soon as possible to ensure that the shelf has adequate cooling Related concepts Fan canister overview on page 29 Requirements for replacing a fan canister on page 30 Prepare to replace fan caniste...

Страница 38: ...t either fan canister or the red fan icon e On the Fans tab look at the statuses of the fan canisters to determine which fan canister must be replaced A component with a Failed status must be replaced Attention If the second fan canister in the shelf does not have Optimal status do not attempt to hot swap the failed fan canister Instead contact technical support for assistance You can also find in...

Страница 39: ...and replace the fan canister within 30 minutes to prevent the system from overheating You have an ESD wristband or you have taken other antistatic precautions Procedure 1 Unpack the new fan canister and place it on a level surface near the shelf Save all packing material for use when returning the failed fan 2 Press the orange tab to release the fan canister handle Tab that you press to release th...

Страница 40: ...anister was installed correctly The LED goes off after this process is complete 2 From the Recovery Guru in SANtricity System Manager select Recheck to ensure the problem has been resolved 3 If a failed fan canister is still being reported repeat the steps in Remove failed fan canister and install new one If the problem persists contact technical support 4 Remove the antistatic protection 5 Collec...

Страница 41: ...s The figures show how the drives are numbered in each type of shelf the shelf s front bezel or end caps have been removed Drive numbering in an HB5100 controller shelf or DE224C drive shelf 60 drive shelves Both the HB5200 controller shelf and the DE460C drive shelf consist of five drive drawers that each contain 12 drive slots Drive drawer 1 is at the top and drive drawer 5 is at the bottom For ...

Страница 42: ...drive shelves has five drive drawers Each of the five drawers can hold up to 12 drives Requirements for handling drives The drives in your storage array are fragile Improper drive handling is a leading cause of drive failure Follow these rules to avoid damaging the drives in your storage array Prevent electrostatic discharge ESD 42 ...

Страница 43: ... failed its amber Attention LED is on You can hot swap a failed drive while the storage array is receiving I O Related concepts Drives overview on page 41 Requirements for handling drives on page 42 Prepare to replace drive 24 drive You prepare to replace a drive by checking the Recovery Guru in SANtricity System Manager and completing any prerequisite steps Then you can locate the failed componen...

Страница 44: ...of the drive The cam handle on the drive springs open partially and the drive releases from the midplane 3 Open the cam handle and slide out the drive slightly 4 Wait 30 seconds 5 Using both hands remove the drive from the shelf 6 Place the drive on an antistatic cushioned surface away from magnetic fields 7 Wait 30 seconds for the software to recognize that the drive has been removed Note If you ...

Страница 45: ...e might not be installed correctly Remove the drive wait 30 seconds and then reinstall it Attention LED is on Indicates that the new drive might be defective Replace it with another new drive 2 If the Recovery Guru in SANtricity System Manager still shows an issue select Recheck to ensure the problem has been resolved 3 If the Recovery Guru indicates that drive reconstruction did not start automat...

Страница 46: ...t drive has a capacity equal to or greater than the drive you are replacing and that it has the features you expect For example do not attempt to replace a hard disk drive HDD with a solid state disk SSD Similarly if you are replacing a secure capable drive make sure the replacement drive is also secure capable 3 If needed use SANtricity System Manager to locate the drive within the storage array ...

Страница 47: ...f each drive with an attention icon on the drive handle just behind the LED Attention icon Attention LED What to do next Go to Remove failed drive 60 drive Remove failed drive 60 drive You remove a failed drive to replace it with a new one Before you begin You have an ESD wristband or you have taken other antistatic precautions 47 ...

Страница 48: ...u need to send a drive back 2 Release the drive drawer levers from the center of the appropriate drive drawer by pulling both towards the sides of the drawer 3 Carefully pull on the extended drive drawer levers to pull out the drive drawer to its full extension without removing it from the enclosure 4 Gently pull back the orange release latch that is in front of the drive you want to remove The ca...

Страница 49: ... replacement drive as soon as possible after removing the failed drive Otherwise there is a risk that the equipment might overheat Before you begin You have a replacement drive that is supported by Fujitsu for your controller shelf or drive shelf About this task Attention Possible loss of data access When pushing the drive drawer back into the enclosure never slam the drawer shut Push the drawer i...

Страница 50: ... this procedure What to do next Go to Complete drive replacement 60 drive Complete drive replacement 60 drive You complete the drive replacement to confirm that the new drive is working correctly Procedure 1 Check the Power LED and the Attention LED on the drive you replaced When you first insert a drive its Attention LED might be on However the LED should go off within a minute Power LED is on or...

Страница 51: ...the drive shelf is online or if you need to stop host I O activity and power off any of the shelves that are powered on If you are replacing a drawer in a shelf with Drawer Loss Protection there is no need to stop host I O activity and power off any of the shelves Before you begin You must have installed SANtricity System Manager on a management station so you can use the storage array s command l...

Страница 52: ... and to power off the drive shelf and the controller shelf 4 Ensure that no I O operations are occurring between the storage array and all connected hosts For example you can perform these steps Stop all processes that involve the LUNs mapped from the storage to the hosts Ensure that no applications are writing data to any LUNs mapped from the storage to the hosts Unmount all file systems associat...

Страница 53: ...tion Indicator CLI command or you have stopped host I O activity and powered off the drive shelf and controller shelf You have an ESD wristband or you have taken other antistatic precautions You have a flashlight About this task Each drive drawer has left and right cable chains The metal ends on the cable chains slide into corresponding vertical and horizontal guide rails inside the enclosure as f...

Страница 54: ...to disconnect If the power is on the amber Attention LED on the front of the drawer indicates the cable chain you need to disconnect If the power is off you must manually determine which of the five cable chains to disconnect The figure shows the right side of the drive shelf with the fan canister removed With the fan canister removed you can see the five cable chains and the vertical and horizont...

Страница 55: ... easy access use your finger to move the cable chain on the right side to the left 4 Disconnect any of the right cable chains from their corresponding vertical guide rail a Using a flashlight locate the orange ring on the end of the cable chain that is connected to the vertical guide rail in the enclosure 55 ...

Страница 56: ... the right and the cable chain disconnected and partially pulled out on the left side Orange ring on horizontal guide rail Cable chain partially removed b To unlatch the cable chain gently insert your finger into the orange ring and push down The figure shows the orange ring on the horizontal guide rail see item 1 in the figure above as it is pushed down so that the rest of the cable chain can be ...

Страница 57: ...Ds turn off when you disconnect the last cable chain connector including the amber Attention LED 12 Replace the left fan canister If the drive shelf is receiving power confirm that the amber LED on the back of the fan is not illuminated and that air is coming out the back of the fan The LED could remain on for as long as a minute after you reinstall the fan while both fans settle into the correct ...

Страница 58: ... Make sure to record the exact location of each drive before removing it 5 Remove the drives from the drive drawer a Gently pull back the orange release latch that is visible on the center front of each drive b Raise the drive handle to vertical c Use the handle to lift the drive from the drive drawer d Place the drive on a flat static free surface and away from magnetic devices 6 Remove the drive...

Страница 59: ...the failed one Installing a drive drawer into a drive tray entails sliding the drawer into the empty slot installing the drives and replacing the front bezel Before you begin You know where to install each drive You must have a replacement drive drawer You must have a flashlight Procedure 1 From the front of the drive shelf shine a flashlight into the empty drawer slot and locate the lock out tumb...

Страница 60: ...sk of equipment damage Stop pushing the drive drawer if you feel binding Use the release levers at the front of the drawer to slide the drawer back out Then reinsert the drawer into the slot ensure the tumbler is above the rail and the rails are aligned correctly What to do next Go to Attach cable chains Attach cable chains You must attach the cable chains so you can safely re install the drives i...

Страница 61: ...sure b Align both cable chain connectors with their corresponding guide rails c Slide the cable chain s horizontal connector onto the horizontal guide rail and push it in as far as it can go Attention Risk of equipment malfunction Make sure to slide the connector into the guide rail If the connector rests on the top of the guide rail problems might occur when the system runs The figure shows the h...

Страница 62: ...tem runs d Slide the vertical connector on the left cable chain into the vertical guide rail e After you reconnect both ends of the cable chain carefully pull on the cable chain to verify that both connectors are latched Attention Risk of equipment malfunction If the connectors are not latched the cable chain might come loose during drawer operation 8 Reinstall the left fan canister If the drive s...

Страница 63: ...ches on the drawer The figure shows the right side view of a drive showing the location of the raised buttons Raised button on the right side of the drive f Lower the drive straight down making sure the drive is pressed all the way down into the bay and then rotate the drive handle down until the drive snaps into place 63 ...

Страница 64: ...n both power switches on the controller shelf b Wait 10 minutes for the power on process to complete c Confirm that both fans come on and that the amber LED on the back of the fans is off If you replaced a drive drawer in an expansion drive shelf without Drawer Loss Protection a Turn on both power switches on the drive shelf b Confirm that both fans come on and that the amber LED on the back of th...

Страница 65: ...a duplex configuration this is because both controllers must have the same HIC configuration when they are powered on You have two HICs must be compatible with your controllers For duplex configurations two controllers the HICs installed in the two controller canisters must be identical The presence of mismatched HICs causes the controller with the replacement HIC to lock down when you bring it on...

Страница 66: ... save the database Enclose the file name in double quotation marks For example file C Program Files CLI logs dbmdata zip This command does not automatically append a file extension to the saved file You must specify a file extension when entering the file name e Select Tools Verify and Execute 3 Collect support data for your storage array using SANtricity System Manager a Select Support Support Ce...

Страница 67: ...ll the second HIC and reinstall the second controller canister Remove controller canister You remove the controller canister so you can add the new host interface card When you remove a controller canister you must disconnect all cables Then you can slide the controller canister out of the controller shelf Before you begin You must have labels to identify each cable that is connected to the contro...

Страница 68: ...le until it releases and then open the cam handle to the right to release the controller canister from the shelf The following figure is an example of an HB5100 controller shelf Controller canister Cam handle The following figure is an example of an HB5200 controller shelf 68 ...

Страница 69: ...storage array Before you begin You have an ESD wristband or you have taken other antistatic precautions You have a 1 Phillips screwdriver You have one or two HICs based on whether you have one or two controllers in your storage array The HICs must be compatible with your controllers About this task Attention Possible loss of data access Never install a HIC in an HB5000 controller canister if that ...

Страница 70: ...he three thumbscrews on the HIC with the corresponding holes on the controller and align the connector on the bottom of the HIC with the HIC interface connector on the controller card Be careful not to scratch or bump the components on the bottom of the HIC or on the top of the controller card 6 Carefully lower the HIC into place and seat the HIC connector by pressing gently on the HIC Attention P...

Страница 71: ...ws you removed previously What to do next Go to Reinstall controller canister Reinstall controller canister You reinstall the controller canister into the controller shelf after installing the new HIC Procedure 1 Turn the controller canister over so that the removable cover faces down 2 With the cam handle in the open position slide the controller canister all the way into the controller shelf The...

Страница 72: ... the controller canister in place 4 Reconnect all the cables you removed Attention Do not connect data cables to the new HIC ports at this time 5 Optional If you are adding HICs to a duplex configuration repeat all steps to remove the second controller canister install the second HIC and reinstall the second controller canister What to do next Go to Complete adding a host interface card 72 ...

Страница 73: ...e repeating sequence OS Sd blank to indicate that the controller is performing Start of day SOD processing After a controller has successfully booted up its seven segment display should show the tray ID The amber Attention LED on the controller turns on and then turns off unless there is an error The green Host Link LEDs remain off until you connect the host cables Note The figure shows an example...

Страница 74: ...ce card overview on page 65 Requirements for adding upgrading or replacing a HIC on page 65 Prepare to upgrade host interface cards You prepare to upgrade host interface cards HICs by backing up the storage array s configuration database collecting support data and stopping host I O operations Then you can power down the controller shelf Before you begin You have scheduled a downtime maintenance w...

Страница 75: ...iated with volumes on the array Note The exact steps to stop host I O operations depend on the host operating system and the configuration which are beyond the scope of these instructions If you are not sure how to stop host I O operations in your environment consider shutting down the host Attention Possible data loss If you continue this procedure while I O operations are occurring the host appl...

Страница 76: ...ristband or you have taken other antistatic precautions Procedure 1 Label each cable that is attached to the controller canister 2 Disconnect all the cables from the controller canister Attention To prevent degraded performance do not twist fold pinch or step on the cables 3 If the HIC ports use SFP transceivers remove them Depending on what type of HIC you are upgrading to you might be able to re...

Страница 77: ...f Attention Always use two hands to support the weight of a controller canister If you are removing the controller canister from an HB5100 controller shelf a flap swings into place to block the empty bay helping to maintain air flow and cooling 7 Turn the controller canister over so that the removable cover faces up 8 Place the controller canister on a flat static free surface What to do next Go t...

Страница 78: ...Cs must be identical The presence of incompatible or mismatched HICs will cause the controllers to lock down when you apply power Procedure 1 Unpack the new HIC and the new HIC faceplate 2 Using a 1 Phillips screwdriver remove the four screws that attach the HIC faceplate to the controller canister and remove the faceplate 3 Align the three thumbscrews on the HIC with the corresponding holes on th...

Страница 79: ...r canister Reinstall controller canister You reinstall the controller canister into the controller shelf after installing the new host interface card HIC Procedure 1 Reinstall the cover on the controller canister by sliding the cover from back to front until the button clicks 2 Turn the controller canister over so that the removable cover faces down 3 With the cam handle in the open position slide...

Страница 80: ...troller canister in place 5 Reconnect all the cables you removed Attention Do not connect data cables to the new HIC ports at this time 6 Optional If you are upgrading HICs in a duplex configuration repeat all steps to remove the other controller canister remove the HIC install the new HIC and replace the second controller canister What to do next Go to Complete upgrading a host interface card 80 ...

Страница 81: ...ooted up its seven segment display should show the tray ID The amber Attention LED on the controller turns on and then turns off unless there is an error The green Host Link LEDs remain off until you connect the host cables Note The figure shows an example controller canister Your controller might have a different number and a different type of host ports Host Link LEDs Attention LED amber Seven s...

Страница 82: ... a problem occurs when you remove a controller you can use the saved file to restore your configuration a Open the Enterprise Management Window EMW for SANtricity System Manager on your management station b Select the storage array c Select Tools Execute Script d Type the following command in the text box save storageArray dbmDatabase sourceLocation onboard contentType all file filename In this co...

Страница 83: ... HICs in a duplex configuration repeat all steps to remove the second controller canister install the second HIC and reinstall the second controller canister Remove controller canister You remove the controller canister so you can add the new host interface card HIC When you remove a controller canister you must disconnect all cables Then you can slide the controller canister out of the controller...

Страница 84: ...le until it releases and then open the cam handle to the right to release the controller canister from the shelf The following figure is an example of an HB5100 controller shelf Controller canister Cam handle The following figure is an example of an HB5200 controller shelf 84 ...

Страница 85: ...w HIC Before you begin You have an ESD wristband or you have taken other antistatic precautions You have a 1 Phillips screwdriver You have one or two HICs based on whether you have one or two controllers in your storage array The HICs must be compatible with your controllers About this task Attention Possible loss of data access Never install a HIC in an HB5000 controller canister if that HIC was ...

Страница 86: ...he three thumbscrews on the HIC with the corresponding holes on the controller and align the connector on the bottom of the HIC with the HIC interface connector on the controller card Be careful not to scratch or bump the components on the bottom of the HIC or on the top of the controller card 6 Carefully lower the HIC into place and seat the HIC connector by pressing gently on the HIC Attention P...

Страница 87: ...emoved previously What to do next Go to Reinstall controller canister Reinstall controller canister After installing the host interface card HIC you reinstall the controller canister into the controller shelf Procedure 1 Turn the controller canister over so that the removable cover faces down 2 With the cam handle in the open position slide the controller canister all the way into the controller s...

Страница 88: ...ock the controller canister in place 4 Reconnect all the cables you removed Attention Do not connect data cables to the new HIC ports at this time 5 Optional If you are adding HICs to a duplex configuration repeat all steps to remove the second controller canister install the second HIC and reinstall the second controller canister What to do next Go to Place controller online duplex 88 ...

Страница 89: ...inking or off depending on the host interface Host Link LEDs Attention LED amber Seven segment display 2 Bring the controller online using either SANtricity System Manager or the Enterprise Management Window s EMW script editor To use SANtricity System Manager a Select Hardware b If the graphic shows the drives select Show back of shelf c Select the controller you want to place online d Select Pla...

Страница 90: ...n LEDs are on confirm that all cables are correctly seated and check that the HIC and the controller canister are installed correctly If necessary remove and reinstall the controller canister and the HIC Note If you cannot resolve the problem contact technical support 5 Collect support data for your storage array using SANtricity System Manager a Select Support Support Center Diagnostics b Select ...

Страница 91: ...onversion You are using out of band management You cannot use in band management to complete this procedure You have obtained the necessary hardware for the conversion Your Fujitsu Sales Representative can help you determine what hardware you need and help you order the correct parts If you are attempting to change the baseboard host ports of your storage array and it currently uses dual protocol ...

Страница 92: ...will lose data access and data loss might occur Converting from iSCSI to FC Asynchronous Mirroring requires both the local storage array and the remote storage array to use the same protocol If you are currently using Asynchronous Mirroring with the baseboard ports you must deactivate Asynchronous Mirroring before changing the protocol Refer to the online help for SANtricity System Manager to dele...

Страница 93: ...rces tab locate and select the Storage Array Profile link 4 Type SFP in the text box and click Find 5 For each SFP listed in the Storage Array Profile locate the entry for Supported data rate s 6 Refer to the table to determine whether you can reuse the SFPs as follows Supported data rate s SFP type Supported protocol 16 Gbps 10 Gbps 4 Gbps Dual protocol FC 16 Gbps 4 Gbps iSCSI 10 Gbps 10 Gbps 10 ...

Страница 94: ...ct Support Support Center b With the Support Resources tab selected scroll to the View top storage array properties section c Locate the Chassis Serial Number and copy this value to a text file 2 Locate the feature pack submodel ID a From the SANtricity System Manager select Support b Select the Support Center tile c On the Support Resources tab locate and select the Storage Array Profile link d T...

Страница 95: ... baseboard ports 362 iSCSI baseboard ports SGL 2SB ZEX13 362 iSCSI baseboard ports 360 FC baseboard ports 5GI 4TB ZW3HL Table 2 Encryption Capable Feature Activation Codes Starting configuration Ending configuration Controller Submodel ID Baseboard Ports HIC Ports Controller Submodel ID Baseboard Ports HIC Ports Feature Activation Code 361 FC SRP UGG XSB ZCZKU 362 iSCSI iSER SGL 2SB ZEX13 363 iSCS...

Страница 96: ... or NVMe FC IGR IIK ZDBRB 360 FC iSER LG8 JUB ZATLD 361 FC SRP LGA 3UB ZBAX1 362 iSCSI iSER NGF 7UB ZE8KX 363 iSCSI SRP 3GI QUB ZFP1Y 383 Not Available NVMe IB 403 Not Available NVMe RoCE or NVMe FC 5G7 RIK ZL5PE 360 FC iSER BGC UIK Z03GR 361 FC SRP LGF EIK ZPJRX 362 iSCSI iSER PGJ HIK ZSIDZ 363 iSCSI SRP 1GM 1JK ZTYQX 382 Not Available NVMe IB JGH XIK ZQ142 403 Not Available NVMe RoCE or NVMe FC ...

Страница 97: ...3KW 368 iSCSI SRP 4GX ZVB ZNJVD 384 Not Available NVMe IB TGS WVB ZKL9T 365 FC iSER 405 Not Available NVMe RoCE or NVMe FC WGC GJK Z7PU2 365 FC iSER WG2 3VB ZQHLF 367 iSCSI iSER QG7 6VB ZSF8M 368 iSCSI SRP PGA PVB ZUWMX 384 Not Available NVMe IB CG5 MVB ZRYW1 366 FC SRP 405 Not Available NVMe RoCE or NVMe FC 3GH JJK ZANJQ 365 FC iSER PGR IWB Z48PC 366 FC SRP 9GU 2WB Z503D 368 iSCSI SRP SGJ IWB ZJF...

Страница 98: ...VWB ZFZEN 368 iSCSI SRP 4GE FWB ZGGQJ 385 Not Available NVMe IB 405 Not Available NVMe RoCE or NVMe FC NG1 WKK ZLFAI 365 FC iSER MG6 ZKK ZNDVC 366 FC SRP WG9 JKK ZPUAR 367 iSCSI iSER NGE MKK ZRSW9 368 iSCSI SRP TGG 6KK ZT9BU 384 Not Available NVMe IB AGB 3KK ZQBLR 405 Not Available NVMe RoCE or NVMe FC 385 Not Available NVMe IB JGJ PKK ZUQG2 Note If your controller submodel ID is not listed contac...

Страница 99: ...e that no I O operations are occurring between the storage array and all connected hosts For example you can perform these steps Stop all processes that involve the LUNs mapped from the storage to the hosts Ensure that no applications are writing data to any LUNs mapped from the storage to the hosts Unmount all file systems associated with volumes on the array Note The exact steps to stop host I O...

Страница 100: ...2 Under Add ons select Change Feature Pack 3 Click Browse and then select the feature pack you want to apply 4 Type CHANGE in the field 5 Click Change The feature pack migration begins Both controllers automatically reboot twice to allow the new feature pack to take effect The storage array returns to a responsive state after the reboot is complete 6 Confirm the host ports have the protocol you ex...

Страница 101: ... array see Cabling ETERNUS AB HB Series hardware to install cables and SFPs Then follow the instructions in the Linux express configuration Windows express configuration or VMware express configuration to complete the setup for each protocol Procedure 1 Configure the switches You should configure the switches used to transport iSCSI traffic according to the vendor s recommendations for iSCSI These...

Страница 102: ...umes or start using block volume What to do next Your host protocol conversion is complete You can resume normal operations Complete iSCSI to FC conversion If you previously had iSCSI host ports and you converted to FC you might need to modify your existing configuration to support FC The following procedure is only applicable if no FC HIC is present About this task This task applies only if you a...

Страница 103: ...host port identifier settings g Repeat these steps to add and remove any additional host port identifiers 4 Reboot the host or perform a rescan so that the host properly discovers mapped storage 5 Remount volumes or start using block volume What to do next Your host protocol conversion is complete You can resume normal operations Complete IB iSER to from IB SRP NVMe over InfiniBand NVMe over RoCE ...

Страница 104: ...NO EVENT SHALL FUJITSU BE LIABLE FOR ANY DIRECT INDIRECT INCIDENTAL SPECIAL EXEMPLARY OR CONSEQUENTIAL DAMAGES INCLUDING BUT NOT LIMITED TO PROCUREMENT OF SUBSTITUTE GOODS OR SERVICES LOSS OF USE DATA OR PROFITS OR BUSINESS INTERRUPTION HOWEVER CAUSED AND ON ANY THEORY OF LIABILITY WHETHER IN CONTRACT STRICT LIABILITY OR TORT INCLUDING NEGLIGENCE OR OTHERWISE ARISING IN ANY WAY OUT OF THE USE OF T...

Страница 105: ...k FUJITSU FUJITSU logo and ETERNUS are trademarks of Fujitsu All other trademarks are the property of their respective owners https www fujitsu com global products computing storage eternus trademarks html 105 ...

Страница 106: ...documentation and receive update notifications The latest version of this document and the latest information related to this device are available at the following site https www fujitsu com global support products computing storage manuals list html If necessary refer to the manuals for your model 106 ...

Страница 107: ... with the utmost attention to detail However Fujitsu shall assume no responsibility for any operational problems as the result of errors omissions or the use of information in this manual Fujitsu assumes no liability for damages to third party copyrights or other rights arising from the use of any information in this manual The content of this manual may not be reproduced or distributed in part or...

Отзывы: