27
G e t t i n g t o K n o w Y o u r L i f e B o o k
REMOVING AND INSTALLING
MODULAR DEVICES
There are three ways to remove and install modular
devices in the Flexible Bay:
■
Cold-swapping: swapping devices while your
notebook is powered off.
■
Warm-swapping: swapping devices while your
notebook is in suspend mode.
■
Hot-swapping: swapping devices while your
system is active using BaySwap
™
software.
Cold-swapping
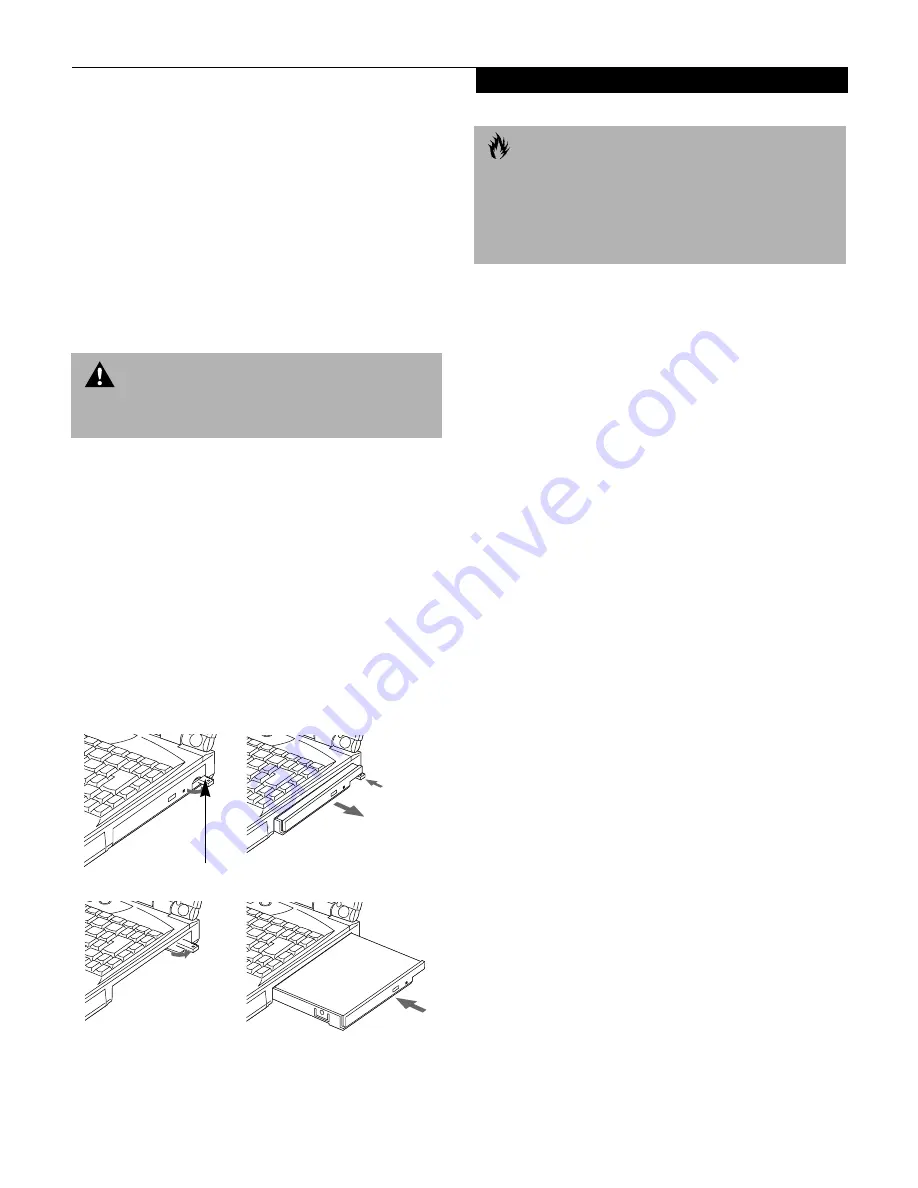
To cold-swap modular devices in your Flexible Bay
follow these easy steps: (Figure 2-21)
1. Close any open files.
2. Shutdown your notebook.
3. Pull out the Flexible Bay release latch and then
press the latch in to release the modular device.
This will push your device out slightly allowing
you to remove the device.
4. Slide your device out until it is clear of the bay.
This will require light force.
Figure 2-21 Removing/Installing a device in the Flexible Bay
5. Slide the device you are installing into your
notebook until it clicks into place.
6. It is now safe to turn your notebook back on.
7. You can now access and use the device.
Your notebook will automatically detect the new device
and activate it within your system. The drive letters
associated with the device will be created and listed
under My Computer and Windows Explorer.
Warm-swapping
To warm-swap devices in your Flexible Bay follow these
easy steps: (Figure 2-21)
1. Close any open files.
2. Put your notebook into suspend mode
3. Pull out the Flexible Bay release latch and then
press the latch in to release the device. This will
push your device out slightly allowing you to
remove the device.
4. Slide your device out until it is clear of the bay.
This will require light force.
5. Swap the modular device.
6. Press the Suspend/Resume button to return your
notebook to normal operation. You can now access
and use the device.
Your notebook will automatically detect the new device
and activate it within your system. The drive letters
associated with the device will be created and listed
under My Computer and Windows Explorer.
W A R N I N G
You should never leave your Flexible Bay empty when
the notebook is in operation.
Flexible Bay Release Latch
C A U T I O N
Be careful aligning and seating devices in the bay. If the
fit is incorrect, you may damage the bay or the device.
If the device does not move easily in the bay, remove it,
and check for dirt or foreign objects. It will require a
firm push to latch the device in place.
Содержание E Series
Страница 1: ...S E R I E S E The Power And Choices You Demand User s Guide ...
Страница 9: ...L i f e B o o k E S e r i e s ...
Страница 10: ...1 P r e f a c e Section One Preface Preface About This Guide 3 Fujitsu PC Contact Information 3 Warranty 3 ...
Страница 11: ...2 L i f e B o o k E S e r i e s S e c t i o n O n e ...
Страница 13: ...4 L i f e B o o k E S e r i e s S e c t i o n O n e ...
Страница 45: ...36 L i f e B o o k E S e r i e s S e c t i o n T w o ...
Страница 47: ...38 L i f e B o o k E S e r i e s S e c t i o n T h r e e ...
Страница 57: ...48 L i f e B o o k E S e r i e s S e c t i o n T h r e e ...
Страница 59: ...50 L i f e B o o k E S e r i e s S e c t i o n F o u r ...
Страница 79: ...70 L i f e B o o k E S e r i e s S e c t i o n F o u r ...
Страница 81: ...72 L i f e B o o k E S e r i e s S e c t i o n F i v e ...
Страница 97: ...88 L i f e B o o k E S e r i e s S e c t i o n F i v e ...
Страница 99: ...90 L i f e B o o k E S e r i e s S e c t i o n S i x ...
Страница 103: ...94 L i f e B o o k E S e r i e s S e c t i o n S i x ...
Страница 105: ...96 L i f e B o o k E S e r i e s S e c t i o n S e v e n ...
Страница 109: ...100 L i f e B o o k E S e r i e s S e c t i o n S e v e n ...
Страница 110: ...G l o s s a r y Section Eight Glossary ...
Страница 111: ...L i f e B o o k E S e r i e s S e c t i o n E i g h t ...
Страница 117: ...108 L i f e B o o k E S e r i e s S e c t i o n E i g h t ...


