background image


FUJITSU DL3100 

D-12 

User’s Manual


3. Set printer IP address to be the same net segment as 

PC IP address in step 2. Disconnect DLMENU after 

the Ethernet parameters are setup. The printer restarts 

automatically.   

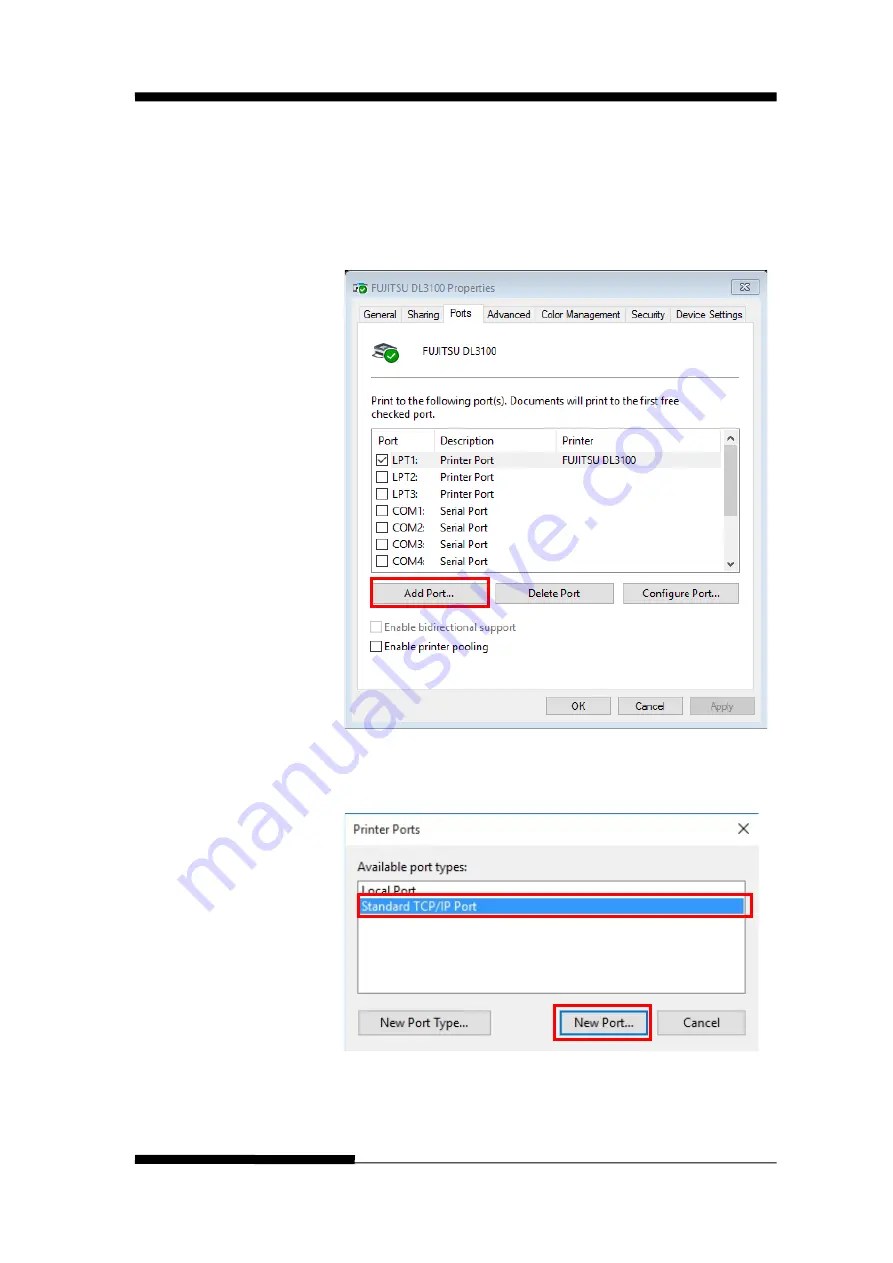
Follow following instructions to add the print port in 

the driver. 


4. Click “Add Port…” in step 3. Below window will pop 

up. 


Содержание DL3100

Страница 1: ...FUJITSU DL3100 DOT MATRIX PRINTER USER S MANUAL ...

Страница 2: ...red as contemplated for general use including without limitation general office use personal use household use and ordinary industrial use but is not designed developed and manufactured as contemplated for use accompanying fatal risks or dangers that unless extremely high safety is Secured could lead directly to death personal injury severe physical damage or other loss hereinafter High Safety Req...

Страница 3: ...television reception which can be determined by turning the equipment off and on the user is encouraged to try to correct the interference by one or more of the following measure Reorient or relocate the receiving antenna Increase the separation between the equipment and receiver Connect the equipment into an outlet on a circuit different from that to which the receiver is connected Consult the de...

Страница 4: ... Deutschland Das Gerät ist nicht für die Benutzung im unmittelbaren Gesichtsfeld am Bildschirmarbeitsplatz vorgesehen Um störende Reflexionen am Bildschirmarbeitsplatz zu vermeiden darf dieses Produkt nicht im unmittelbaren Gesichtsfeld platziert werden ...

Страница 5: ...IMITED Printed in Japan All rights reserved No part of this manual may be reproduced or translated stored in a database or retrieval system or transmitted in any form or by any means electronic mechanical photocopying recording or otherwise without the prior written permission of Fujitsu Isotec Limited FUJITSU is a registered trademark and Fujitsu Creative Faces is a trademark of Fujitsu Limited C...

Страница 6: ...e table of contents and chapter introductions to locate information This manual has several chapters a glossary and an index CHAPTER A lists supplies and additional documentation and information available from your dealer or authorized Fujitsu representative Fujitsu offices are listed at the end of the manual This manual covers model DL3100 a 80 column printer Each model has a 100 120 M33342A 220 ...

Страница 7: ...loading paper and selecting print features in detail Chapter 5 Printer Setting Changes describes how to change the printer s optional settings such as print features hardware options and top of form Most settings only affect print features such as the typestyle and page format Note that certain settings directly affect hardware and software compatibility Chapter 6 Customized Form explains the cust...

Страница 8: ...e correctly CAUTION A CAUTION indicates that damage to the printer may result if you do notfollow a procedure correctly NOTE A NOTE provides how to tips or suggestions to help you perform a procedure correctly NOTEs are particularly useful for first time users For Experienced Users If you are familiar with this printer or with dot matrix printers in general this information will help you use the m...

Страница 9: ...ibited action The image in or beside this symbol expresses the prohibited action the example on the left indicates that disassembly is prohibited Indicates a direction that must be observed The image in this symbol shows the direction the example on the left shows the direction in which a power plug is disconnected from an outlet Caution Hot This symbol and accompanying statement indicate a risk o...

Страница 10: ...n a humid or dusty area in an area with explosive fumes an area with poor ventilation or close to a fire Otherwise electric shock or fire may result Use only one of the power cords included with this product for this product Do not use any other power cord for this product Otherwise electric shock or fire may result Do not use this product in an area exposed to a high level of moisture such as a b...

Страница 11: ... area such as on a slope Otherwise the printer may fall or topple possibly resulting in personal injury Do not leave the printer in an area exposed to direct sunlight for a long time such as inside a car under the sun or any other area subjected to high temperatures Otherwise the printer surface heats up possibly melting covers or resulting in other deformities or the inside of the printer may bec...

Страница 12: ... the plug does not fit securely in the outlet receptacle Using the power cord in that condition may result in electric shock or fire Do not insert the power cord into an outlet or turn on the power to the printer when any of its covers has been removed Otherwise electric shock or fire may result Prevent foreign objects such as metal shards and inflammable materials from being inserted or dropped i...

Страница 13: ...your printer dealer Continued use of the printer in that condition may result in electric shock or fire Customers who use the printer near children should take especial care regarding this point If the printer is dropped or a cover is damaged turn off the power to the printer by using the power switch and disconnect the power plug from the outlet Then contact your printer dealer Continued use of p...

Страница 14: ... wrap the printer with a cloth or anything else while it is operating Otherwise heat accumulates possibly resulting in fire Do not use the power cord with it bunched together Otherwise heat accumulates possibly resulting in fire If the printer operates when the front cover is unclosed immediately turn the printer off and unplug the power code from wall outlet Continued use of the printer in that c...

Страница 15: ...may result Note that continuous forms that are fed in the reverse direction continuously may come off the paper feed tractors Operate the printer with the paper thickness set to the appropriate paper thickness Use only an original ribbon cassette that is specified as suitable by Fujitsu Textile fibers accumulate on components inside the printer and parts of the roller so clean these parts regularl...

Страница 16: ...Print Gap Lever 3 2 Friction Feed Handling 3 3 Tractor Feed Handling 3 4 Continuous Paper Placement 3 6 Tips on Paper Handling 3 7 CHAPTER 4 CONTROL PANEL OPERATION 4 1 LED Indicators 4 3 Control Panel Keys 4 4 Panel Operation 4 7 Online State 4 8 Setup State 4 9 Power on State 4 11 CHAPTER 5 PRINTER SETTING CHANGES 5 1 System Setup 5 2 Paper Setup 5 4 Interface Setup 5 10 Character Setup 5 12 Oth...

Страница 17: ...aper Handling Problems and Solutions 8 4 Operating Problems and Solutions 8 6 Printer Failures 8 7 Diagnostic Functions 8 8 Getting help 8 8 CHAPTER A SUPPLIES AND OPTIONS A 1 Supplies A 1 CHAPTER B PRINTER AND PAPER SPECIFICATIONS B 1 Physical Specifications B 1 Functional Specifications B 2 Performance Specifications B 5 Paper Specifications B 7 CHAPTER C COMMAND SETS C 1 ESC P2 Emulation Comman...

Страница 18: ...FUJITSU DL3100 xvi User s Manual ...

Страница 19: ...DE UNPACKING GUIDE If this is your first printer you should read the entire chapter before attempting to use the printer In this chapter you will learn how to Select a good location for the printer Unpacking the Printer Know the name of the printer components ...

Страница 20: ...und the printer Do not block the airvents on the front left and right sides of the printer Do not place the printer in direct sunlight or near heaters Make sure that the room is well ventilated and free from excessive dust Do not expose the printer to extremes of temperature and humidity Use only the power cord supplied with the printer or recommended by your dealer Do not use an extension cord Do...

Страница 21: ...nter out of the cardboard box and remove the remaining packaging material 4 Check the printer for any visible transport damage and missing items If you find any transport damage or if any accessories are missing please contact your dealer The following items are included Printer Paper feed knob Sheet feeder Power cord Ribbon cartridge USB cable CD ROM Quick Start Guide Using different cable accord...

Страница 22: ...aterials from the printer as follows 1 Open and remove the top covers of the printer following the below picture 2 Remove the shipping cardboard from around the print head 3 Rotate the paper feed knob to make it fix with the latch And then press it to lock ...

Страница 23: ...der slightly and push it to the corresponding positioning slot on both sides of the printer until it can no longer move forward If you use the continuous forms remove the sheet feeder install the sheet feeder downward after paper loading until you heard click the installation is in place ...

Страница 24: ...FUJITSU DL3100 1 6 User s Manual PRINTER COMPONENTS Please for the explanation of each parts see the table of next page Sub Guide ...

Страница 25: ...ge Help to tear off printed pages without wasting paper Control Panel Shows printer status for printer setup Each key on the control panel has different function of course you also can get many new functions by pressing different keys at the same time or performing different combinations of keys Paper Select Lever Two positions continuous forms single sheet paper Paper Feed Knob Manual feed or ver...

Страница 26: ... printer power ON Printable Condition OFF Unprintable Condition Print Head The print head become extremely hot during printer operation and remain so immediately afterwards Do not touch these parts until sufficient time has passed to allow them to cool Otherwise burns or personal injury may result ...

Страница 27: ...sy to install and set up This chapter tells you how to set up the printer and start printing right away In this chapter you will learn how to Install Ribbon Install the single sheet feeder into the rear of the printer Connecting the Interface Cable Connecting the Power Supply Installing the Windows Driver ...

Страница 28: ...ON HOT The print head and metal frame is hot during printing or immediately after printing Do not touch them until it cools down 1 Ensure the power to the printer is off Open the printer s cover backward and remove it upward 2 Adjust the lever forward to the maximum gear that is Ribbon gear ...

Страница 29: ...bon frame to install it properly 4 Pull out the ribbon guide stuck on the ribbon case with holding both ends of the ribbon guide 5 Install the ribbon guide stuck behind the print head turn the ribbon cartridge knob in the clockwise direction and move the carriage left and right to ensure the carriage and ribbon fabric is taut ...

Страница 30: ...emoval 1 Eject any paper loaded in the printer 2 Turn off the printer power 3 Open and remove the cover 4 Set the gap lever to the most open position labeled RIBBON 5 Move the carriage to the middle Be careful not to touch the print head if printing had just been performed as the print head may be hot 6 Remove the ribbon frame from the print head 7 Use fingers to take hold of the handle on the rib...

Страница 31: ...way assure having removed the fanfold paper out of the rear tractor paper way by pressing Load Eject Key Then switch the paper select lever to Single As shown in the picture below unfold the Paper Guides first Then Tilt the sheet feeder slightly and push it to the corresponding positioning slot on both sides of the printer until it can no longer move forward ...

Страница 32: ... THE INTERFACE CABLE The USB port is located at the rear of the printer IMPORTANT Make sure the printer and the computer are switched off before connecting or disconnecting the interface cable to prevent electrical damage to the interface ports ...

Страница 33: ...eck the rating plate at the back of the printer Contact your dealer if the setting is incorrect Never switch on the printer if the voltage setting is incorrect This may result in electrical damage to the printer Make sure that the power switch is in the O off position Connect the power cord to the power inlet of the printer Connect the power cord plug to a mains socket Switch on the printer ...

Страница 34: ...vers refer to Printer Driver Installation Giude or Readme txt of the printer driver to be installed These printer drivers run with ESC P2 emulation Be sure to specify ESC P2 emulation for the printer mode The DL3100 printer driver is a printer driver for monochrome printing The color data printing result may differ from its print preview or the monochrome data printing result Printer Driver Instal...

Страница 35: ...JITSU DL3100 User s Manual 2 9 1 Select the installation document dlsetup in the driver folder double click it The following window will appears click OK 2 Select Add a Printer Driver package and click OK ...

Страница 36: ...owing window appears choose the Always trust software click Install 4 Connect the printer to the computer and switch on the printer When the printer power on it will install the DL3100 driver automatically When the installation is finished click ok ...

Страница 37: ...JITSU DL3100 User s Manual 2 11 5 You can find you printer in the print device in your computer Right click and then select the Printer properties Click the Print Test Page can print the Driver Test Page ...

Страница 38: ...FUJITSU DL3100 2 12 User s Manual ...

Страница 39: ...nclude envelopes and non continuous multipart forms Continuous forms include labels and multipart forms fed into the printer using the forms tractors The printer is able to print 1 5 plies multipart paper This chapter explains how your printer uses paper Topics covered are Adjusting the Print Gap Lever Friction Feed Handling Tractor Feed Handling Continuous Paper Placement Tips on paper handling ...

Страница 40: ...ver is on the left side of the printer inside the top cover Take care to adjust the print gap lever to a suitable position whenever you change the number of copies being printed Using the wrong print gap may cause print head damage or paper jams Paper type Weight g m2 ply Gap lever position Single sheet 2 ply 45 70 1 3 ply 34 70 3 4 ply 34 70 4 5 ply 34 55 5 Change ribbon RIBBON ...

Страница 41: ...single sheet feeder 5 Adjust the right paper guide to the width of the paper used 6 Insert a sheet of paper Make sure that the bottom edge of the paper engages snugly with the platen Please push the paper in manually if the paper does not feed in while the friction roller is running 7 The paper should advance automatically to the print position The printer is now ready to print in the online state...

Страница 42: ...he print gap lever if necessary 4 Raise the tractor doors and fit the first 3 paper holes onto the left tractor pins Close the left tractor door In the same way install the paper on the right tractor 5 Adjust the left and right tractor to the width of the paper until the paper is flat Do not stretch the paper too taut Press the tractor locking to lock the tractor ...

Страница 43: ...ttention If you want to use continuous paper make sure that the sheet feeder is not standing If the sheet feeder is in state it may hinder the continuous paper feed and cause a paper jam Attention In case of aligning the guide to the position in the 0 mm the left end starting position is 0 mm Adjust it to align to the printing position Refer to CHAPTER B PRINTER AND PAPER SPECIFICATIONS for the pr...

Страница 44: ...eet feeder The tolerance should be less than 3 cm Attention If you want to use continuous paper make sure that the sheet feeder is not standing If the sheet feeder is in state it may hinder the continuous paper feed and cause a paper jam 3 Front and back positioning The distance between the rear of printer and the wall should be more than 60cm To avoid paper jam the distance between the continuous...

Страница 45: ...se paper that is wrinkled or curled at the edges Do not use paper with staples or metal parts Do not use paper with unpredictable variations in thickness such as paper with partial multilayers paper with embossed printing and labels with the backing sheet exposed Store paper in a clean dry environment ...

Страница 46: ...FUJITSU DL3100 3 8 User s Manual ...

Страница 47: ...anual 4 1 4 CHAPTER 4CONTROL PANEL OPERATION CONTROL PANEL OPERATION This chapter describes the following everyday printing operations LED Indicators Control Panel Keys Panel Operation Online State Setup State Power on State ...

Страница 48: ...LEDs L1 L4 The meaning and application of each switch and LED are described below pages Attention The LED may sometimes light when the platen knob rotates or the carrier moves even when the power is OFF Do not unplug or plug in the interface cable when the LED is lit ...

Страница 49: ...icates continuous paper is at tear off position otherwise it indicates the selected font See table 4 1 table 4 1 Font Selection Label L2 State L3 State Tear Off Blink Blink Draft Off Off Draft Condensed Off On Roman Off Blink Sans Serif On Off Courier On On Prestige On Blink Script Blink Off Others see Menu setting Blink On 3 Online LED On The printer is in online state and ready to receive data f...

Страница 50: ...tarts on the next TOF by pressing any key or receiving print data from the host When online this key will move any loaded continuous paper to the tear off position When in setup state this key is used to select the desired font 2 LF FF Key Pressing this key will feed paper one line forward By holding down this key the printer will initially feed a few lines then perform a form feed continuous pape...

Страница 51: ...heets it ejects the form on the platen When paper is loaded pressing this key will eject the paper single sheet mode or park the paper continuous paper mode When paper is not loaded pressing this key will load the paper to the starting print position 4 Online Key Toggles between Online and Offline states This key switches the printer between online and offline states Printing is stopped when the p...

Страница 52: ...anual 5 Clear Buffer and Reset Key In offline state press switch S1 while holding S4 Clears the print buffer beeps once upon completion Pressing S1 longer initializes the printer to default settings Beeps 3 times upon completion ...

Страница 53: ...etup state In the Setup state the keys provide font selection micro feed and quiet mode printing To enter the Power On state the user holds down a key or a combination of keys while powering up the printer This state provides the following functions Hex dump Main Menu setup print Main Menu print lift time information Customize Form The followings describe the 3 states in details Legend A press and...

Страница 54: ... continuous paper mode or eject the form single sheet mode Load Eject S3 Load Automatically loads the paper according to path selection when no paper is on the platen Eject For rear tractor it retracts the form from the platen to allow users to install cut sheets NOTE Users have to toggle the path selection lever For cut sheets it ejects the form on the platen Online S4 L4 on or off Toggles betwee...

Страница 55: ...S4 L4 on Toggling to the Online state will cause the printer to go into a ready to print state Any changes made in Setup state will be saved permanently Lighting up L4 indicates the Online state Micro UP S3 Press S3 to micro feed paper up Micro Down S2 Press S2 to micro feed paper down Font Select S1 L2 L3 Refer to Table 4 1 for details ...

Страница 56: ...et the automatic silent mode print once print twice and print thrice Function Name Switch Operation LED Function Description Automatically determines the number of prints based on the segmentation mode S1 Press S1 Tearoff button can choose the silent mode the buzzer will call you can set the automatic silent mode print once print twice and print thrice print once Segmentation is invalid S1 print t...

Страница 57: ...ch off the power to terminate the hex dump Menu Setup EDS S1 Allows for Main Menu setting changes Please read the instructions printed on how to change settings when this mode is activated Refer the Chapter5 Printer Setting Changes EDS Electronic DIP Switch Self Test Status Page S4 Prints the printer settings and self test pattern Restore Factory Defaults S2 S4 Restore all settings to factory defa...

Страница 58: ...FUJITSU DL3100 4 12 User s Manual ...

Страница 59: ... Main Menu setup state Follow the instructions printed on how to make setting changes When a new setting is saved it is retained after the printer has been powered off The Printer Settings menu contains 8 sub menus System Setup Paper Setup Interface Setup Character Setup Other Setup Bi directional Alignment BlackMark Mode This chapter describes the following operations System Setup Paper Setup Int...

Страница 60: ... grids by graphics commands or slanted grids block graphics are not affected Enabled Vertical grids are continuous in all line spacing Dashed Horizontal grids are printed in dotted lines and vertical grids are not affected NoPrint Grids are not printed But nested grids by graphical commands above 2 levels deep are printed Zero 0 Ø 0 No slashed Zero 0 Ø Slashed Zero Ø LQ Text Quality LQ NLQ The LQ ...

Страница 61: ...int speed unchanged Standard The printer increases the impact force and reduces the print speed Enhance The printer prints with even stronger impact force and slower print speed Impact Normal Heavy Normal The print speed is faster causing head hot easily and the impact force is weaker Heavy The print speed is reduced resulting better thermal performance and copy capability Graphic Speed Normal Fas...

Страница 62: ...ne Compensation value added to Single Left Mrg Single Top Mrg 1 180inch 0 1 2 3 4 5 6 7 8 9 10 11 12 13 14 15 16 17 18 19 20 21 22 23 24 25 26 27 28 Compensation value added to Single Top Single Auto Load Disable 0 5sec 1sec 1 5sec 2sec Defines the setting time before a single sheet is loaded Disable Press the Load Eject key manually to load a single sheet Fanfold FormLen 2 5 11 4 3 3 5 11 3 4 5 5...

Страница 63: ...ea Only valid to fanfold Yes Blank lines between 2 pages No No blank lines between 2 pages Tear Auto Manual View Auto FF Auto Form Feed command from the host causes the printer to advance the paper to the tear off position Printing resumes on the TOF on next page Manual After the completion of a print job press a panel key to advance the paper to the tear off position View No incoming print data i...

Страница 64: ...etection of both Anti jam Detect paper jam only Anti Skew Detect paper skew only Valid Enables the detection of both Buzzer No Yes No Buzzer does not sound if out of paper Yes Buzzer sounds if out of paper Tear Position Invalid Detect Record This printer saves the tear off position before switched off After switched on the printer if any change in the tear off position and determines the start pri...

Страница 65: ...vances the paper to the tear off position BlackMark commands also see section 5 7 1D 0C Feeds paper to the print position designated by the black mark Advance the paper to the tear off position after printing 1C 28 4C 03 00 42 m m 0 feeds paper to the print position designated by the black mark m 1 feeds paper to the black mark tear off position Width 8 0inch PaperWidth 8 0inch The maximum print w...

Страница 66: ...If tear off was implemented and printing position is in lever area then the printer will press the lever If tear off was not implemented the printer will not press the lever Roll Paper No Yes In friction mode LF FF will not eject the paper and feed to next page Assume roll paper Single LF Adj Level D Level C Level B Level A Normal Level A Level B Level C Level D Graphic Set the line feed correctio...

Страница 67: ...gle carbonless copy paper Correct the line feed deviation when the line feed is approximately 1 inch If the printing position deviates in the upward direction correct it in the direction Regarding the correction quantity A is larger than D NOTE The Restore function cannot reset those options which are handled by the Single LF Adj Multi settings Single LF Adj Multi is correct when shipped Fanfold L...

Страница 68: ...ort Serial The printer can only use RS232C serial port Baud Rate 9600 19200 38400 4800 2400 1200 115200 This parameter chooses the transmission rate of RS232C serial interfaces Data Bit 8 7 8 The number of each bit is 8 7 The number of each bit is 7 Parity Check None Odd Even None Bidirectional transmission has no odd even check Odd Bidirectional transmission uses Odd parity Even Bidirectional tra...

Страница 69: ...K signal LPT STORBE Ctrl Rising Falling Rising Rising edge is valid Falling Falling edge is valid LPT BI Model SPP NIBBlE SPP LPT Bidirectional mode is SPP NIBBLE LPT Bidirectional mode is NIBBLE The following options can only be set when carrying the Ethernet interface Interface setup Valid Settings Function Interface Share USB Ethernet Share Printer can detect the type of input signal and activa...

Страница 70: ... Group 1 Group 2 The interpretation of ASCII codes between 0x80 0x9F Group 1 as control codes Group 2 as printable characters Int l Char Set USA France Germany UK Denmark I Sweden Italy Spain I Japan Norway Denmark II Spain II LatinAm Denmark China International character set selections HS Draft No Yes Yes Prints High Speed Draft when Draft font is selected Font Daft DraftCond Roman Sans Serif Cou...

Страница 71: ... CoaxTwinax New437 NewDig850 OldCode860 Flarro863 Hebrew865 CP1257 Ukraine866 Kazakhst866 Kamenicky Mazovia Baltic775 CROASCII Farsi Urdu GreekDEC ELOT928 UK_ASCII US_ASCII Swedish German Portuguese French Italian Norwegian Spanish SiemensTurk DECTurkish Tarama Code page selections 15cpi Style Small Normal Sets the height for 15CPI character Small prints in 1 8 height Normal prints in full height ...

Страница 72: ...mands are valid Print Speed Ctrl No Yes No Print speed commands are invalid Yes Print speed commands are valid Pitch Ctrl No Yes No Ignores CPI commands Yes CPI commands are valid Font Ctrl No Yes No Ignores font select commands Yes font select commands are valid Uni Dir Ctrl No Yes No Uni Direction print commands are Yes Uni Direction print commands are valid ...

Страница 73: ...zel Ob Rand 1 0 1 1 8 2 3 4 5 6 7 8 9 10 11 12 13 14 15 16 17 18 19 20 21 22 23 24 25 26 27 28 29 30 31 32 33 34 35 36 37 38 39 40 41 42 43 44 45 46 47 48 49 50 51 52 53 54 55 56 57 58 59 60 61 62 63 64 65 66 Definiert Einzel Unt Rand 0 1 6 1 4 1 3 1 2 2 3 3 4 1 Definiert Einzel Li Rand 0 1 2 3 4 5 6 7 8 9 10 Definiert Einzel Ob Rand Fein 0 1 2 3 4 5 6 7 8 9 10 11 12 13 14 15 16 17 18 19 20 21 22 ...

Страница 74: ... Level A Level B Level C Level D Graphic Fanfold LF Adj Level D Level C Level B Level A Normal Level A Level B Level C Level D Graphic Single LF Adj Multi Level D Level C Level B Level A Normal Level A Level B Level C Level D Graphic Fanfold LF Adj Multi Level D Level C Level B Level A Normal Level A Level B Level C Level D Graphic Schnittstellen Setup Gültige Werte PnP Nein Ja USB ID Nein Ja Zeic...

Страница 75: ...an8 CoaxTwinax New437 NewDig850 OldCode860 Flarro863 Hebrew865 CP1257 Ukraine866 Kazakhst866 Kamenicky Mazovia Baltic775 CROASCII Farsi Urdu GreekDEC ELOT928 UK_ASCII US_ASCII Swedish German Portuguese French Italian Norwegian Spanish SiemensTurk DECTurkish Tarama 15cpi Stil Schmal Normal AGM IBM Nein Ja Erweitertes Setup Gültige Werte Formularlänge Strg Nein Ja Geschwindigkeit Strg Nein Ja Laufwe...

Страница 76: ...н Сверху oтступ Лист 1 0 1 1 8 2 3 4 5 6 7 8 9 10 11 12 13 14 15 16 17 18 19 20 21 22 23 24 25 26 27 28 29 30 31 32 33 34 35 36 37 38 39 40 41 42 43 44 45 46 47 48 49 50 51 52 53 54 55 56 57 58 59 60 61 62 63 64 65 66 oлpeделeн Снизу oтступ Лист 0 1 6 1 4 1 3 1 2 2 3 3 4 1 oлpeделeн Слева oтступ Лист 0 1 2 3 4 5 6 7 8 9 10 oлpeделeн Веpx отс Л Тонко 0 1 2 3 4 5 6 7 8 9 10 11 12 13 14 15 16 17 18 1...

Страница 77: ... Level C Level B Level A Normal Level A Level B Level C Level D Graphic Fanfold LF Adj Level D Level C Level B Level A Normal Level A Level B Level C Level D Graphic Single LF Adj Multi Level D Level C Level B Level A Normal Level A Level B Level C Level D Graphic Fanfold LF Adj Multi Level D Level C Level B Level A Normal Level A Level B Level C Level D Graphic Настройка интерфейс Правильные знач...

Страница 78: ...ASCII Abicomp Roman8 CoaxTwinax New437 NewDig850 OldCode860 Flarro863 Hebrew865 CP1257 Ukraine866 Kazakhst866 Kamenicky Mazovia Baltic775 CROASCII Farsi Urdu GreekDEC ELOT928 UK_ASCII US_ASCII Swedish German Portuguese French Italian Norwegian Spanish SiemensTurk DECTurkish Tarama Cпocoб пeчaтc 15 cpi Meпкий Обычный AGM IBM НET Да Другие настройки Правильные значения длинa формyляp Ctrl HET Да ско...

Страница 79: ...o Margine Sup Foglio 1 0 1 1 8 2 3 4 5 6 7 8 9 10 11 12 13 14 15 16 17 18 19 20 21 22 23 24 25 26 27 28 29 30 31 32 33 34 35 36 37 38 39 40 41 42 43 44 45 46 47 48 49 50 51 52 53 54 55 56 57 58 59 60 61 62 63 64 65 66 Definito Margine Infer Foglio 0 1 6 1 4 1 3 1 2 2 3 3 4 1 Definito Regola foglio a SX 0 1 2 3 4 5 6 7 8 9 10 Definito Regola Sup Foglio 0 1 2 3 4 5 6 7 8 9 10 11 12 13 14 15 16 17 18...

Страница 80: ... Level A Normal Level A Level B Level C Level D Graphic Fanfold LF Adj Level D Level C Level B Level A Normal Level A Level B Level C Level D Graphic Single LF Adj Multi Level D Level C Level B Level A Normal Level A Level B Level C Level D Graphic Fanfold LF Adj Multi Level D Level C Level B Level A Normal Level A Level B Level C Level D Graphic Setup IF Impostazioni Valide PnP No Si ID USB No Si...

Страница 81: ...ASCII Abicomp Roman8 CoaxTwinax New437 NewDig850 OldCode860 Flarro863 Hebrew865 CP1257 Ukraine866 Kazakhst866 Kamenicky Mazovia Baltic775 CROASCII Farsi Urdu GreekDEC ELOT928 UK_ASCII US_ASCII Swedish German Portuguese French Italian Norwegian Spanish SiemensTurk DECTurkish Tarama Stile 15 CPI Piccolo Normale AGM IBM No Si Altri Setup Impostazioni Valide Comando lunghezza No Si Comando velocità No...

Страница 82: ...26 27 28 29 30 31 32 33 34 35 36 37 38 39 40 41 42 43 44 45 46 47 48 49 50 51 52 53 54 55 56 57 58 59 60 61 62 63 64 65 66 Définie Listing Bord infér 0 1 6 1 4 1 3 1 2 2 3 3 4 1 Définie Listing Marge Gauche 0 1 2 3 4 5 6 7 8 9 10 Définie Listing Marge Haute 0 1 2 3 4 5 6 7 8 9 10 11 12 13 14 15 16 17 18 19 20 21 22 2 3 24 25 26 27 28 Listing Charg Auto Non Oui Configuration Système Paramètres Vali...

Страница 83: ... A Normal Level A Level B Level C Level D Graphic Fanfold LF Adj Level D Level C Level B Level A Normal Level A Level B Level C Level D Graphic Single LF Adj Multi Level D Level C Level B Level A Normal Level A Level B Level C Level D Graphic Fanfold LF Adj Multi Level D Level C Level B Level A Normal Level A Level B Level C Level D Graphic Config Interface Paramètres Valides PnP Non Oui USB ID No...

Страница 84: ...RASCII Abicomp Roman8 CoaxTwinax New437 NewDig850 OldCode860 Flarro863 Hebrew865 CP1257 Ukraine866 Kazakhst866 Kamenicky Mazovia Baltic775 CROASCII Farsi Urdu GreekDEC ELOT928 UK_ASCII US_ASCII Swedish German Portuguese French Italian Norwegian Spanish SiemensTurk DECTurkish Tarama Style15cpi Petit Normal AGM IBM Non Oui Autre réglage Paramètres Valides Ctrl LongPage Non Oui Ctrl Vitesse Impr Non ...

Страница 85: ...a S 1 0 1 1 8 2 3 4 5 6 7 8 9 10 11 12 13 14 15 16 17 18 19 20 21 22 23 24 25 26 27 28 29 30 31 32 33 34 35 36 37 38 39 40 41 42 43 44 45 46 47 48 49 50 51 52 53 54 55 56 57 58 59 60 61 62 63 64 65 66 Definido Margen Inf Hoja S 0 1 6 1 4 1 3 1 2 2 3 3 4 1 Definido Margen Izq Hoja S 0 1 2 3 4 5 6 7 8 9 10 Definido Margen Sup Hoja S 0 1 2 3 4 5 6 7 8 9 10 11 12 13 14 15 16 17 18 19 20 21 22 23 24 25...

Страница 86: ... Level A Level B Level C Level D Graphic Fanfold LF Adj Level D Level C Level B Level A Normal Level A Level B Level C Level D Graphic Single LF Adj Multi Level D Level C Level B Level A Normal Level A Level B Level C Level D Graphic Fanfold LF Adj Multi Level D Level C Level B Level A Normal Level A Level B Level C Level D Graphic Conf Interface Ajustes validos PnP No Si USB ID No Si Menu Carácte...

Страница 87: ...omp Roman8 CoaxTwinax New437 NewDig850 OldCode860 Flarro863 Hebrew865 CP1257 Ukraine866 Kazakhst866 Kamenicky Mazovia Baltic775 CROASCII Farsi Urdu GreekDEC ELOT928 UK_ASCII US_ASCII Swedish German Portuguese French Italian Norwegian Spanish SiemensTurk DECTurkish Tarama Estilo15cpi Pequeno Normal AGM IBM No Si Config Otros Ajustes validos Cmd Long de Hoja No Si Cmd Vel Impresión No Si Cmd Tamaño ...

Страница 88: ...9 10 11 12 14 A4 B4 Oto Tanım Tek kağıt Üst boşluk 1 0 1 1 8 2 3 4 5 6 7 8 9 10 11 12 13 14 15 16 17 18 19 20 21 22 23 24 25 26 27 28 29 30 31 32 33 34 35 36 37 38 3 9 40 41 42 43 44 45 46 47 48 49 50 51 52 53 54 55 56 57 58 59 60 61 62 63 64 65 66 Oto Tanım Tek kağıt Altkenar 0 1 6 1 4 1 3 1 2 2 3 3 4 1 Oto Tanım Tek kağıt Sol ayar 0 1 2 3 4 5 6 7 8 9 10 Oto Tanım Tek kağıt Üst ayar 0 1 2 3 4 5 6...

Страница 89: ...l D Level C Level B Level A Normal Level A Level B Level C Level D Graphic Fanfold LF Adj Level D Level C Level B Level A Normal Level A Level B Level C Level D Graphic Single LF Adj Multi Level D Level C Level B Level A Normal Level A Level B Level C Level D Graphic Fanfold LF Adj Multi Level D Level C Level B Level A Normal Level A Level B Level C Level D Graphic Arabirim Ayarı Geçerli ölçüler P...

Страница 90: ...man8 CoaxTwinax New437 NewDig850 OldCode860 Flarro863 Hebrew865 CP1257 Ukraine866 Kazakhst866 Kamenicky Mazovia Baltic775 CROASCII Farsi Urdu GreekDEC ELOT928 UK_ASCII US_ASCII Swedish German Portuguese French Italian Norwegian Spanish SiemensTurk DECTurkish Tarama 15cpi Biçimi Küçük Normal AGM IBM Hayır Evet Diğer Ayarlar Geçerli ölçüler Kğt Uzunluk Komutu Hayır Evet Baskı Hızı Komutu Hayır Evet ...

Страница 91: ...inido Margem Topo Folha 1 0 1 1 8 2 3 4 5 6 7 8 9 10 11 12 13 14 15 16 17 18 19 20 21 22 23 24 25 26 27 28 29 30 31 32 33 34 35 36 37 38 39 40 41 42 43 44 45 46 47 48 49 50 51 52 53 54 55 56 57 58 59 60 61 62 63 64 65 66 Definido Margem Inf Folha 0 1 6 1 4 1 3 1 2 2 3 3 4 1 Definido Margem Esq Folha 0 1 2 3 4 5 6 7 8 9 10 Definido Margem Dir Folha 0 1 2 3 4 5 6 7 8 9 10 11 12 13 14 15 16 17 18 19 ...

Страница 92: ...l B Level A Normal Level A Level B Level C Level D Graphic Fanfold LF Adj Level D Level C Level B Level A Normal Level A Level B Level C Level D Graphic Single LF Adj Multi Level D Level C Level B Level A Normal Level A Level B Level C Level D Graphic Fanfold LF Adj Multi Level D Level C Level B Level A Normal Level A Level B Level C Level D Graphic Conf Interface Valores válidos PnP Não Sim ID US...

Страница 93: ...5 BRASCII Abicomp Roman8 CoaxTwinax New437 NewDig850 OldCode860 Flarro863 Hebrew865 CP1257 Ukraine866 Kazakhst866 Kamenicky Mazovia Baltic775 CROASCII Farsi Urdu GreekDEC ELOT928 UK_ASCII US_ASCII Swedish German Portuguese French Italian Norwegian Spanish SiemensTurk DECTurkish Tarama Estilo 15cpp Pequeno Normal AGM IBM Não Sim Config Outros Valores válidos Cmd Tam de Folha Não Sim Cmd Vel Impress...

Страница 94: ...es the printer to locate its scanner preparing for identifying the black marks 2 Vertical offset of the first print line from the black mark called Distance Offset From Black Mark To Print Position later on the print makes use of this value to print the first line relative to the black mark 3 Vertical offset of the tear off edge from the black mark called Distance Offset From Black Mark To Tear Po...

Страница 95: ...rinter System Setup 2 Press the Next or Back keys to scroll forward or backward the sub menus till the printer shows BlackMark Mode 3 Press OK to go into the BlackMark menu The printer prompts Black Mark Adjustment Mode LF Next TEAR Back LOAD EJECT OK ONLINE Exit ONLINE LOAD EJECT Save and restart the printer Black Mark Physical Horizontal Position Press any key to eject the paper and load paper w...

Страница 96: ...er fails to scan the horizontal offset see the below picture it prompts you to repeat the above procedures If scanning is successful it prompts Successfully setup black mark parameters Distance Offset From Black Mark To Print Position 6 The last prompt above invites you to set the next parameter vertical offset of the first print line from the black mark Like other setting dialogs you have options...

Страница 97: ...ng the tear off position relative to the black mark Successfully setup black mark parameters Distance Offset From Black Mark To Tear Position 8 When you respond with OK to set the tear off position the printer prompts you to reload a black marked fanfold form Press any key to eject the paper and load paper with black mark in the Fanfold Path The printer reloads the form By default the form stops 5...

Страница 98: ...ment 3 Press Load Eject to confirm the current settings Due to Single paper text Single paper graphy and Multiayer paper are controlled by different instructions the printer will print Bi directional Alignment Single paper text The printer waits for instructions A If you need a Single paper text bidirection test and longitudinal correction press the Load Eject button to confirm the current setting...

Страница 99: ...s The printer will print TEAR 1 LF 1 LOAD EJECT OK ONLINE Back ONLINE LOAD EJECT Save and restart the printer Single paper text LQ 360DPI 2 Each press on LF FF the current value will add 1 Each press on Teat Off the current value will reduce 1 For example Press LF FF twice then press Load Eject to confirm the printer will print Single paper text LQ 360DPI 0 4 During the above steps the printer wil...

Страница 100: ...indicates Save the parameter setting LOAD EJECT or ONLINE OK LF Next Yes Press LF FF or Tear Off to choose Yes or No then press Load Eject or Online to confirm 7 After exiting the bidirection test and longitudinal correction mode select the printer parameter settings 8 When you finishing the setting you also can choose bidirection test and longitudinal correction the printout is following ...

Страница 101: ...ity graph 240DPI 1 Mutilayer paper LQ 360DPI 2 Mutilayer paper NLQ 180DPI 2 Mutilayer paper Draft 120DPI 1 Mutilayer paper High Draft 80DPI 4 Mutilayer paper Dual density graph 240DPI 1 Note a The adjustment of Single paper text Single paper graphyand Mutilayer paper is separate and does not affect each other ensuring that the adjustment is consistent with the application b In order to make the pr...

Страница 102: ...inter System Setup 2 Press the Next or Back keys to scroll forward or backward the sub menus till the printer shows Restore Factory Defaults 3 Press OK to go into restore factory default dialog The printer prompts Restore Factory Defaults Restore factory settings LOAD EJECT OK ONLINE Exit Yes 4 At this stage you have the option of OK to restore default setting or Exit to discard the restoration 5 ...

Страница 103: ...entation Pressing S4 suspends the printing When the hex dump has finished pressing S4 forces the printing of the last line of data as any line termination control code from host has no function Switch off the power to terminate the hex dump Self Test Status Page Prints the printer settings and self test pattern show as follow picture ...

Страница 104: ... double clicking the DLMENU Setup exe 2 Connect the printer to the system using USB or Parallel cable 3 Power up the printer 4 Run the tool from the Windows Start menu by selecting All Programs and then FUJITSU Printer Setup 5 For more information on how to use the tool go to the Help menu and select User Guide Note Ensure to disconnect the DLMENU before sending the printing data otherwise the dat...

Страница 105: ... to unload the conversation form from the printer 3 With the exception of measuring the form length for cut sheets always set the lever to the tractors position 4 For form length measurement insert the customized form from the proper paper path The other six settings are actually done on general fanfold forms not the actual customized form Fanfold paper gives direct visual results on the TOF botto...

Страница 106: ...rinter prompts Single sheet Form Length 3 You may skip to other customized settings by pressing Next or Back Once you press OK to continue with form length measurement the printer prompts A Press any key to clear the Setup Instructions Page from the printer Insert the Customized Page into the corresponding paper path Press Load Eject to load and measure the page length B The printer rolls over the...

Страница 107: ...rinter print out the measured length The measured form length is 11 0Inch approximately equal to 279mm accuracy of plus or minus 0 1 inches The measured value has been saved Remeasure LOAD EJECT OK ONLINE Exit Yes 5 At this stage If Load Eject is pressed an asterisk is appended to Yes and you should repeat the procedures for form length measurement as mentioned Or If you input Exit the printer sav...

Страница 108: ...ter 3 Follow the given prompt to unload the conversation form Ensure the lever is at position Then press the Load Eject key to load fanfold paper from tractors The top edge of the form initially aligns with the printer s tear off blade You may input 1 180 to adjust the TOF position When you get the desirable TOF press OK or Exit The printer prompts the customized TOF value The defined position is ...

Страница 109: ...e remaining operations are nearly the same as described in section 6 2 The only difference is to input 1 180 till you get the desirable bottom margin 1 After you follow through all the steps in 6 3 or you input Next three times in step 3 in 6 1 the printer prompts Left Margin 2 The remaining operations are nearly the same as described in section 6 2 The only difference is to input 1 180 till you g...

Страница 110: ...s to bypass the Single Sheet menu under Customize Form Follow step 1 in section 6 1 Customize Form LF Next TEAR Back LOAD EJECT OK ONLINE Exit ONLINE LOAD EJECT Save and restart the printer Single sheet Then hit Next instead to get into the fanfold parameter menus Tractor Paper Form Length Refer section 6 1 to 6 4 for details on customizing the form length TOF bottom margin and left margin for fan...

Страница 111: ...rints out Customize Form LF Next TEAR Back LOAD EJECT OK ONLINE Exit ONLINE LOAD EJECT Save and restart the printer Single sheet Then hit Next instead to get into the fanfold parameter menus Tractor Paper Form Length The printer waits for input Press LF FF button to select the setting item until the current setting is Tear Position and the current setting is confirmed according to the Load Eject b...

Страница 112: ...ding paper is finished the paper will automatically go to the tearing position and then the paper can be adjusted The functions of each button are as follows Tear Off reduce 1 180 inch LF FF add 1 180 inch Load Eject Prompt save Online Prompt save 5 Press Load Eject or Online the printer will print out The defined position is 16 4mm Save the parameter settings LOAD EJECT or ONLINE OK LF Next Yes P...

Страница 113: ...and forth clean the printer in the manner described in this chapter If the problem continues contact your dealer to determine whether lubrication may be necessary The housing and the top cover of the printer help protect it against dust dirt and other contaminants However paper produces small particles that accumulate inside the printer This section explains how to clean and vacuum the printer and...

Страница 114: ...ng Do not touch them until it cools down Use the following procedure to clean and vacuum the printer as required 1 Remove any paper from the printer Make sure that the power is off and then disconnect the printer power cord 2 Using a soft vacuum brush vacuum the exterior of the printer Also vacuum the cut sheet edge 3 Use a soft damp cloth to wipe the exterior of the printer including the cover A ...

Страница 115: ...age and shaft and surrounding areas You can easily slide the print head to the left or right when the power is off Be careful not to press too hard on the flat head cable that extends from the print head carriage 5 Re install the ribbon cartridge 6 Remove the single sheet feeder and clean the form tractors and the surrounding areas 7 Re install the single sheet feeder ...

Страница 116: ...r supplier and proceed as follows 1 Apply a small amount of platen cleaner to a soft cloth Avoid spilling liquid inside the printer CAUTION Do not use alcohol to clean the platen Alcohol maycause the rubber to harden 2 Place the cloth against the platen and manually rotate the paper feed knob 3 Repeat this procedure for each roller To dry the platen place a dry cloth against the platen and the rol...

Страница 117: ...TION HOT The print head and metal frame is hot during printing or immediately after printing Do not touch them until it cools down To replace the ribbon cassette 1 Turn off the printer Note If the power is turned off during or immediately after printing turn on the power again Verify that the print head has moved to the ribbon replacement position and then turn off the power again 2 Open the front...

Страница 118: ... ribbon guide 4 To remove the ribbon cassette pull the underside of ribbon cassette and carefully lift the cartridge out ofthe printer 5 Remove the ribbon guide blue part from the ribbon cassette Don t turn the ribbon feed knob before installation ...

Страница 119: ...he blue ribbon guide into the space in front of print head And then place the mounting pins both side of ribbon cassette on the slot of the printer cover And then push the ribbon cassette so that the ribbon cassette is installed horizontally ...

Страница 120: ...sure that the ribbon slack lightly If the ribbon is strained it will quirk when installation 8 Turn the ribbon feed knob clockwise to take up any slack in the ribbon 9 Close the front cover NOTE A Fujitsu ribbon cassette is recommended Don t use other cassettes If other cassettes are used operating problems or a damage of the print head may be caused ...

Страница 121: ...lems may occur You can solve many of these problems yourself Using this chapter If you encounter problems that you cannot resolve contact your dealer for assistance This chapter is organized as follows Solving problems Print quality problems Paper handling problems Operating problems Printer failures Diagnostic functions Getting help ...

Страница 122: ...ke sure that the print gap lever is set for the thickness of your paper Check for ribbon wear Replace the ribbon if necessary Check whether the tip of the print head is dirty Clean the head with a soft cloth if necessary The print head may need to be replaced The paper is blank Make sure that the ribbon cartridge is properly installed Make sure the gap lever is set corretly Printing is erratic or ...

Страница 123: ... and the setting of top margin is correct and enter the margin setting again Adjust the Top Margin setting in Page Setup menu if necessary Lines are double spaced instead of single spaced Change the Auto LF setting in the System Setup menu to No The printer overprints on the same line Change the Auto CR setting in the System Setup menu to No The next print line starts where the previous line ended...

Страница 124: ...thickness of your paper Make sure that the paper is not folded creased or torn Make sure that the left and right tractors are set so that the continuous forms are stretched taut When using continuous paper user must keep the sheed feeder across not upright Paper jams while printing Turn off the printer and remove the jammed paper Remove any obstructions from the paper path Make sure that the Print...

Страница 125: ...g single paper set Single Form Length to match the size of the paper used 3 Press the Load Eject switch when suction operation is not performed even if the single paper is set While printing on continuous paper is taking place the paper separates from the tractor or an error occurs in the paper feed operation When setting the paper on the tractor be careful not to apply an excessively high tension...

Страница 126: ...e printer is on but it will not print Verify the printer Online light condition If the Online light goes out the printer is offline Press the Online key can change to Online state If you use the interface cable make sure it is securely connected to both the printer and the computer Make sure paper is loaded Run the printer Status Page If printing executes normally the problem is caused by the inte...

Страница 127: ...line Buzzer Sound Print head too hot Flashing No change No change Flashing None Paper select lever error Flashing No change No change Flashing Continuous Paper jam Flashing No change No change On Once Paper End Flashing No change No change Off Once Carriage initial position Off Off Flashing Flashing Continuous Paper sensor failure Flashing No change No change Off Once Paper width problem Flashing ...

Страница 128: ...orrectly This function is useful to programmers or others who understand how to interpret hex dumps PRINTING ALIGNMENT ADJUSTMENT Allows you to check and if necessary correct the printer s vertical line print alignment in bi directional mode For details on using these functions please refer to chapters 4 and 5 GETTING HELP If you are not able to correct a problem using this chapter contact your de...

Страница 129: ... OPTIONS CHAPTER A SUPPLIES AND OPTIONS This chapter lists the supplies and options available for the printer Contact your dealer for information on ordering any of these items SUPPLIES Supplies Order Number Ribbon cassette Black ribbon KA02100 0201 ...

Страница 130: ...FUJITSU DL3100 A 2 Use s Manual ...

Страница 131: ...120V 10 50 60 Hz Power consumption 34 W Test pattern is specified in standard ISO IEC 10561 Power consumption of sleep mode 1 4W Interface Universal Serial Bus interface 2 0 Parallel interface Factory option RS232C Factory option LAN Factory option Data buffer size up to 256K bytes Download buffer Maximum 128K bytes Operating environment 5 to 38 C 20 to 80 RH no condensation Storage environment 20...

Страница 132: ...LQ 12cpi 15 24 dots Draft 12cpi 10 24 dots High speed draft 12cpi 10 24 dots LQ 15cpi 24 24 dots NLQ 15cpi 12 24 dots Draft 15cpi 8 24 dots High speed draft 15cpi 8 24 dots LQ 17 1cpi 21 24 dots NLQ 17 1cpi 11 24 dots Draft 17 1cpi 11 24 dots High speed draft 17 1cpi 11 24 dots LQ 20cpi 18 24 dots NLQ 20cpi 9 24 dots Draft 20cpi 9 24 dots High speed draft 20cpi 9 24 dots Paper handling Feed method...

Страница 133: ...including the original Command sets Epson ESC P2 emulations IBM 2390 Character sets 14 international character sets one legal character set Fonts Draft 10 12 15 17 1 20 cpi High Speed Draft 10 cpi Roman 10 12 15 17 1 20cpi and proportional OCR A 10cpi in NLQ and LQ OCR B 10cpi in NLQ and LQ Courier Gothic SanSerif Prestige elite Script Orator bold all in NLQ and LQ style and 10 12 15 16 6 17 1 20c...

Страница 134: ...FUJITSU DL3100 B 4 User s Manual Characters per line 10cpi 80cpl 12cpi 96cpl 15cpi 120cpl 17 1cpi 136cpl 20cpi 160cpl cpi characters per inch cpl characters per line ...

Страница 135: ...120dpi 360 120dpi 240 180dpi 120 360dpi 15cpi 450 120dpi 450 120dpi 300 180dpi 150 360dpi 17 1cpi 340 180dpi 340 180dpi 340 180dpi 170 360dpi 20cpi 400 180dpi 400 180dpi 400 180dpi 200 360dpi cpi characters per inch cps characters per second Line feed speed 41 6ms per line at 6 lines per inch Form feed speed 4 inches per second Ribbon life Up to 7 million characters ...

Страница 136: ...ada M33342B CE EMC EN55032 EN55032 Class A for 220 to 240VAC Europe Energy regulation Model Certification Regulation country M33342A Energy star ES2 0 ENERGY STAR Program Requirements for Imaging Enquipment Version 2 0 for 100 to 120VAC United States M33342B Wnergy star ES2 0 ENERGY STAR Program Requirements for Imaging Enquipment Version 2 0 for 220 to 240VAC United States Europe Harmful material...

Страница 137: ...sheets and continuous forms Feeding paper by friction single paper Printing area Pos Title Min Max mm Ins mm ins A Paper width 95 3 75 267 10 5 B Printable width 203 2 8 E Top margin 4 2 0 17 25 4 1 F Page length 76 3 364 14 3 G Bottom margin 4 2 0 17 H Left margin 3 0 0 12 I Right margin 3 0 0 12 G E H I printable area F A B K ...

Страница 138: ... 34 43 55 70 5P 34 43 55 Attention 1 Ream weight means weight of 1000 sheets of full sized paper 788 1091 Kg Attention 2 The ream weight of carbonless paper and paper with double size carbon at intervals will be different because they are made by different factory We will choose the paper that is close to the value in the table Attention 3 Add a carbon paper between papers with double size carbon ...

Страница 139: ...r Printing area Pos Title Min Max mm inches mm inches A Paper width 95 3 75 267 10 5 B Printable width 203 2 8 0 E Top margin 0 0 25 4 1 F Page length 101 6 4 363 2 22 G Bottom margin 0 0 H Left margin 0 scale position 12 7 0 5 I Right margin 0 scale position 12 7 0 5 G E A B F H I ...

Страница 140: ...55 70 3P 34 45 55 70 4P 34 45 55 70 5P 34 45 55 Carbon interleaved Attention 3 2P 30 40 45 55 70 3P 30 40 45 55 Attention 1 Ream weight means weight of 1000 sheets of full sized paper 788 1091 Kg Basis weight means paper weight in gramps per square meter Attention 2 The ream weight of carbonless paper and paper with double size carbon at intervals will be different because they are made by differe...

Страница 141: ...ser s Manual C 1 C COMMAND SETS CHAPTER C COMMAND SETS This chapter describes printer commands and their parameters This printer has three resident command sets ESC P2 Emulation Command List IBM Emulation Command List ...

Страница 142: ...This is a nonrecommended command use the ESC U command instead ESC Moving the print position Carriage return CR Line feed LF Form feed FF Tab horizontally HT Tab vertically VT Backspace BS Set absolute horizontal print position horizontal position nH 256 nL defined unit left margin 0 nH 127 0 nL 255 ESC nL nH Notes Set the defined unit with the ESC U command The default defined unit setting for th...

Страница 143: ...f it would move the print position outside the printing area Set absolute vertical print position vertical position mH 256 mL defined unit top margin position nL 2 nH 0 0 mL 255 0 mH 127 ESC V nL nH mL mH Notes Set the defined unit using the ESC U command The default defined unit for this command is 1 60 inch The new position is measured in defined units from the current top margin position Moving...

Страница 144: ...rtical print position to the top margin position on the next page single sheet paper Ejects the paper Advance print position ESC J n Advances the vertical print position n 180 inch 0 n 255 Notes ESC J does not affect the horizontal print position Moving the print position below the bottom margin position produces the following results Continuous paper moves the vertical print position to the top m...

Страница 145: ... condensed printing DC2 Set intercharacter space ESC SP Select character style ESC q n Turns on off outline and shadow printing according to the parameters below n 0 Turn off outline shadow printing 1 Turn on outline printing 2 Turn on shadow printing 3 Turn on outline and shadow printing Copy ROM to RAM Copies the data for the characters between 0 and 126 of the n typeface from ROM to RAM memory ...

Страница 146: ... Selects 10 cpi ESC P On 1 1 Selects 12 cpi ESC M 1 Off 0 0 Cancels proportional ESC p 0 On 2 2 Selects proportional ESC p 1 2 Off 0 0 Cancels condensed DC2 On 4 4 Selects condensed SI 3 Off 0 0 Cancels bold ESC F On 8 8 Selects bold ESC E 4 Off 0 0 Cancels double strike ESC H On 10 16 Selects double strike ESC G 5 Off 0 0 Cancels double width ESC W 0 On 20 32 Selects double width ESC W 1 6 Off 0 ...

Страница 147: ...ing proportional mode take effect when the printer exits proportional mode The printer automatically switches to LQ printing when proportional spacing is selected Select 10 cpi ESC P Select 12 cpi ESC M Select 15 cpi ESC g Set horizontal motion index HMI Fixes the character width HMI according to the following formula HMI nH 256 nL 360inch 0 nH 4 0 nL 255 HMI 3 00 inches ESC c nL nH Select typefac...

Страница 148: ... Near Letter quality printing Select Draft Super Draft ESC y n Selects draft super draft for ANK characters in accordance with the value for n n 00H draft setting 01H Super draft setting Notes If super draft is specified draft ESC x 0 should be selected Select user defined set ESC n Switches between normal and user defined characters as follows n 0 Normal ROM characters 1 User defined RAM characte...

Страница 149: ...characters a2 Space to the right of each proportional user defined character d1 dk Character data 0 n 127 0 m n LQ mode Draft mode 0 a1 37 0 a1 15 0 a0 a1 a2 42 0 a0 a1 a2 18 Normal characters Super subscript characters k 3Xa1 k 2Xa1 Notes The following maximum character widths are recommended heightXwidth Print quality 10cpi 12cpi 15cpi Proportional Draft Normal size 24x12 24x10 24x 8 Not Availab...

Страница 150: ...he set of characters printed for specific character codes as listed below n 0 USA 1 France 2 Germany 3 United Kingdom 4 Denmark I 5 Sweden 6 Italy 7 Spain I 8 Japan English 9 Norway 10 Denmark II 11 Spain II 12 Latin America Notes The characters printed for each international character set are listed below ...

Страница 151: ...0 PC864 Arabic 13 7 ISO_8859_7 14 0 PC866 Russian 24 0 PC861 Icelandic 25 0 BRASCII Braz Portuguese 26 0 Abicomp Braz Portuguese 27 0 MAZOWIA Poland 28 0 KAMENICKY 29 7 ISO 8859 7 Latin Greek 29 15 ISO 8859 15 32 0 Bulgaria 35 0 Roman 8 42 0 PC720 43 255 ISO 8859 1 44 0 PC858 45 0 PC771 46 255 ISO 8859 9 48 255 PC1250 49 0 PC1251 50 0 PC1252 51 0 PC1253 52 0 PC1254 55 0 PC1257 112 0 OCR B 127 1 IS...

Страница 152: ...108 255 ELOT_928 114 255 TABLE_1252 115 255 TABLE_1253 116 255 TABLE_1254 129 255 NEW_437 131 255 NEW_DIG_850 142 255 TABLE_866 148 255 TABLE_737 149 255 TABLE_864 150 255 FARSI 151 255 URDO 152 255 OLD_CODE_860 153 255 FLARRO_863 154 255 TABLE_865 157 255 BULGARIA_866 ...

Страница 153: ... character table to any character table Data and memory control Initialize printer ESC Cancel Line CAN Delete last character in buffer DEL Cancel MSB control Cancels any controls on the MSB bit number 7 set by the ESC or ESC commands printer then accepts all MSB data as is Notes This is a nonrecommended command most computer systems no longer require MSB control ESC Set MSB to 0 Sets the MSB bit n...

Страница 154: ...cs data ESC Setting the units ESC U nL nH m Set unit Sets the unit to m 3600 inch The printer uses this unit when moving the print position setting the page length and setting the top and bottom margins with the following commands ESC V ESC v ESC ESC ESC C ESC c nL 1 nH 0 m 5 10 20 30 40 50 60 Select 1 8 inch line spacing ESC 0 Select 1 6 inch line spacing ESC 2 Set n 180 inch line spacing ESC 3 n...

Страница 155: ...than the previous n ends tab setting like the NUL code Send an ESC D NUL command to cancel all tab settings The tab settings move to match any movement in the left margin A maximum of 32 horizontal tabs can be set Set vertical tabs ESC B n1 n2 nk NUL Sets vertical tab positions in the current line spacing at the lines specified by n1 to nk as measured from the top margin position 0 k 16 1 n 255 nk...

Страница 156: ...nit 22 Default Continuous paper None Single sheet paper top margin top of form position bottom margin last printable line Notes Measure both top and bottom margins from the top edge of the page Send this command before paper is loaded or when paper is at the top of form position Otherwise the current print position becomes the top margin position this results in undesirable contradictions between ...

Страница 157: ...dth Set left margin ESC l n Sets the left margin to n columns in the current character pitch as measured from the left most printable column 1 n 255 0 left margin right margin Control code character printing ESC nL nH d1 dk Print data as characters Prints data bytes d1 through dk as characters not control codes The amount of data to be sent is calculated as follows k nH 256 nL 0 nH 127 0 nL 255 En...

Страница 158: ...ion in dpi 720 360 180 3600 v dpi h Horizontal resolution in dpi 720 360 180 3600 h dpi m Vertical dot count rows of dot graphics nL nH Horizontal dot count columns of dot graphics according to the following formula nH INT horizontal dot count 256 nL MOD horizontal dot count 256 k Total number of data bytes according to the following formula k mX INT nHX256 nL 7 8 d During full graphics mode Graph...

Страница 159: ...10 360 360 1 8 or 24 Stylus COLOR only 5 5 720 720 1 with special paper Notes Use only one image density and do not change this setting once in raster graphics mode When MicroWeave is selected the image height m must be set to 1 Special coated stock paper available from EPSON is required when printing raster graphics at 720 dpi This command can be used only during graphics mode entered by sending ...

Страница 160: ... times the number of bytes required for each column see the table below 0 nL 255 0 nH 31 m 0 1 2 3 4 6 32 33 38 39 40 Dot density m Horizon tal density dpi Vertical density dpi Adjacen t dot printing Dots per column Bytes per column 0 60 60 Yes 8 1 1 120 60 Yes 8 1 2 120 60 No 8 1 3 240 60 No 8 1 4 80 60 Yes 8 1 6 90 60 Yes 8 1 32 60 180 Yes 24 3 33 120 180 Yes 24 3 38 90 180 Yes 24 3 39 180 180 Y...

Страница 161: ...his command use ESC 0 instead of this command The dot density printed with this command can be redefined with the ESC command Select 120 dpi graphics ESC L nL nH d1 d2 dk Prints bit image graphics in 8 dot columns at a density of 120 horizontal by 60 vertical dpi according to the following parameters nL nH Specify the total number of columns k of graphics data following according to the formula k ...

Страница 162: ... printer ignores the second continuous horizontal dot The dot density printed with this command can be redefined with the ESC command Select 240 dpi graphics ESC Z nL nH d1 d2 dk Prints bit image graphics in 8 dot columns at a density of 240 horizontal by 60 vertical dpi according to the following parameters nL nH Specify the total number of columns k of graphics data following according to the fo...

Страница 163: ...0 default 1 01 16 1 360 inch 2 02 16 2 360 inch 3 03 16 3 360 inch 2 Positive and negative p1 increase and decreases respectively the width of a space element 3 space width is the total space occupied by a narrows space a wide space and the gap between a character 4 Power on the printer INPRM or reset command restore the default space width 5 This command acts on subsequent received barcode comman...

Страница 164: ...pe A with check character d w width of narrow bar in 1 1440 inch unit Actual bar width is converted to 1 180 inch unit w Narrow bar width 1 19 2 dot 2 180 inch 20 27 3 dot 3 180 inch 28 4 dot 4 180 inch e h defines the narrow bar height in 1 1440 inch unit h 11 inch For actual printout a dot is 1 180 inch in height When the bar or the last portion is not a multiple of 24 dots the initial height is...

Страница 165: ... B 0 Printed 1 Blank 2 Position of flag characters for EAN UPC 3 0 Barcode s left centererd 1 Below barcode s left side 1 Bit 0 is ineffective for Codabar by default without check digit Usually define Bit 0 0 for EAN13 EAN8 UPC Type A UPC Type A with check character 2 Reserve additional XX spaces to print the flag character if bit 1 0 3 EAN13 EAN8 UPC Type A UPC Type A with check character can pri...

Страница 166: ...7 fixed Code 3 of 9 Numbers 0 9 Check Digit alphabet A Z included symbol SPACE 1 n 31 Start Stop Industrial 2 of 5 Numbers 0 9 Check Digit included Interlieved2 of 5 Numbers 0 9 1 n 32 UPC Type A Numbers 0 9 n 11 fixed UPC Type A with checkcharacter Numbers 0 9 n 11 fixed CODE 128 ASCII Code Check Digit included Start Code A B C 1 n 62 Code Set C 0 9 Check Digit not attached 1 n 63 Code Set C 2n 3...

Страница 167: ...vertically VT Tab vertically ESC VT Backspace BS Backspace ESC BS Automatic Line Feed ESC 5 n n 0 To end automatic line feed LF on carriage return CR CR CR 1 To begin automatic line feed LF on carriage return CR CR CR LF Move Current Print Position This command moves the current print position to the right in increments of 1 120 inch ESC d nL nH Current Print Position nH 256 nL Move Paper Vertical...

Страница 168: ...th Enable printer DC1 The DC1 control code ASCII 17 enables the printer to accept data for printing again after a disable printer instruction Disable printer Signals the printer to stop accepting data from the computer This control code has no effect on the parallel interface DC3 Cancel Data Clears current line buffer of data already received to print on the current line CAN Disable printer This c...

Страница 169: ...ks as init 00H The following is the basic initial condition for each init values init 00H The printer Condition is initialize to the user default setting The parm bytes overwrite the user default setting The download font is not cleared init 01H The printer Condition is initialized to the user default setting The parm bytes overwrite the user default setting The download font is cleared init 04H T...

Страница 170: ...This parameter specifies the parm conditions followed by this id The supported values of id are 03H 16H 23H 24H B1H and B4H If the id is any other value the parm bytes are ignored V03 id 03H 16H 23H 24H parm1 and parm2 are valid If the following parm are specified these parm are ignored See the following parm 1 and 2 tables parm1 bit ON OFF 7 Discard byte Ignore this byte Process this byte 6 Reser...

Страница 171: ...he character and the number of line spacing Use this printer command for Italic print Single high character Double high character Single wide character Double wide character Single line feed Double line feed Shadow for 239x Plus only Outline for 239x Plus only Notes You may combine these selections for example italic print with doublehigh double wide character and double line feed See the followin...

Страница 172: ...erline off Turn Overscore on off ESC _ n n 1 Turns Overscore on 0 Turns Overscore off Select Font and Pitch ESC I 2 0 fH fL This command allows you to vary the font and pitch type style within a file The fH and fL variables identify the pitch and font typestyle you want to print Follow table describe the fH and fL variables Decimal fH fL Hex fH fL Font and Pitch 0 11 00 0B Courier 10CPI 1 235 01 E...

Страница 173: ...1 208 01 D0 Presentor 12CPI 1 209 01 D1 Presentor 15CPI 1 210 01 D2 Presentor 17CPI 1 211 01 D3 Presentor 20CPI 1 35 01 23 Presentor 24CPI 0 199 00 C7 Presentor PS 0 5 00 05 Orator 10CPI 1 203 01 CB Orator 12CPI 1 204 01 CC Orator 15CPI 1 205 01 CD Orator 17CPI 1 206 01 CE Orator 20CPI 1 33 01 21 Orator 24CPI 0 198 00 C6 Orator PS 1 212 01 D4 Script 10CPI 1 213 01 D5 Script 12CPI 1 214 01 D6 Scrip...

Страница 174: ...lowing Decimal Hex Speed 0 0 No change 1 63 01 3F High draft 64 127 40 7F Draft 128 254 80 FE LQ 255 FF Default speed Score Select ESC 2 0 loc type This command selects several forms of overscore underscore and strikethrough To select loc loc Underscore Strikethrough Overscore Decimal 1 2 3 Hex 1 2 3 To select type type Cancel score Single line Double line Decimal 0 1 2 Hex 0 1 2 ...

Страница 175: ...ige 12 18 Normal LQ 17pi Courier 3 3 Normal LQ Proportional Couri 4 4 Downloaded 10 cpi DRAFT 0C 12 Downloaded 12 cpi DRAFT 14 20 Downloaded 17cpi DRAFT 6 6 Downloaded 10 cpi LQ 0E 14 Downloaded 12 cpi LQ 16 22 Downloaded 17 cpi LQ 7 7 Downloaded Proportional LQ Select bold font ESC E Cancel bold font ESC F Turn proportional mode on off ESC P n 0 Returns to current fixed character pitch 1 Selects ...

Страница 176: ... n2 define the number of characters to be defined as follows number of characters n1 n2 256 2 13 n3 is the character code of the first character in the sequence to be defined It is assumed that you are defining a sequence of characters whose code numbers increment by one for each character to be defined If bits 1 and 2 of n4 are 0 and bit 8 is set to 1 the bytes that make up the character definiti...

Страница 177: ...ank to the left of the defined character in proportional spacing mode Up to seven columns can be skipped Bits 1 to 4 of n5 specify the width in columns of the defined character in proportional spacing mode Up to fifteen columns can be used to define the character Downloaded characters are selected using the Esc I command and then printed by sending the appropriate character codes Select Code Page ...

Страница 178: ...ance moved when a line feed command is received Set n 72 or n 60 inch line spacing ESC A n This command sets line spacing in n 72 inch AGM No or n 60 inch AGM Yes increments To activate the line spacing use the printer command Activate Line Spacing for Text ESC 2 Set horizontal tabs ESC D n1 nk NULL This command sets up to 28 tabulation stops to be used with the printer command HT Horizontal Tabul...

Страница 179: ...tabulation stops in ascending order n1 n32 The last digit in the sequence must be a 0 to terminate the command 1 n 255 1 k 32 Set Default Tab Stops ESC R Setting the page format Set top of form ESC 4 Set page length in lines ESC C n The value of n is the number of lines you want to set as the page length and works in conjunction with the current line spacing Set page length in inches The value of ...

Страница 180: ...n position Use n2 to select the right margin position Control code character printing Print Characters from a Code Page ESC n1 n2 This command enables you to print characters from the All Character Code table n1 and n2 specify the number of characters to be printed The number of characters printed is 256 n2 n1 Control codes included in the character data are not executed Print one character ESC Th...

Страница 181: ...y Wires 0 0 60 8 1 1 120 8 2 2 120 8 3 3 240 8 8 8 60 24 9 9 120 24 11 0B 180 24 12 0C 360 24 data is the bit mapped graphics information The printhead moves at half the speed of mode 2 giving better resolution Select bit image ESC mode nL nH data When AGM mode is selected prints dot graphics in 8 24 dot columns mode is the same as the mode value of the command ESC g nL and nH identify the number ...

Страница 182: ...d graphics information Select 120 dpi double speed graphics ESC Y nL nH data Use this command to print dual density bit images at 120 dpi horizontally and 72 dpi vertically nL and nH identify the number of bytes in data data is the bit mapped graphics information Select 240 dpi graphics ESC Z nL nH data Use this command to print high density bit images at 240 dpi horizontally and 72 dpi vertically...

Страница 183: ...s 0 026 s specifies the space adjustment value 3 s 3 unit 1 360 inch v1 v2 specifies the height of barcode v1 v2 256 unit 1 180 inch v1 v2 256 288 c check digit control c Check Digit bit0 0 not computed 1 compute and print check digit bit1 0 print human readable characters 1 not printed bit2 Position of check digit for EAN 13and UPC A only 0 Center 1 Below bit3 Reserved bit4 Reserved bit5 Reserved...

Страница 184: ...d allows you to select a line spacing of n 72 Your selection does not take effect until you activate it with the Esc 2 command if AGM mode is setting to Yes this command sets the line spacing to n 60 n must be in the range 1 to 85 Notes If n is outside the range 1 to 85 the default line spacing 1 6 is selected ESC A n Move Paper Vertically Advances the paper in a vertical movement a distance of n ...

Страница 185: ...u can specify the interface selection mode so that the printer uses which interface or it can automatically select the interface from which it first recrives data This chapter provides information you may need for wiring your own interface cables or for programming computer to printer communications Most users do not need the information in this chapter To simply connect your printer to your compu...

Страница 186: ...al name Description 1 VBUS 5V power supply 2 D data 3 D data 4 S GND ground Transmission mode Full speed Maximum 12 Mbps High speed Maximum 480 Mbps USB interface connector diagram Note 1 Use a standard USB interface cable to connect the printer and the computer 2 USB Maximum length 2m ...

Страница 187: ...ost ACK acts as the output signal when the printer is ready for receiving new data after previous data is read and saved in DATA 1 DATA8 Normal state is high logic level After activating it turns to low logic level The pulse width is about 4 microseconds BUSY Signal to indicate that the printer is not ready for receiving data If the host ignores it and continues to send data the data will be lost ...

Страница 188: ...nly When the signal is set to low logic level and CR control code is implemented LF command will be added GND Signal to ground F GND Signal to connect to the base of the printer 5V Signal to connect to 5V output For maintenance only Max load current is 50mA INIT Reset signal to indicate the printer is initialized Normal state is high logic level while low logic level is effective The minimum pulse...

Страница 189: ... is received Clock and signal logic level Signal logic level Input high logic level 2 5V low logic level 0 0 8V Output high logic level 2 4 5V low logic level 0 0 4V Parallel interface connector diagram Note 1 Use a standard parallel interface cable to connect the printer and the computer The length should not exceed 2 meters Connect the 25P plug to the computer and connect the 36P plug to the pri...

Страница 190: ...ned frame length after the start bit Overflow error Before the data sent from the host to the UART and ready for printing send the data again Attention If the above error occurs print the corresponding error information Image errors will also be printed as image data Serial interface pin assignment Pin Signal name Description 1 Empty Empty 2 RXD Receive data 3 TXD Send data 4 DTR Data terminal rea...

Страница 191: ...D 7 Serial interface wiring diagram Note 1 The serial cable length should not exceed 15 meters 2 Make sure the Interface Setup selects serial interface and the settings are the same as PC communication port settings Shown as below ...

Страница 192: ...nter did not receive data the signal is MARK low level Pin 5 SGND Signal ground lines Signal ground XON XOFF RS 232C Pin2 RXD Receiving data Receiving the serial data sent from the host with this line so when no data is sent the host must be set to MARK Pin3 TXD Sending data Receiving the serial data sent from the host with this line so when no data is sent the host must be set to MARK Pin4 DTR Da...

Страница 193: ...NK ACK Amber LED 100Mbps No Signal line name DIR Function 1 TXO NIC HUB Transmit data 2 TXO NIC HUB Transmit data 3 RXI HUB NIC Receive data 4 5 6 RXI HUB NIC Receive data 7 8 Note Green LED Led is on indicates the link is connected Amber LED Led is flashing indicates the data is switching ...

Страница 194: ...area networks Its attributes are Hardware LAN Ethernet RJ45 Ethernet 100BASE TX with 100 Mbps IEEE802 3u 10BASE T with 10 Mbps IEEE802 3 Supported operating Systems Windows 10 Windows Server 2016 Windows 8 1 Windows Server 2012 R2 Windows 8 Windows Server 2012 Windows 7 Windows Server 2008 R2 Supported Protocols TCP IP Setup DLMENU ...

Страница 195: ...you want to set the Ethernet port you need to use USB to connect the DLMENU The use of Ethernet interface 1 Install Ethernet interface board into the printer Connect PC and the printer using the network cable Turn on the printer to connect DLMENU The user interface is shown as below 2 Click Ethernet in step 1 to display the parameter setup for Ethernet as below Parameters Function IP Address Print...

Страница 196: ... be the same net segment as PC IP address in step 2 Disconnect DLMENU after the Ethernet parameters are setup The printer restarts automatically Follow following instructions to add the print port in the driver 4 Click Add Port in step 3 Below window will pop up ...

Страница 197: ...JITSU DL3100 User s Manual D 13 5 Select Standard TCP Port in step 4 and click New Port Below window will pop up 6 Type in the printer IP address in step 5 and click Next The added port is shown as below ...

Страница 198: ...ld be connected with the router One is connected to PC while the other one is connected to the printer Enter the router interface through IE browser to view the IP address assigned to the printer then repeat the above steps 3 6 to add the printer IP port into the drive port Send the data to print when completed ...

Страница 199: ...FUJITSU DL3100 User s Manual E 1 E CHARACTER SETS CODE PAGES CHAPTER E CHARACTER SETS CODE PAGES CHARACTER SETS Standard character set 1 Standard character set 2 ...

Страница 200: ...FUJITSU DL3100 E 2 User s Manual IBM character set 1 IBM character set 2 ...

Страница 201: ...FUJITSU DL3100 User s Manual E 3 OCR A character set 1 OCR A character set 2 ...

Страница 202: ...FUJITSU DL3100 E 4 User s Manual OCR B character set 1 OCR B character set 2 ...

Страница 203: ...NCE ESC R CHR 1 GERMANY ESC R CHR 2 UK ESC R CHR 3 DENMARK 1 ESC R CHR 4 SWEDEN ESC R CHR 5 ITALY ESC R CHR 6 SPAIN 1 ESC R CHR 7 JAPAN ESC R CHR 8 NORWAY ESC R CHR 9 DENMARK 2 ESC R CHR 10 SPAIN 2 ESC R CHR 11 LATINAMERICA ESC R CHR 12 DENMARK NORWAY ESC R CHR 13 CHINA ESC R CHR 16 International character sets ...

Страница 204: ... 860 84 CP 861 94 CP 863 85 CP 864 8C CP 864 Extended 95 CP 865 86 CP 866 Cyrillic 8E CP 866 Bulgaria 9D CP 1250 70 CP 1251 71 CP 1252 72 CP 1253 73 CP 1254 74 8859 1 25 8859 1 SAP 2B 8859 2 26 8859 5 2A 8859 7 2D 8859 9 2E 8859 15 2F BRASCII 6D Abicomp 6E Roman8 4D Coax Twinax 4F New 437 81 New Dig 850 83 Old Code 860 98 Flarro 863 99 865 Hebrew 9A ...

Страница 205: ...66 Ukraine 8F 866 Kazakhstan 90 Kamenicky 91 Mazovia 92 CP 775 A6 CRO ASCII 3C Arabic Farsi 96 Arabic Urdu 97 Greek DEC 46 Greek ELOT 928 6C UK_ASCII 41 US_ASCII 42 Swedish 48 German 4B Portuguese 4C French 52 Italian 59 Norwegian 60 Spanish 5A SiemensTurk 9B DECTurkish 9C ...

Страница 206: ...FUJITSU DL3100 E 8 User s Manual CODE PAGE TABLES CP 437 CP 737 CP 850 ...

Страница 207: ...FUJITSU DL3100 User s Manual E 9 CP 851 CP 852 CP 857 ...

Страница 208: ...FUJITSU DL3100 E 10 User s Manual CP 858 CP 860 CP 861 ...

Страница 209: ...FUJITSU DL3100 User s Manual E 11 CP 863 CP 864 Extend 864 ...

Страница 210: ...FUJITSU DL3100 E 12 User s Manual CP 865 CP 866 Bulgaria 866 ...

Страница 211: ...FUJITSU DL3100 User s Manual E 13 CP 1250 CP 1251 CP 1252 ...

Страница 212: ...FUJITSU DL3100 E 14 User s Manual CP 1253 CP 1254 8859 1 ...

Страница 213: ...FUJITSU DL3100 User s Manual E 15 8859 1 SAP 8859 2 8859 5 ...

Страница 214: ...FUJITSU DL3100 E 16 User s Manual 8859 7 8859 9 8859 15 ...

Страница 215: ...FUJITSU DL3100 User s Manual E 17 BRASCII Abicomp Roman 8 ...

Страница 216: ...FUJITSU DL3100 E 18 User s Manual Coax Twinax New 437 New Dig 850 ...

Страница 217: ...FUJITSU DL3100 User s Manual E 19 Old Code 860 Flarro 863 Hebrew 865 ...

Страница 218: ...FUJITSU DL3100 E 20 User s Manual CP 1257 Ukraine 866 Kazakhstan 866 ...

Страница 219: ...FUJITSU DL3100 User s Manual E 21 Kamenicky Mazovia Baltic 775 ...

Страница 220: ...FUJITSU DL3100 E 22 User s Manual CRO ASCII Farsi Urdu ...

Страница 221: ...FUJITSU DL3100 User s Manual E 23 Greek DEC ELOT 928 UK_ASCII ...

Страница 222: ...FUJITSU DL3100 E 24 User s Manual US_ASCII Swedish German ...

Страница 223: ...FUJITSU DL3100 User s Manual E 25 Portuguese French Italian ...

Страница 224: ...FUJITSU DL3100 E 26 User s Manual Norwegian Spanish Siemens Turk ...

Страница 225: ...FUJITSU DL3100 User s Manual E 27 DEC Turkish Tarama ...

Страница 226: ...FUJITSU DL3100 E 28 User s Manual ...

Страница 227: ...1 F RESIDENT FONTS CHAPTER F RESIDENT FONTS This chapter provides print samples of the printer s nineteen resident fonts Roman 10 Sanserif 10 Courier 10 Prestige 10 Script 10 OCR B 10 OCR A 10 Orator 10 Draft 10 Gothic 10 Souvenir 10 ...

Страница 228: ...FUJITSU DL3100 F 2 Use s Manua ...

Страница 229: ...ilippines Phone 63 2 812 4001 Fax 63 2 817 7576 FUJITSU MALAYSIA SDN BHD Level 1 2 No 3505 Jalan Technokrat 5 Cyberjaya Selangor Darul Ehsan Malaysia 63000 Tel 60 3 8318 3700 Fax 60 3 8318 8700 PT FUJITSU INDONESIA OFFICES Wisma Kyoei Prince 10th Floor Jl Jend Sudirman Kav 3 4 Jakarta Indonesia 10220 Phone 62 21 570 9330 Fax 62 21 573 5150 FUJITSU VIETNAM LIMITED Unit 01 03 17th Floor Keangnam Han...

Страница 230: ...KA02100 Y890 01EN ...

Отзывы: